ASC Setup — Manage ASC Templates
Note
The following describes an opt-in feature for practices that have ambulatory surgery centers (ASCs). To enable this feature for your organization, contact your CSM. For more information, see ASC Setup: Enable ASC Features.
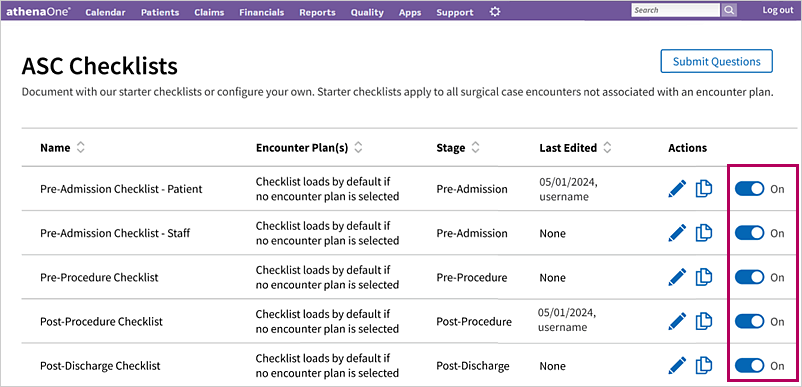
Ambulatory Surgery Center (ASC) features include a library of supporting templates, which determine the text that appears in documents at a given stage of a procedure. Use the ASC Checklists page (previously known as Ambulatory Surgery Template) to configure your own checklists or use athenaOne's provided starter checklists.
ASC Managers or Administrators: Review the following to enable the templates that appear for users or modify template content.
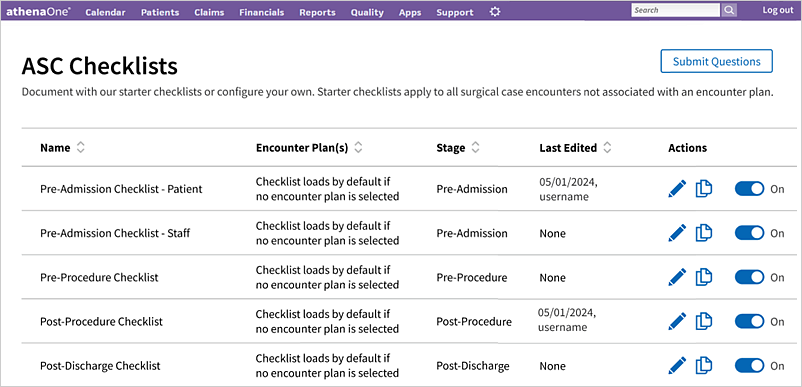
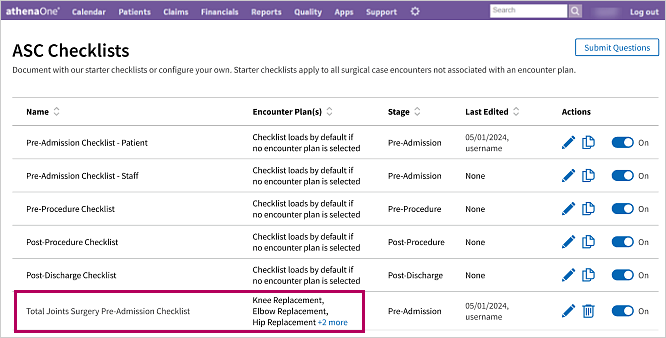
athenaOne enables the following starter checklists for all ASCs by default:
- Pre-Admission Checklist - Patient
- Pre-Admission Checklist - Staff
- Pre-Procedure Checklist
- Post-Procedure Checklist
- Post-Discharge Checklist
Starter checklists appear at the top of the ASC Checklists admin page. Checklists that you copy and configure appear below starter checklists.
| Term | Definition |
|---|---|
| Starter checklist | A checklist that athenaOne provides by default. |
| Local checklist | A copy of a starter checklist that you can tailor to your practice's needs. |
When copying a starter checklist, be sure to rename your local checklist to a unique, appropriate name before saving.
Best practice
If you make a copy of a starter checklist to create your own local checklist, we recommend you disable the starter checklist you copied from. Doing so avoids redundancy in the questions offered to your clinical staff during the workflow.
For example, if you create a copy of the Pre-Procedure starter checklist, but you don't disable the original Pre-Procedure starter checklist, then the Pre-Procedure starter checklist and your local copy of it will appear stacked on top of each other in the encounter.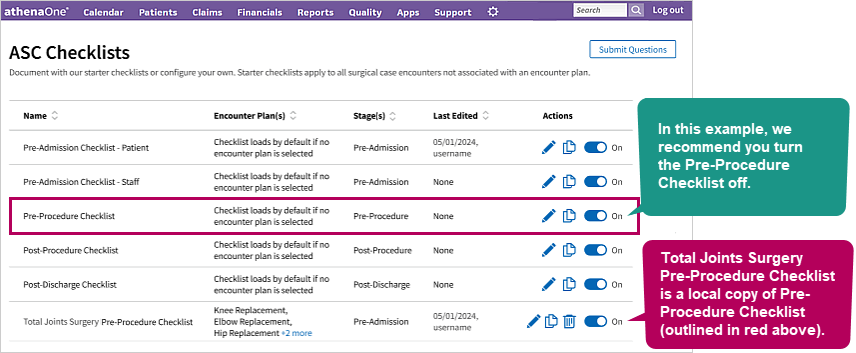
ASC Checklist Columns
Name
Use to view the name of each checklist.
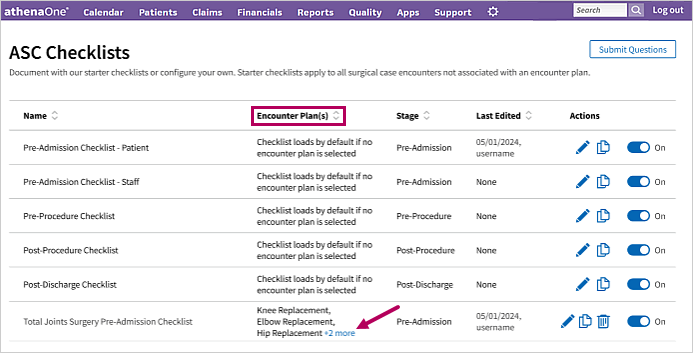
Encounter Plan(s)
- Use to view the encounter plan(s) a checklist appears in.
- If there are more than three associated encounter plans, athenaOne shows the first three and truncates the rest, displaying +1 more, +2 more, etc. depending on how many more associated encounter plans there are.
Stage
Use to view which stage the checklist is located in.
Last Edited
Use to view the username of the person who last edited a checklist and when they edited it.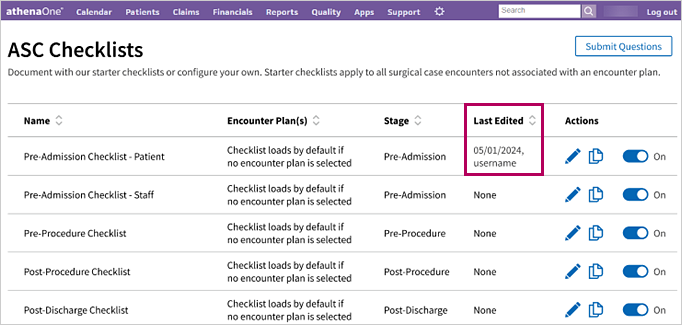
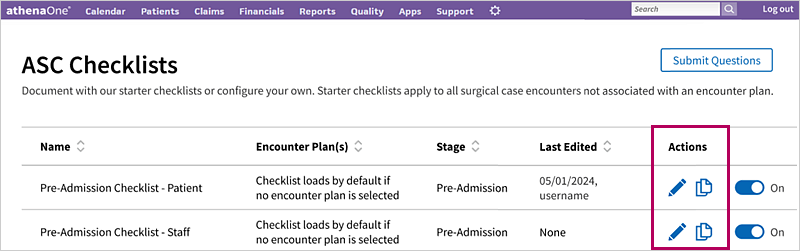
Actions
Use to edit, copy, or delete a checklist.
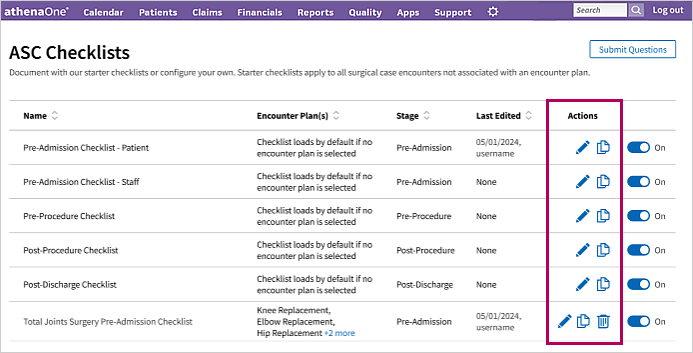
| Icon | Action |
|---|---|

|
Click to edit a checklist. |

|
Click to copy a checklist. |

|
Click to delete a checklist. |
Note
You can only delete checklists in your local table space. Starter checklists such as Pre-Procedure Checklist, Post-Procedure Checklist, Post-Discharge Checklists, etc. can only be edited or copied.
Configure Checklist
Clicking the edit icon or copy icon next to a checklist brings you to the revamped Configure Checklist page. From there, you can still enable, disable, or reorder the listed questions as usual. You can also mark questions as required to answer.

NEW  and UPDATED
  alerts appear on the ASC Checklists admin page and within the checklists themselves. These alerts reflect new or updated changes since you last visited the page.
Note
New questions are disabled by default — they do not show in the checklist until you set the Show in Checklist toggle to On. Updated questions remain the same depending on what they were set to prior (disabled questions stay disabled and enabled questions stay enabled).
If you mark a question as required, clinical staff must answer the question in order to sign and close the case.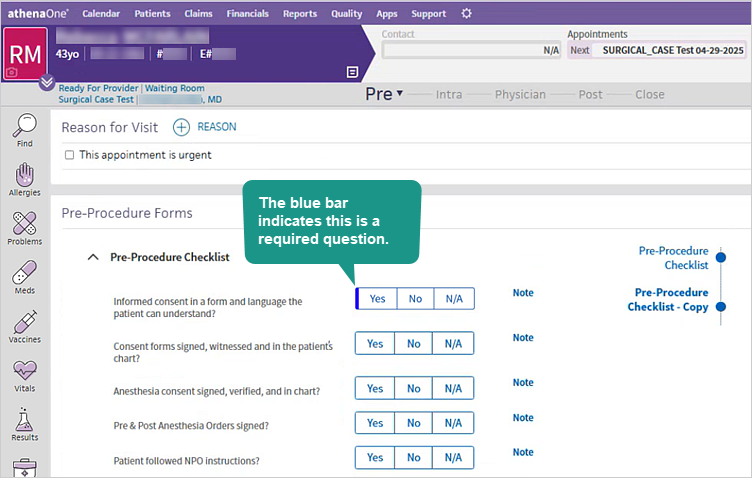
If you try to close the case without answering the required question(s), athenaOne displays an orange alert bar on the Close button. If you hover your cursor over the Close button, a reminder message appears, alerting you to answer all required questions.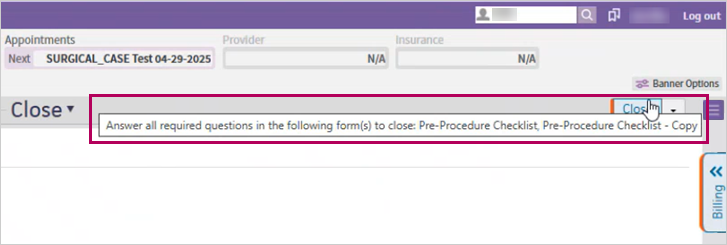
If you still proceed to click the Close button with the orange alert bar, athenaOne automatically brings you back to the first unanswered required question. A yellow alert bar appears next to the required question, indicating you still need to answer the question to close the case.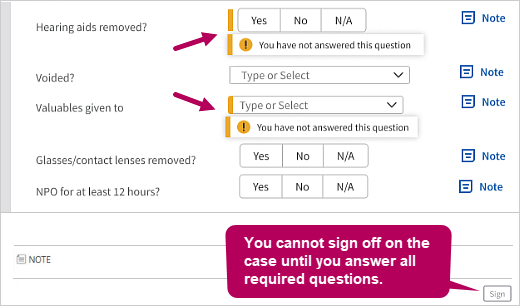
If you haven't answered all required questions, you cannot click the Sign button at the end of a checklist. Once you answer all required questions, the Sign button turns blue and becomes clickable.
Enable templates
- On the Main Menu, click Settings
 > Clinicals.
 - In the left menu, under Practice Links - Procedure Configuration, click ASC Checklists.
Tip: Alternatively, enter text in the search box.
The ASC Checklists page appears. - Click the toggle to the right of a template name to turn it On or Off. If you toggle a template Off, it won't appear to users.
Note
If you turn off all templates for a checklist, the following message appears when users access the checklist.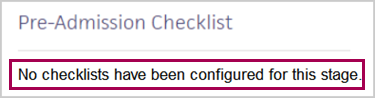
| If you create a local copy of a starter checklist and... | Then... |
|---|---|
| You don't disable the original starter checklist | Both the original starter checklist and the local copy of it appear in the surgical case (see caveat note below). |
| You disable the original starter checklist | Only the local copy you made of that starter checklist appears in the surgical case. |
| Note: However, if you create a local copy of a starter checklist and add it to an encounter plan, only the local copied checklist appears in the surgical case. This is the case whether you enable or disable the original starter checklist. | |
If you add a local checklist to an encounter plan, athenaOne automatically disables the original starter checklist. Only the attached local checklist appears in the affiliated section of the surgical case.
Note
While an encounter plan displays a local checklist if you add it, it still also displays the original starter checklists for any section (Pre-Admission, Post-Procedure, etc.) that does not have a locally copied checklist assigned to that same encounter plan. Read the following workflow scenario for an example.
Modify questions in checklist templates
- On the Main Menu, click Settings > Clinicals.
- In the left menu, under Practice Links - Procedure Configuration, click ASC Checklists.
Tip: Alternatively, enter text in the search box.
The ASC Checklists page appears. - To the right of a template, under the Actions column, click the edit icon .
The Configure Checklist page appears. - Under the Show in Checklist column, click the Yes or No toggle next to the question you want to show or hide in the checklist.
- Reorder questions as needed by clicking the six dots
 next to the question and dragging it above or below other questions.
Delete a checklist
-
On the Main Menu, click Settings
> Clinicals. -
In the left menu, under Practice Links - Procedure Configuration, click ASC Checklists.
Tip: Alternatively, enter text in the search box.
The ASC Checklists page appears. -
Under the Actions column, click the delete icon
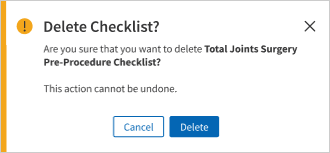
next to the checklist you want to delete.-
If the checklist appears in an encounter plan (or multiple encounter plans), the following pop-up message appears:
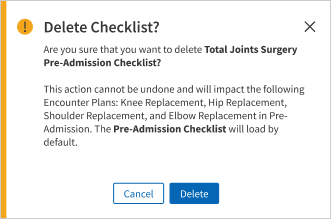
Note
Deleting a checklist will impact your encounter plan(s) that contains that checklist. If you create a separate encounter plan or modify an existing encounter plan, the deleted checklist will not appear as an option to be added. The appropriate starter checklist will load by default, or you can choose a different local checklist instead.
However, deleted checklists still appear in surgical cases where the encounter plan was already deployed. Deleting a checklist does not impact former use or display of that checklist in previous surgical cases.-
If the checklist does not appear in any encounter plan, the following pop-up message appears:
-
-
Click Delete.
Copy a checklist
-
On the Main Menu, click Settings
> Clinicals. -
In the left menu, under Practice Links - Procedure Configuration, click ASC Checklists.
Tip: Alternatively, enter text in the search box.
The ASC Checklists page appears. -
Under the Actions column, click the copy icon
next to the checklist you want to copy.
The Configure Checklist page appears. The name of the checklist you copied along with "[Copy]" auto-populates the Name field.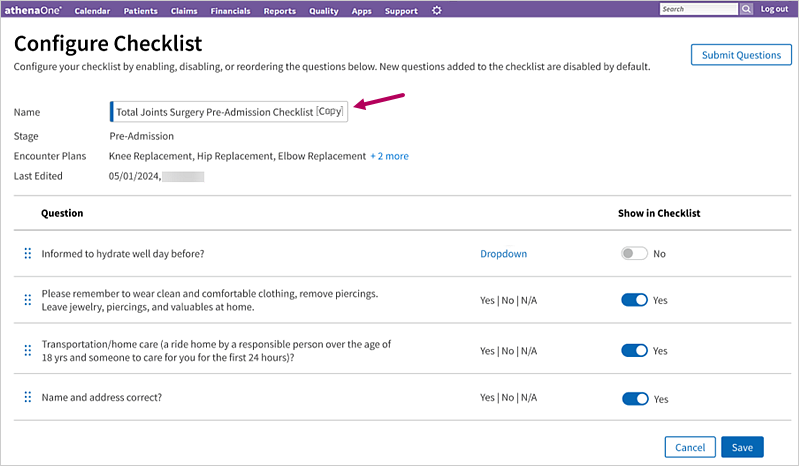
-
Name — Enter a new name for the checklist.
-
Under the Answer Required column, click the Yes or No toggle next to the question you want to make required.
-
Under the Show in Checklist column, click the Yes or No toggle next to the question you want to show or hide in the checklist.
-
Reorder questions as needed by clicking the six dots
next to the question and dragging it above or below other questions.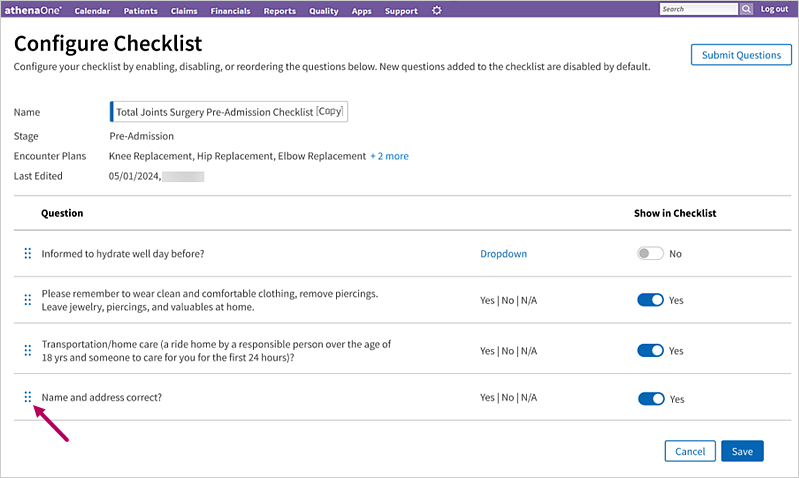
-
Click Save.
Note
If you try to save a copied checklist by only deleting "[Copy]" from the name, the following pop-up message appears: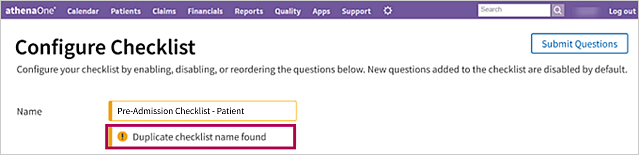
You must rename the checklist to a unique, appropriate name before saving.
Once you finish making your changes to a checklist and click Save, a pop-up message appears, prompting you to go straight to the Encounter Plans admin page to add the checklist to the appropriate encounter plans.
Add a checklist to an encounter plan
-
Click Go To Encounter Plans from the Checklist Added pop-up message.
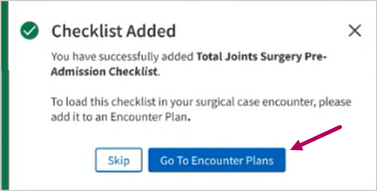
The Encounter Plans admin page appears.
Note
Alternatively, you can access the Encounter Plans admin page by the following:
-
On the Main Menu, click Settings
> Clinicals. -
In the left menu, under Practice Links - History/Intake, click Encounter Plans.
Tip: You could also enter text in the search box.
-
Click the edit icon
 next to the encounter plan you want to add the checklist to.
 -
Under Plan Actions, select the checklist you want to add to the encounter plan.
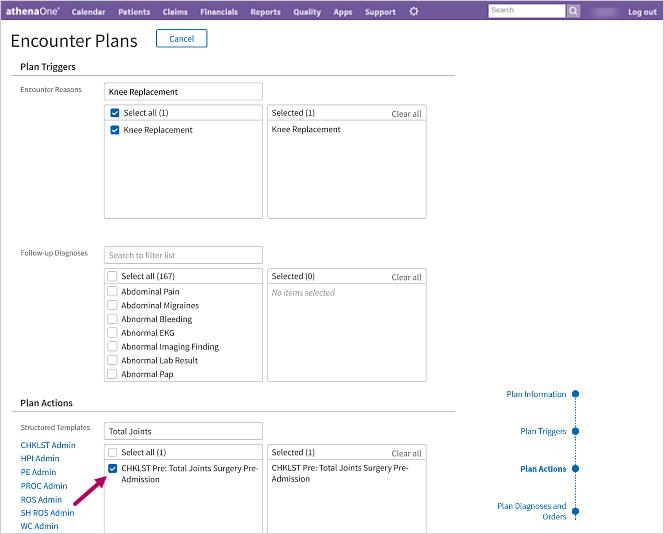
Note
If you want to return to the ASC Checklist admin page, click CHKLST Admin under Plan Actions to the left of the structured templates.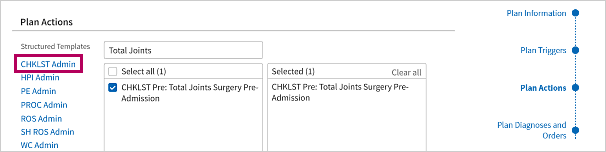
-
Click Save at the bottom of the page.
The newly copied local checklist appears in two places:-
Under Structured Templates on the Encounter Plans admin page.
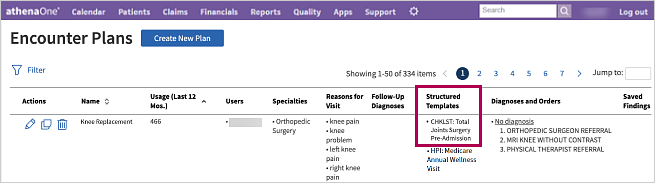
-
In the ASC Checklists admin page.
-
User access and permissions
You must have the Clinicals Admin user permission to access the ASC Checklists admin page.
You must have the Clinicals Admin: History/Intake user permission to access the Encounter Plans admin page.