Identity Verification
athenaOne for Hospitals & Health Systems
A user designated as an EPCS "trusted Individual" can use this page to initiate the provider identity verification process, which is part of the setup required for the EPCS Enrollment feature.
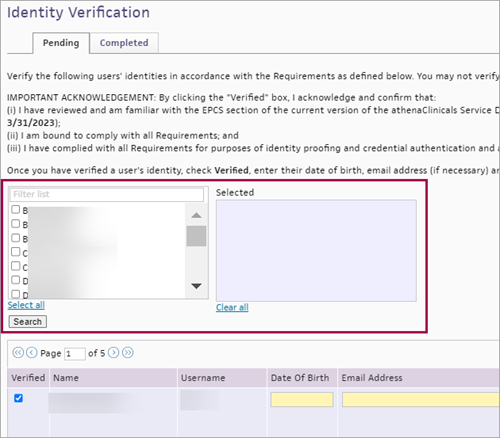
You can search the table of providers on the Identity Verification page:
- Search for providers via a provider filter that uses predictive, type-ahead text
- Select providers individually or click the Select all all link
- Click the Clear all link to remove any selected providers
On the Main
Menu, click Settings ![]() > User. In the left menu, under Practice Links — Users, click Identity Verification Admin
> User. In the left menu, under Practice Links — Users, click Identity Verification Admin
Your practice must have the EPCS Enrollment feature enabled to access EPCS pages.
To initiate the identity verification process for providers who want to use EPCS, trusted individuals (TIs) must have the User Admin: Identity Verification role or permission.
The EPCS prescriber identity verification process includes actions taken by the following roles:
- Trusted individual
- Prescriber approver
- Prescriber
The DEA sets strict requirements for the enrollment process that prescribers must complete to electronically prescribe controlled substances. One of these requirements is that prescribers must verify their identity and activate a two-factor authentication credential.
Trusted individual initiates identity verification
For more information, see "Trusted individual (TI) responsibilities."
Important: Users cannot verify or edit the information associated with their own identity. Only another trusted individual can verify or edit this information.
- Display the Identity Verification page: On the Main
Menu, click Settings
 > User. In the left menu, under Practice Links — Users, click Identity Verification Admin.
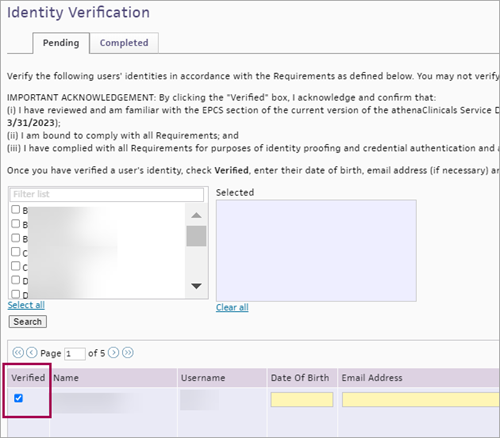
The Pending tab displays a list of prescribers whose identity you must verify. - To complete EPCS identity verification for a prescriber, confirm that you verified a prescriber's current government or state issued ID and check the Verified box.

- Enter the following information for each prescriber:
- Date Of Birth
- Email Address (used to receive a confirmation code)
- Home Address (mailing address)
- Click Save.
athenaOne moves the verified prescribers to the Completed tab, where you can make edits as necessary.
The "trusted individual" is an athenaOne user at your organization who is responsible for verifying the identity of the prescribers who use EPCS to prescribe controlled substances. A practice superuser designates at least one user as a "trusted individual" (TI) by assigning the User Admin: Identity Verification role to a user (the TI can be that same superuser).
Trusted individuals initiate the identity verification process for prescribers who want to use EPCS and perform the following actions for each prescriber:
- Obtain an original copy of a photo identity document, the prescriber's NPI number, and a valid email address for the prescriber.
Note: Acceptable forms of photo ID include a U.S. driver's license, state ID, or U.S./foreign passport. - Verify that the prescriber providing the photo identity document matches the photo shown in the document.
- Confirm that the NPI number provided by the prescriber exists and matches the prescriber in the National Plan and Provider Enumeration System (NPPES) NPI Registry and that the status of the prescriber is "Active."
- Confirm that the prescriber's full name and practice or mailing address match those that appear in the NPI Registry.
Note: For instructions on how trusted individuals enable EPCS access for prescribers, see To initiate prescriber identification for EPCS enrollment.
The trusted individual must maintain copies of the valid photo IDs used to verify the identity of each prescriber for whom EPCS accounts are created. These documents should not be stored in athenaOne and should be kept for at least 7 years.
For instructions on how trusted individuals enable EPCS access for providers, see To initiate provider identification for EPCS enrollment.
Identity Proofing Review (EPCS auditing)
To retain our status as a credential service provider (CSP), athenahealth is required to conduct Identity Proofing reviews on a representative sample of our client organizations (we conduct these reviews twice a year). Your organization is responsible for maintaining copies of identity verification documents and ensuring that EPCS processes comply with our policies.
For more information, see the FAQ: Electronic Prescribing of Controlled Substances (EPCS).
Prescribers must update their medical credentials in a timely manner when they change their business address or name.
- State license — Follow your state's process to update the practice address.
- DEA license — The DEA states that an address change requires an approved state license for the new address first. Update your name or address using the Make Changes to My DEA Registration form, which you can find on the DEA Forms & Applications page.
- NPPES profile (NPI number) — Prescribers can update their name or address by logging in to the NPPES website with their username and password. If you require assistance, go to the NPPES FAQs and review the "Making Changes Online" section. The NPPES site states that for a Practice Location Address: “You must provide a Physical address, this cannot be a PO Box or CMRA (Commercial Mail Receiving Agency). This is the location where the actual services are rendered. Users can enter multiple addresses, but only one primary practice location is required to be specified.” This information is on the Address Page of the NPPES site.
- You are required to update your name or address with CMS within 30 days of a change being made.
Important: If you need help to update your information, contact the credentialing entity directly. athenahealth cannot provide support for these updates.
- Type text into the search bar and see predictive results appear in the list.
- From here, you can either:
- Individually select providers from the list.
- Click Select all to check each box.

- Individually select providers from the list.
-
Notice the providers you selected appear in the Selected box before you search the table of results.
Tip: Click Clear all to remove all providers from the Selected box.
- Click Search to filter the table of results.
- See the table of results filter down to those specific providers.