Complete MIPS and MVP Attestations from Program Attestations Pages
The Program Attestations page provides a central location to complete manual attestations and sign offs for Promoting Interoperability (PI) measures and Improvement Activities (IA) measures within both MIPS and MVP programs including:
- Query of Prescription Drug Monitoring Program (PDMP)
- Health Information Exchange (HIE) Bi-Directional Exchange
- Security Risk Analysis (SRA)
- High Priority Practices Guide of the Safety Assurance Factors for EHR Resilience (SAFER) Guides
- Immunization Registry Reporting
- Actions to Limit or Restrict the Compatibility of CEHRT (aka Information Blocking)
- Electronic Case Reporting
- Plus additional IA measures
Pre-requisite: To complete attestations, users must have the "Meaningful Use Point Person (MUPP)" role or "Clinicals Admin: Quality Manager Admin" role. See also, To add the Clinicals Admin: Quality Manager Admin role to a user. Before you can use this feature for MVP attestations, you must be enrolled in an MVP.
How this works
The Program Attestations page has a simple interface that makes it easy for you to track and complete attestations, enter any applicable exclusions, and meet program objectives within MIPS and MVP programs.
From the Quality menu, click Program Attestations to open the page. When you click a measure or program requirement from the list, the attestation page for that specific measure opens. Right below the attestation page title is a handy ribbon summarizing key details regarding that measure or requirement:
The summary ribbon names the programs to which the attestation applies, the category, whether it's a mandatory measure, the status of the attestation and the date by which you must complete the attestation. The lists of clinicians or groups shown in the grid on the rest of the page is where you'll do most of the attestation work.
Once you select those entities you're attesting for, the blue bar above the list will display the attestation statement.
In the image above, note that a clinician is included in two TINs and another clinician is enrolled in multiple programs (MIPS and MVP)—in both cases, a single attestation satisfies both TINS and both requirements/programs, given these are provider level attestations. Now with enhanced search and sort capabilities, the Program Attestation pages help you become submission ready more easily.
Features on the Program Attestation page
This table describes the enhancements to attestation workflows now available on the Program Attestation pages.
| Feature | Image | Description |
| Action alerts |

|
Identifies program requirements that have not yet been met and require your attention before the Due date |
| Completion tracker |
|
Provides an at-a-glance visual of how your entities are progressing towards satisfying the measure. |
| Bulk select |

|
Allows you to select all the clinicians or all groups within a list with a single click. For ease of reference, clinicians and groups are often generically referred to as entities. |
| Required measures indicator |

|
A badge that indicates which measures or requirements are mandatory for a given performance year, as specified by the program steward. |
| Due date |
|
Shows the date by which the attestation must be completed on the Program Attestations landing page |
| Filter |

|
Let's you zero in on only those programs or categories you want to show in the list of measures. |
| Sort |

|
Allows you to toggle the column heading so that similar values within that column are grouped together. Available on many column headings. |
| Last action tracker |

|
Shows you the details of the user (initials, date and time stamp) that last took an action. |
The filter options are especially helpful if you have many providers or groups at your practice and you want to limit the list. Here's another image of the filtering capabilities available from the Programs & Category field:
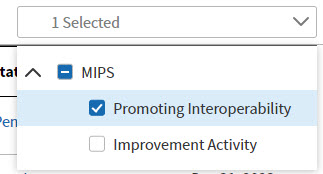
Attestation statuses
Some Promoting Interoperability measures are satisfied when at least one MIPS eligible clinician at the practice meets the requirements of that program. In those instances, the attestation statement for the group can be made at the individual clinician level. Other attestation statements are satisfied at the group level for the whole practice. This table lists the level at which each measure or requirement an attestation statement can be made:
| Attestation statement is made at the group level: | Attestation statement for the group can be made at the individual clinician level: |
|---|---|
| Security Risk Analysis (SRA) | Immunization Registry Reporting |
| Actions to Limit or Restrict the Compatibility of CEHRT (PKA Info Blocking) | Electronic Case Reporting (eCR) |
| SAFER Guides | Query of Prescription Drug Monitoring Program (PDMP) |
| Health Information Exchange (HIE) Bi-Directional Exchange |
Improvement Activities* - see the Quality Help Center for a complete list of measures. |
*Note to satisfy IA measures, at least 50% of the clinicians within a group must attest to satisfying the activity to change the status of the group to Completed.
Attestations statuses for PDMP
Your practice may automatically satisfy an exclusion criterion if your clinician writes fewer than 100 permissible prescriptions during the performance period. If this is the case, the Status column on the PDMP attestation page will be Excluded - Auto Attested. This table describes the varying attestation statuses you can see in the PDMP measure:
| Attestation status | Description |
|---|---|
| Completed - Auto Attested | athenaClinicals logic satisfies the measure. |
| Completed - User Attested | Clinicals Admin: Quality Manager Admin or MUPP manually attested to the PDMP satisfaction statement within the new program attestation page. |
| Excluded - Auto Attested | athenaClinicals automatically applies the exclusion. |
| Excluded - User Attested | Clinicals Admin: Quality Manager Admin or MUPP manually selected the PDMP Exclusion statement within the new program attestation page. |
Instructions
This section provides instructions to complete each of the available program attestation requirements supported by athenahealth. Each requirement may have a slightly different workflow; however generally this is the process:
- Open the Program Attestation page
- Select an attestation task from the list. The specific attestation measure page opens.
- Select an individual or group of clinicians as appropriate to the attestation measure you've selected (providers and groups referred to here as entities).
- Select an attestation statement or an exclusion statement and click Attest. That's it!
Follow theses instructions to complete your own attestations.
User access and permissions
To access the Program Attestation page and complete any of the attestations, users must have the Meaningful Use Point Person (MUPP) role or Clinicals Admin: Quality Manager Admin role.
Note: MUPP role updates are performed by Customer Care. Select Support > Success Community > Contact Client Support Center to enter a case.
To add the Clinicals Admin: Quality Manager Admin role to a user
You must have the User Admin role to access the User admin setup pages.
-
Navigate to the User Admin page:
-
On the Main Menu, click the Settings icon
 .
. -
Under ADMIN, click User.
-
In the Task Bar, under PRACTICE LINKS — Users, click Users. The Users page opens.
-
-
Username — Enter the username of the person to whom you're giving permission to complete the program attestations and then click Search.
A list of usernames appears below the search criteria. -
Click the update link for the user account that you want to update.
The user profile details appear in the fields at the top of the page. -
Click the Roles tab.
-
Click the Edit link.
-
Start typing Clinicals above the list of roles and permissions.
-
Select the Clinicals Admin: Quality Manager Admin check box.
-
Click Save.
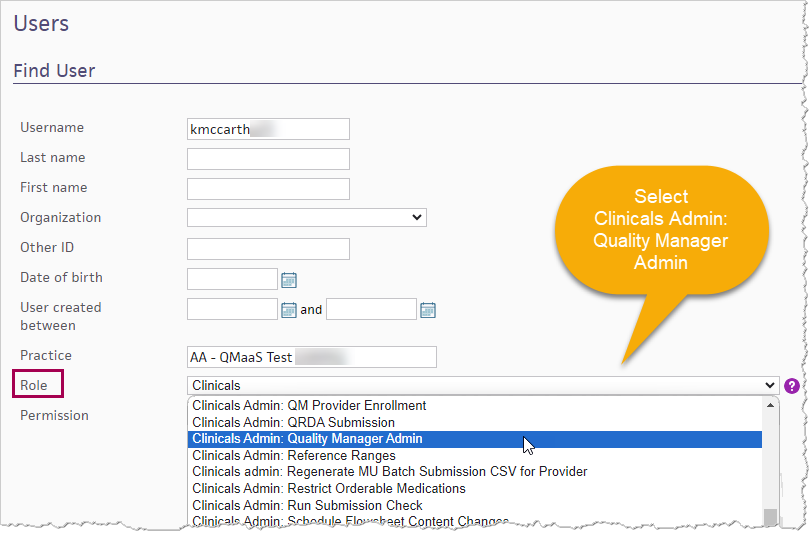
- To learn more about setting up roles and permissions, refer to the Users topic in O-help.
Setup instructions
Before you can use this feature for MVP attestations, you must be enrolled in an MVP. Refer to this release note: MIPS Value Pathways (MVP) —Subgroup Enrollment Now Available for more information.
To access the Program Attestations page
-
Display the Program Attestations page:
-
On the Main Menu, click the Quality menu.
-
Click Program Attestations. The Program Attestations page opens.
-
-
Click one of the attestation measures or requirements and follow the instructions as described below.
This became a mandatory measure in performance year 2023. The PDMP attestation is at the provider level for group and provider. Select the Individual or Group tab and then select the provider to attest for. You may qualify for an exclusion if your MIPS eligible clinicians do not electronically prescribe any Schedule II opioids or Schedule III or IV drugs during the performance period. If you meet Exclusion #2 (PI_EP_2_EX_2), you satisfy the measure and will be auto-attested.
-
From the Main menu in athenaClinicals, click Quality, and then click Program Attestations. The Program Attestations page opens.
-
Click the Query of Prescription Drug Monitoring Program (PDMP) measure. The Query of Prescription Drug Monitoring Program page opens.
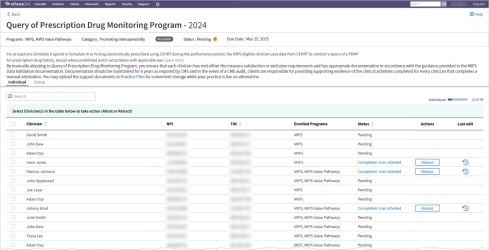
-
Select the clinicians on the Individual tab, or click the Group tab if you're attesting for a group.
-
Select the attestation statement applicable to your practice. The Attest button becomes enabled.
-
Click Attest. Your PDMP attestation is complete for all selected providers and a confirmation message appears:

-
Note the values in the Status column advance from Pending to Completed - User attested. You can hover over the Status column to see any applicable exclusions.
-
To undo the attestation for any providers, click Retract under the Actions column and in the row of the applicable provider or group.
-
To bulk retract for all entities in the list, click the check box beside the column heading. The number of providers selected appears above the list along with the Retract button.
-
Click Retract. Respond to the message that opens by clicking Retract again. The attestation is retracted and the status returns to Pending.
-
These instructions are to be used when manually attesting to any of the new MIPS or MVP Improvement Activity attestations. For a complete list of the new IA measures and to learn how athenaClinicals implements the Activity, review the details described on the Improvement Activities Measure Satisfaction Guides landing page of the Quality Help Center.
The procedure to attest to an IA measure is the same for all Improvement Activities. These instructions use the Promote Use of Patient-Reported Outcome Tools activity:
-
From the Main menu in athenaClinicals, click Quality, and then click Program Attestations.
-
Select an Improvement Activity from the list, such as the Promote Use of Patient-Reported Outcome Tools. The attestation page opens.
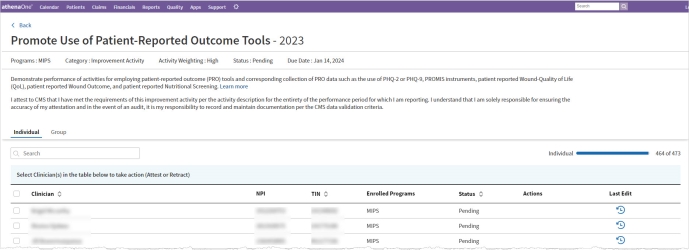
-
Review the Improvement Activity attestation description. See the Quality Help Center for more information.
-
Select the clinicians on the Individual tab, or click the Group tab if you're attesting for a group. To bulk select clinicians or groups, click the check box beside the column heading to select all entities in the list. For a group, bulk select means attesting for all providers in that group.
-
Once you select the entities, the attestation statement displays above the list:
-
I attest to CMS that I have met the requirements of this improvement activity per the activity description for the entirety of the performance period for which I am reporting. I understand that I am solely responsible for ensuring the accuracy of my attestation and in the event of an audit, it is my responsibility to record and maintain documentation per the CMS data validation criteria.
-
-
Select the check box to the left of the statement and then click Attest. A confirmation message appears.

-
Note the values in the Status column advance from Pending to Completed.
-
To undo the attestation for any providers, click Retract under the Actions column and in the row of the applicable provider or group.
-
To bulk retract for all entities in the list, click the check box beside the column heading. The number of providers selected appears above the list along with the Retract button.
-
Click Retract. Respond to the message that opens by clicking Retract again. The attestation is retracted and the status returns to Pending.
-
The process to attest to the Immunization Registry Reporting requirement remains the same as the previous workflow when the attestation was located on the Submission Dashboard. This attestation happens at the NPI level.
-
From the Main menu in athenaClinicals, click Quality, and then click Program Attestations.
-
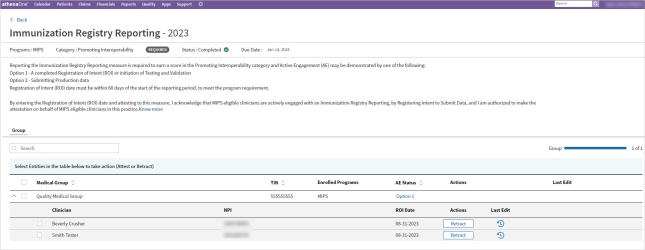
Click Immunization Registry Reporting. The Immunization Registry Reporting attestation page opens.
-
Select the clinicians for whom you're attesting—click the check box beside their name. To bulk attest, click the check box beside the Medical Group column heading to select all clinicians in the list. Once you select the clinicians, the number of providers selected and the ROI date entry field display above the list:

-
Click the calendar icon
 in the Indicate ROI date field and select the date on which your Registration of Intent (ROI) was done for those providers.
 -
Click Attest. Your ROI date is saved for all selected providers and a confirmation message appears:

-
Note the value in the Active Engagement status (AE Status) column advances to Option 1.
-
If you need to change the date for any providers, click Retract beside the provider.
-
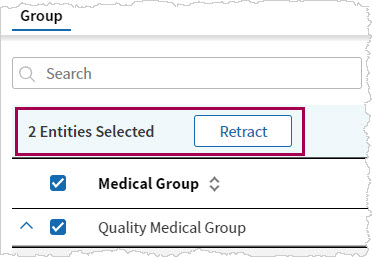
To bulk change the ROI date for all providers in the list, click the check box beside the Medical Group column heading. The number of providers selected appears above the list along with the Retract button.
-
Click Retract. Respond to the message that opens by clicking Retract again. The attestation is retracted and the AE Status returns to Pending.
Tip
If a check box beside an entity's name is disabled, that is likely because the entities' AE status is Option 2. They are likely further along in the attestation process than the other providers you're bulk attesting.
-
The process to attest to the Electronic Case Reporting requirement remains the same as the previous workflow when the attestation was located on the Submission Dashboard. This attestation happens at the NPI level.
-
From the Main menu in athenaClinicals, click Quality, and then click Program Attestations.
-
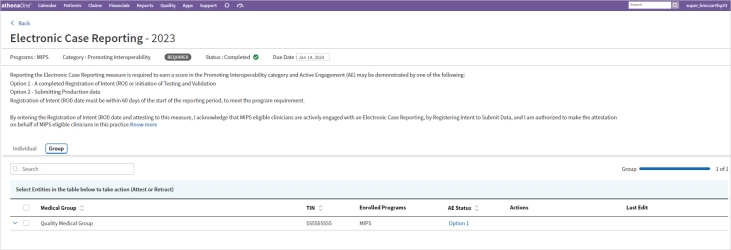
Click Electronic Case Reporting. The Electronic Case Reporting attestation page opens.
-
Review the measure requirement statement:
Reporting the Electronic Case Reporting measure is required to earn a score in the Promoting Interoperability category and Active Engagement (AE) may be demonstrated by one of the following:
Option 1 - A completed Registration of Intent (ROI) or initiation of Testing and Validation
Option 2 - Submitting Production data
Registration of Intent (ROI) date must be within 60 days of the start of the reporting period to meet the program requirement.
By entering the Registration of Intent (ROI) date and attesting to this measure, I acknowledge that MIPS eligible clinicians are actively engaged with an Electronic Case Reporting registry, by Registering Intent to Submit Data, and I am authorized to make the attestation on behalf of MIPS eligible clinicians in the practice. -
Select the clinicians for whom you're attesting—click the check box beside their name. To bulk attest, click the check box beside the Medical Group column heading to select all clinicians in the list. Once you select the clinicians, the number of providers selected and the ROI date entry field display above the list:

-
Click the calendar icon
 in the Indicate ROI date field and select the date on which your Registration of Intent (ROI) was done for those providers.
 -
Click Attest. Your ROI date is saved for all selected providers and a confirmation message appears:

-
Note the value in the Active Engagement status (AE Status) column advances to Option 1.
-
If you need to change the date for any providers, click Retract beside the provider.
-
To bulk change the ROI date for all providers in the list, click the check box beside the Medical Group column heading. The number of providers selected appears above the list along with the Retract button.

-
Click Retract. Respond to the message that opens by clicking Retract again. The attestation is retracted and the AE Status returns to Pending.
Tip
If a check box beside an entity's name is disabled, that is likely because the entities' AE status is Option 2. They are likely further along in the attestation process than the other providers you're bulk attesting. To complete a bulk attestation, all selected entities must have the same status.
-
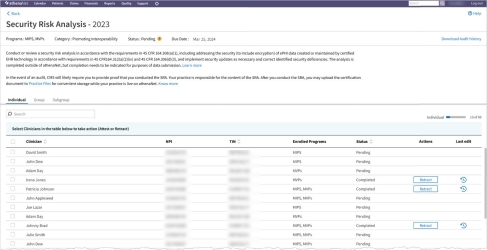
The Security Risk Analysis attestation is another Promoting Interoperability (PI) measure. Attestations for this measure happen at the NPI TIN level. A provider that crosses two TINs will have two separate rows for each TIN that they belong to. However, the attestation itself is at the participating entity level; therefore you attest as a group, or as a provider, which satisfies the measure for the whole TIN.
-
From the Main menu in athenaClinicals, click Quality, and then click Program Attestations. The Program Attestations page opens.
-
Click Security Risk Analysis. The Security Risk Analysis attestation page opens.
-
Select the clinicians for whom you're attesting—click the check box beside their name/group name. Once you select the clinicians/groups, the number of entities selected, and the attestation confirmation message appear above the list:

-
Click the check box next to the message, Yes, my practice has conducted a Security Risk Analysis. The Attest button becomes enabled.
-
Click Attest. Your SRA attestation is complete for all selected providers and a confirmation message appears:

-
Note the value in the Status column advances from Pending to Completed.
-
If you need to change the date for any providers, click Retract beside the provider and start over.
Tip
If the message above the list of entities says, # Entities selected Actions disabled that is because the clinicians or groups do not have the same status. You can only multi-select entities with the same status in order to complete attestations for more than one entity at a time.
-
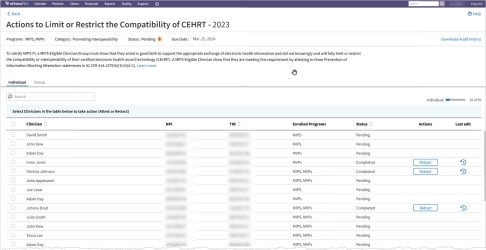
The Actions to Limit or Restrict the Compatibility of CEHRT, previously known as the Info Blocking attestation, is another PI task that happens at the unique TIN level for each clinician.
-
From the Main menu in athenaClinicals, click Quality, and then click Program Attestations. The Program Attestations page opens.
-
Click Actions to Limit or Restrict the Compatibility of CEHRT. The Actions to Limit or Restrict the Compatibility of CEHRT attestation page opens.
-
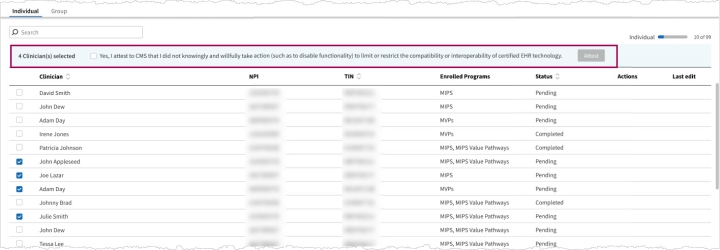
Select the clinicians for whom you're attesting—click the check box beside each name. To bulk attest, click the check box beside the Clinician column heading to select all clinicians in the list. Once you select the clinicians, the number of providers selected and the attestation message display above the list of providers:
-
You can also attest at the group level. Click the Group tab to see the list of the entitites organized by participating Groups. Use the check box beside each group to make your selections. On the Group tab, you can only attest by participating groups-you cannot select individual providers within a group for this attestation.
-
-
Click the check box next to the message, Yes, I attest to CMS that I did not knowingly and willfully take action (such as to disable functionality) to limit or restrict the compatibility or interoperability of certified EHR technology. The Attest button becomes enabled.
-
Click Attest. The attestation is complete for all selected entities and a confirmation message appears:

-
Note the value in the Status column advances from Pending to Completed.
-
If you need to change the date for any providers, click the Retract button within the appropriate row.
-
To bulk change the attestation for all providers in the list, click the check box beside the Clinician or Group column heading. The number of providers selected appears above the list along with the Retract button.

-
Click Retract. Respond to the message that opens by clicking yes, retract . The attestation is retracted and the Status values return to Pending.
-
The Health Information Exchange (HIE) Bi-Directional Exchange measure is an alternative option to the Support Electronic Referral Loops by Sending Health Info and the Support Electronic Referral Loops by Receiving and Reconciling Health Information measures in the HIE objective.
You have these options for satisfying this measure:
-
athenahealth will automatically attest on your behalf if Patient Record Sharing (PRS) is enabled for the entire reporting period, or
-
You can use another HIE of your choice and self-attest to satisfy the measure, or
-
Use the alternative Sending and Receiving measures to meet the HIE objective.
These instructions are for practices where PRS is disabled, or if you want to retract an automatic attestation and manually attest on behalf of specific clinicians.
-
From the Main menu in athenaClinicals, click Quality, and then click Program Attestations. The Program Attestations page opens.
-
Click HIE bi-directional Measure. The HIE bi-directional measure attestation page opens.
Tip: For practices with PRS enabled, the status column will show Completed - Auto attested.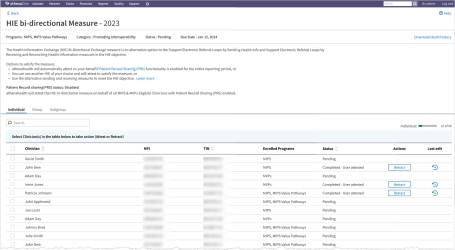
-
Review the attestation statement.
-
Select the clinicians for whom you're attesting—click the check box beside each name. To bulk attest, click the check box beside the Clinician column heading to select all clinicians in the list. Once you select the clinicians, the number of entities selected and the attestation message display above the list of providers:

-
You can also attest at the group level. Click the Group tab to see the list of the entitites organized by participating Groups. Use the check box beside each group to make your selections. On the Group tab, you can only attest by participating groups-you cannot select individual providers within a group for this attestation.
-
-
Click the check box next to the three bulleted message. The Attest button becomes enabled.
-
Click Attest. The attestation is complete for all selected entities and a confirmation message appears.
-
Note the value in the Status column advances from Pending to Completed - User attested.
-
If you need to change the date for any providers, click the Retract button within the appropriate row.
-
To bulk change the attestation for all providers in the list, click the check box beside the Clinician or Group column heading. The number of providers selected appears above the list along with the Retract button.
-
The Safety Assurance Factors for EHR Resilience Guides (SAFER Guides) requirement is a Promoting Interoperability task. To complete an attestation for the SAFER Guides requirement, you select one of either two statements. Attesting to either statement satisfies the requirement and moves the status from Pending to Completed.
This measure is required.
-
From the Main menu in athenaClinicals, click Quality, and then click Program Attestations.
-
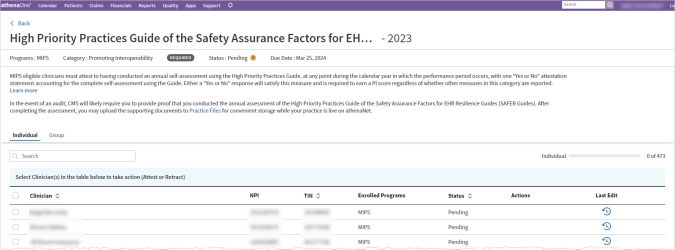
Click High Priority Practices Guide of the Safety Assurance Factors for EHR Resilience (SAFER) Guides. The attestation page opens.
-
Review the attestation statement:
-
MIPS eligible clinicians must attest to having conducted an annual self-assessment using the High Priority Practices Guide, at any point during the calendar year in which the performance period occurs, with one "Yes or No" attestation statement accounting for the complete self-assessment using the Guide. Either a "Yes or No" response will satisfy this measure and is required to earn a PI score regardless of whether other measures in this category are reported.
In the event of an audit, CMS will likely require you to provide proof that you conducted the annual assessment of the High Priority Practices Guide of the Safety Assurance Factors for EHR Resilience Guides (SAFER Guides). After completing the assessment, you may upload the supporting documents to Practice Files for convenient storage while your practice is live on athenaOne.
-
-
Select the clinicians/group for whom you're attesting—click the check box beside their name. You can bulk select clinicians.
-
Select the attestation statement in the blue bar above the list of selected entities:

-
Click Attest. Your attestation is complete.
-
Note the value in the Status column advances from Pending to Completed.
-
If you need to change the status for any entities, click the Retract button within the appropriate row.
-


