Data View Settings
If your organization uses Data View, you can use the Data View Settings page in athenaOne to manage users and create service account users. For more information about Data View, see the Data View Documentation article on the Success Community.
On the Main Menu, click Settings ![]() >Practice Manager. In the left menu,under PRACTICE LINKS — Data View, click Data View Settings.
>Practice Manager. In the left menu,under PRACTICE LINKS — Data View, click Data View Settings.
You must have the Data View User Management role or permission to view the Data View Settings page and access all features.
You must have the Access to Data View role or permission to view the Data View Settings page and to access the following features:
- View your organization's Data View account URL.
- View user details in the Data View User Management section (only logged-in user details appear).
- Reset the password, unlock a user, and disable MFA.
To access and edit the Manage IP Whitelisting tab, you must have the following:
- Data View User Management permission
- Super User role
- Display the Data View Settings page: On the Main Menu, click Settings
 >Practice Manager. In the left menu,under PRACTICE LINKS — Data View, click Data View Settings.
 - Select a user.
- Click Reset Password.
A temporary password appears. - Copy and paste the temporary password and share it with the user.
- Display the Data View Settings page: On the Main Menu, click Settings >Practice Manager. In the left menu,under PRACTICE LINKS — Data View, click Data View Settings.
- Select a user.
- Click Unlock User.
- Display the Data View Settings page: On the Main Menu, click Settings >Practice Manager. In the left menu,under PRACTICE LINKS — Data View, click Data View Settings.
- Select one or more users.
- Click Disable MFA.
- Display the Data View Settings page: On the Main Menu, click Settings >Practice Manager. In the left menu,under PRACTICE LINKS — Data View, click Data View Settings.
- Select a user.
- Click Enable User.
- Display the Data View Settings page: On the Main Menu, click Settings >Practice Manager. In the left menu,under PRACTICE LINKS — Data View, click Data View Settings.
- Select a user.
- Click Disable User.
You can create a non-person service account user (for example, an account for a data visualization tool, such as Tableau) on the Data View Settings page. You can also view the audit history of service account creation. After you add the service account user, the information appears in the Data View User Management section.
Note: To enable access to Data View for an individual user, add the Access to Data View role to the user's account on the Users page (for more information, see To assign a role to a user).
- Display the Data View Settings page: On the Main Menu, click Settings >Practice Manager. In the left menu,under PRACTICE LINKS — Data View, click Data View Settings.
- Scroll down to the Create Service Account User section of the page, below the Data View User Management section.
- Service Account User Name — Enter the service account user name.
- First Name of Individual Requesting Account — Enter the first name of the person requesting the account.
- Last Name of Individual Requesting Account — Enter the last name of the person requesting the account.
- Email Address — Enter the email address of the person who requested the account.
- Click Submit.
The account appears in the Data View User Management section.
Note: You must have the Data View User Management permission and Super User role to edit this tab.
- Display the Data View Settings page: On the Main Menu, click Settings >Practice Manager. In the left menu,under PRACTICE LINKS — Data View, click Data View Settings.
- Select the Manage IP Whitelisting tab.
- Click Enable Network Policy.
athenaOne disables the Enable Network Policy button. Machines with IP addresses listed in the Allowed IP Addresses section allow users access the Data View reader account.
Note: You must have the Data View User Management permission and Super User role to edit this tab.
- Display the Data View Settings page: On the Main Menu, click Settings >Practice Manager. In the left menu,under PRACTICE LINKS — Data View, click Data View Settings.
- Select the Manage IP Whitelisting tab.
- Click Disable Network Policy.
athenaOne disables the Disable Network Policy button and users can access the Data View reader account without any restriction on the IP address of the machine.
Note: You must have the Data View User Management permission and Super User role to edit this tab.
- Display the Data View Settings page: On the Main Menu, click Settings >Practice Manager. In the left menu,under PRACTICE LINKS — Data View, click Data View Settings.
- Select the Manage IP Whitelisting tab.
- Scroll down to the Manage Network Policy section.
- IP Address — Enter the IP address.
- Type — Select Allow IP.
- Select operation— Select Add IP Address.
- Click Submit.
Note: You must have the Data View User Management permission and Super User role to edit this tab.
- Display the Data View Settings page: On the Main Menu, click Settings >Practice Manager. In the left menu,under PRACTICE LINKS — Data View, click Data View Settings.
- Select the Manage IP Whitelisting tab.
- Scroll down to the Manage Network Policy section.
- IP Address — Enter the IP address.
- Type — Select BlockIP.
- Select operation – Select Add IP Address.
- Click Submit.
Note: You must have the Data View User Management permission and Super User role to edit this tab.
- Display the Data View Settings page: On the Main Menu, click Settings >Practice Manager. In the left menu,under PRACTICE LINKS — Data View, click Data View Settings.
- Select the Manage IP Whitelisting tab.
- Scroll down to the Manage Network Policy section.
- IP Address — Enter the IP address.
- Type — Select AllowIP.
- Select operation — Select Remove IP Address.
- Click Submit.
Note: You must have the Data View User Management permission and Super User role to edit this tab.
- Display the Data View Settings page: On the Main Menu, click Settings >Practice Manager. In the left menu,under PRACTICE LINKS — Data View, click Data View Settings.
- Select the Manage IP Whitelisting tab.
- Scroll down to the Manage Network Policy section.
- IP Address — Enter the IP address.
- Type — Select BlockIP.
- Select operation — Select Remove IP Address.
- Click Submit.
Note: You must have the Data View User Management permission and Super User role to edit this tab.
- Display the Data View Settings page: On the Main Menu, click Settings >Practice Manager. In the left menu,under PRACTICE LINKS — Data View, click Data View Settings.
- Select the Manage IP Whitelisting tab.
Allowed IP Addresses section
- SEARCH ALLOW IP — Enter the IP address or select it from the list.
Blocked IP Addresses section
- SEARCH BLOCK IP — Enter the IP address or select it from the list.
athenahealth Data View provides a secure and efficient direct database connection to the athenahealth analytics platform, which contains athenaOne client data optimized for analytics. Enterprise data warehouse (EDW) users can use Data View to retrieve their data directly from athenaOne without the need to import CSV or other flat-file types; similarly, Business intelligence (BI) users can access their data directly in their BI tool of choice.
If your organization uses Data View, you can use the Data View Settings page in athenaOne to manage users and create service account users. For more information about Data View, see the Data View Documentation article on the Success Community.
Note: Contact your Customer Success Manager if your organization wants to use the Data View product.
Data View account details appear at the top of the page. Copy and paste the URL into your browser to access your organization's Data View account.
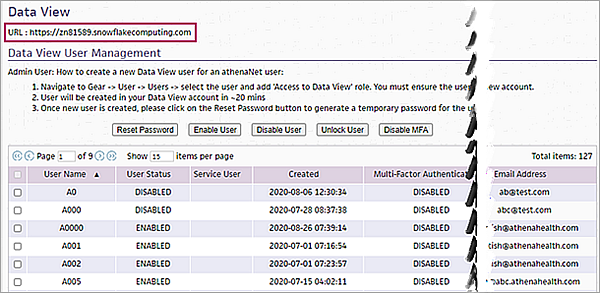
The Data View User Management section provides user details and several actions that you can take for a user account, such as resetting a password or unlocking a user.
The Create Service Account User section lets you create a non-person service account user (for example, an account for a data visualization tool, such as Tableau). You can also view the audit history of service account creation. After you add the service account user, the information appears in the Data View User Management section.

Your organization can use the Manage IP Whitelisting tab on the Data View Settings page to control which IP addresses allow or block access to Data View.
On the Manage IP Whitelisting tab, you can:
- Enable the network policy — When you enable the network policy, users have access to the Data View reader account only when the IP address of the machine they're using appears on the allow list.
- Disable the network policy — When you disable the network policy, users can access the Data View reader account without any restrictions on the IP address of the machine they're using.
- Review IP addresses on the allow list — In the Allowed IP Addresses section, review the IP addresses of machines that allow users' access to the Data View reader account.
- Review IP addresses on the block list — In the Blocked IP Addresses section, review the IP addresses of machines that block users' access to the Data View reader account.
- Add or remove IP addresses from the allow list or block list — In the Manage Network Policy section, add or delete an IP address from the allow list or block list.
| Display Columns | |
|---|---|
| User Name |
The user's Data View user name (the same as the user's athenaOne user name). |
| User Status |
Indicates whether the user is enabled or disabled. Disabled users cannot log in to Data View. |
| Service User |
Indicates whether the user is a service user. |
| Created | Date and time that the user account was created for Data View. |
| Multi-Factor Authentication |
Indicates whether the user has enabled multi-factor authentication (MFA). |
| Last Login |
Date and time of the user's last login. |
| Last Failed Login | Last date that this user experienced a failed login attempt. |
| Email Address |
The email address associated with the user. |