 Service Overview — athenaClinicals
athenaClinicals is the athenahealth clinical workflow solution. This service is enabled and configured at the department level.
Our solution includes:
- Electronic health record — this includes a full patient chart, and a fully customizable "encounter form" integrated into the athenaOne patient workflow, with an automated encounter summary record that is automatically added to the patient chart for each encounter.
- Medical document management service — this includes digitizing X-rays, lab results, prescriptions, and other clinical documents by automated fax routing, image scanning, classification, and electronic data capture.
- Paperless workflow for providers — the Clinical Inbox, for both providers and administrators, replaces manual tasks associated with paper chart administration, paper prescriptions, and other medical documents previous in paper form.
- Medications database — athenahealth retrieves Rx information from a database called First Databank (FDB). This database is used to populate the available medication list, drug-drug interactions, drug-allergy interactions, monographs, and other information. We update this database weekly. Link to First Databank website
The five-stage patient encounter workflow is the core of the athenaClinicals service.
This workflow provides your practice with several important capabilities:
- Visibility into patient status, location, and stage of encounter throughout the workflow
- Efficient hand-offs between front desk staff, clinical staff, and providers
- Behind-the-scenes measurement of data
- Common workflow and consistent athenaOne user interface across the five patient workflow stages:
- Check-in
- Intake (athenaClinicals)
- Exam (athenaClinicals)
- Sign-off (athenaClinicals)
- Checkout
The 5-Stage patient encounter workflow starts when you click a patient name in the Today's Appointments worklist or in the appointment schedule on the non-clinician home page. The Appointment page appears with the basic appointment information in read-only format and a link to Cancel or Reschedule Appointment. The Appointment page functions as the starting point for the 5-stage patient encounter.
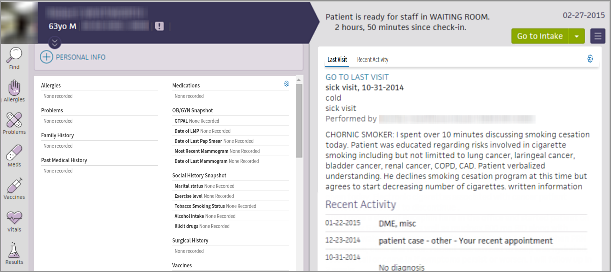
The patient chart has a patient banner showing demographic information, a current clinical briefing, an Action menu, which provides quick links to the most common actions, and chart tabs down the left side of the screen. Click a chart tab to view the content in that section.
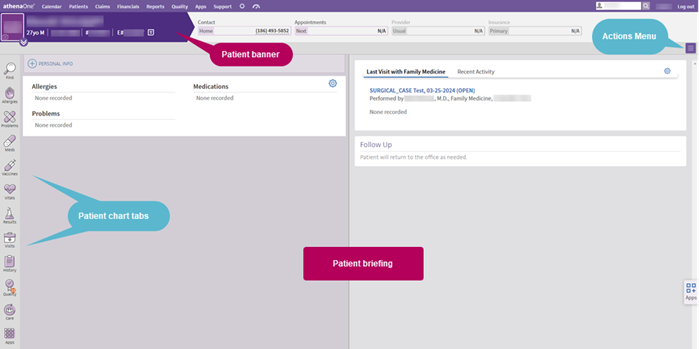
The briefing shows the story of the patient at a glance, highlighting the most critical information at the point of care. It provides lists of chart alerts, allergies, problems, and medications (sorted alphabetically) on the left, and a summary of the patient's last visit and recent activity on the right. The right side of the page displays a summary of today's visit, recent activity, and what happened the last time the patient visited the practice.
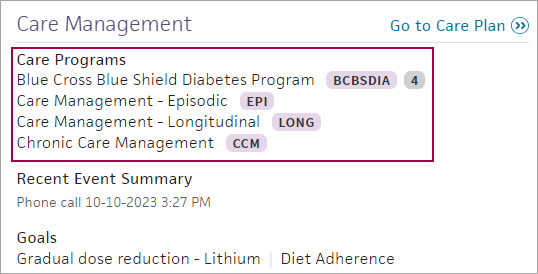
This section lists the care programs a patient is a part of, the patient's recent event summary, and the patient's goals.
The Care Management section displays each care program along with the program's abbreviation:
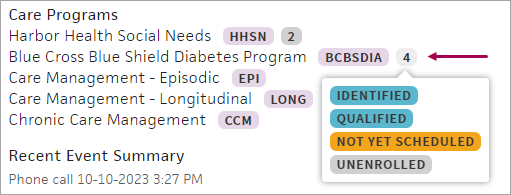
You can also see the patient's enrollment statuses for each care program. Hover over the number of statuses beside the abbreviation for more details:
You can display an existing care plan for the patient from the patient briefing.
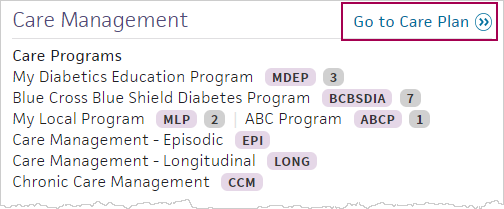
Click Go to Care Plan to display the care plan.
For information about creating and editing a care plan in athenaClinicals, see athenaClinicals Care Plan.
The Last Visit tab shows the most recent encounter with the current rendering provider, if applicable; otherwise, the Last Visit tab shows the most recent visit at your practice.
With the multispecialty feature enabled, when you view the chart briefing in an encounter, the Last Visittab shows one of the following (in order):
- Most recent encounter with the current rendering provider
- Most recent visit with a provider who shares the rendering provider's specialty
- Most recent visit in any of the specialties selected in the "Default specialty view" User Preference setting of the rendering provider
- Most recent encounter at your practice
If you are viewing the patient's chart outside an encounter, athenaOne recognizes your role and specialty:
- For providers, the most recent visit from the following appears:
- The patient's last visit with the user.
- The patient's last visit with a provider who shares the same specialty as the user.
- The patient's last visit with any of the specialties selected in the "Default specialty view" User Preference setting.
- For non-providers, the following appears:
- The patient's last visit with any of the specialties selected in the "Default specialty view" User Preference setting.
- If none of these is available, the patient's last visit at your practice appears.
Note: If the last visit displayed is not the current user's and there is a past encounter with the current user, then a VIEW MY LAST VISIT link appears.
This section lists signed orders for labs, imaging, vaccines, durable medical equipment (DME), surgery, procedures, and referrals. The Outstanding Orders section displays orders to be performed on or before today's date, up to 1 year prior to today's date.
This section lists orders for labs, imaging, vaccines, durable medical equipment (DME), surgery, procedures, and referrals that are scheduled to be performed in the future, after today's date.
This section of the patient briefing lists recent encounters, clinical documents, patient cases, and lab/imaging results, including:
- Encounter documents not in PEND status, associated with the current date or the current encounter.
- Patient encounters that occurred after the last visit with a provider in the same specialty as the current appointment's rendering provider.
Note: This feature applies only to multispecialty practices. Your practice must have the Multispecialty Filtering feature enabled. - The following order types: prescriptions, physician authorizations, vaccines, DME, surgery, corrective lens.
Note: No documents in PEND status appear. - Hospital discharge documents receiving through patient record sharing.
Click a document to display its details. Click the X icon ![]() to collapse the details.
to collapse the details.
For a single specialty practice, this section displays documents from the day after the patient's last visit through the current date.
If your practice has the Multispecialty Filtering feature enabled, this section displays documents from the day after the patient's last visit in the user's specialty, if available, through the current date. If the user's specialty isn't available, the section displays documents from the day after the patient's last visit at the practice through the current date.
Note: All result documents that aren't closed appear, regardless of the date range, to ensure that you have full visibility of a patient's results.
Review patient demographics
- Click the patient's name in the schedule or in the Clinical Inbox list of encounters.
- Click the view more icon
 in the patient banner to expand and review patient demographic information.
Review patient documents
- Click the Find tab
 in the patient chart to search for documents associated with the patient.
Note: From the Intake stage, you can click the Search icon in the patient banner to search for documents associated with the patient.
Review chart alerts
- If the chart alert icon
 is yellow, click the icon to view chart alerts.
Review briefing information
- In the left-hand pane, review the read-only views of the Allergies, Problems, and Medications sections.
Note: You can add more sections to the left-hand pane of the briefing by clicking the settings icon in the top right corner. See also: To configure the patient summary on the patient briefing.
 - In the right-hand pane, review Last Visit or Recent Activity information.
Review relevant chart sections
- Click the chart tabs at the left to access the sections of the patient chart to review pertinent details. Click an item to edit it.
Tip: You can sort problems in the default view or drag problems to customize the sort order. - After you click a section of the chart to review it, "Reviewed" appears at the bottom of the section. (athenaOne marks a section as "Reviewed" only if you scroll to view the entire section.)
The "Reviewed" note also appears in the Full Encounter Summary.
Note: If a section in the chart is incorrectly marked as reviewed during the encounter workflow, you can navigate to the section and click the "Reviewed" text to change it to "Not Reviewed." Marking a section as not reviewed also removes the statement from that section in the Full Encounter Summary or removes the entire section (if blank). - When you finish reviewing the briefing, click Go to Intake to start the Intake stage of the encounter.
Note: If another user made changes to the patient chart or encounter information since you started making changes, a message at the bottom of the page displays the username of the person who made the changes and the time that the changes were saved. Click REFRESH Chart to obtain the latest updates.
- In the briefing, click the Menu icon
 and select Audit history.
The Audit History box appears. - Click each section to expand and collapse it.
- Click outside the box to close it.