 User Guide — athenaTelehealth
athenaOne for Hospitals & Health Systems
athenaTelehealth is a full-scale telehealth service that's built into athenaOne and the athenaOne app.
You can access the Reimagined athenaTelehealth Experience.
For athenaOne desktop, the same workflows you're used to are available in the reimagined experience like:
-
Video visit
-
Chatting with patients
-
Provider screen-sharing
New! — New workflows in the upgrade include:
-
Virtual visit video loads in separate window
-
Patient screen-sharing
-
Virtual whiteboard
-
Closed captioning
-
Virtual background
-
Noise suppression
-
Mute participants
Note: The one-way message from schedule view to patients in athenaOne is not currently available in this new experience.
You must have access to the patient chart and encounter to conduct an athenaTelehealth session. Any user with access to schedule appointments can schedule video conference calls for athenaTelehealth sessions.
Note: You cannot start an athenaTelehealth session from the Checkout page.
You need the following permissions to access these reports:
- Patient Communication Activity page — Your practice must use the athenaCommunicator service or the athenaCollector service with ReminderCall, and you must have the Report: Report Library: Communicator user permission.
- Patient Communication History page — Your practice must use the athenaCommunicator service or the athenaCollector service with ReminderCall.
This update applies to all roles using the athenaTelehealth online visit.
For athenaOne desktop, the same workflows you're used to are available in this upgraded experience like:
-
Video visit
-
Chatting with patients
-
Provider screen-sharing
New! — New workflows in the upgrade include:
-
Virtual visit video loads in separate window
-
Patient screen-sharing
-
Virtual whiteboard
-
Closed captioning
-
Virtual background
-
Noise suppression
-
Mute participants
Note: The one-way message from schedule view to patients in athenaOne is not currently available in this new experience.
The look and feel of athenaTelehealth has been updated. The basic features of athenaTelehealth have been expanded.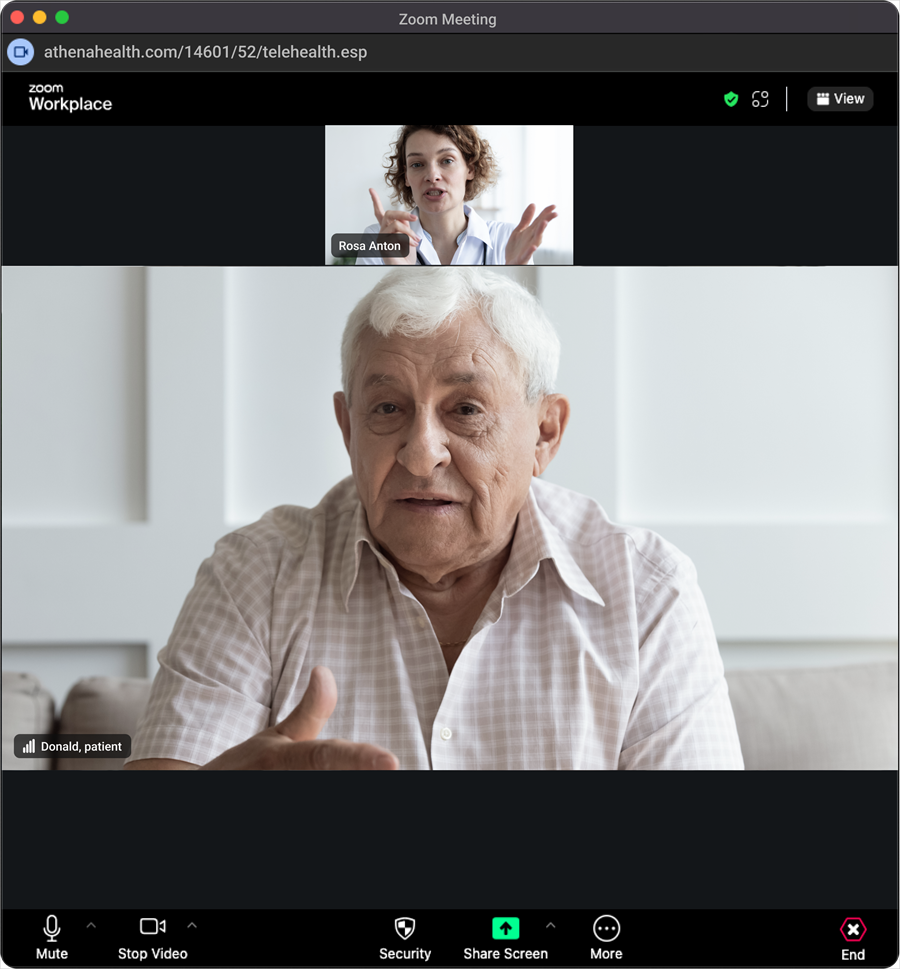
Providers, practice staff, patients, and anyone joining the visit with the patient, will all notice this change to the presentation of the athenaTelehealth online visit.
However, you may be accustomed to the new look and feel of the in call experience.
Patients remain in the virtual waiting room until a member of practice staff joins the online visit.
You can take several actions via the participant list.
Best practice
When sending Waiting Room messages:
- Use clear, concise, and reassuring language
- Avoid sharing personal health information
- Inform patients if there will be a delay or if they need to prepare anything before being admitted
- Start the virtual visit for the scheduled appointment.
- Click on the Participants button in the visit toolbar.
- In the Participants panel, go to the Waiting Room section.
- Click Message at the bottom of the Waiting Room section.
- A chat window will appear labeled Message to Waiting Room Participants.
- Type your message (for example: "We’ll be with you shortly. Thank you for your patience.").
- When ready to share your message, you can:
- Press Enter on your keyboard.
- Click Send.
Note
This message is visible to all participants currently in the Waiting Room. You cannot message individual patients separately.
Workflow Scenario — A patient is in the virtual waiting room and ready to be seen
- Observe on the schedule, in check in, or in intake and exam that the patient is online.
- Start the virtual visit for the scheduled appointment.
- When the patient is in the Waiting Room, you will see a message to Admit them.
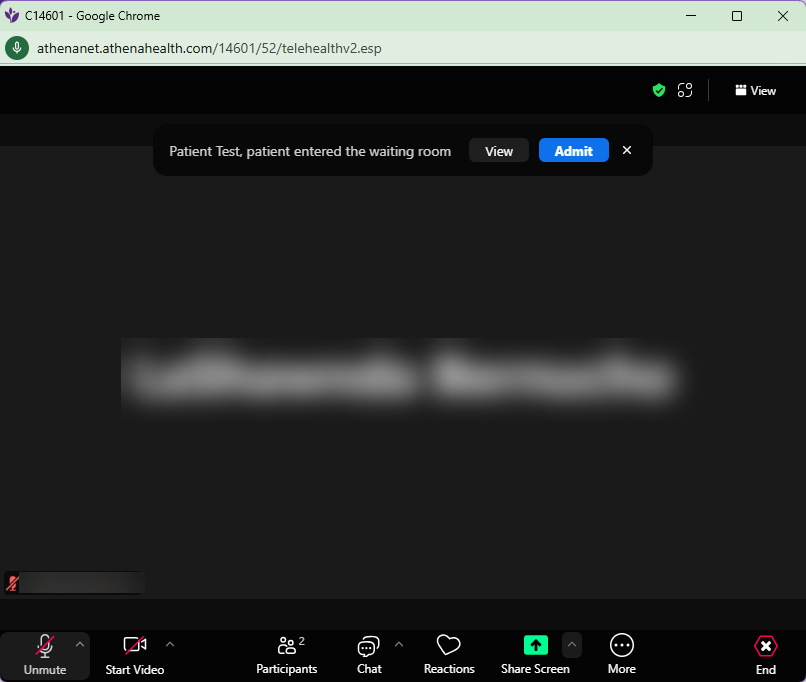
When you have multiple practice users joining the visit
-
If the patient is showing as online, and you (an medical assistant, nurse, or doctor) join the call, pause and wait to be prompted to admit the patient. You may also go to the participant panel and wait for the patient to appear and admit them from there.
-
Only one host is allowed in a visit. The first practice user to join from athenaOne is the host. When they leave the visit, the patient is returned to the waiting room. When the provider joins, the provider becomes the host and can admit the patient.
-
If a practice user other than the provider is the host when the provider joins the visit, the practice user must admit the provider into the visit before they leave the visit and make the provider the host.
-
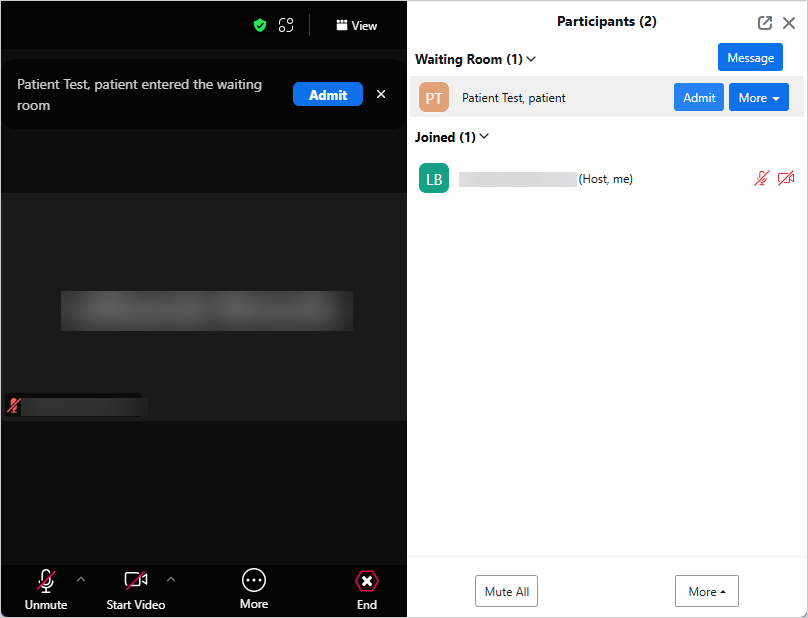
Workflow Scenario — Admit from participants panel
- Observe on the schedule, in check in, or in intake and exam that the patient is online.
- Start the virtual visit for the scheduled appointment.
- In the visit toolbar, click Participants.
- In the Participants panel, locate the patient under Waiting Room.
- Verify the patient and click Admit next to their name. They will be joined to the visit.
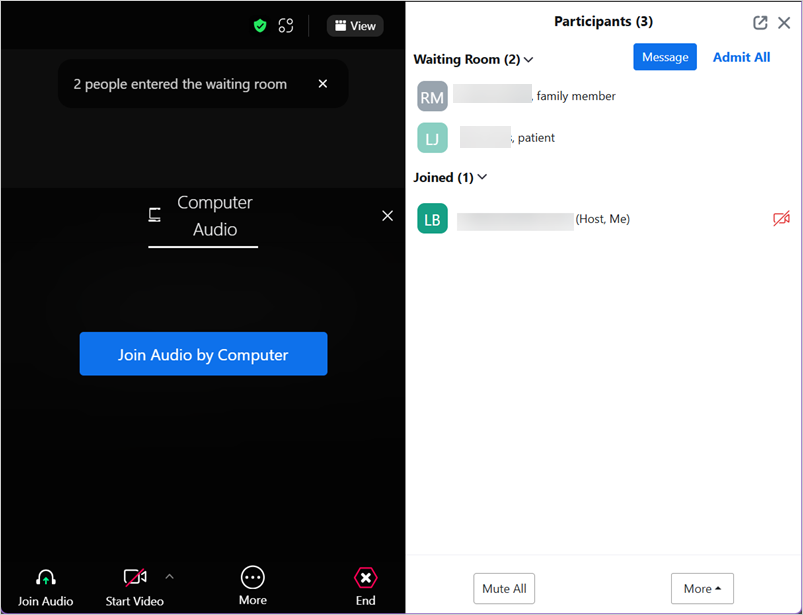
Workflow Scenario — Admit all participants
- Observe on the schedule, in check in, or in intake and exam that the patient is online.
- Start the virtual visit for the scheduled appointment.
- In the visit toolbar, click Participants.
- In the Participants panel, locate the patients under Waiting Room.
- Verify the patients and click Admit All above their names. They will be joined to the visit.
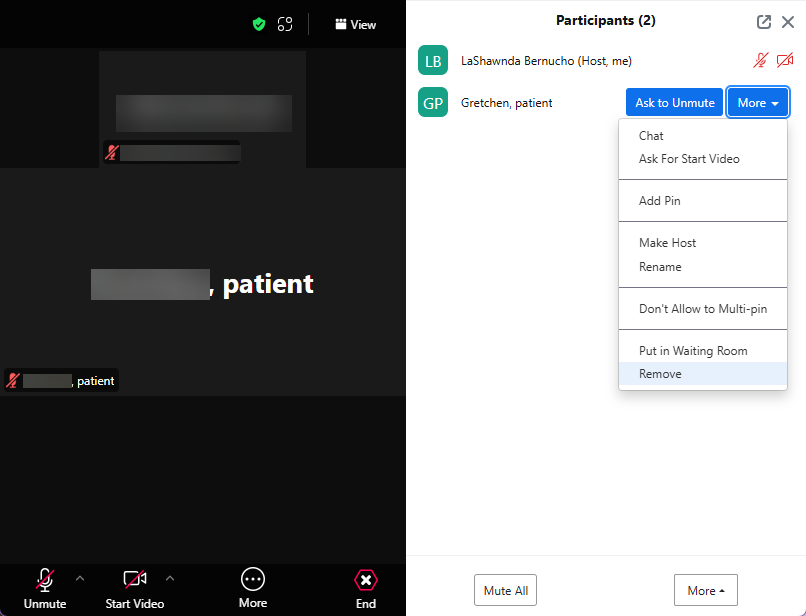
Workflow scenario — The visit is complete, or the patient needs to be removed:
- Open the Participants panel.
- Hover over the patient’s name.
- Click More (three dots).
- Click Remove.
Note
Removing a patient will disconnect them from the session. They will need re-admittance to rejoin.
Workflow scenario — You need to pause the session temporarily (for example: to consult with a colleague)
- In the visit toolbar, click Participants.
- Hover over the patient’s name.
- Click More.
- Select Put in Waiting Room.
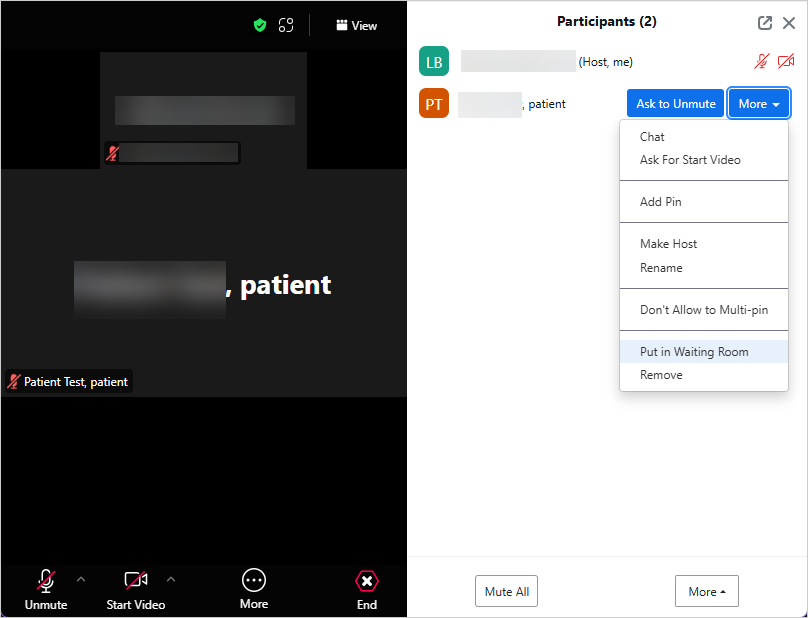
While in waiting room
- They see a message: The host will admit you, when they're ready.
To resume
- Go back to Participants.
- Click Admit next to the patient’s name.
Note
Only the host or co-host can place someone on hold. The Telehealth usage report includes information time spent on hold in the waiting room.
In athenaOne mobile, you can also admit a participant, remove a participant, or put a participant on hold. However, you cannot currently send a message to a participant who is in the waiting room and not yet admitted to the visit. We are considering adding this functionality in a future release.
-
Start the virtual visit for the scheduled appointment.
Note
When a participant joins the call, a pop-up notification indicates which participant has entered the waiting room. There may be multiple participants in the waiting room. -
You can:
-
Tap Admit to join all waiting room participants to the visit.
-
Tap View to see a list of all waiting room participants and tap Admit next to each individual patient that you want to join to the visit.
-
-
Tap Participants.
-
Select the participant from the call list.
-
Tap Remove. If a patient is removed from the call, they will be able to rejoin the call.
-
Tap Remove again to confirm.
-
Tap Participants.
-
Select the participant from the call list.
-
Tap Hold to suspend their audio and video.
-
To resume, select the participant and tap Resume.
Patents hear Provider Joining the Call sound
When a provider joins the call, patients hear the Provider Joining the Call sound.
If a patient finds this sound too loud on their end, we recommend telling them to lower the volume settings on their local device.
We're making this clarification because you requested it. Keep those suggestions coming! For the original suggestion, please see the request on Success Community.
Tip: The following workflows for managing device volume should be done before joining the online visit.
Mobile device
To adjust the device volume on a mobile device (for example a smartphone or tablet) use the physical volume buttons located on the side of the device.
Alternatively, on the screen of your device, you can tap the settings icon or swipe down on the top, to open the Control Center or Quick Settings to adjust the volume.
Desktop or laptop
To adjust the volume on a desktop or laptop use the physical volume buttons located on the keyboard of the device.
You can conduct the athenaTelehealth online visit in a more robust and improved experience:
You can still conduct the athenaTelehealth online visit as you did before. We're ensuring key features in the legacy experience are available in the new experience, which should save you time and ensure minimal loss of features and capabilities.
This means you can have both an improved experience and access all the same work workflows you're used to, like:
-
Video visit
-
Chatting with patients
-
Provider screen-sharing
Benefits of new features include:
-
Virtual visit video opens in separate window - The provider telehealth experience launches in a separate browser window.
-
Patient screen-sharing — Patients can share their screen with you so you can quickly and easily see things from their side.
-
Virtual whiteboard — Providers and patients can collaborate on a whiteboard (having your cursor draw with a marker tool)
-
Closed captioning — Closed captioning expands the accessibility of conversations in the online visit.
-
Virtual background — You can now blur the background or select a healthcare themed background so the patient can focus on their doctor and not what may be happening in the background.
-
Noise suppression — Reduction in background noise to ensure clear conversations.
-
Mute participants — Providers can mute disruptive audio from call participants as to not interrupt the online visit.
The following images demonstrate the athenaTelehealth online visit from the provider perspective.
-
When you're ready to start the athenaTelehealth online visit, click Start Online Visit.

-
Choose your audio and video settings.
-
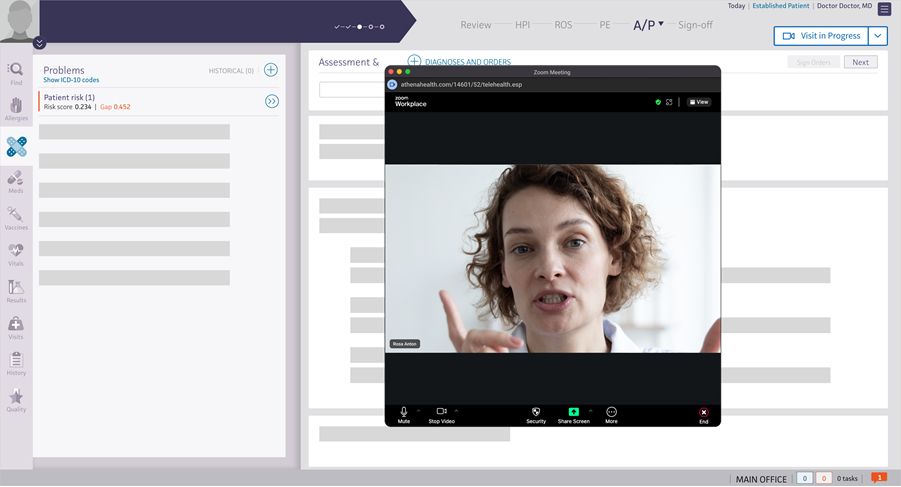
When the online visit starts, it appears right over the encounter and is popped out into a separate window. The visit window can be moved to a second monitor to allow full access to the athenaOne chart. Alternatively, the visit window can be resized and aligned alongside athenaOne on single screen systems.
Important: The patient manually enters their name when logging into the athenaTelehealth visit and this information does not reflect the patient banner in athenaOne. Please follow best practices to verify a patient's identity prior to rendering care.
-
When a patient joins, they will be immediately admitted to the visit.

-
Once joined to the call, familiar and new features are available. You can take several actions like text chatting, using a virtual background, or sharing your screen.

-
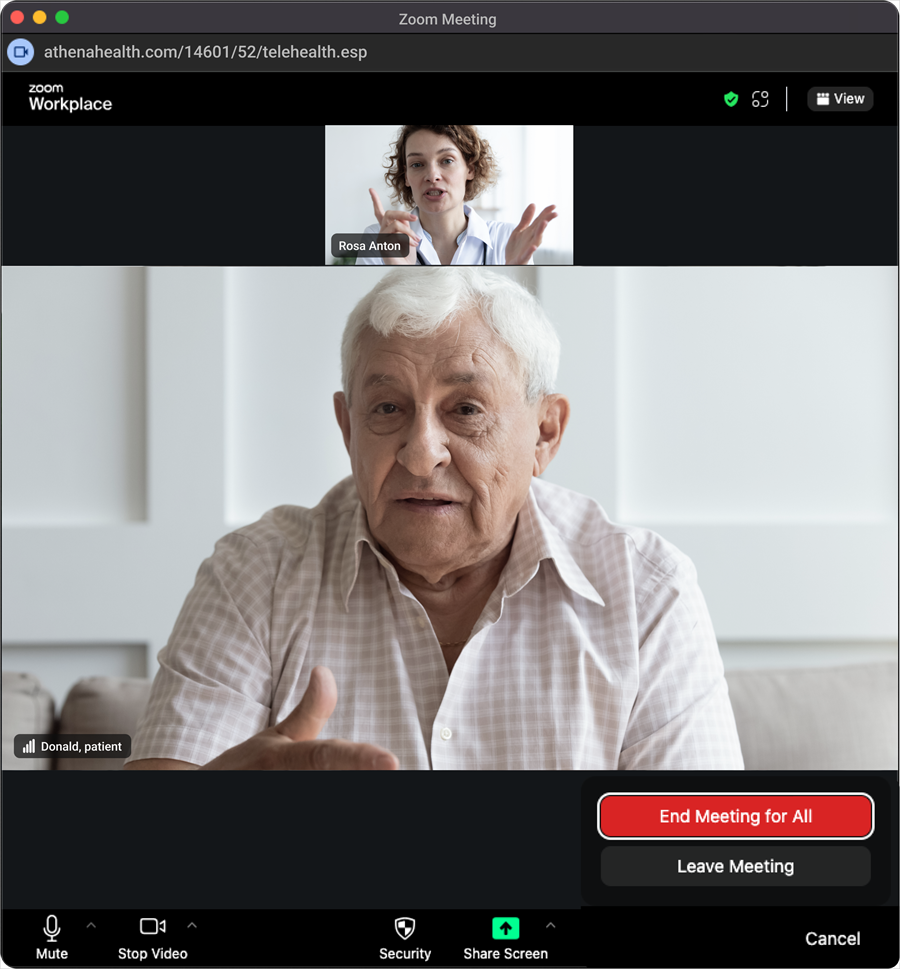
If you need to leave the meeting and return later, you can click the End icon and then choose Leave Meeting. When the visit is finished, you can click the End icon and then choose to End Meeting for All. Be sure to communicate with the patient whether the visit will continue and they should wait for your return or if the visit will end.
Setup instructions
Your technical staff must configure your network firewall to allow new ports. This update is intended to support an athenaTelehealth update.
Your technical staff must configure your network firewall to allow the following ports:
-
UDP ports 8801-8804
-
TCP ports 8801 and 8802
Your technical staff can make this update. For more assistance with this update, contact athenahealth Support or your Onboarding project team. On the Main Menu, click Support > Success Community > Contact Client Support Center.
While the athenaTelehealth online visit is in progress, you can take many of the same actions and complete the same workflows as you did before.
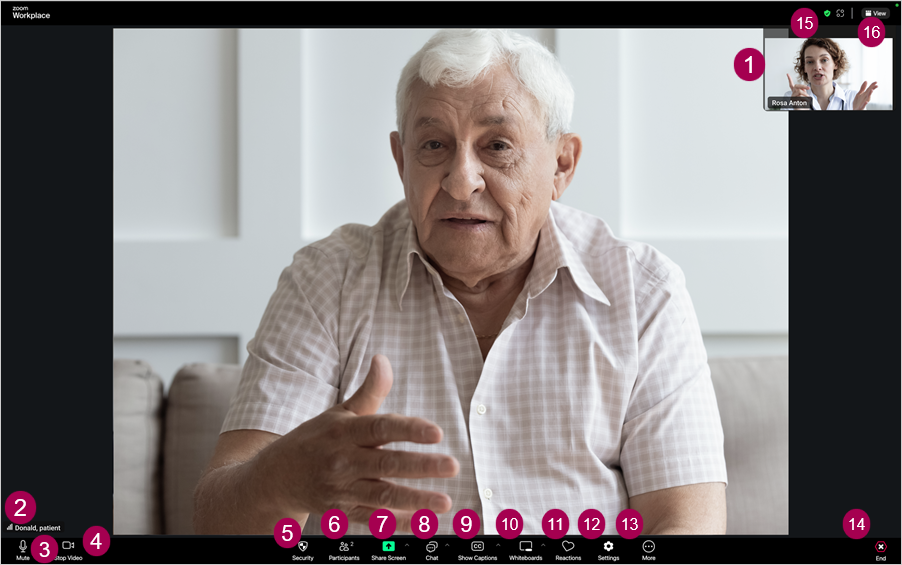
| Number | Action | Description |
|---|---|---|
| 1 | The provider's video displays | The provider's video displays in the top right corner of the athenaTelehealth online visit. |
| 2 | Patient label | The label provider appears on the video display window of the provider. |
| 3 | Mute or unmute your audio |
Mute
Additional audio settings are available when you click a downward arrow icon:
|
| 4 | Stop Video | Turns your video on or off.
Additional video settings are available when you click a downward arrow icon:
|
| 5 | Security | You can reference information regarding the secure connection to the athenaTelehealth online visit. |
| 6 | Participants | See who is participating in the athenaTelehealth online visit. |
| 7 | Share Screen | Share your screen with the patient. |
| 8 | Chat | Opens the right side chat window where patients can text chat with their provider and other participants. |
| 9 | Show Captions | Displays text captions of what the speaker is saying. |
| 10 | Whiteboards |
An area on a white screen shared by several users, on which they can write and draw. |
| 11 | Reactions | Allows patients to send emoticon reactions during the online visit. For example, a thumbs up when they have no additional questions. |
| 12 | Settings |
Access settings options, including:
|
| 13 | More |
In this field, depending on the size of the online visit, you can access more actions like:
Note:Stop Incoming Video turns off the video of others on the call. Sometimes this can help if you're experiencing poor network signals. |
| 14 | End |
Leave the meeting. Once you click End, you can:
|
| 15 | Top right corner of the online visit |
You can see apps that access meeting content — a message displays in the top right corner. You can click it to see apps that are accessing your meeting content.
|
| 16 | View | Change the view of the online visit. |
Note: For providers, Stop Incoming Video always appears in the list of options when you click More. This is the same point of access for patients. What appears in the More actions options depends on the size of the online visit (can be impacted by the width of the screen). The only option that always appears is Stop Incoming Video.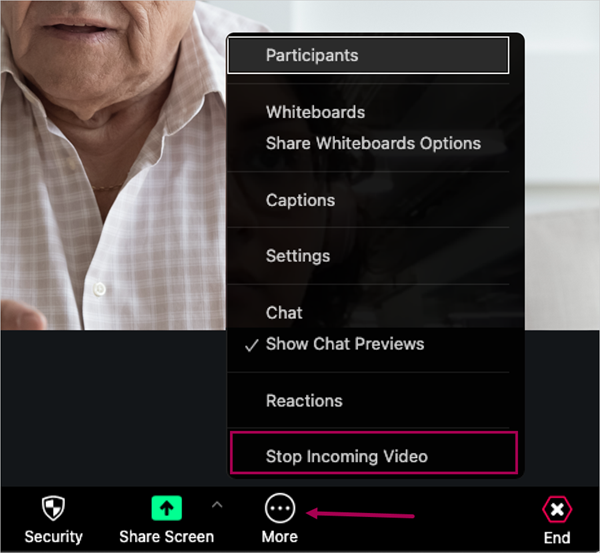
In athenaOne mobile, we also updated the look and feel of athenaTelehealth to allow us to provide better feature support in the future.
Note: The screen sharing and whiteboard options are currently not available in athenaOne mobile. We plan to add these features in a future release.
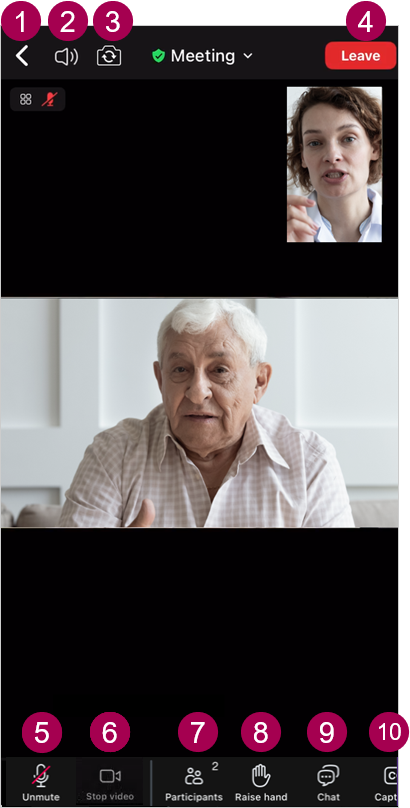
| Number | Action | Description |
|---|---|---|
| 1 | Minimize |
Reduces the video window so you can see the patient's chart. Tap the reduced video window to make it full screen. |
| 2 | Change audio source |
Changes your audio source. You'll be asked for your audio source when you join the call and also have the option to dial in. |
| 3 | Switch camera |
Switches between your front and back camera. You can also double tap the video screen to switch between cameras. |
| 4 | Leave | Leaves the meeting. |
| 5 | Mute/Unmute |
Turns your microphone off (mute) or on (unmute). When this icon is crossed out, your audio is muted. |
| 6 | Stop Video |
Turns your video off and on. When this icon is crossed out, your video is off. |
| 7 | Participants | Shows who is participating in the athenaTelehealth online visit. |
| 8 | Raise or Lower hand | Signals that you want to speak or no longer want to speak. |
| 9 | Chat |
Opens an area of the screen where you can chat with participants. |
| 10 | Captions |
Turns captions on or off. |
The following images demonstrate the new athenaTelehealth online visit from the patient perspective.
-
The patient or a participant related to the patient (like spouse, family, caregiver) fills in the required fields and clicks Continue.
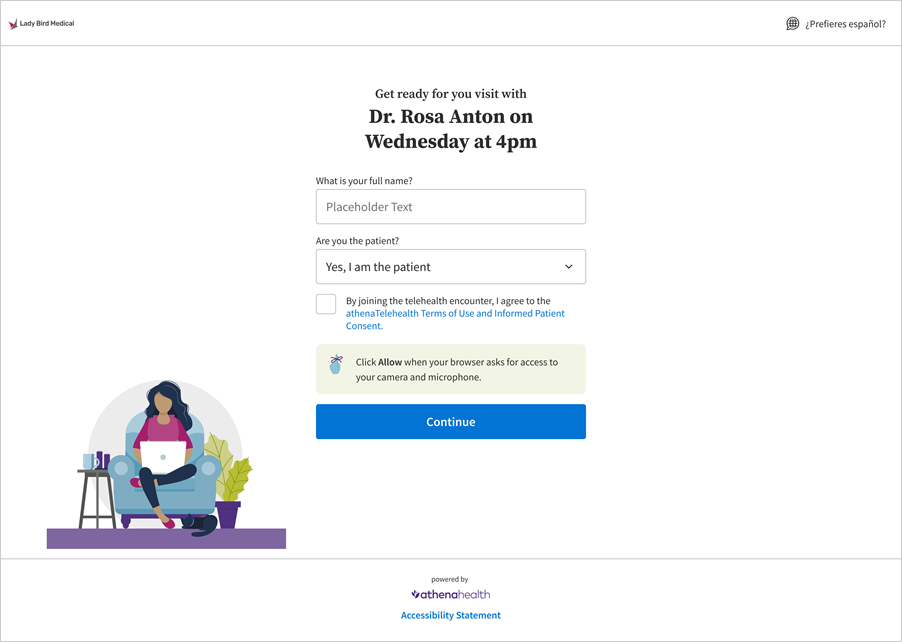
-
Once they join the visit, they see a preview of the provider's video and they can choose their own audio and video settings.
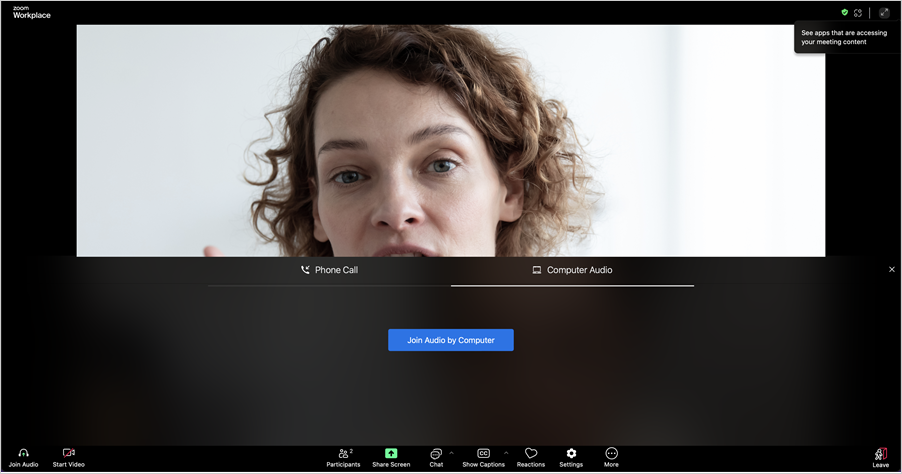
Note: The patient does not see a preview of the provider unless the provider is already on the call. Patients that join before the provider will see their own video preview along with audio and video settings.
-
Once the visit starts, the patient appears in the upper right corner and the provider appears in the main view.
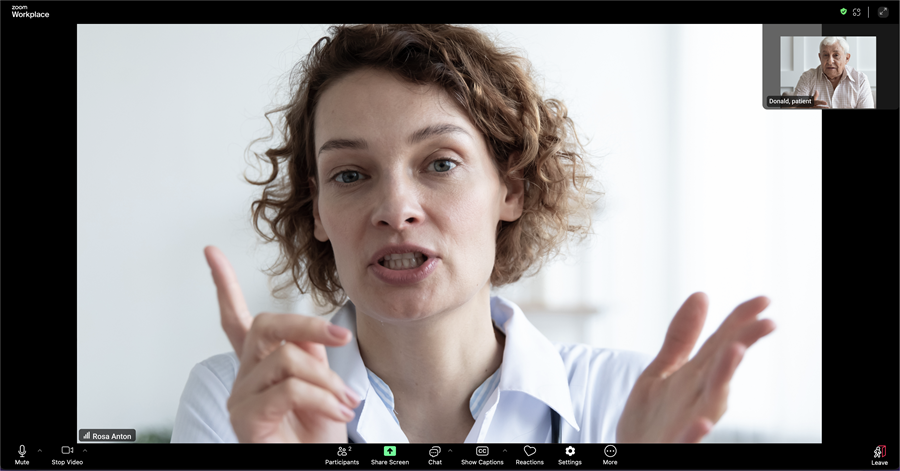
-
Once the provider ends the visit, the patient sees a meeting ended message and clicks OK to proceed to a quick start-based survey. If the provider does not select end meeting for all, the patient must click Leave Meeting.
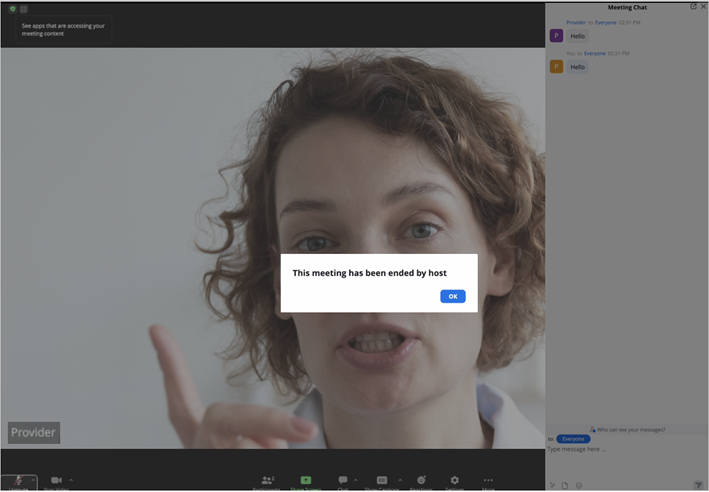
-
The patient fills out a quick and brief star-based feedback survey regarding their experience with the quality of the athenaTelehealth online visit.
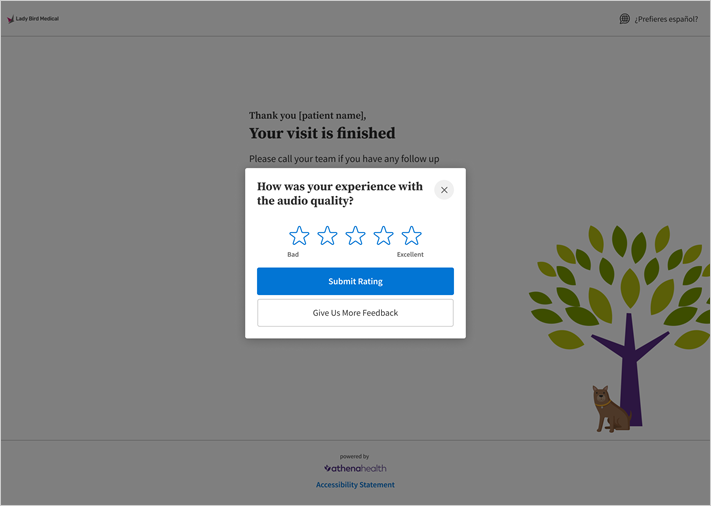
-
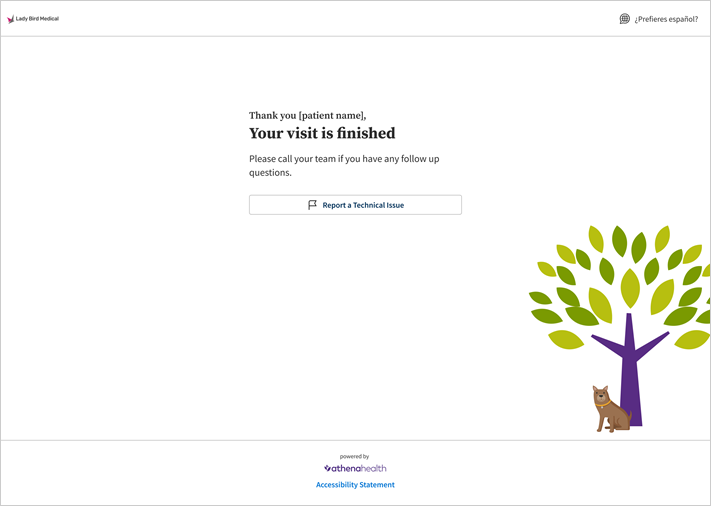
Once they finish the brief survey, they are taken to the finished visit page where they can report a technical issue if needed.
While the athenaTelehealth online visit is in progress, your patients can take many of the same actions and complete the same workflows as they did before.
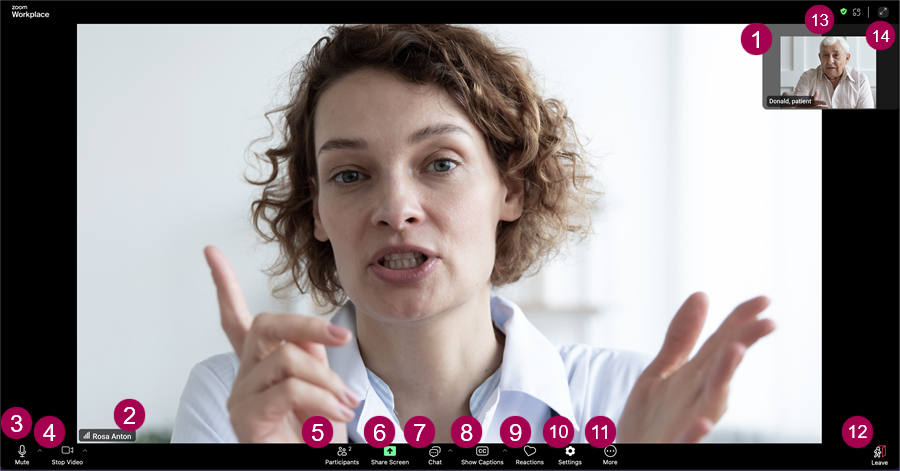
| Number | Action | Description |
|---|---|---|
| 1 | The patient's video display | The patient's video displays in the top right corner of the athenaTelehealth online visit. |
| 2 | Provider label | The label provider appears on the video display window of the provider. |
| 3 | Mute | Mute or unmute your audio. |
| 4 | Stop Video | Turns your video on or off. |
| 5 | Participants | See who is participating in the athenaTelehealth online visit. |
| 6 | Share Screen | Share your screen with the patient. |
| 7 | Chat | Opens the right side chat window where patients can text chat with their provider and other participants. |
| 8 | Show Captions | Displays text captions of what the speaker is saying. |
| 9 | Reactions | Allows patients to send emoticon reactions during the online visit. For example, a thumbs up when they have no additional questions. |
| 10 | Settings |
|
| 11 | More |
Access more actions like:
Note: Stop Incoming Video turns off the video of others on the call. Sometimes this can help if you're experiencing poor network signals. |
| 12 | Leave | Allows the patient to leave the athenaTelehealth online visit. |
| 13 | Top right corner of the online visit |
You can see apps that access meeting content — a message displays in the top right corner. You can click it to see apps that are accessing your meeting content.
|
| 14 | Full screen | Make the online visit full screen. |
Note: For patients, Stop Incoming Video always appears in the list of options when you click More. This is the same point of access for providers.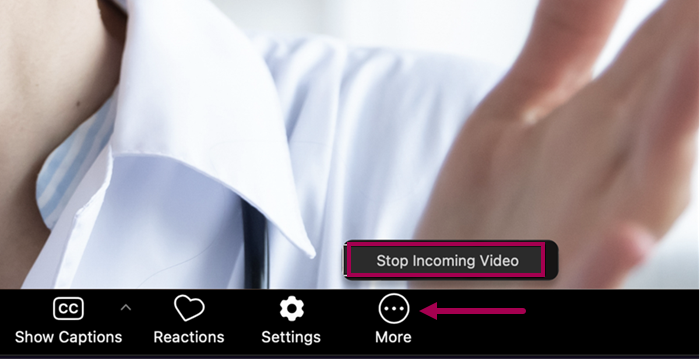
You can now conduct online group sessions using athenaTelehealth.
For more information on Group Sessions in athenaOne, refer to Group Sessions in O-help.
Important
The following sections are for the Group Sessions feature.
When the patients join the online visit, they appear as online in the schedule.
The physician or other clinicians can join per their usual workflows. All features available in single patient online visits are available in online group sessions. For more information refer to O-help: athenaTelehealth — Reimagined athenaTelehealth Experience

The group appointment types you create allow your staff to schedule multiple patients for the same online appointment slot. As a clinic manager or administrator, you’ll need to create these appointment types before your practice can add online group appointments to a provider’s schedule.
Important
You must have the Schedule admin permission to perform these tasks.
Create appointment type for telehealth group sessions
-
On the main menu, click Settings. Under ADMIN, click Schedule.
-
In the left navigation menu that opens, locate PRACTICE LINKS > Scheduling. Click Appointment Types.
-
In Appointment Types, click Add new.
-
Enter the following
-
Name — Enter the full name for the appointment type, up to 20 characters. In this example, a clinic administrator is creating an appointment type for “Group Seasonal Depression."
Best practice
We recommend including the word Group in the name to help staff further identify the appointment type. - Short Name — Enter an abbreviated name or acronym for the appointment type, up to four characters.
- Duration — Enter the duration in minutes.
- Appointment Type Class — Telehealth Distant Site Visit
- Schedule color (Optional) — Click Select. Select a color to apply to appointments of that type. While optional, using colors for different appointment types can help your staff identify specific appointments more quickly.
- Group Session — Under Scheduling:
- Locate Group Session.
- Select Yes. This enables staff to add multiple patients to appointments of this type.
- Display Name — Enter a name for the appointment type that patients will see in the appointment section of the patient portal.

-
For more information refer to Create Appointment Types for Group Sessions in O-help.
Any specialty can schedule a group telehealth session, however the ability to use the group session document template is only for the Behavioral Health specialty.
For more information refer to Add Group Scheduling Templates or Manage Group Session Template Drafts in O-help.
To add a group session template
- Access the Schedule Builder Dashboard. In the dashboard, click Add Template
 .
. - In Add Template, click Create New Template.
- Select a color and enter a name for the template. We recommend including the word ‘group’ in the name to further identify a group session.
- In Apply to, select the provider’s group, their department, and the provider.
- Click Group session template to enable it.
- In Apply on, define starting and ending dates. This determines when the template's time slots will appear on the provider’s calendar for scheduling.
Note
To quickly define a date range, select options from the Pre-calculated dates menu. In this example, selecting Next Month automatically enters the first day of the following month as the start date and the last day of the following month as the expiration date. If the provider holds sessions on holidays, click Schedule on holidays. If left deselected, the template won’t include appointment types on holidays. - In Frequency, select how often the provider will facilitate the group session. Options vary depending on the frequency selected. In this example, the frequency is every Monday and Wednesday.
- In Build Schedule, select the Appointment type and enter the Start time. athenaOne automatically calculates the ending time based on the appointment type’s length and the start time entered.
When you define a start time for a session, a preview of what will appear in the provider’s schedule opens to the right. Adjust the template settings as needed.
In Build Schedule, define the session capacity and open or closed status for group sessions.- Capacity — Required for group scheduling templates. Enter the maximum number of patients your staff can schedule for a group session, up to 50 patients. For more information, see Capacity in Quick Reference: Schedule Builder Template Fields.
- Open session — Indicates that scheduling staff can book patients at any point within a series of sessions. If deselected (a closed session), it indicates to staff that new patients should not be added to a future session after first session has started. Refer to Open Session in Quick Reference: Schedule Builder Template Fields for more information.
Note
Closed session slots include a C icon to indicate the provider's preference only. athenaOne won't prevent you from scheduling patients for the session after the session or session series has begun.
-
To include additional appointment types to the provider’s template, click Add appointment type
 . In the added section, select the appointment type and configure the appointment details. You can continue to add appointment types to the scheduling template as needed.
Note
Click Add Time Range to create multiple time slots for the same appointment type within the provider’s schedule.
To preview scheduled slots before saving, return to the Apply on section of template settings and click Preview. A calendar view with the template occurrences appears. - Click Save and Apply. A confirmation message appears with the following information:
- Appointments that will need to be rescheduled — Lists the number of existing appointments impacted by the template's start times, duration, and appointment types selected. You can either click Back and modify templates to avoid rescheduling or click Continue. Displaced appointments will appear under Claims > Workflow Dashboard in the Appts to Reschedule column for rescheduling.
- Sessions that will be created — Lists the total number of new sessions added to the template. If this number looks incorrect, click Cancel and check settings in Apply on and Build Schedule before continuing.
- Sessions that will be updated — Lists the number of existing sessions that have the same start time and duration but have a new appointment type applied.
- Sessions that will be removed — Lists the number of existing sessions that will be removed if changes are applied.
When ready, click Continue.
Note
If you modify the date and time of a group template so it overlaps other templates, a warning message appears under Start time and Repeat until fields, prompting you to adjust the time range. You will be prevented from saving and applying the group template until you correct any time slot overlaps.
If you're not ready to apply the template to a provider's schedule, click Save as Draft instead of Save and Apply. For information on template drafts, see Manage template drafts. Also see Save and delete options for additional actions. - At the top of the template settings panel, click Navigate back to Dashboard. The new group session template appears in the dashboard.
You must book patients for group sessions via Appointment Schedule.
For more information refer to Book Patients for Group Sessions in O-help.
You can reschedule appointments for group sessions via Appointment Schedule.
For more information refer to Reschedule Group Session Appointments in O-help.
You can cancel appointments for group sessions via Appointment Schedule.
For more information refer to Cancel Group Session Appointments in O-help.
As group session participants appear online, access your Inbox or the Appointment Schedule calendar and check each of them in.
For more information refer to Check Patients in and Start Group Sessions in O-help.
Select one patient and enter intake or exam and join the visit.

The provider then becomes the host of the visit.
When you document in the encounter, the athenaTelehealth visit length will be available to add to the note.

The visit length will be the same for all patients in the visit.

For more information on the documentation of Behavioral Health group sessions, refer to Document Group Sessions.
You can use the athenaOne app on your iPhone or iPad to complete the Exam stage of an athenaTelehealth visit. For all other stages of the visit, please use athenaOne.
What you can do in athenaOne
- Set up and test the athenaTelehealth service.
- Schedule an athenaTelehealth appointment.
- Send the patient links to their telehealth visit and to check their device's compatibility.
- Check if the patient is online.
- Start or join the athenaTelehealth visit from Check-in, Intake, or Exam.
- Hear a sound when the patient joins the call.
- Complete the Intake and Exam stages of the encounter.
-
Have more than four participants join an athenaTelehealth online visit at the same time. The extra participants can be from either the practice side or the patient side.
Important: This extra participant feature does not support group visits with multiple patients. This update only supports one single patient appointment, where in you can add multiple participants. - See the athenaTelehealth call length during the call.
- View, copy, and paste the athenaTelehealth call length after the call.
- Close and sign the encounter.
- Complete checkout.
- Bill for the athenaTelehealth visit.
- Run reports to see all athenaTelehealth messages sent to a patient, including those sent manually during Check-in.
What you can do in the athenaOne app
- Check if the patient is online.
- Start or join the athenaTelehealth visit from Exam.
- Send the athenaTelehealth visit link to the patient.
- Pin a participant's video so it's the largest video displayed.
- See the athenaTelehealth call length during the call.
- Text chat with patients in the Chat window.
- Adjust connection quality settings that may boost your call connectivty.
- Complete the Exam stage of the encounter.
- Schedule an athenaTelehealth appointment (I.e., an appointment with the Telehealth Distant Site Visit appointment type class).
Important: Regardless of how you or your patient schedule an telehealth appointment, you can choose to use the athenaTelehealth service for the appointment. The only requirements are that:- It's an appointment with the Telehealth Distant Site Visit appointment type class; and,
- If you're using the athenaTelehealth service in test mode, you select Generate athenaTelehealth video link option to enable the athenaTelehealth service for the appointment.
- Choose to use athenaTelehealth for the appointment
See To generate an athenaTelehealth testing session for more information. - Patients have the option to self-schedule their own athenaTelehealth appointments from both the consumer scheduling application and the Patient Portal.
- Consumer scheduling application — The following image is an example of the desktop scheduling experience.
- Patient Portal — The following image is an example of the desktop scheduling experience.
- Consumer scheduling application — The following image is an example of the desktop scheduling experience.
- Easily spot athenaTelehealth appointments in your schedule through the video icon that indicates that the appointment is for an online visit.
- Send Link to Patient — Click this button to send your patient an on-demand ReminderCall message. This workflow opens a new window that allows you to select or enter the contact information that receives the link, which is any email address or phone number that has Patient Portal access for the patient.
- Decide whether to use an audio call or video conferencing.
- View if a patient is online.
- Start the online visit from check-in.
- See a patient information banner.
- Join the call
- Adjust the patient's video as needed to complete the Exam
- Share your screen
- Choose to conduct this part of the online visit In the athenaOne app
There is not an option to use video conferencing from Checkout stage, but you can use the link in the Check-in stage instead.
For your Spanish-speaking patients, you can offer them the athenaTelehealth en espanol option. athenaTelehealth en espanol translates all the text in the online visit experience and any terms and conditions from English to Spanish. The language spoken in the online visit is decided by you and your patient.
The online visit workflow, the pre-appointment device check workflow, and the athenaTelehealth terms and conditions all support both Spanish-language and English-Language text:
- For athenaTelehealth en español, click the Esp option
 .
. - For athenaTelehealth in English, click the Eng option
 .
. - When your patient selects Spanish, the language selection is saved for later. When the patient returns, they see the workflow translated into the language they last selected.
- If the patient clears their browser history the language defaults back to English.
Your patient currently receives ReminderCall emails in Spanish based on their Quickview preferred language.
You can also generate on-demand and 15-minute prior SMS text messages in Spanish.
- Before the day and time of their athenaTelehealth online visit your patient receives a link to join the scheduled online visit.
- On the day and time of the visit, they click their athenaTelehealth online visit link.
The online visit workflow appears with the "Get ready for your visit" page of the virtual waiting room displayed. - The patient can click the Esp icon
 before entering the required self-identification information.
The content of the online visit workflow translates to Spanish.
Note: The patient can click the Eng icon to translate the content of the online visit workflow to English.
Patients do not need to download an app or log on to their Patient Portal account to participate in an athenaTelehealth visit. In fact, patients do not even need to have a Patient Portal account, although it is encouraged.
Patients simply schedule a telehealth appointment and follow the steps in the confirmation and reminder messages they receive.
When the patient joins the online visit, they see the name of your practice at the top of the page. (Alternatively, if you have the Communicator Brands feature, they see the name of your brand — or if there is more than one brand, the name of the brand associated with the department in which the appointment is scheduled — at the top of the page.)
The following sections provide an overview of the patient experience:
Patients can schedule their own athenaTelehealth appointments in the consumer scheduling app and the Patient Portal.
Your patient successfully self-scheduled an athenaTelehealth appointment
Your patient sees the appointment details section for the URL link to the online visit in the Location section of the Appointment Scheduled page.
Before the day of the online visit, we recommend that you instruct your patient to test their device audio and video by clicking the guidance for preparing for your online visit link.
Important: The actual link to the athenaTelehealth appointment doesn't work until the day and time of the appointment, but the guidance for preparing for your online visit link that goes to the pre-appointment device check workflow is always available.
After completing the self-scheduling workflow, your patient can download an ICS file that has both the link to the athenaTelehealth visit and the pre-appointment device check workflow. The ICS file downloads when your patient clicks Add to Calendar and selects the type of calendar they'd like to add the appointment to (either Gmail, Outlook, or Apple calendar).
Share the link to the pre-appointment device check workflow directly with your patient
Do you need to share the link to the pre-appointment device check workflow directly with your patient? You can share the following link:
https://telehealth.px.athena.io/device-check/
Your patient can view upcoming athenaTelehealth appointments on the Patient Portal in both desktop and mobile.
- Click the Join Telehealth Call button to start the visit.
- The athenaTelehealth visit opens the visit in a new browser tab.
- You can check in, reschedule, or cancel the visit as you normally would.
Note: The athenaTelehealth appointment does not include physical location information.
athenaOne uses the ReminderCall service to send patients the link to the virtual patient room and the link to the pre-appointment device check workflow (patients receive an email or text message, depending on their preferred contact method).
To ensure that the patient can access the online visit, find the link on the Check-in page (in the Appointment Information section) and, through a ReminderCall message, send it in an email or SMS text message to the patient.
Important: You can use the video conference call as an audio-only call, without video. However, an audio-only call could have implications for coding and billing as well as the appropriate patient consents required for the visit. For more information, see COVID-19 and Telehealth: Coding and Billing on the Success Community.
When an athenaTelehealth appointment is within three hours from the time it is scheduled or rescheduled, the patient receives an automatic confirmation email.
The patient link to the athenaTelehealth visit is included in the email along with the link to the pre-appointment device check workflow, but you can also manually send your patient these links.
Please ensure that providers and practice staff instruct patients to test their settings through the pre-appointment device check workflow prior to their visit.
We recommend that providers and patients click the link to the pre-appointment device check web application and perform the workflow to ensure that their intended device and browser for the athenaTelehealth session will work on the day of their visit. This feature reduces the amount of time clinical staff has to spend helping patients troubleshoot issues on the day of the visit, which helps maintain your schedule.
Patients can:
- Access the workflow through a web browser on desktop and mobile devices.
- Start the pre-appointment device check workflow by clicking the link to the application whenever they want, the link is available before and on the day of the appointment.
- Choose to complete either an English-language workflow or a Spanish-language workflow.
The athenaTelehealth experience for patients works through your web browser. Patients do not need to download an app to their device or log on to their Patient Portal account. athenaTelehealth enables HIPAA compliance.
- Consent to athenaTelehealth appointments for their encounters.
Important: Acknowledge universal consent language for athenaTelehealth Appointments for each encounter. - Schedule athenaTelehealth appointments online at their own convenience.
- Receive the following message for standard athenaTelehealth appointments.
- Receive the URL link to the athenaTelehealth visit via their preferred contact method (text or email) or directly from practice staff if needed.
- Join a private virtual waiting room.
Note: The patient enters a virtual waiting room until a practice user joins the session, at which point the patient enters the call. The virtual waiting room expires after one hour (60 minutes) and the patient must reenter the waiting room. - Select English or Spanish as the text language.
- Enter their name to display it in the athenaTelehealth session.
- Get alerted if they are using an unsupported browser or the application is unable to interact with their camera and/or microphone.
- Allow athenaTelehealth access to their device's camera and microphone for video and audio to connect with the athenaTelehealth application.
- Read a message stating that the call will begin when their provider or a practice staff member joins the call. Your patient can also verify the appointment details on this screen to confirm that they've joined the right session.
Note: Your patient joins the call automatically as soon as you do. - Preview and manage their device settings in the virtual waiting room.
- Mute their microphone.
- Choose to use their front-facing or back-facing camera on mobile devices.
- The online visit starts when the provider or a member of your practice staff joins the online visit.
- See a "Thank you!" screen when they leave the athenaTelehealth session.
Note: The screen tells the patient that they can close the window. If you are done with the visit and no other practice users are joining, make sure that the patient understands they can leave the session as well. If another practice user is joining, inform the patient to stay present on the session.
Confirmation email
-
Details about the appointment
-
Option to add to calendar
-
Link to start device check — To ensure their device will work during the visit
-
Reminder to join the session 5-10 minutes before the scheduled time
-
Link to join the telehealth visit
-
Reminder to use the latest version of your web browser
-
Reminder to allow access to your camera and microphone
-
Link to check out our FAQ (for online appointments)
Reminder email
-
Details about the appointment
-
Option to add to calendar
-
Select an option to let the practice know if you can make it
-
Reminder to join the session 5-10 minutes before the scheduled time
-
Link to join the telehealth visit
-
Link to check out our FAQ (for online appointments)
Reminder SMS text
-
Details about the appointment
-
Reminder to join the session 5-10 minutes before the scheduled time
-
Link to join the telehealth visit
Automatically
If a patient's communication preferences allow them to receive autogenerated SMS text messages and emails, they automatically receive a confirmation email, reminder email, and text message with:
-
Link to join the telehealth visit
-
Link to start device check — To ensure their device will work during the visit
Manually
You can also manually send the links for joining the athenaTelehealth visit and completing the pre-appointment device check to the patient prior to their appointment.
You can send these links from both athenaOne and the athenaOne app as either an:
-
SMS text message
-
Email
Important: Texting the same number multiple times in a row may cause the mobile carrier to treat the message as junk and not deliver it.
In athenaOne
You can send links to patients on the following pages:
-
Check-in
-
Appointments
In the athenaOne app
You can send links to patients on the following pages:
-
Appointments
For more information about sending links manually in athenaOne, see:
If you use the standard ReminderCall settings, patients who have agreed to receive autogenerated email and SMS text messages typically receive the following messages. Each message includes the link to the patient's athenaTelehealth visit.
-
Confirmation email: Sent after the athenaTelehealth appointment is scheduled
-
Reminder email: Sent 2 days before the athenaTelehealth appointment
-
Reminder texts:
-
Sent 2 days before the athenaTelehealth appointment
-
Sent 15 minutes before the athenaTelehealth appointment
-
Note: SMS text messages are available only to practices using athenaCommunicator.
-
Confirmation email: Sent after the athenaTelehealth appointment is scheduled
-
Reminder text: Sent 15 minutes before the athenaTelehealth appointment
Can customize
On the ReminderCall Settings page in athenaOne, you can customize:
-
When messages are sent
-
What types of messages are sent
Important: Your changes will affect other types of appointments.
Cannot customize
You cannot customize:
-
Wording of messages
-
Look of messages
Patients receive ReminderCall emails and texts in Spanish based on their preferred language on the Quickview.
You can generate a report to view any email or text message sent to patients via the ReminderCall service. These reports include any athenaTelehealth-related messages and links sent to the patient manually.
Reports you can run
-
Patient Communication Activity report — Shows messages for any patient.
-
Patient Communication History report — Shows messages for an individual patient.
Tip: Be sure to select ReminderCall as the Service and Detailed as the Report type.
For more information, see To view ReminderCall messages sent to patients.
The messages shown in the virtual waiting room update automatically, depending on when the patient joins the athenaTelehealth visit, how long they have been waiting in the virtual waiting room, and if a member of the care team has sent an update to the patient to indicate they are running late for the appointment.
Here's an example of what a patient sees while they are in the virtual waiting room:
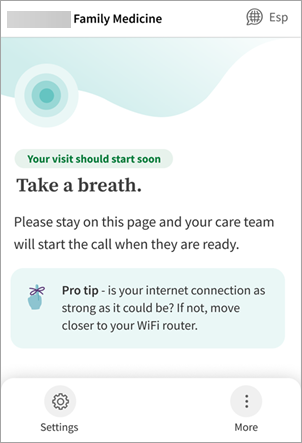
The messages include the status of the online visit, an automated message from the care team, and a pro tip. This information helps manage patient expectations while they wait for their appointment to begin and improves the athenaTelehealth patient experience.
Status of online visit
One of the following statuses appears near the top of the page:
-
You're set up — Appears if the patient joined the online visit early.
-
Your visit should start soon — Appears at the time the appointment is scheduled to begin.
Note: If six minutes pass, an information alert appears at the top of the page with a message to reassure the patient that the care team can see that they are online. -
We apologize for the delay — Appears if it is 15 minutes past the time the appointment was scheduled to begin or if a member of the care team sent an update to the patient indicating that they are running late.
Message from the care team
A message provides the patient with instructions or informs them that their care team is running late.
Note: You cannot edit this message or write your own message and send it to a patient.
Pro tip
A tip appears below the message from the care team to help the patient improve their online visit experience. For example, the tip may ask the patient if they are in a private place or suggest how they might improve their internet connection.
If you are running a little late, you can let the patient know of the delay sooner than the automated messages would relay this information by sending an update to the patient.
The status and message shown in the virtual waiting room then change to the "We apologize for the delay" status and the "Your care team is running a little late" message.
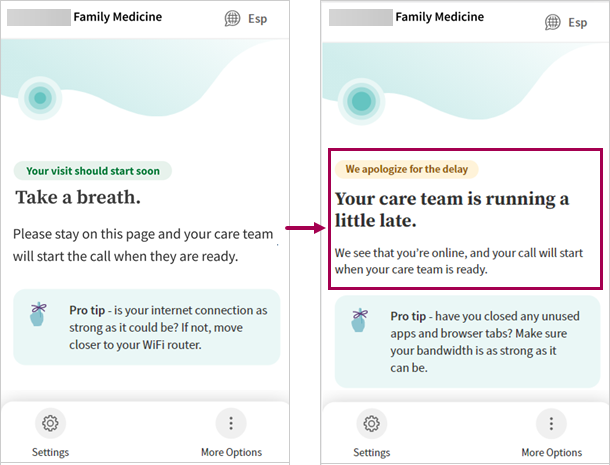
Note: If you do not send an update, these message still appear at 15 minutes past the scheduled appointment time.
These capabilities are also available in the athenaOne app.
Important: After a member of your staff joins the online visit, the patient is no longer in the virtual waiting room and, therefore, cannot see any messages alerting them that their care team is running late. In such cases, we recommend that a staff member join the call to provide the patient with updates.
-
Display your schedule as follows on either of these pages:
-
Clinician home page — Click the athenaOne logo in the top left corner.
Tip: To set the Clinician home page as your default, click your username and under USER HOMEPAGE, select Clinician. -
Today's schedule — Click
 in the status bar at the bottom right of the page.
-
-
Click
 .
. -
Click Send Running Late Status.
-
Optional: Review the message that the patient will see.
Note: You cannot change the wording of the message. -
Click Send Status.
athenaTelehealth updates the message displayed to the patient in the virtual waiting room to indicate that you are running late.
Notes:-
The message can take up to one minute to be displayed.
-
The patient hears an audio tone to alert them of this change.
Exception: The patient will not hear an audio tone if they are using an iOS device. -
The patient cannot send you a message in response.
-
If a member of your staff joins the online visit before you do, the status of the appointment updates to "In progress," and you cannot send an update to the patient.
-
-
Display your schedule as follows on either of these pages:
-
Clinician home page — Click the athenaOne logo in the top left corner.
Tip: To set the Clinician home page as your default, click your username and under USER HOMEPAGE, select Clinician. -
Today's schedule — Click
 in the status bar at the bottom right of the page.
-
-
Click
 .
.
If a member of the care team already sent a update to the patient, a message appears showing who sent the update and when it was sent.
You can see the duration of an athenaTelehealth call both during and after the call as follows.
During the call
During an athenaTelehealth call, you see a timer at the top of the telehealth window.

The timer shows the duration of the athenaTelehealth appointment in progress so you can easily keep track of time to maintain your schedule.
After the call
When an athenaTelehealth call ends, you see View Telehealth call length in the Assessment & Plan.
Click View Telehealth call length to see a summary of the call:
- Total time
- Provider name
- Username
- Start time
- End time

Is the "total time" the same as the "total provider time on day of service"?
Not necessarily. The total time includes the amount of time with the staff and the provider. For the total provider time on day of service, refer to the amount of time listed next to the provider's name, below the total time.
To copy and paste the athenaTelehealth call duration
-
In the Assessment & Plan section, click View Telehealth call length.
-
Hover over the call duration.
A copy and paste icon appears.
 -
Click
 to copy the duration of time.
 -
Put your cursor in the field where you want to paste it.
The length of the telehealth encounter appears in that field.
The difference between test mode and live mode is that test mode lets you individually select which appointments use the athenaTelehealth service, whereas live mode automatically uses the athenaTelehealth service for all appointments that are set up as telehealth appointments.
Test mode
When the athenaTelehealth service is first turned on for your practice, it's enabled in test mode for all departments at your practice. Test mode lets you familiarize yourself with the functionality and train your staff using a combination of mock and live appointments.
In test mode, you manually select which appointments with the Telehealth Distant Site Visit appointment type class use the athenaTelehealth service.
Note: You can use the athenaTelehealth service in test mode for as long as you want; there is no time limit associated with test mode.
Live mode
When you're ready to start using athenaTelehealth more broadly for patient appointments, see How to switch athenaTelehealth from test mode to live mode.
In live mode, all appointments with the Telehealth Distant Site Visit appointment type class automatically use the athenaTelehealth service.
Note: You can switch any department back to test mode at any time.
Patients and providers see a warning when video window opens if they are using an unsupported browser. athenaTelehealth relies on access to camera and microphone functionality not available in older browser versions.
Desktop — practice-facing
- Google Chrome (latest three versions), for macOS and Windows
- Microsoft Edge (chromium-based, version 79 and later), for Windows
- Safari (version 12+) on macOS
Important:athenaTelehealth is not supported on Internet Explorer.
Desktop — patient-facing
- Google Chrome (latest three versions), for macOS and Windows
- Microsoft Edge (chromium-based, version 79 and later), for Windows
- Safari (version 12+) on macOS
- Firefox (latest three versions), for macOS and Windows
Mobile — patient-facing
- Google Chrome on Android (latest three versions)
- Samsung Internet Browser (version 12+) on Android
- Safari on iOS 12+
Important:athenaTelehealth is not supported on other browsers (such as Chrome) on iOS, because those browsers do not support WebRTC.
See athenaOne Technical Requirements for more information.
The athenaTelehealth patient experience is available for any video-enabled desktop or mobile device through a Web browser.
For the mobile experience, patients can use the Chrome browser on Android devices or the Safari browser on iPhone devices.
Your patient must allow the athenaTelehealth app access to their device's camera and microphone.
Contact athenahealth for information on enabling athenaTelehealth.
- New to athenahealth? — athenaTelehealth can be enabled by the athenahealth Onboarding team that handles your implementation.
- Already partnered with athenahealth? — Contact your Customer Success Manager for more information.
- Participated in the athenaOne athenaTelehealth beta program? — Your organization maintains full access to the updated version of athenaTelehealth, and you don't need any additional setup or configuration.
Set-up overview
- Update your network filtering to allow access to the *.chime.aws domain.
This allows you to access the athenaTelehealth service. - Enable the ReminderCall service.
The ReminderCall service generates automated phone, email, and text messages to remind patients about upcoming appointments and provide them with pre-appointment instructions and the link to their athenaTelehealth visit. - Disable the functionality that groups ReminderCall messages when patients have multiple appointments on the same day.
This ensures that patients receive a link for each athenaTelehealth visit if they have multiple visits scheduled for the same day. Otherwise, patients receive a message for only their earliest appointment. - Ensure the patient's communication preferences allow them to receive auto-generated SMS text messages and emails so they receive the link to join their athenaTelehealth visit.
- Allow the athenaTelehealth service to access your microphone and camera to ensure that your audio and video work properly during athenaTelehealth visits.
- Assess and supplement the patient consent language in the athenaTelehealth Terms of Use and Informed Patient Consent to meet local regulations.
- Set up athenaTelehealth appointment types.
- Change how athenaTelehealth displays your name to patients.
Practices are responsible for:
- Obtaining all necessary patient consents required to provide athenaTelehealth services.
- Determining if the patient consent language used by athenahealth meets your local regulations. Please see athenaTelehealth Terms of Use and Informed Patient Consent on the Success Community for more information.
Note: Your practice may need to disable IP-based filtering for your practice users. If your practice uses domain name-based filtering, please add the "chime.aws" domain name to that filter.
Before you can use the athenaTelehealth feature, the feature must be enabled for your practice and you must:
- Ensure that your device and network settings, the computer and VPN that the provider uses to connect to athenaOne, can access athenaTelehealth. You can perform this test on the Test Datacenter Connectivity page.
- Ensure that you have the ReminderCall service enabled.
Note: For patients to automatically receive the URL link via their preferred contact method, ReminderCall must be enabled. - Disable the mail merge functionality that groups ReminderCall messages for appointments scheduled on the same day, so that patients receive each telehealth URL. For more information see ReminderCall Settings.
- On the Appointment Types page, edit or create at least one appointment type to have the Appointment type class field set to Telehealth Distant Site Visit.
- Update existing appointments to a telehealth-specific appointment type.
Note: On the Manage Appointments page, you can change the appointment type of booked appointments and reschedule every appointment with the same details in the same timeslot. The patient receives updated ReminderCall confirmation messages. This feature allows you to send your patients the URL even if their appointment is within the next few days.
Please test the provider's ability to connect to athenaTelehealth prior to using athenaTelehealth.
- In athenaOne, display the Test Datacenter Connectivity page:
On the Main Menu, click Settings >Practice Manager. In the left menu,under Practice Links — Troubleshooting, click Connectivity Test Page
 - Check that athenaTelehealth has a connectivity status of OK.
- If the status is NOT OK, ensure that your firewall is open to *.chime.aws, and then recheck the status on this page.
The athenaTelehealth functionality is enabled for testing and training purposes for all departments at your practice. This lets you experience the full workflow for test appointments without enabling the functionality for all applicable appointments.
If you would like to test the patient messaging capabilities, you should also perform a test of the full workflow. We recommend that you enter your email address and then schedule the appointment for at least 24 hours from the time of the test. If you would like to test SMS text messages, add your mobile phone number and make sure that the Consent to text option is enabled on the patient Quickview. Testing patient messaging is optional.
- Why perform this test? To familiarize yourself with the athenaTelehealth functionality and train staff.
- Who performs this test? Any member of the practice staff can generate a testing session.
Note: You can generate an unlimited number of testing sessions. This provides you with the flexibility of demonstrating the functionality and training staff together during a training session or individually at their convenience. You can also try using the service for some patient appointments before deciding whether to use the service more broadly. - When to perform this test? After athenahealth enables the athenaTelehealth service for your practice in test mode, before using the service for a patient appointment.
Create a test athenaTelehealth session
The Generate athenaTelehealth video link option, which is intended for testing purposes, is only available when scheduling an online visit for existing appointments.
- Schedule an appointment with the Telehealth Distant Site Visit appointment type class.
- Select the Generate athenaTelehealth video link option.
Note:Appointment note — This field is filled automatically when you select an appointment with the Telehealth Distant Site Visit appointment type. This fields says "athenaOne Telehealth Test." - Go to the Check-in page to access the patient URL and test the patient experience of a virtual encounter.
Note: Alternatively, like the patient, you can wait for the email or SMS text message to arrive. - Appointment information — Click copy link in the Patient video link field to view the patient's link to the athenaTelehealth session.
- Follow the steps to check the patient in and initiate the athenaTelehealth session for the provider.
To fully enable athenaTelehealth functionality for all departments at your organization, create a Success Community case and select athenaTelehealth, found in the Additional Services section of the Create a Case workflow.
Setup instructions
Contact your CSM or Platform Services representative to get your practice's developers access to the Github repository and to this feature if your practice creates its own mobile applications.
Note:
- Detailed instructions for your practice's developers to integrate the SDKs with your native mobile application are available in the Github repository where the code is stored.
- These SDKs relate solely to patient-facing mobile applications that are only for IOS and Android.
For more information on the related API: New athenaTelehealth Visit API, see the Release Notes and Change Logs on the Developer Portal.
Overview
This feature applies to you if developers at your practice create patient-facing mobile applications for iOS and Android.
You can embed the athenaTelehealth visit experience in the patient-facing applications that your practice creates via software development kits (SDKs).
We’re building SDKs for practices who create their own patient-facing mobile applications so they can embed the patient connection to an athenaTelehealth virtual visit into those mobile applications. This eliminates the need to redirect the patient to a web browser for their athenaTelehealth virtual visit.
The SDKs we build are for both Android and iOS. Since these SDKs embed the patient user experience into your mobile application, they include all the audio and visual elements as well as user interface controls. However, you can customize certain elements of the experience to match your practice’s brand, like:
- Fonts
- Icons
- Color
Differences between the SDK experience and the web-based athenaTelehealth experience
SDKs do not:
- Gather consent
- Have integrated readiness checks (which are not required on the native experience)
- Let you change input and output devices (which is done in your phone’s settings)
Important: We’re not capturing patient consent in SDKs. You can read the following message in the readme file:
"Capturing patient consent remains the sole responsibility of the client's custom app. Connecting to athenaTelehealth virtual visits through the SDKs eliminates the step whereby patients must accept the embedded T&Cs which we have included as a convenience in our web-based workflow."
Send a one-way message to manage patient expectations while they wait for an online visit to begin
You can send your patient a one-way message from athenaOne or the athenaOne app that you're running late to the athenaTelehealth online visit. Your patient sees the one-way message in the patient experience of your practice-created mobile application.
Note: It can take up to one minute for the message to display.
The difference between test mode and live mode is that test mode lets you individually select which appointments use the athenaTelehealth service, whereas live mode automatically uses the athenaTelehealth service for all appointments that are set up as telehealth appointments.
Test mode
When the athenaTelehealth service is first turned on for your practice, it's enabled in test mode for all departments at your practice. Test mode lets you familiarize yourself with the functionality and train your staff using a combination of mock and live appointments.
In test mode, you manually select which appointments with the Telehealth Distant Site Visit appointment type class use the athenaTelehealth service.
Note: You can use the athenaTelehealth service in test mode for as long as you want; there is no time limit associated with test mode.
Live mode
When you're ready to start using athenaTelehealth more broadly for patient appointments, see How to switch athenaTelehealth from test mode to live mode.
In live mode, all appointments with the Telehealth Distant Site Visit appointment type class automatically use the athenaTelehealth service.
Note: You can switch any department back to test mode at any time.
After you open or start the online visit, you'll see controls to:
More than four people can join a call at any given time.
In athenaOne
Click the following buttons to:
-
 — Join the call
 -
 — Leave the call
In the athenaOne app
 — Join the call
 — Leave the call
In the athenaOne app
During the athenaTelehealth visit, tap the following icons to:
-
 — Change your audio source
Note: After you connect your device to earbuds or earphones, this icon appears and the athenaOne app automatically begins using the associated speaker and microphone. This icon lets you switch between using the iPhone or iPad speaker and microphone and the earbuds or earphones speaker and microphone. -
 — Show the patient's video
Note: The number of participants in the call is listed next to this icon. -
 — Hide the patient's video
 -
 — Turn your video on and off (when green, your video is enabled; when black and crossed out, your video is disabled)
 -
 — Turn your audio on and off (when green, your audio is enabled; when black and crossed out, your audio is muted)
 -
 — Reduce video
 -
 — Enlarge video
Note: The number of participants in the call appears next to the Enlarge video icon. -
 — Tap and hold and then drag to move the patient's video or the online visit status bar.
Note: In the athenaOne app, you cannot document Intake or close and sign an encounter.
In athenaOne
After you click go to Audio & Video Settings, you can:
- Click Test your speakers to initiate a sound test and adjust the volume of your speakers as needed.
- Microphone — Change your audio source and check your audio preview.
- Camera — Change your video source and check your video preview.
- Report a Technical Issue — Both practice staff and the patient can click this link while previewing their video and during the athenaTelehealth visit to report issues to athenahealth.
You can also click these icons to:
-
 — Access the audio and video settings.
 -
 — Turn your audio on and off.
 -
 — Turn your video on and off.
 -
 — Minimize video.
 -
 — Enlarge video.
 -
 — Reduce video.
 -
 — Click and hold and then drag to move the video.
Regardless of the type of device the patient uses to join the athenaTelehealth visit, patients see controls to:
More than four people can join the call at any given time.
Patients can click the following buttons to:
-
 — Join the call.
Note: To access this button, patients can click the link they received in the confirmation and reminder emails or the Join telehealth call link on the Patient Portal. -
 — Leave the call.
Patients will see the following controls to test their speakers and change their audio and video source only after they click go to Audio & Video Settings.
-
Click Test your speakers to initiate a sound test and adjust the volume of your speakers as needed.
-
Microphone — Change your audio source and check your audio preview.
-
Camera — Change your video source and check your video preview.
-
Report a Technical Issue — Both practice staff and the patient can click this link while previewing their video and during the athenaTelehealth visit to report issues to athenahealth.
After a member of the practice staff joins the call, the patient will also see these controls:
-
 — Access the audio and video settings.
 -
 — Turn your audio on and off.
 -
 — Turn your video on and off.
When you schedule an athenaTelehealth appointment, you automatically share the URL link for the associated patient room through your patient's preferred contact method. However, if you need to share the link directly with your patient, you can find the link to the athenaTelehealth session in the appointment details.
When scheduling athenaTelehealth appointments:
- View athenaTelehealth appointments in the home page schedule.
Note: A video icon appears in the appointment banner. - Click a patient's athenaTelehealthHelp link to see information about setting up the application for the first time, along with additional details about scheduling athenaTelehealth appointments.
Note: Patients who have agreed to receive autogenerated email and SMS text messages are automatically sent confirmation and reminder messages that contain this link.
-
Go to the Check-in stage of the encounter.
-
Patient video link — Click Send Link to Patient.
The Send Online Visit Link window appears.
Note: Alternatively, you can click Copy link, and then paste it into a text message or email. -
Ask the patient how they would prefer to receive the link and either select or enter their contact information in one of these fields:
-
Mobile number — Select or enter the patient's smartphone number.
-
Email — Select or enter the patient's email address.
Note: When you click into these fields, phone numbers and email addresses that have Patient Portal access appear in a list. -
Click Send via Text Message or Send via Email.
Important: If the link is sent via an SMS text message, after you click Send Link to Patient, an alert appears for you to confirm that the patient received the link before clicking the button again. Clicking Send Link to Patient too many times in a short period of time could potentially make the message route as spam to the patient and cause them not to receive the link. A message may appear: "It may take up to a few minutes for the message to be received. Texting the same number multiple times in a row will cause the mobile carrier to treat the message as junk and not deliver it."
Note: Patients who have agreed to receive autogenerated email and SMS text messages are automatically sent a confirmation email that contains this link.
-
Share the following link with the patient: https://telehealth.px.athena.io/device-check/
The athenaTelehealth icon appears on the Appointment page where you can also access the online visit link to send to your patient. The athenaTelehealth video icon indicates if a patient is online.
- Patient online — The video icon is filled in.
The appointment details section of the Appointment page says "Status: Patient Online." - Patient not online — The video icon is not filled in.
The appointment details section of the Appointment page says "Status: Patient Not Online."
The athenaTelehealth icon also appears in these locations:
- Today's Appointment Worklist
- Home page schedule
- Today's schedule
Note: Click the calendar icon at the bottom right of the page to open today's schedule. - Appointment page
Alternatively, you can view the same Patient Online and Patient Not Online video icons at the bottom of the screen.- Patient Online
- Patient Not Online
- Patient Online
Tip: If the patient is not online when you join the call, you will hear a sound when the patient joins the call. Until you hear this sound, you can work outside athenaOne.
You can generate a report to view any email or text message sent to patients via the ReminderCall service. These reports include any athenaTelehealth-related messages and links sent to the patient manually.
To view a ReminderCall message sent to a patient
-
Generate one of the following reports:
-
In the report results, locate the message that you want to view.
-
In the View column, click the information icon
 .
.
The email or text message sent to the patient is displayed. -
When you're done viewing the message, click the X in the upper right corner.
To show ReminderCall messages for any patient
-
Display the Patient Communication History page:
-
Practices that use athenaCommunicator: On the Patient Actions Bar, click Communicator, and then click Patient Communication History.
-
Practices that use athenaCollector and ReminderCall only: On the Patient Actions Bar, click Scheduling, and then click Automated Messaging History.
-
-
Show services — Select ReminderCall.
-
Report types — Select Detailed - show all activity.
The results appear automatically. It may take a few moments to load the results.
To show ReminderCall messages for an individual patient
-
Display the Patient Communication Activity page: On the Main Menu, click Quality. Under REPORTS, click Patient Communication Activity.
-
Criteria — Accept the default option: Past activity by communication date.
-
Date range — Enter the date range for the report.
-
Services — Select ReminderCall only.
-
Message results — Click All to select all message results, or click Selected and then select the message result types to include in your report. You can select message types from these categories: Phone, SMS, Email, and ResultsCall.
-
Departments — Click All to select all departments, or click Selected and then select the departments to include in the report.
-
Providers — Click All to select all providers, or click Selected and then select the providers to include in the report.
-
Report type — Select Detailed.
-
Report format — Select View as HTML page to display the report in athenaOne, or select Export CSV file to view the report in Excel.
-
Click Run Report.
Your screen share options change based on which browser you use:
- Google Chrome — You can share your entire screen, an application window, or a Chrome tab.
- Microsoft Edge — You can share your entire screen, an application window, or an Edge tab.
- Safari — You can only share the athenaOne screen you're currently on.
- With the athenaTelehealth online visit in-progress, click screen share.
The Share your screen window opens. - Select one the following options:
- Your entire screen — Select this option to share the entirety of your screen, including the taskbar at the bottom of the display (Chrome and Edge).
- Application window — Select this option to share the entire browser window in which you're displaying athenaOne.
- Chrome/Edge tab — Select this option to share the entire browser tab in which you're displaying athenaOne.
Note: In a Chrome browser, you can check the Share audio option to include the sound from the tab you want to display.
- Your entire screen — Select this option to share the entirety of your screen, including the taskbar at the bottom of the display (Chrome and Edge).
- Click Share.
The shared screen appears as the main video in the athenaTelehealth online visit. - To stop screen sharing you can:
- Click the screen share icon again.
Note: The screen share icon has a blue box around it to show when it's on. - Click the bar at the bottom of the screen that says "Stop Sharing."
- End the online visit.
- Click the screen share icon again.
You can drag and drop the participant's video to different places on the screen for maximum viewing efficiency.
- With the athenaTelehealth online visit in progress, click the minimize window icon.
- Click the Actions icon
 .
. - Select Fit to frame to adjust to the full-frame view.
Black bars appear above and below the selected participant video player window. - To go back to the zoomed-in view, click the Actions icon
 , then click Fill frame.
The video player zooms in on the participant.
If there are multiple participants in the video call, you can pin one of the participants' video to the top, largest screen.
- With the athenaTelehealth online visit in-progress, identify the video player window you want to pin.
- Click the Actions icon
 .
. - Select Pin video.
You can see indicators in the online visit that show signal strength and when the patient or other participants have muted audio.
During the athenaTelehealth online visit, you can see indicators that show signal strength and muted audio of providers, patients, and other participants.
-
Providers and practice staff see — A visual indicator when any participants mute their microphone. They see a call quality indicator to show their own connection performance and other participant's too.
-
Patients see — A call quality indicator next to their name to show changes in their connection performance. They also see a call quality indicator for their family or caregiver and practice participants.
Note: Only providers and practice staff participants can see the muted audio indicator.
You can monitor whether the patient muted their audio during the online visit.
You can see the muted audio indicator for yourself and all other participants on the call:
Note: The mute icon appears next to the patient's name. The provider's option to mute the microphone is in the actions bar.
Patients do not see the muted audio indicator.
Note: Providers, patients, and other participants can see the signal strength indicator.
You can monitor your connection to the online visit and the connection of the patient and other participants via the signal strength indicator.
This indicator provides real-time information about the quality of your own connection, and that of other, like the signal strength indicator found on a cell phone.
The indicator is represented by three bars either in the title banner of the online visit window or next to a participant’s name.
This indicator helps participants understand the quality of all of the connections and take appropriate action to ensure a smooth and uninterrupted online visit experience.
Note: Providers, patients, and other participants can see the signal strength indicator.
The signal strength indicator consists of three bars, each representing a different level of signal strength and connection quality.
Up to three bars appear on the signal strength indicator:
-
Three bars — Indicates a high-quality connection with low or no data loss. With three bars, you are likely to have a smooth online visit experience with minimal disruptions.
-
Two bars — Suggests a degraded connection with some data loss. With two bars, you may experience occasional disruptions or delays during the online visit.
-
One bar — Indicates a serious connection issue with significant data loss. With one bar, you may face difficulties participating effectively in the online visit due to frequent disruptions, delays, or even call drops.
Tip: The actions that may improve signal strength are applicable to both providers and patients. You can share these tips with your patients to help them boost their connection to the online visit.
The signal strength indicator is a valuable tool that you can use to monitor your connection quality in real-time.
If you find that your signal strength indicator is showing a lower number of bars, we recommend the following tips to improve your connection. Follow these suggestions to enhance your connection and ensure a more reliable and effective online visit.
| Connection Type | Recommendation | Comment |
| Shared internet connection | If you are sharing your internet connection with others, ensure that no one else is performing bandwidth-intensive activities during your online visit. | This will help allocate more bandwidth to your call and improve the overall connection quality. |
| Wi-Fi connection |
If you are using a Wi-Fi connection, try getting closer to your Wi-Fi router to strengthen the signal.
Additionally, ensure that there are no other devices causing interference with your Wi-Fi signal. |
Walls, distance, and other obstacles can weaken the Wi-Fi signal, leading to a lower quality connection.
Things like online gaming and streaming devices, cordless phones or printers, or other appliances connected to the internet, can interfer with your Wi-Fi. |
| Mobile data connection |
If you are using a mobile data connection, consider moving to a location with better cellular signal strength. |
Areas with poor reception or low signal strength can result in a weaker connection and higher data loss.
Moving to a place with a stronger cellular signal can significantly improve your online visit experience. |
Additionally, if you notice other participants with a lower signal strength, you can advise them to take action to improve their connection following the same actions.
If you encounter persistent connection issues, we recommend to reaching out to your internet service provider or mobile network operator for further assistance.
Note: The signal strength indicator is an approximation based on data loss and may not reflect other factors that can affect the overall call quality, such as latency issues or video performance.
During an athenaTelehealth visit, patients see your name next to your video. By default, the athenaTelehealth service shows your Patient Portal display name or, if you don't have a Patient Portal display name, your full name. You can change your Patient Portal display name as follows.
Note: Changing your name in athenaTelehealth visits also changes your name in other patient communications.
Providers
- Display the Providers page: On the Main Menu, click Settings
 >Billing. In the left menu, under Practice Links — Providers, click Providers
 - Locate the provider and click edit.
The Edit Provider view appears. - In the Patient Communication section, change the Name field to the name you want to appear in athenaTelehealth visits.
Note: Changing this field also changes how the provider's name appears in email messages, billing statements, automated calls, and the Patient Portal or Patient Information Center. - Click Save.
Other staff
- Display the Users page: On the Main Menu, click Settings
 >User. In the left menu,under Practice Links — Users, click Users
 - Locate the user and click update.
The Profile tab appears. - Portal display name — Select Display custom name, then type the name that you want to appear in athenaTelehealth visits.
Note: Changing this field also changes how the user's name appears in messages on the Patient Portal or Patient Information Center. - Click Save.
You can message patients during the online visit in a chat window. Click the chat icon to open the chat window.
This feature is available for athenaTelehealth online visits in the athenaOne Web experience. The aOne mobile app and the athenaTelehealth SDKs for iOS and Android experiences do not support text chat during the online visit.
Ways you and your patients can use this feature, and the several benefits it provides, include:
- Communicating via chat even if video or audio connections are unavailable or experiencing quality issues
- Sharing sensitive information if the patient is in a setting where privacy may be a concern
- Showing how to spell medical conditions or complex medication names
- Providing links to health education or other related materials (no hyperlinks)
Only participants of the specific, single online visit can view the chat. There is no chat history after the online visit concludes.
If the patient is in a call with a provider and then the provider leaves the online visit, the patient is put on hold and can continue to send chat messages. Once the provider rejoins the online visit they receive any messages that the patient sent while on hold in the waiting room.
Send a message to your patient in the Chat window
- Join the online visit via your usual workflow.
- Ensure the patient has joined the call.
- Click the Chat icon to expand the Chat window.
The Chat window expands on the left side of the online visit window - Type your message into the text bar and then press enter on your keyboard.
-
Notice your message appear in the Chat window with an indication of who sent the message and when it was sent.
Note: If a message fails to send, you’re informed directly under the message. Click the Retry icon
 to resend the message.
 - When you’re ready to leave the online visit, click Leave Call.
The Leaving the call? window appears - Be aware that, if there are messages in the Chat window, the chat log is deleted for patient privacy.
-
Click Leave.
Note: If you click Stay, the Chat window automatically opens.
Notification of new message when the Chat window is collapsed
- Join the online visit via your usual workflow.
- Ensure the patient has joined the call.
- Notice the Chat icon display a yellow circle and a preview of the message. This preview shows the message sender and the beginning of the message.
- Click the Chat icon to read and respond to the message.
Someone is typing in the Chat window
- Join the online visit via your usual workflow.
- Ensure the patient has joined the call.
- Click the Chat icon to expand the Chat window.
The Chat window expands on the left side of the online visit window. - Notice text appear that informs you of someone typing. The name of the person and their initials avatar appear.
Note: When multiple people are typing:
- The avatar displayed is an icon of many users.
- You’re informed that multiple people are typing.
Chat views
Mini view
- Join the online visit via your usual workflow.
- Ensure the patient has joined the call.
-
Click the Mini view icon.
Note: In mini view, the Chat icon appears in the top left of the online visit but within the video player window.
- When you receive a new message, the Chat icon displays a yellow circle.
- Click the Chat icon to read and respond to the message.
Full view
- Join the online visit via your usual workflow.
- Ensure the patient has joined the call.
-
Click the Full view icon.
Note: In full view, the chat icon appears in the top left of the online visit.
- When you receive a new message, the Chat icon displays a yellow circle and a preview of the message. This preview shows the message sender and the beginning of the message.
- Click the Chat icon to read and respond to the message.
To ensure that your practice staff sees all critical messages sent in the Chat window, athenaTelehealth automatically disables chat for online visits when no practice staff is present or they leave the call.
FAQ
When does athenaTelehealth disable chat?
When the online visit begins without a member of your practice staff or they leave the call, the athenaTelehealth application automatically disables the Chat window to ensure your practice sees all patient messages.
The athenaTelehealth application automatically disables the Chat window when:
-
The patient is alone in the online visit without a member of your practice staff.
-
The patient is with family members or caretakers without a member of your practice staff.
When the patient clicks the chat icon in the online visit without a member of your practice staff present:
-
No messages appear if none were sent and the patient cannot enter new messages.
-
Messages appear if they were sent previously (for example the practice staff member sent one and left the call) and the patient cannot enter new messages.
If a practice staff member sent a message and leaves the call, the patient:
-
Sees a notification in the online visit.
-
Can click Reply to be taken to the Chat window but cannot enter a message.
Once a practice staff member joins (or rejoins) the call:
-
The patient can enter a new message in the chat window.
-
The patient can respond to previously sent messages in the chat window.
You can see an error message when athenaTelehealth cannot connect properly to your device. For example it cannot detect a camera to select.
While connecting to the athenaTelehealth online visit, you can now see an error message when video is unavailable due to camera connection issues.
This means that when the online visit is open, and athenaTelehealth is unable to connect to the camera, an error message appears with helpful info.
We're making this change to ensure that athenaTelehealth can provide guidance and troubleshooting tips for providers and practice staff.
You can click Troubleshooting Tips to read through guidance on potential actions to take when the online visit cannot select your device's camera.
Note: To help improve call quality, the athenaTelehealth application automatically sets default video resolution to 480p when the online visit starts.
During the online visit, you can troubleshoot connectivity issues and make ad hoc adjustments that may boost your call quality. An error message appears when athenaTelehealth cannot connect properly to your device's camera during the online visit. You can click Troubleshooting Tips to read through guidance on potential actions to take when the online visit cannot select your device's camera.
You can:
- Reconnect to the online visit without leaving the call
- Adjust video quality (resolution) settings yourself. Default is 480p. Alternatively, you can set the resolution as:
360p
480p (default)
520p
720p
- See the athenaTelehealth app detect an issue, then automatically:
- Reconnect you to the online visit itself
- Set your video quality (resolution) according to what best improves your connection
When the athenaTelehealth app detects an issue
If the app detects that a participant is experiencing audio or video issues in the online visit, the app lowers the video resolution automatically.
This automatic adjustment benefits all participants in the online visit because you:
-
Remain better connected to the call
-
See a reduction in dropped calls
Your patient is notified when the app automatically lowers the resolution.
If the athenaTelehealth app detects a participant is experiencing audio or video issues in the online visit, the app refreshes the connection.
Your patient is notified when the app tries to automatically reconnect you to the call.
To lower the video resolution manually
- While participating in an online visit, click the More icon.
The More Options window appears - Click Settings.
The Settings window appears -
Video Quality — The default is 480p. Click the downward arrow and choose from the following options:
-
360p
-
480p (default)
-
520p
-
720p
-
- Click Go Back to Call. to return to the main window of the online visit.
To refresh a connection manually
- While participating an in online visit, click the More icon.
The More Options window appears - Click Reconnect.
- Notice a message appear in the online visit that you're being reconnected.
- Click Report a Technical Issue in the video preview or in the session. Both practice staff and the patient have a link to report issues.
- Check the statement that most closely relates to the issue you're experiencing.
- Click Send Feedback.
- From the Consumer Scheduling application: On the Main Menu, click APPOINTMENTS.
- Click Find Appointments.
The Search page appears. - Patient Type — Select Existing if you're a returning patient or select New if your scheduling a visit with this practice for the first time.
- Specialty — Select the type of provider you'd like to see.
- Reason for visit — Select the reason you're scheduling an appointment with a provider.
- [Month YYYY] — Select a date for your appointment.
Note: After you select a provider, their availability displays in the calendar section indicated as a green circle background behind the number value of the date. - Appointment method – Select In Person or Online.
Note: Please select Online for athenaTelehealth appointments. - Provider — Select the provider you want to find an available appointment with.
- Location — For In Person visits, select the location of the practice you want to find an appointment at.
Filter results appear on the right side of the page. - Select an available time for your appointment.
Note: For online visits, you'll see a provider icon with a smaller green camera icon next to it indicating that these available appointments are athenaTelehealth appointments.
The Schedule Appointment page appears. - Fill in the required patient information fields.
Note: The Location field displays "Online athenaTelehealth)" in the Appointment Details section. - Click Next.
The Review Appointment page appears. - Ensure the information you entered is accurate.
- Click I'm not a robot and complete the reCAPTCHA test.
- Click the checkbox to agree to the Terms and Conditions and Privacy Policy.
- Click Schedule Appointment.
Note: Click Previous to update the appointment details before booking the appointment.
The Appointment Scheduled page appears. - Click Add to calendar to add the appointment to either Outlook, Google, or IOS calendar applications.
An .ics file downloads.
Note: Currently when you download the .ics file for IOS calendar, you'll see a link to the consumer scheduling application where you scheduled the appointment. The URL to the online visit appears at the top of the .ics file.
- From the Consumer Scheduling application: On the Main Menu, tap APPOINTMENTS.
- Tap Find Appointments.
The Search page appears. - Patient Type — Select Existing if you're a returning patient or select New if your scheduling a visit with this practice for the first time.
- Specialty — Select the type of provider you'd like to see.
- Reason for visit — Select the reason you're scheduling an appointment with a provider.
Note: You can set an "At Home" status for telehealth encounters that occur in a non-telehealth department. For more information see, At Home Status for Telehealth Encounters in Non-Telehealth Departments in O-help. - Tap Show appointments.
Filter results appear. - Tap the Online tab to see available athenaTelehealth appointments.
Note: When you tap the search icon, the In person and Online options appear in a Filter section on the Search page. - Tap the calendar icon
 to select a date.
The calendar section appears. - Day, Month ## — Select a date for your appointment.
- Select an available time for your appointment.
Note: For online visits, you'll see a provider icon with a smaller green camera icon next to it indicating that these available appointments are athenaTelehealth appointments.
The Schedule Appointment page appears. - Fill in the required patient information fields.
Note: The Location field displays "Online (athenaTelehealth)" in the Appointment Details section. - Tap Next.
The Review Appointment page appears. - Ensure the information you entered is accurate.
- Tap I'm not a robot and complete the reCAPTCHA test.
- Tap the checkbox to agree to the Terms and Conditions and Privacy Policy.
- Tap Schedule Appointment.
Note: Click Previous to update the appointment details before booking the appointment.
The Appointment Scheduled page appears. - Tap Add to calendar to add the appointment to either Outlook, Google, or IOS calendar applications.
An .ics file downloads.
Note: Currently when you download the .ics file for IOS calendar, you'll see a link to the consumer scheduling application where you scheduled the appointment. The URL to the online visit appears at the top of the .ics file.
- From the Patient Portal home page: Click Manage Appointments or the APPOINTMENTS tab on the left side of the page.
- Click Find Appointments.
The Search page appears. - Specialty — Select the type of provider you'd like to see.
- Reason for visit — Select the reason you're scheduling an appointment with a provider.
- [Month YYYY] — Select a date for your appointment.
Note: After you select a provider, their availability displays in the calendar section indicated as a green circle background behind the number value of the date. - Appointment method — Select In Person or Online.
Note: Please select Online for athenaTelehealth appointments. - Provider — Select the provider you want to find an available appointment with.
- Location — For In Person visits, select the location of the practice you want to find an appointment at.
Filter results appear on the right side of the page. - Select an available time for your appointment.
Note: For online visits, you'll see a provider icon with a smaller green camera icon next to it indicating that these available appointments are athenaTelehealth appointments.
The Review Appointment page appears. - Review the required patient information fields.
Note: The Location field displays "Online (athenaTelehealth)" in the Appointment Details section. - Click Schedule Appointment to book the appointment.
Note: Click Previous to update the appointment details before booking the appointment.
The Appointment Scheduled page appears. - Click Add to calendar to add the appointment to either Outlook, Google, or IOS calendar applications.
An .ics file downloads.
- From the Patient Portal home page: Tap Manage Appointments or the APPOINTMENTS tab on the left side of the screen.
- Tap Find Appointments.
The Search page appears. - Specialty — Select the type of provider you'd like to see.
- Reason for visit — Select the reason you're scheduling an appointment with a provider.
- Tap Show appointments.
Filter results appear. - Tap the Online tab to see available athenaTelehealth appointments.
Note: When you tap the search icon, the In person and Online options appear in a Filter section on the Search page. - Tap the calendar icon
 to select a date.
The calendar section appears. - Day, Month ## — Select a date for your appointment.
- Select an available time for your appointment.
Note: For online visits, you'll see a provider icon with a smaller green camera icon next to it indicating that these available appointments are athenaTelehealth appointments.
The Schedule Appointment page appears. - Review the required patient information fields.
Note: The Location field displays "Online (athenaTelehealth)" in the Appointment Details section. - Tap Schedule Appointment to book the appointment.
Note: Click Previous to update the appointment details before booking the appointment.
The Appointment Scheduled page appears. - Tap Add to calendar to add the appointment to either Outlook, Google, or IOS calendar applications.
An .ics file downloads.
Let your patients know that they can find the link to the pre-appointment device check workflow in their appointment confirmation email. We also recommend that your patients visit and review the troubleshooting web app before their athenaTelehealth visit to avoid technical issues on the day or at the time of the visit. The athenaTelehealth pre-appointment device check link works the moment your patient receives an appointment confirmation email.
Workflow scenario
- Your patient, Jane, just scheduled an appointment for a virtual visit with you, her primary care provider (PCP). Per the athenahealth recommendation, you instructed her to open a link to a pre-appointment device check web application to test her device settings and browser compatibility when she receives an appointment confirmation email with appointment information and links for the appointment. You tell her that when she clicks the Pre-appointment device check link, a message should appear, "Great, you're on a supported browser."
Important: This message displays once you're on a supported browser. Otherwise, instructions appear indicating that your browser is not supported and state how to switch to a supported browser. Then, a reminder appears to restart the device check workflow once you're on a supported browser. - Jane receives an email from your practice with information about her upcoming appointment and a link to her virtual visit.
- Jane sees the link to the athenaTelehealth session intended for use on the day and at the time of her appointment and the link her PCP instructed her to click when she receives the message.
- Jane clicks the link to a device check web application.
The pre-appointment device check web application appears in a browser window.
Pre-appointment device check workflow for a patient
- When Jane opens the link to the troubleshooting web application, the app automatically checks the web browser she opened for compatibility. She is on a supported browser so she sees the following message, "Great, you're on a supported browser."
- Jane notices options for English-language or Spanish-language text.
- She selects the Eng icon for English-language.
- Jane clicks the "Start device check" or "Got it, let's start button".
- Speaker Test — The audio output automatically defaults to the device. Jane clicks the downward arrow and selects an alternate audio output device, her headphones.
A test sound initiates. - Jane clicks Yes, I hear it.
Important: If she does not hear the test sound, she can click No, I don't and a set of device-specific troubleshooting steps display at the bottom of the page. - Microphone test — Jane clicks the downward arrow and selects her headphones with a built-in microphone.
- She tests the microphone and sees the audio bar move.
- She clicks Yes, I see it.
Important: If she does not see the audio bar move, she can click No, I don't and a set of device-specific troubleshooting steps display at the bottom of the page. - Camera test — The setting automatically defaults to her device's built-in camera. Jane clicks the downward arrow and selects her usb-attached webcam.
- Jane sees herself in the window.
- She clicks Yes, I see myself.
Important: If she does not see herself, she can click No, I don't and a set of device-specific troubleshooting steps display at the bottom of the page.
The next page appears with a message saying, "Good job! You're all set. We look forward to seeing you at you appointment time. You may close this window." - Jane closes the window.
Note: Your patient can click Still got questions? Visit our FAQ to display the full Telehealth FAQ & Troubleshooting page.