athenaOne Dental — Complete Registration, Dental Insurance, Eligibility, and Poverty-Based Sliding Fee for Dental Patients in athenaOne
athenaOne Dental is only available for FQHCs on athenaOne.
Read the full, end-to-end online user guides:
This topic shows the front desk workflows completed in athenaOne and the workflows completed in athenaOne Dental.
You can remain in athenaOne when you need to complete patient registration, dental insurance, eligibility, and poverty-based sliding fee for dental patients:
-
You don't have to jump between two different locations (athenaOne Dental and athenaOne) to complete these workflows.
-
You must capture a dental patient's medical insurance in addition to their dental insurance (for reporting).
The Training Journey - Foundational and Proficient Training Plan
Note: Once there refer to:
-
INPK 100: Introduction to Insurance Packages
-
ELIG 100: Introduction to Eligibility in athenaOne
-
PEXP 100: Introduction to Patient Registration
Refer to these instructions on the Success Community to learn more about creating a case and how to route it to the appropriate team:
You can now stay in athenaOne when you're completing the following workflows for dental patients.
| Action | Perform in athenaOne? |
Perform in athenaOne Dental? |
|---|---|---|
| Register New Patient(Patient Demographics Intake) |
Yes
You can now enter Patient demographic information in athenaOne only (including sliding fees) |
No
Demographic fields are now read-only. You can no longer enter patient demographics (including sliding fees) in athenaOne Dental. |
| Capture Dental Insurance |
Yes
You can now add Dental Insurance for patients directly in athenaOne as a Case Policy |
No
You no longer add Dental Insurance for the patient in athenaOne Dental. |
| Record eligibility details |
Yes
You can now record patient dental insurance eligibility details directly in athenaOne. |
No
You can no longer record patient dental insurance eligibility details in athenaOne Dental. |
| Poverty-Based Sliding Fee Plans |
Yes
You can now add a patient poverty-based sliding fee plan |
No
You must set up Program and Plans in athenaOne as a “Dental Sliding Fee Program” (Program name may vary as health centers choose the dental program name).
Otherwise, the sliding fee plans assigned to athenaOne Dental patients will not be visible in athenaOne Dental, and your patient will be classified as Self-Pay.
Your health center’s Slide Program and associated Plans will be mapped in Membership. |
Best Practice: For Uniform Data System (UDS) purposes, you should capture a dental patient's medical insurance in addition to their dental insurance (even if they are only a dental patient). This is a best practice because it helps reduce the amount of "None/Uninsured" values that appear in UDS Table 4.
Note: The following images in this release note use mock example data.
You must be logged into a dental department to:
- Add a Dental Case Policy when entering dental Insurance in athenaOne for the customer
- Request a new Dental package
-
View the Dental Eligibility tab to record Dental Eligibility details
HRSA recommends that you:
-
Report primary medical insurance for all patients, regardless of the services they receive. This applies to patients who did not receive medical care, such as dental-only or behavioral health-only patients, as well as patients whose medical insurance did not cover the service.
-
Report the patient’s primary medical insurance covering medical care, if any, as of their last visit during the calendar year.
Note: You should presume a patient with Medicaid, private, or other public dental insurance to have the same kind of medical insurance. If a dental patient does not have dental insurance, you may NOT assume that they are uninsured for medical care. Instead, obtain this information from the patient.
For more information, refer to the 2024 UDS Manual from HRSA.
Read-only data — The following data has been moved to read-only in athenaOne Dental, and all information will need to be added and maintained in athenaOne:
-
Insurance
-
Eligibility
-
Sliding Fee
-
Privacy Information
The check-in and check-out workflows remain available in athenaOne Dental but are simplified so that the user can visually verify the information rather than have to re-enter it.
Your practice must have the "Sliding Fee Programs" feature enabled.
In addition, your practice must have the "Post-Adjudication Sliding Fee Plans" feature enabled to perform these tasks:
-
Add a poverty-based sliding fee program
-
Add a poverty-based sliding fee plan
-
View the Health & Human Services (HHS) poverty guidelines table
-
Apply a poverty-based sliding fee plan to a patient
-
Edit a patient's existing poverty-based sliding fee plan
-
Adjust sliding fee plan balances automatically after primary and/or secondary payer adjudication
To request these features, create a case: On the Main Menu, click Support > Success Community > Contact Client Support Center.
The following athenaOne roles and permissions are required for:
| Task | Roles and permissions |
|---|---|
| Register new patient | To access Patient Registration, you must have the EDITDEMOGRAPHICS role or permission. |
| Add case policy | To access the Quickview, you must have the Quickview (or Quickview no financials) role or permission. |
| Request a new insurance package | To request a new insurance package, you must have the New Insurance Add/Change Request permission. Common roles that include this permission are Receptionist and Practice Superuser. |
| Provided Eligibility Details | To access the Provided Eligibility Details, you must have the View Eligibility Detail role. |
| Poverty-Based Sliding Fee Plans |
Your practice must have the "Sliding Fee Programs" feature enabled. In addition, your practice must have the "Post-Adjudication Sliding Fee Plans" feature enabled to perform these tasks:
To access Poverty-Based Sliding Fee Plans pages, you must have the Practice Set-Up: Sliding Fee Programs/ Plans permission. |
For more information about the fields on the Patient Registration page, see the Field Reference section in O-help.
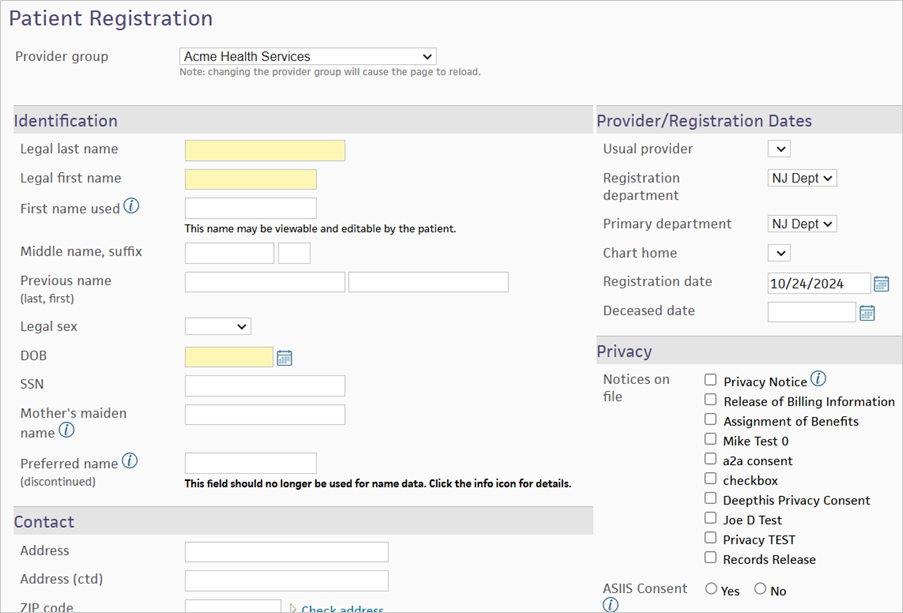
Note: The Provider Group field only appears for organizations that use them.
To register a new patient
Display the Patient Registration page: On the Main Menu, click Patients > PATIENT REGISTRATION > New Patient Registration
- Legal last name — Enter the patient's legal last name.
- Legal first name — Enter the patient's legal first name.
-
First name used — Enter the patient's preferred first name or nickname, if any. This name appears in the patient banner (along with the legal first name); on the patient schedule; in athenaCommunicator messages (email, SMS, and phone); and on the Patient Portal.
Note: The name in the First name used field can reflect the patient's gender identity. For more information about the patient banner for transgender and nonbinary people, see Transgender and Nonbinary Patient Care.
- Middle name, suffix — Enter the patient's middle name and name suffix (for example, Jr.), if any.
- Previous name (last, first) — Enter the patient's previous first and last names (if applicable): last name in the left-most field and first name in the right-most field.
- Legal sex — Enter the patient's legal sex (male or female) on legal documents such as the insurance card or driver's license.
- DOB — Enter the patient's date of birth.
-
SSN — Enter the patient's Social Security number.
Note: You can enter SSNs when you first register a patient or when you add an SSN to an existing patient registration. To see the full 9 digits of already-entered SSNs, you must have the "Display Full SSN" role.
-
Mother's maiden name — Enter the maiden name of the patient's mother.
Note: This information is used only as an additional means of determining identity, especially if information is received from non-athenahealth systems.
- Preferred name (discontinued) — The Preferred name field has been replaced by the First name used field. For more information about moving existing information in this field, see the Field Reference.
-
Address — Enter the patient's address. For apartments, use this format: 1199 Whitney Ave #310.
Note: You can click the Check address option (to the right of the ZIP code field) to validate the address that you entered (you must first enter the address and either the ZIP code or the city and state).
- Address (ctd) — Enter additional address information, if needed.
- ZIP code — Enter the patient's 5-digit ZIP code (the City and State fields are automatically filled in).
- City — Enter the patient's city.
- State — Enter the patient's state.
-
Country — If the Country field appears, select the patient's country.
athenaOne automatically formats foreign mailing addresses according to the country's specifications for all claims, bills, statements, and other correspondence.Note: If you select a country other than the United States, select the country from the menu, and then enter the two-letter postal abbreviation for the country in the State field.
- ID Number Override — If your practice generates its own numeric patient IDs (rather than using athenaOne auto-generated patient IDs), enter the number. If you leave this blank, athenaOne automatically assigns the patient an ID number. This field appears only at the time of initial patient registration.
- Home phone — Enter the patient's home phone number.
- Mobile phone — Enter the patient's mobile phone number.
- If the mobile phone is the same as the patient's home phone, click the Copy from home link.
- If the patient does not have a mobile phone or declines to provide the number, select the None option.
- Consent to call — Helps you comply with the Telephone Consumer Protection Act. This field indicates whether you obtained "express consent" from the patient to receive automated calls from your practice to the patient's mobile phone. Automated calls include ReminderCall, GroupCall, ResultsCall, and Self-Pay calls.
-
Consent to text — Indicates whether you obtained "express consent" from the patient to send automated text messages from your practice to the patient's mobile phone. Automated text messages are used by the ReminderCall, GroupCall, ResultsCall, and Self-Pay services. If the patient consents to receive text messages, athenaOne automatically enables the Text Message options in the Communicator Automated Messaging Preferences section of the Privacy Information page for that patient. Patients are charged standard message and data rates for text messages from your practice.
Note: If a phone number is provided in the Mobile phone field, you must set the Consent to text option to Yes or No to save changes on the Check-in, Patient Registration, or Quickview page.
- Work phone — Enter the patient's work phone number.
- Patient email — Enter the patient's valid email address. This field is required on the Patient Registration and Check-in pages for practices using athenaCollector and athenaCommunicator.
Selecting the No email option clears any email address or other notation present in the Patient email field.
If the No email option is already selected, the patient has already informed another staff member at your practice that he or she does not have an email address or does not wish to provide one. - Portal access — This field displays the Patient Portal status of the patient and the patient's family members. You can invite a patient or family member to register for the Patient Portal (or the Patient Information Center), and you can view Patient Portal access for the patient and the patient's family members. For more information, see "Portal access section."
-
Contact preference — Select the contact method preferred by the patient.
Note: The contact preference that you select on this page has no effect on the athenaCommunicator messaging preferences configured on the Privacy Information page.
-
Language — Select the patient's preferred language from the menu. By default, a short list of the values that you most commonly select appears. To select a different value, enter the first few letters of the desired language and select it from the list.
Note: If the patient does not provide a language, select the Patient Declined option.
-
Race — Select the patient's racial affiliation from the menu. By default, a short list of the values that you most commonly select appears. To select a different value, enter the first few letters of the desired language and select it from the list. To select more than one race, click the plus icon.
Note: If the patient does not provide a race, select the Patient Declined option.
-
Ethnicity — Select the patient's ethnic affiliation. By default, a short list of the values that you most commonly select appears. To select a different value, enter the first few letters of the desired option and select it from the list. To select more than one ethnicity, click the plus icon.
Note: If the patient does not provide an ethnicity, select the Patient Declined option.
- Marital status — Select the patient's marital status from the menu.
-
Sexual orientation — Select the patient's sexual or romantic preference from the menu.
Note: The options in the Sexual orientation field are based on 2015 edition certification requirements. If you see patients with additional sexual orientations, select the Something else, please describe option and enter the patient information in the free-text field.
-
Gender identity — Select the patient's internal sense of self as male, female, both male and female, or neither gender. A patient may identify as transgender or nonbinary if their gender identity is different than their assigned sex at birth.
Note: The options in the Gender identity field are based on 2015 edition certification requirements. If you see patients with additional gender identities, select the Additional gender category / other, please specify option and enter the patient information in the free-text field.
- Assigned sex at birth — Select the patient's assigned sex at birth. The patient's sex assigned at birth is generally determined by their physical anatomy at birth. This may be the same or different than the patient's gender identity and legal sex.
- Pronouns — Select the personal pronouns that reflect the patient's gender identity (the pronouns may not be tied to the patient's gender identity).
- Homebound? — Select Yes or No to indicate whether the patient is homebound.
- How did you hear about us? — Select the route by which the patient heard about your practice.
The contents of this menu are administered on the Referral Sources page. - Specify (if Other, above) — If you select Other in the How did you hear about us? field, you can enter a free-text source here.
-
Usual provider — Select the patient's primary medical provider. Primary dental provider should be documented in the Care Team
Note: By default, the name of the rendering provider is printed at the top of patient medical statements. If you prefer to print the name of the usual provider at the top of patient statements, please contact the CSC by selecting Support > Create Case or Call in the Main Menu.
- Registration department — Select the department in which the patient was initially registered.
-
Primary department — Select the patient's current active department, typically the department in which the patient chart is kept. The primary department may differ from the department of registration if the patient was transferred from one department to another.
Note: If a patient is both a Medical and Dental patient, their primary department and provider should reflect their Medical department and provider. Dentist can be added to the Care Team.
- Chart home — Select the department where the patient's chart is normally kept.
- Registration date — Enter the date that the patient was registered in the athenaOne system. For new patients, the default value is the current date.
- Deceased date — If the patient is deceased, enter the date of death. When a date is entered in this field, the field is displayed on the patient Quickview page with the date in red.
-
Notices on file — Select the relevant options to indicate that the patient received the notices.
Note: If you select the Privacy Notice option in the Notices on file field, athenaOne automatically sets the Medication History Authority field to Yes (if you have not yet selected Yes or No for this field).
-
CIIS Consent — Appears if your practice uses an immunization registry interface with athenaClinicals.
Note: This field appears only after the initial patient registration information has been saved.
-
Medication History Authority — Select Yes to indicate that the patient has signed a consent form allowing your practice to download his or her medication history. You should first consult your practice's HIPAA compliance committee to verify that your current privacy consent forms cover medication history downloads.
Note: If you select the Privacy Notice option in the Notices on file field, athenaOne automatically sets the Medication History Authority field to Yes (if you have not yet selected Yes or No for this field).
-
Patient notes — Enter any internal notes about the patient in this field. The notes you enter here also appear in the Patient notes field on the patient Quickview page and on the Check-in page in athenaOne.
Best Practice: The notes are not printed on any form. If the patient has a guarantor other than self, athenahealth recommends that you enter the name and phone number of the guarantor in this field for your billing staff's convenience.
- Name — Enter the name of the emergency contact for the patient. This is for reference only and is not used anywhere else.
- Relationship — Enter the relationship of the contact to the patient.
- Home phone — Enter the emergency contact's phone number.
- Mobile phone — Enter the emergency contact's mobile phone number.
- Name — Enter the full name of the patient's next of kin.
- Relationship — Select the next of kin's relationship to the patient.
- Phone — Enter the next of kin's phone number.
- Employer name — Click choose to access the tool and select the name of the patient's employer. If the patient's relationship to insured is SELF when adding an insurance policy, the Employer name field on the patient's Add Update Policy Details page defaults to the value in this field.
- Employer phone — Enter the phone number of the patient's employer. This field is for reference only.
- Usual occupation — Enter the first few characters of the patient's current or most recent occupation and select it from the matching list. If the occupation is not found, enter it as free text.
- Usual industry — Enter the first few characters of the patient's occupational industry and select it from the matching list. If the industry is not found, enter it as free text.
- Last name — If the patient is under the care of a guardian who is not the same person as the guarantor (for example, in the case of separated parents), enter the last name of the patient's legal guardian. This is for reference only and is not used anywhere else in the system.
- First name — First name of the patient's legal guardian.
- Middle name, suffix — Middle name and name suffix of the patient's legal guardian.
Note:
-
The guarantor is the person who appears as the addressee on patient statements. If Patient's relationship to guarantor is set to Self, the patient's address is used as the address for patient statements.
-
Medical insurance uses family relationships for statements but dental insurance does not.
- Last name — Enter the last name of the patient's guarantor, if the guarantor is not the patient and not a patient at your practice.
- First name — Enter the first name of the patient's guarantor.
- Middle name, suffix — Enter the middle initial and suffix (for example, Sr., Jr., etc.) of the patient's guarantor.
- DOB — Enter the date of birth of the patient's guarantor (optional).
-
Same as patient's address — Select this option if the guarantor's address is the same as the patient's.
-
Address — Enter the guarantor's address (if different from patient's).
Note: You can click the Check address option (to the right of the ZIP code field) to validate the address that you entered (you must first enter the address and either the ZIP code or the city and state).
- Address (ctd) — Enter the second line of the guarantor's address.
- ZIP code — Enter the guarantor's ZIP code (if different from the patient's). After you enter the guarantor's ZIP code, the City and State fields are automatically filled in.
- City — Enter the guarantor's city.
- State — Enter the guarantor's state.
- Country — Select the country in which the guarantor resides.
-
SSN — Enter the guarantor's Social Security number (optional).
Note: Practice staff registering patients for the first time or editing registration information can enter and re-enter SSNs, but cannot see the full nine digits of SSNs that have already been entered without the "Display Full SSN" user role.
- Phone — Enter the guarantor's phone (optional).
- Email — Enter the guarantor's email address. Select the No Guarantor Email option if the guarantor has no email address or declines to provide it.
- Employer — Enter the guarantor's employer (optional).
- You can save the information as follows:
- Click Save to save the information and go to the patient Quickview page without adding an insurance policy.
Privacy information no longer integrates bi-directionally, and now may only be updated from athenaOne. A limited view of this data is now available in athenaOne Dental.
To capture dental insurance, you must add a case policy and choose the Dental type:
If you need to request a new insurance package because what you are searching for does not yet exist in the system, you can also do that in athenaOne.
Do not delete or modify the ATHENAONE DENTAL PLACEHOLDER package. It is used for $0 dollar claims in athenaOne to support UDS reporting.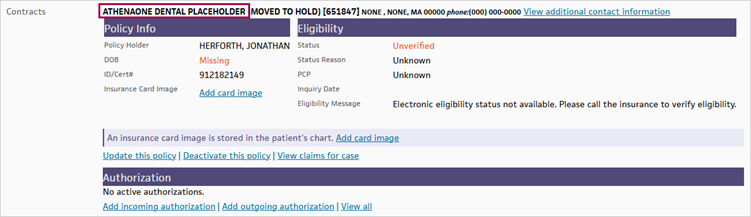
- Display the Add Case Policy page: On the Quickview:
- Under the Insurances heading, click Add case policy.
Click Add New in the insurance section.
- Type — Select the Dental case policy type.
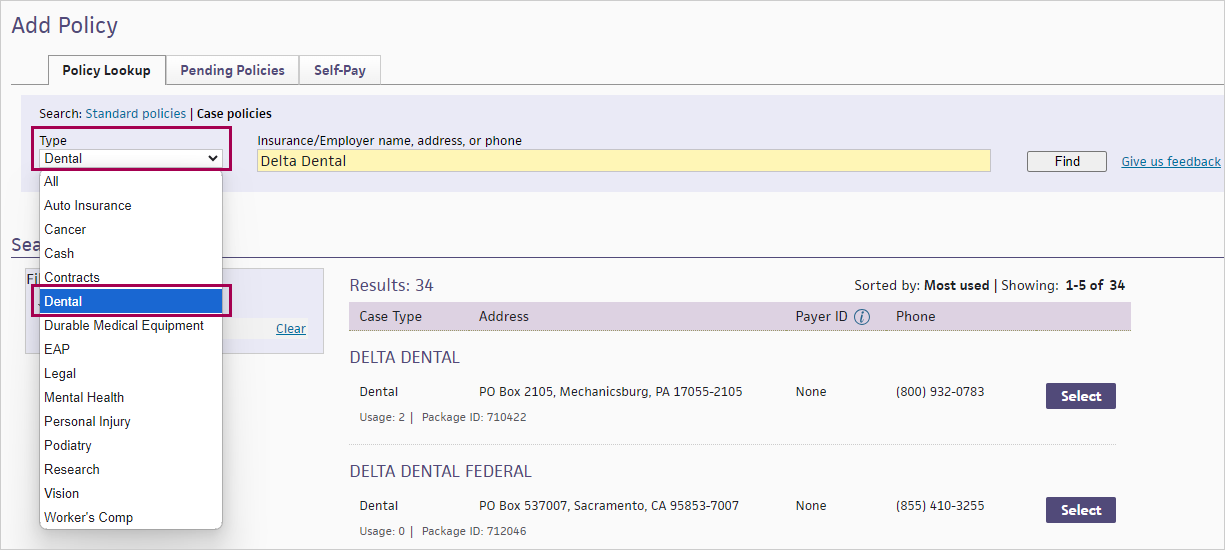
- Enter terms into the search bar. You can enter insurance or employer name, address, or phone.
- Click Find.
- Click Select next to the case policy you want to add. The Policy Details page appears.
-
Add policy details on the Policy Details page.
-
Click Add Policy.
After entering policy details, the case policy appears on the Quickview for use on appointments and claims.
Tip: You can add multiple dental insurances if the patient has multiple dental plans.
You may not need to complete the following workflow. However, should you need to, you can request a new insurance package after adding a dental case policy.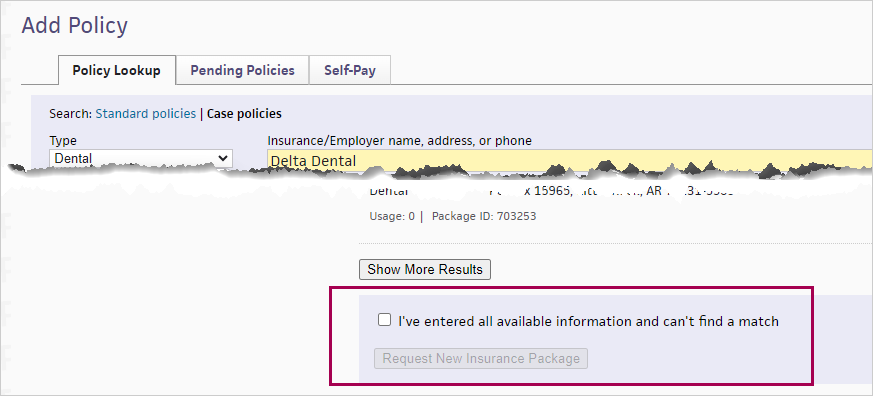
Note: To access this page, you must have the New Insurance Add/Change Request permission. Common roles that include this permission are Receptionist and Practice Superuser.
- Display the Insurance Package Requests page: On the Main Menu, click Settings > Billing. In the left menu, under Practice Links — Insurance Packages, click Insurance Packages.
-
Request type — Select Case policy.
Note: If you displayed this page from the insurance search, this field defaults to the same type as your search.
- Insurance name — Enter the name of the insurance package.
-
Case type — Select the Dental case type. This field appears for Case policy requests only.
-
Address line 1 — Enter the claims send-to address for the insurance package.
- Address line 2 — If you need a second line for the claims send-to address, enter the information in this field.
- ZIP code — Enter the claims send-to address ZIP code.
- City — Enter the claims send-to city.
- State — Select the claims send-to state.
- Country — Select the claims send-to country.
-
Phone — Enter the main phone number of the insurance package. For standard insurance packages, you can select the Not available option.
Note: You must enter the address or the phone number for athenahealth to process your insurance package request; therefore, you can select the Not available option for either the address or the phone number, but not both.
- Fax — Enter the fax number of the insurance package, if available.
- Contact name — Enter a contact name for the insurance package, if available.
- Reason for request — Select the reason for your insurance package request.
- Request details — Enter any notes for athenahealth about this insurance package, including the patient's first name, last name, and ID, if applicable.
- Click Submit. Your request is submitted to athenahealth. We will process it within 5 business days.
The athenaOne Dental patient’s insurance coverage details are now entered in athenaOne. In athenaOne, select a Case Policy with a type of Dental.
Note: Even if medical insurance is being used for athenaOne Dental, it must be entered in athenaOne as a Case Policy with a type of Dental, or it will not be able to be used for athenaOne Dental claims.
-
Existing Dental Insurances — All existing sites will have all current insurance information on the patient moved to “Expired” as of the day before going live. This will allow the insurance to be used for in-progress encounters, but no longer allow them to be used for encounters moving forward.
-
Pending Case Policies — If a user adds a new Pending Case Policy to a patient in athenaOne, it will show on athenaOne Dental, with a tag marking it as pending. Encounters for patients with a pending case policy applicable for the date of service will not be able to be approved from Ready to Review until the pending policy is resolved.
Important: If you enter multiple Dental Insurance Case Policies in athenaOne, they are billed based on the order they appear in athenaOne. The top insurance will be considered Primary, the second insurance will be considered Secondary, and so on.
Note: All of the data you enter is synced with athenaOne Dental. This data then subsequently appears as read-only in athenaOne Dental.
To record eligibility details, display the Payer-Provided Eligibility Details page. Once there, click the Dental Eligibility tab.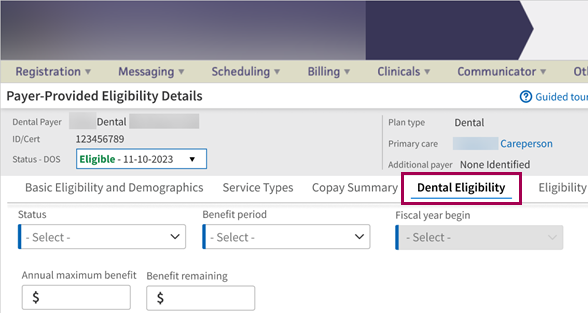
The Payer-Provided Eligibility Details page has multiple entry points. For example, On the Quickview page, under the Insurances heading, click View eligibility details and history.
The following entry points apply to electronic dental eligibility:
-
On the Patient Actions Bar, click Registration, and then click Check Eligibility. If the patient has only one policy registered in athenaOne, the Payer-Provided Eligibility Details page appears.
-
On the Quickview page, under the Insurances heading, scroll to the Dental section. Click View eligibility details and history.
-
On the Quickview page, under the Insurances heading, scroll to the Dental section. Click Perform custom eligibility check and then select the options for the custom check.
-
On the Add/Update Policy Details page, click View eligibility detail and history (next to the last eligibility message at the top).
-
On the Add/Update Policy Details page, click Update & Perform Eligibility Check in the Eligibility section.
The following entry points apply to non-electronic dental eligibility:
-
On the Quickview page, under the Insurances heading, scroll to the Dental section. Click View eligibility details and history.
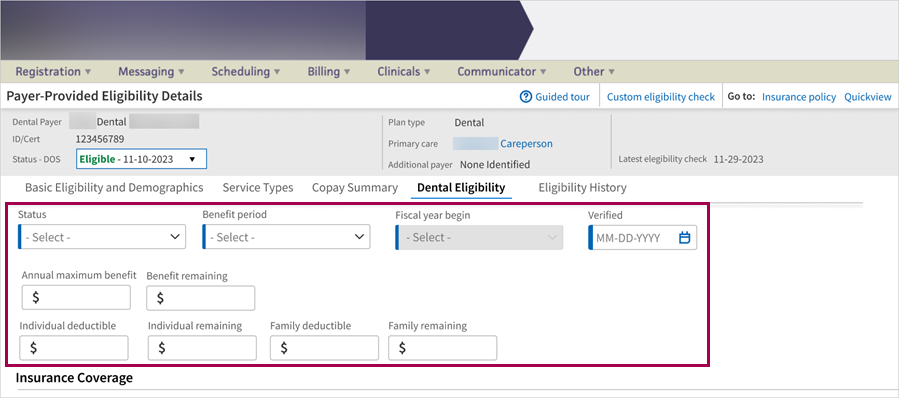
Once on the Payer-Provided Eligibility Details page, click the Dental Eligibility tab.
You must manually enter information on the Dental Eligibility tab of the Payer-Provided Eligibility Details page.
-
Status — Either ELIGIBLE or INELIGIBLE.
-
Benefit period — Either Calendar year or Fiscal year.
-
Fiscal year begin — Based on calendar year January through December.
-
Verified — Date verified.
-
Annual maximum benefit — The annual maximum benefit. Can be left blank or a number range.
-
Benefit remaining — The benefit reaming. Can be left blank or a number range.
-
Individual deductible — The individual deductible. Can be left blank or a number range.
-
Individual remaining — The individual remaining. Can be left blank or a number range.
-
-
Family deductible — The family deductible. Can be left blank or a number range.
-
Family remaining — The family remaining. Can be left blank or a number range.
-
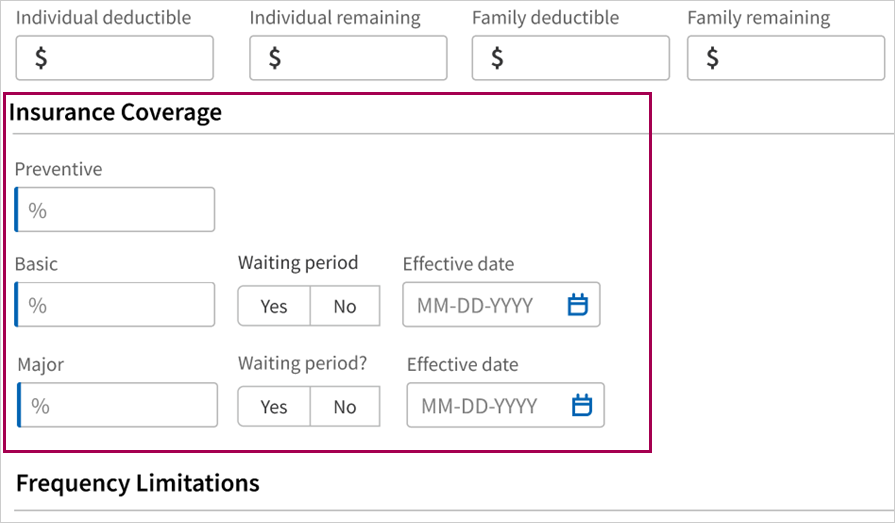
Preventive — This is a percentage the payer will cover for preventive services.
Note: Preventive is defined by the specific dental codes considered as preventive such as cleanings, xrays, or fluoride treatments. For example, dental procedure code D1110 applies to dental cleanings for adults and is a preventive service.
-
Basic —This is a percentage the payer will cover for basic services.
Note: Specific dental codes are considered basic services. For example, fillings, simple extractions, and sometimes root canals are basic services.
-
Waiting period — Either Yes or No.
-
Effective date — When the waiting period ends and benefits are covered at the specified percentage.
-
-
Major — Percentage that payer covers for major services.
Note: Specific dental codes are considered major services. Complex dental work and surgical procedures, like implants, are classified as major dental services. Generally speaking, if a procedure needs anesthesia, or surgery, or is an orthodontic procedure, it will likely be classified as a major dental service.
-
Waiting period — Either Yes or No.
-
Effective date — When the waiting period ends and benefits are covered at the specified percentage
-
-
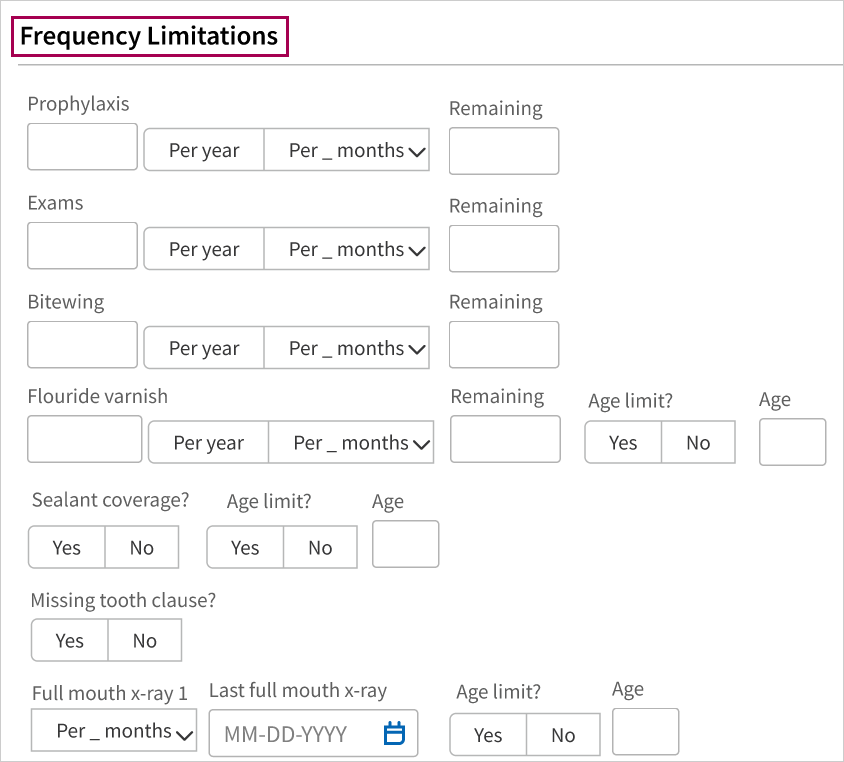
Prophylaxis — The number of prophylaxis visits (like cleanings) a patient can have in the specified time period.
-
Remaining — How many prophylaxis visits are remaining during the benefit period.
-
-
Exams — This is the number of exams a patient can have in the specified time period.
-
Remaining — How many exams are remaining during the benefit period.
-
-
Bitewing — How many bitewings (xrays) are allowed in the specified time period.
Note: Bitewings are one of the most common sets of X-rays. Bitewings show teeth above the gum line and the height of the bone between teeth. Bitewings help diagnose gum disease and cavities between teeth.
-
Remaining — How many bitewings are remaining during the benefit period.
-
-
Flouride varnish — How many fluoride varnishes are allowed in the specified time period.
Note: Fluoride varnish: can be applied to both baby teeth and adult teeth by a dentist. The process involves painting a varnish containing high levels of fluoride onto the surface of the tooth twice a year to prevent decay. It works by strengthening tooth enamel, making it more resistant to decay.
-
Remaining — How many visits are remaining during the benefit period.
- Age limit —Either Yes or No.
-
Age — Numeric (1-100).
-
-
Sealant coverage — Either Yes or No.
-
Age limit — Either Yes or No.
-
Age — Numeric (1-100).
-
-
Missing tooth clause — Either Yes or No.
-
Full mouth x-ray 1 — Full mouth Xray once every interval of months.
-
Last full mouth x-ray — Date of last full mouth x-ray.
-
Age limit — Either Yes or No.
-
Age — Numeric (1-100).
-
-
Eligibility message text box — Enter an eligibility message.

-
Click Save Eligibility to enter the eligibility details.
Eligibility details are now entered via the athenaOne Dental eligibility screen in athenaOne. In athenaOne Dental, the Patient Profile will display a limited amount of data for the applicable insurance.
Note: The eligibility information available from Quickview may differ from that entered in the dental eligibility form. ONLY data from the dental eligibility form in athenaOne will show in athenaOne Dental.
Display the Poverty-Based Sliding Fee Plans page: On the Main Menu, click Settings > Billing. In the left menu, under Practice Links — Fee and Allowable Schedules, click Sliding Fee Plans (Poverty-Based)
- Display the patient's Quickview page.
- Scroll down to the Insurances area and click add new. The Add Policy page appears with the Policy Lookup tab selected by default.
- Click the Self-Pay tab, or click Self Pay in the Favorites list.
- Click Select next to Sliding Fee Schedule - Discount. The Add Cash Policy Details page appears.
- Sliding fee program — Select a poverty-based sliding fee program from the menu.
Additional fields appear. - Family size — Enter the number of people in the patient's family.
-
Income — Enter the family's income as a whole dollar amount (without a dollar sign or commas), and select the time frame for the income.
Note: athenaOne converts the income to an annual amount before it performs a lookup in the HHS Poverty Guidelines table.
-
Click Calculate plan to the right of the Income field.
The sliding fee plan is displayed.Note: When you select a poverty-based sliding fee plan, athenaOne calculates the correct plan according to the most recently uploaded HHS Poverty Guidelines. athenaOne continues to use the selected plan for the patient until someone selects a new plan, the plan is deactivated, or the expiration date is reached.
- Effective date — Enter or select the effective date for the sliding fee plan.
Leave this field blank to make the policy effective immediately, until you delete or modify it. - Expiration date — Enter or select the expiration date (if available).
- Notes — Enter any notes about the plan and the patient.
- Click Add Cash Plan.
- Display the patient's Quickview page: In the text box at the top right of the Main Menu, enter the first three letters of the patient's last name, followed by a comma, followed by the first three letters of the patient's first name. Click the search icon. On the Find a Patient page, click Quickview for the patient you need.
- Cash — Click Update this cash plan.
The Update Cash Policy Details page appears. For security reasons, asterisks appear in the Family size and Income fields. -
Family size — Click edit.
Note: For security reasons, the amounts you previously entered in the Family size and Income fields do not appear. To view these amounts, you must create a custom report.
- Enter new data in each field, as necessary.
- Click Update Cash Plan.
Note: There can only be one sliding fee plan linked for athenaOne Dental. This has been selected for your organization based on a 1:1 match of Poverty Bounds between athenaOne and athenaOne Dental.
The Sliding Fee Program and Plans will now be set up in athenaOne as the registration workflow shifts. By consolidating the Sliding Fee Plan management into a single location within athenaOne, we are simplifying workflows and enhancing ease of use. The plan calculations will continue to be managed within athenaOne Dental to maintain accurate and efficient billing processes.
Important: These plans have been pre-configured and align with existing Programs in Dental. Please refrain from adding new Plans or modifying Poverty Bounds as this will cause a disruption in information crossing over from athenaOne to athenaOne Dental.
The Sliding Fee Program Name shown in athenaOne will vary as this is based on how your individual organization has set this up. Some organizations may have a reference to "Medical" listed in the name, which may be confusing for some users. If this is the case, you may update the Sliding Fee Program Name to include "Medical and Dental". (You can make this update in athenaOne on the Sliding Fee Programs page:
-
On the Main Menu, click Settings > Billing. In the left menu, under Practice Links — Fee and Allowable Schedules, click Sliding Fee Programs
-
Once there, you can edit accordingly, see To edit a sliding fee program in O-help for more information
Note: If you have further questions, or are unsure of the correct Sliding Fee Program to use for Dental, reach out to your CSM or create a case.
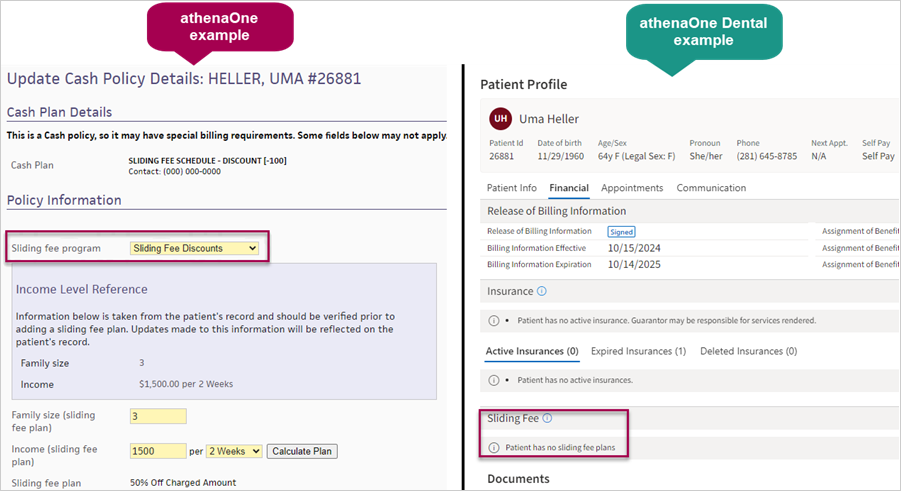
Example of athenaOne Patient with a Sliding Fee Plan under a dental program associated with athenaOne Dental.

Example of athenaOne Patient with a Sliding Fee Plan under a non-dental program displayed in athenaOne Dental as Self-Pay.
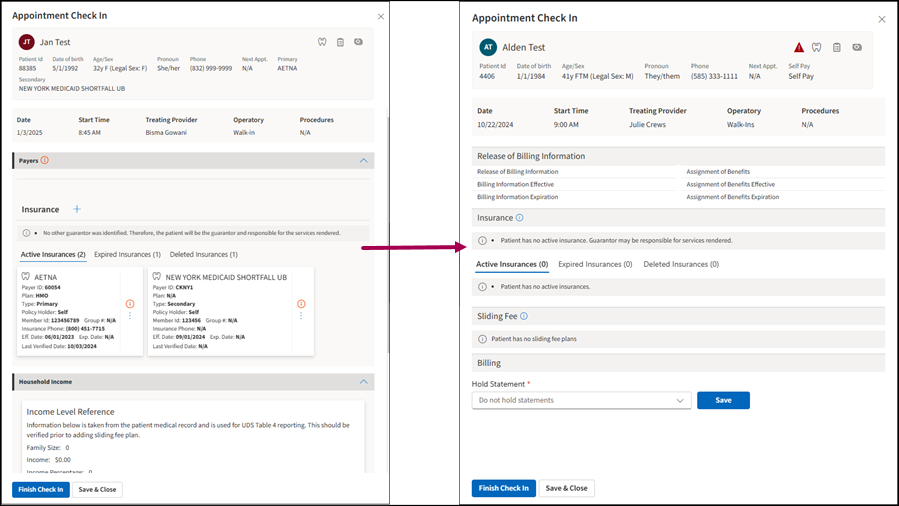
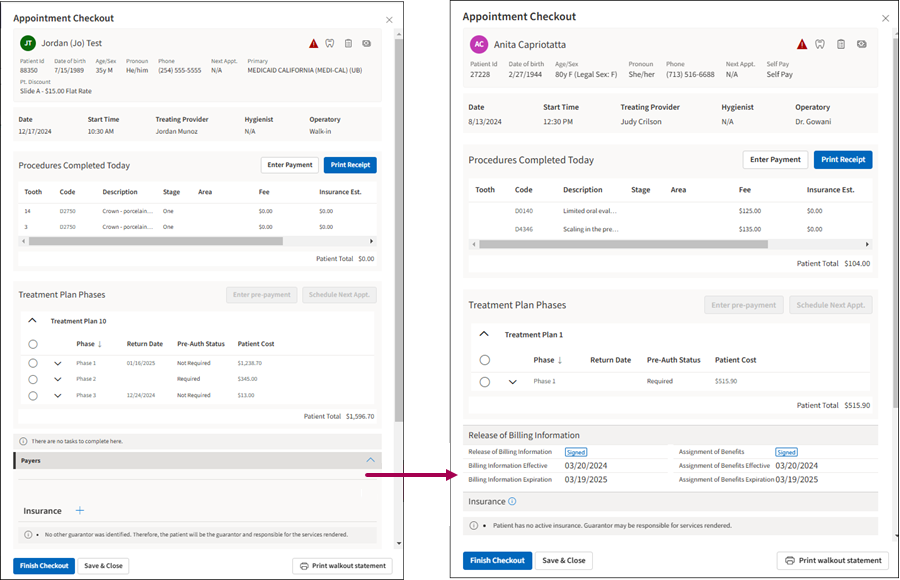
User Experience Changes — The shift to read-only data enabled us to simplify the layout for the Appointment Check In and Checkout. The Check In and Checkout workflows will still exist in athenaOne Dental but are simplified so that the user can visually verify the information rather than have to reenter it:
-
Check In — The Payers and Household Income sections cannot be edited. It displays the Release of Billing Information, Insurance, and Sliding Fee sections as informational. Users can use or edit the Hold Statement feature.
-
Checkout — The Payers and Household Income sections cannot be edited and are view-only. Users can continue to use workflow processes for the Procedures Completed Today features, Treatment Plans Phase features, and Print Receipt or Walkout Statement.
User Experience Changes — We have improved the layout around Patient’s Insurance to enhance readability and clarity:
-
Contact Information — We have moved information from the Contacts tab to a section in the Patient Info tab for better organization and improved readability.
-
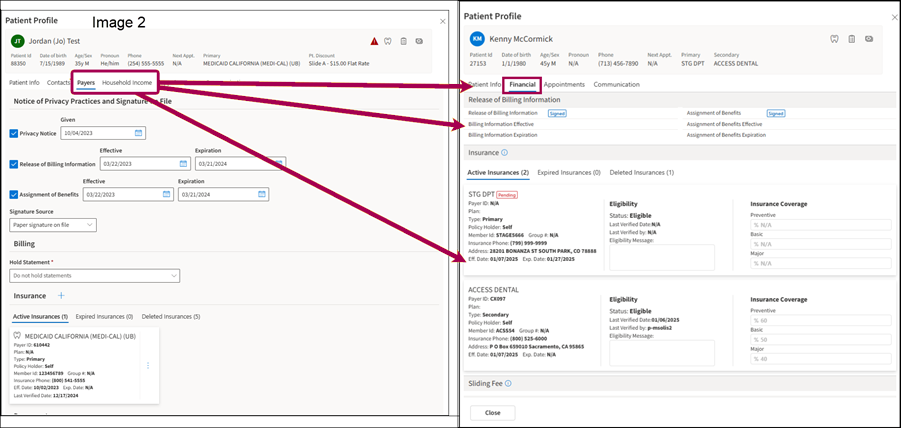
Financial Information — The Payers and Household Income tabs are now combined into a single Financial tab for easier access.
Note
The Privacy Notice Information section has been renamed Release of Billing Information. This displays “Assignment of Benefits” and “Release of Billing Information” alongside their effective and expiration dates and no longer displays “Privacy Notice” or “Signature Source.”
In instances where a patient’s insurance is pending approval, the user interface will display a Pending tag that explicitly indicates the Case Policy or Policies selected for the patient in athenaOne are awaiting approval. This visual cue ensures that users are immediately informed of the approval status, facilitating better workflow management and patient communication.
-
Save Patient Data Button — This button has been removed as part of our shift to read-only data, simplifying your workflow.
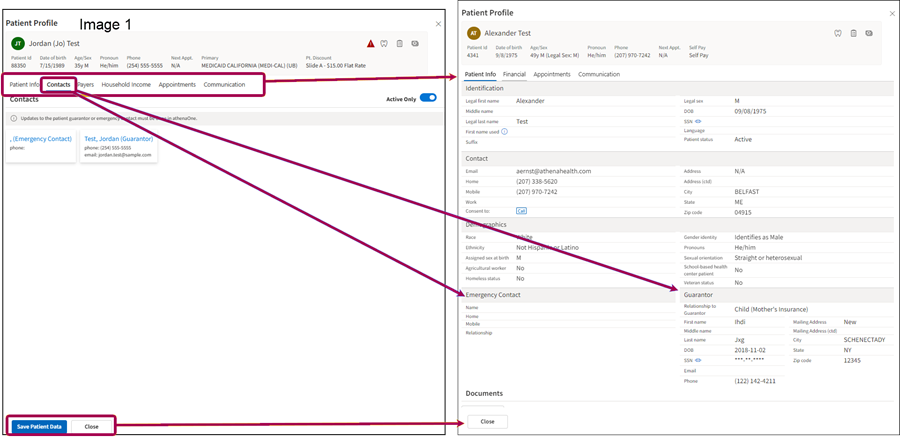
Given the limited amount of data that can now be edited in the Patient Profile in athenaOne Dental, the button has been renamed from “Edit Patient” to “View Patient.” In the Patient Profile, only the Patient Statement Hold feature and the Communication tab can be edited.

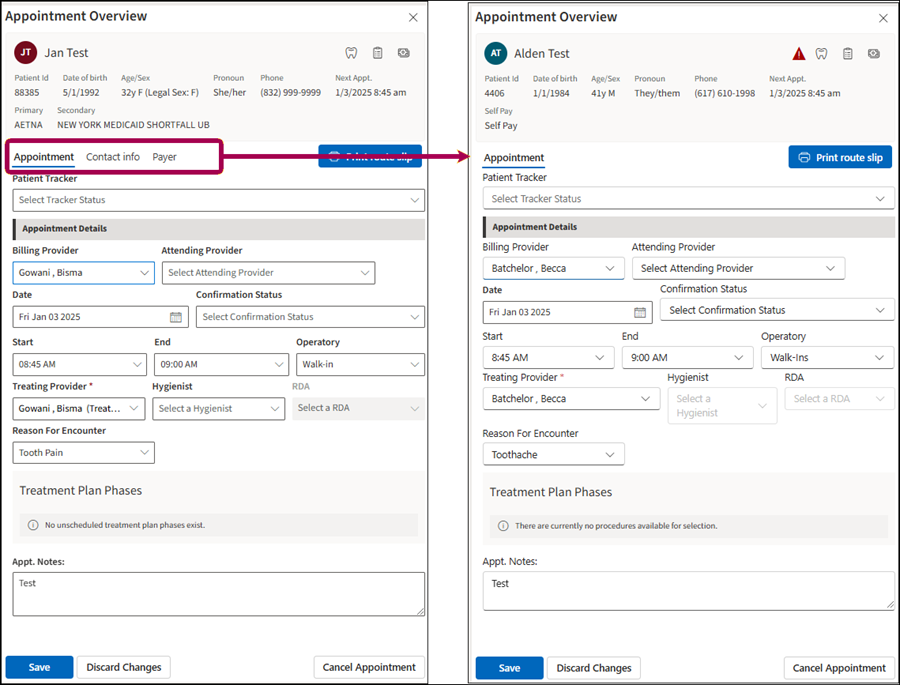
We improved the layout and simplified the workflow for the Appointment Overview panel. The Contact and Payer tabs have been removed. The patient’s contact and payer information is available through the View Patient Profile, streamlining the access point for the patient’s data.
We updated the coverage information that is displayed beneath the patient banner. The simplified view now displays Insurance coverage and Sliding Fee information only. Eligibility details can be viewed in the Patient Profile and edited only in athenaOne.


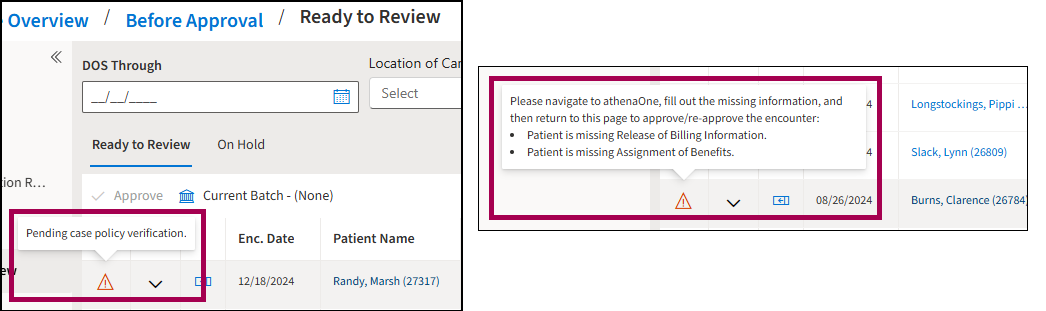
If a patient is missing “Release of Billing,” “Assignment of Benefits,” or has a “Pending Insurance Case Policy,” an alert icon will appear, preventing the user from approving the encounter in the Ready to Review or Ready to Reapprove worklists until these fields are completed in athenaOne.
Hover over the icon to view the alert information.