Emergency Access
athenaOne for Hospitals & Health Systems
This page allows authorized practice administrators to grant an athenaOne user temporary roles and permissions in the event of an emergency.
For example, suppose a patient arrives requiring emergency medical attention, the patient's account is blocked, and the only provider in the office does not have access to blocked patients. The administrator can grant this provider the Privacy: Access Blocked Patients role temporarily, in order to treat the patient.
On the Main Menu, click Settings![]() >User. In the left menu,under Practice Links — Users, click Emergency Access
>User. In the left menu,under Practice Links — Users, click Emergency Access
To access the Emergency Access page, you must have the User Admin user permission.
To access the record of a blocked patient in an emergency, you must have the Emergency Access: Privacy: Access Blocked Patients role or permission.
- Display the Emergency Access page: On the Main Menu, click Settings
 >User. In the left menu,under Practice Links — Users, click Emergency Access.
 - Use the fields provided and click Search to find the user you need.
A list of users matching your search criteria appears. - Click update for the user you need.
The Roles view appears, showing user access information for the selected user. - Click the Grant emergency access link at the upper left.
The Assign Emergency Roles view appears. - Scroll through the list of roles on the left, or enter the first few characters of the role that you need in the text box, and then select the role you need to grant to the user.
The role appears in the list on the right. - Select additional roles from the list on the left, if needed.
- Expire emergency roles in — Select a time period from the menu.
- Click Save. The confirmation message appears.
- Display the Users page: On the Main Menu, click Settings
 >User. In the left menu,under Practice Links — Users, click Users.
 - Search for the user as you normally would.
- Click the Roles tab.
- Scroll through the list to view roles marked (Emergency Role expires at mm/dd/yyyy hh:mm).
- Display the Users page: On the Main Menu, click Settings
 >User. In the left menu,under Practice Links — Users, click Users.
 - Search for the user as you normally would.
- Click the Roles tab.
- Scroll through the list to locate roles marked (Emergency Role expires at mm/dd/yyyy hh:mm).
- Click the Edit link at the upper right corner of the scrollable list of roles. The list of selected roles appears.
- Scroll through the list of selected roles
- Click the x icon to the right of the role that you want to remove
- Click Save.
- Display the Emergency Access page: On the Main Menu, click Settings
 >User. In the left menu,under Practice Links — Users, click Emergency Access.
 - Use the fields provided and click Search to find the user you need.
A list of users matching your search criteria appears. - Click update for the user who needs emergency access. The Roles view appears, showing user access information for the selected user.
- Scroll to the bottom of the page.
- In the "Practice" text box, enter the practice ID number (or the first few characters of the practice name) and select form the matching list.
- Click Add emergency access to practice . The Assign Emergency Roles view appear, showing the new practice name at the top left, just above the scrollable list of roles.
- Select a period from the "Expire emergency roles in" menu.
- Click Save. The confirmation message appears.
The audit history of any temporary role assignment is available to both the administrator who assigned the role and the user who was assigned the role.
- Display the Emergency Access page: On the Main Menu, click Settings
 >User. In the left menu,under Practice Links — Users, click Emergency Access.
 - Use the fields provided and click Search to find the user you need.
A list of users matching your search criteria appears. - Click update for the user who needs emergency access. The Roles view appears, showing user access information for the selected user.
- Click the Audit History link at the bottom left, below the scrollable list of roles. The audit history appears.
Note: It may take several seconds to load the audit history data, so please be patient.
If a practice administrator with Superuser access granted you the "Emergency Access: Privacy: Access Blocked Patients" role or permission, you can access a blocked patient's records for a period of 1 hour up to one week during an emergency.
Note: Practice administrators with Superuser access can grant temporary access to blocked patients for specific providers using the Emergency Access page.
-
 In the text box at the top right of the Main Menu, enter the patient's name (lastname, firstname), date of birth, SSN, insurance number, guarantor name, or phone number. Click the search icon.
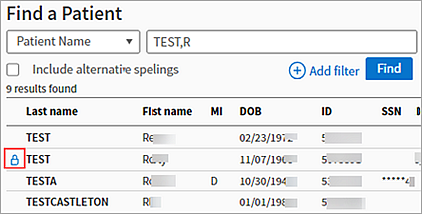
The Find a Patient page appears with information about patient records that are blocked or restricted.
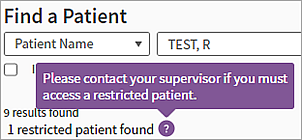
Note: If you do not have the "Emergency Access: Privacy: Access Blocked Patients" role or permission, you see this warning on the Find a Patient page:
- Click Show Details.

- Click Request Temporary Access.
The search results are refreshed, showing the blocked patient records.
- Click the appropriate action — such as Chart — to provide emergency care to the patient.
You can access the patient's record for a period of 1 hour up to one week.