Employer Portal — Setup a Hub for Corporate Billing
The Employer Portal is a centralized hub where contract payers (Employers) can access and pay their invoices.
-
View invoices.
-
Pay one or multiple invoices at once using a credit card (Visa, Mastercard, Discovery)
-
Dispute a claim
-
Automated notification for new, overdue, and re-issued invoices
Tip: After registering, employers can access the Employer Portal with this link: https://billing.web.athena.io/employerportal/login
Refer to the Employer Portal Tipsheet & One-Pager on the Success Community.
With athenahealth’s Employer Portal, your organization can simplifyfinancial operations, enhance transparency, and accelerate payment cycles. Designed specifically for contract payers and healthcare providers offering occupational health services, the employer portal provides a centralized hub for managing, tracking, and paying invoices. This cloud-based solution ensures contractpayers have visibility into their financial interactions with healthcare providers, reducing administrative burdens and improving cash flow management.

The Employer Portal builds on our athenaOne platform, offering robust invoicing capabilities and features designed to meet the unique needs of contract payers, while integrating with your existing workflows.
The Employer Portal is a central hub for payers. The portal:
-
Provides a simplified and secure hub to access invoices.
- Helps expedite payments by allowing multi-invoice payments with a credit card. (Visa, Mastercard, Discovery)
- Automatically deposits portal payments into your US bank account.
Practice users do not access the Employer Portal. The employers access the portal:
https://billing.web.athena.io/employerportal/login
To see workflows intended for employers, see the Instructions for employers section of topic.
Note: Your practice has a setup task to complete. You must invite corporate payers to the portal.
If not already completed, you must create a corporate account per employer and a contact for each employer representative that wants access to the portal.
For more information, see the Setup instructions section of this topic.
To add and manage your practice's local insurance packages, you must have the Local Insurance Package Administration user permission (included in the Billing Admin user role).
-
Before you can use this feature, you must set up any employers as corporate payers via their usual workflows.
-
The payer must have a corporate account. If the payer does not have a corporate account, please create one before proceeding.
Note: For instructions on creating a corporate account, refer to the User Guide — Corporate Billing in O-help for more information. If you're not able to create corporate accounts, please contact your CSM.
Important: The email cannot be associated with a patient portal account or they will not be able to register.
To invite a corporate payer to the portal:
- Click the Settings icon > Under ADMIN click Billing.
-
Under Practice links > Insurance package, click Corporate Accounts.
-
Open to the Contacts tab.
-
Either create a new contact or find the existing contact you wish to invite.
Note:
The email address cannot be linked to an existing patient portal account. Otherwise, registration will not be possible. If an email is entered and it is already associated with a patient portal account, an alert will be triggered. It is recommended to request a new email address from the payer.
-
Click Send Invite. The user is moved an Invited status.
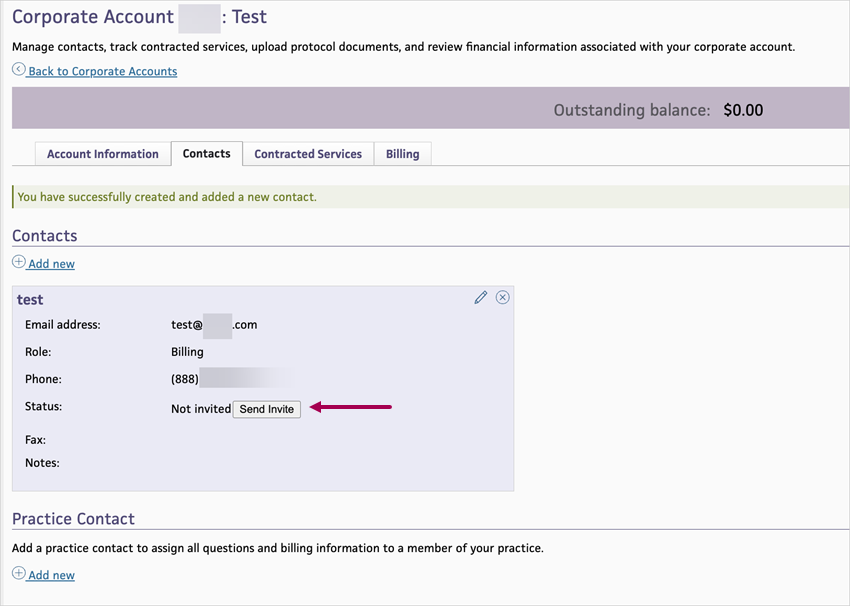
Note: An email address is required to send the invite. If the invite button is not visible, ensure the contact has a valid email address. Emails can take 5 to 10 minutes to be delivered.
-
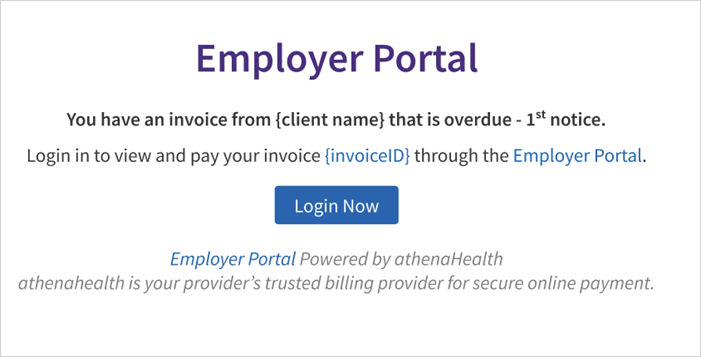
The contact receives an email invitation where they can register for their portal and gain access. The following image is an example of the invitation email.
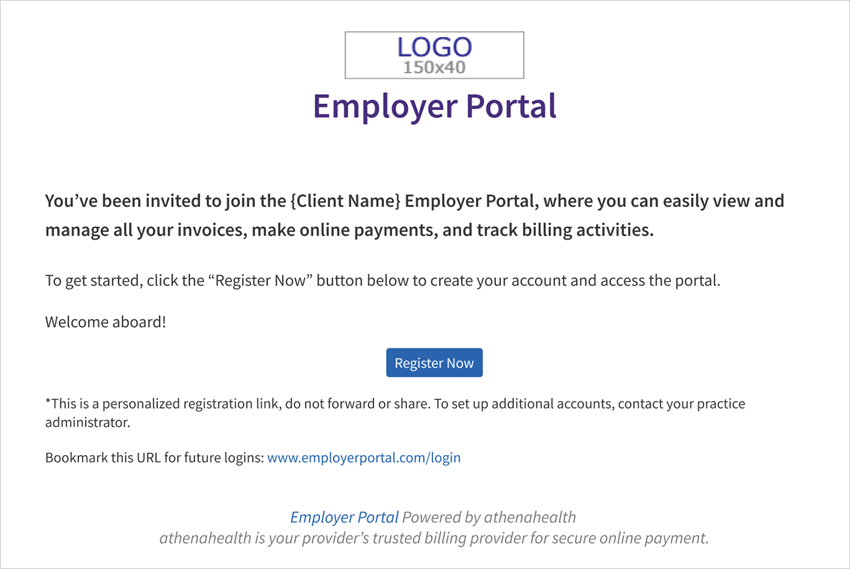
Note: The Register Now button will never expire, and payers can register anytime after receiving this email.
-
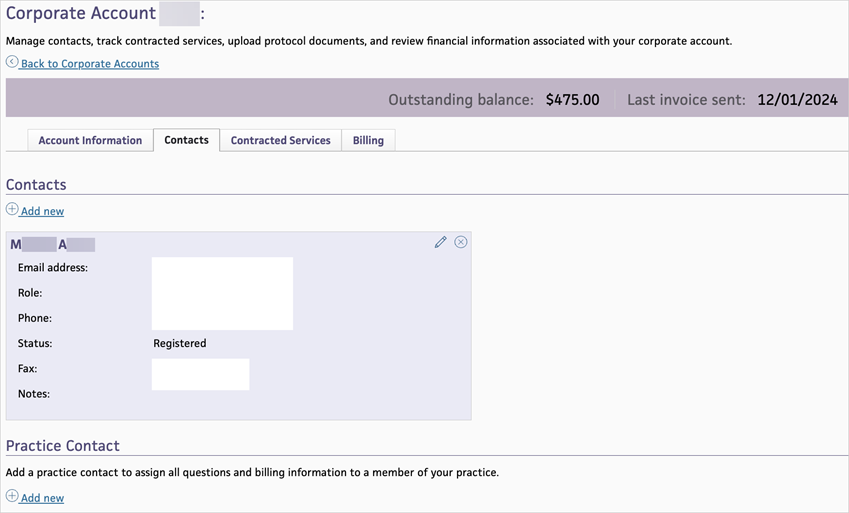
If a user registers to the portal, their status will update to Registered.
Tip: You can click Resend Invite to re-send the email to the contact at any point as needed.
This feature provides the following benefits:
| Benefit | Feature | Description |
|---|---|---|
| Centralized invoice management |
Centralized invoice hub |
Corporate payers can view billed invoices in one place, eliminating the need to manage multiple statements across different channels. |
|
Batch payments |
Simplify transactions by enabling corporate payers to pay multiple invoices at once using credit cards. | |
| Transparent financial workflows |
Detailed invoice breakdown |
Each invoice includes line-item details, allowing corporate payers to easily review charges and reconcile them with their records. |
|
Dispute management tools |
Corporate payers can flag specific claims for review or dispute directly within the portal, facilitating faster resolution and communication with billing staff. | |
|
Automated reminders and notifications |
Corporate payers receive timely alerts for new, overdue, and re-issued invoices, ensuring everything is reviewed. | |
| Seamless integration with existing systems |
Integration with athenaOne |
The portal syncs directly with athenaOne’s billing system, ensuring daily data updates. |
|
Customizable branding |
Tailor the portal to reflect your organization’s branding for a consistent, professional experience. | |
|
Secure, cloud-based access |
HIPAA-compliant security protocols ensure sensitive financial information is protected while allowing access. |
| Feature | Description |
|---|---|
| Centralized home page | Displays billed invoices, their status, and account balance with the option to add invoices to a payment cart. |
| Detailed invoice page |
Provides a breakdown of claims, procedures, balances, and patient information with the option to add invoices to a payment cart. |
| Secure registration |
Employers register via email invitation and set up secure access with account recovery options. |
| Payment processing |
Employers can select invoices, pay securely using a PCI-compliant credit card tool, and receive downloadable receipts. Payments are automatically deposited into your bank account. |
-
Corporate Account - Name: This will appear on the Portal as the employer’s name.
-
Corporate Account - Address: This will be displayed as the address on file for the Corporate payer
-
Corporate Account - Phone: This will be displayed as the phone number on file for the Corporate payer
-
For a detailed guide on creating a corporate account, see User Guide — Corporate Billing in O-help.
If an email is already tied to another corporate account, it can still be used, but the new contact will still have to be granted access by the practice. You can grant access on the contact. If the user is already registered to the portal, they will not need to register again.
To track payments from the portal, run the E-Payment Activity report. Filter by Username: PortalDesktop and Transaction Type: Webportal CC Payment.
Yes, you can restrict access to the portal after a contact is registered. To restrict access, click Revoke Access.
No, we do not support this.
Payers can download the receipt immediately after a successful payment; however, it is not saved for future retrieval.
In a future release, receipts will be stored under the Payment History tab.
The receipt will include the record number and authorization number, enabling clients to confirm the payment by running an e-payment activity report.
If you forgot your password, reset it by clicking the Forgot Password link after clicking login.. You must verify both your email (password reset link) and recovery factor like your phone (prompt upon clicking reset link).
Click on the username icon on the header on the top right of the portal and click logout.
Payers are advised to register for the Employer Portal using a business email address. If a personal email address is used, and that address is already associated with a Patient Portal account, the registration will fail and an error message will appear.
You can view the following pages:
-
Home page
-
Bill payment page
-
Invoice detail page
-
Payment cart page
-
Dispute claim on an invoice
-
Invoice notification (for new, overdue, re-issued invoices)
-
Check your email
-
Look for an email titled Employer Portal.
-
This email contains a secure link to access the registration portal.
-
Click Register Now in the email to begin the onboarding steps.
-
-
Didn’t receive the email?
-
Emails can take 5 to 10 minutes to be delivered. If you don’t see the email in your inbox after this time, please check your spam or junk folder.
-
If it’s still not there, contact the practice directly to request a new invitation.
-
-
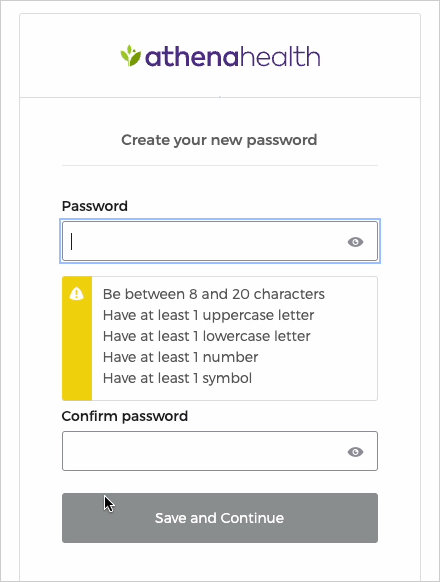
Set your password.
-
Confirm your email on the registration page, which will then bring you
-
Your password must meet the following criteria:
-
Consists of 8 to 72 characters.
-
Contains lowercase, uppercase letters and numbers.
-
Cannot match any of the last 4 passwords for that account.
-
Accounts lock out after 10 failed login attempts.
-
-
-
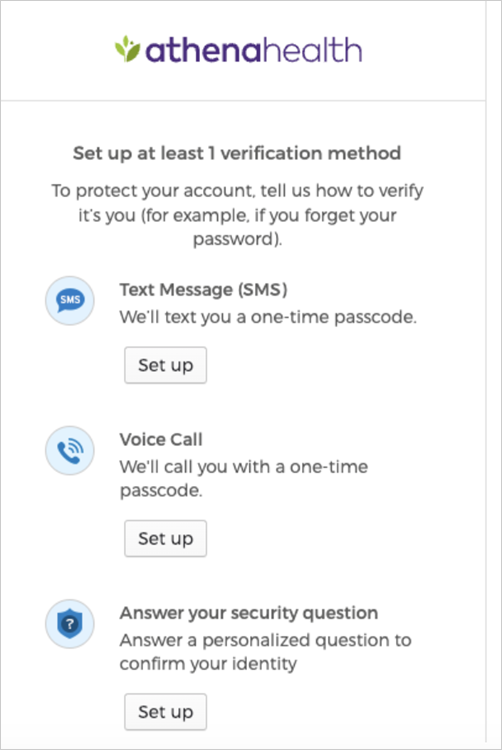
Enter a phone number, voice call or security question to be used as a recovery method.
-
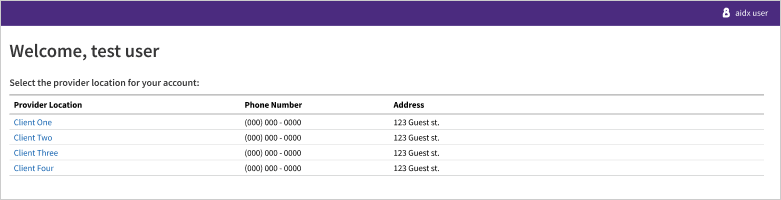
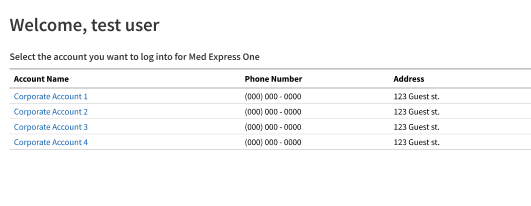
Payers will be required to select the Provider Location (Context). Depending on how many Contexts this payer has access to would determine how many Provider Locations are shown.
-
After selecting a Provider Location and payer will then have to select the Corporate Account name in order to access the invoices for that account. If a Payer has access to multiple accounts, they can use the picker screen to navigate to their desired account.
-
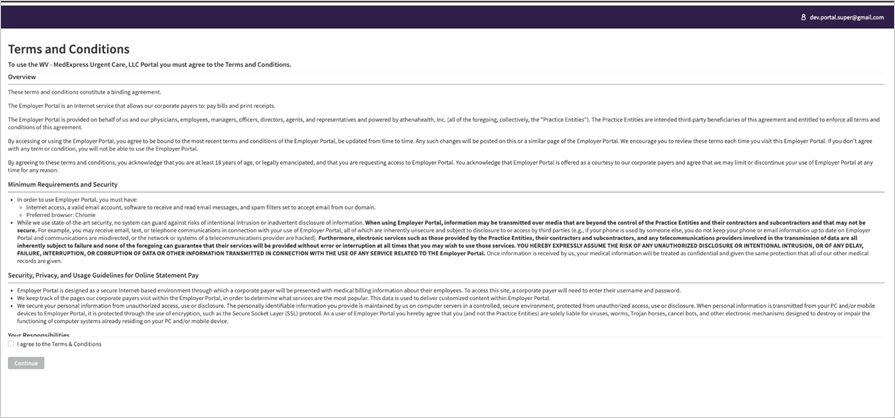
Sign the terms and conditions. (This is only required once)
-
Access the portal.
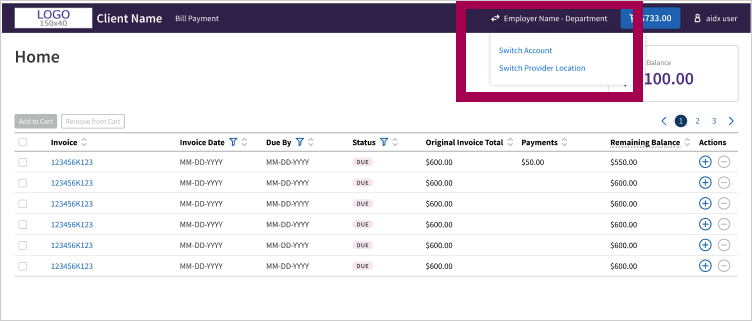
Post-login users can switch between corporate accounts by using the "Switch Account" button.
The Employer Portal can display your practice's logo and practice name, which you can customize.
.
See Communicator Branding in O-help.
.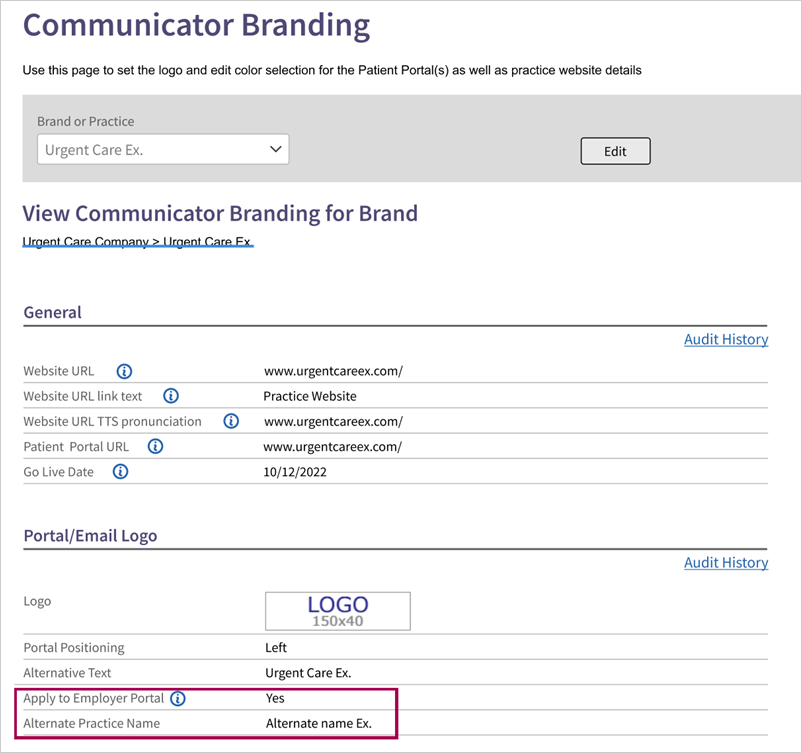
- Navigate to athenaOne's home page.
- Select Gear Icon > Communicator > Patient Portal > Communicator Branding.
- In the Portal/Email Logo section:
- Select the logo you want displayed on the portal.
- Edit the practice name as it appears to employers.
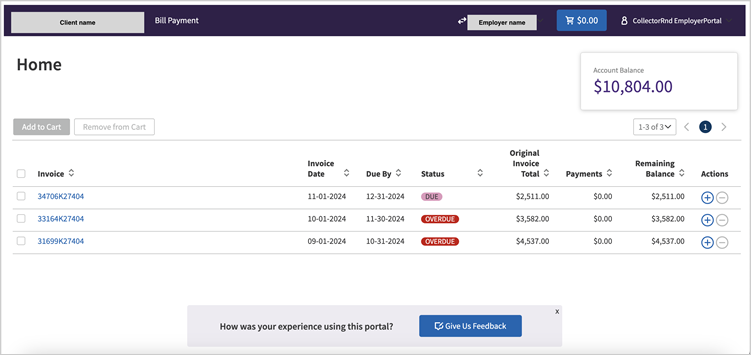
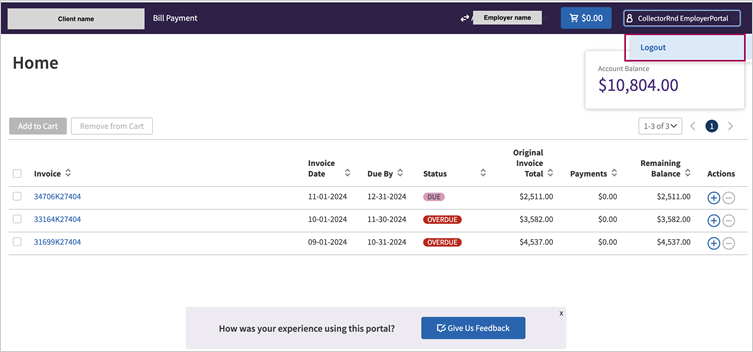
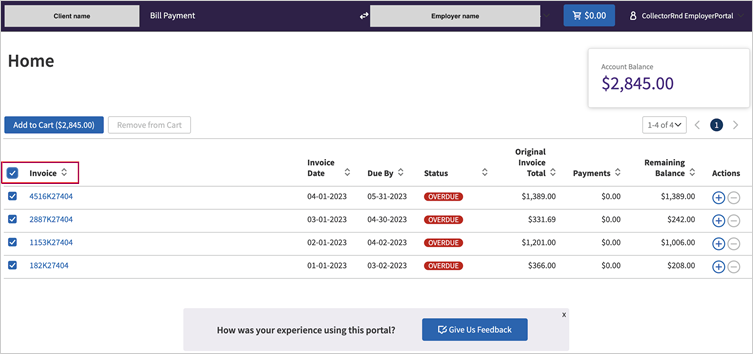
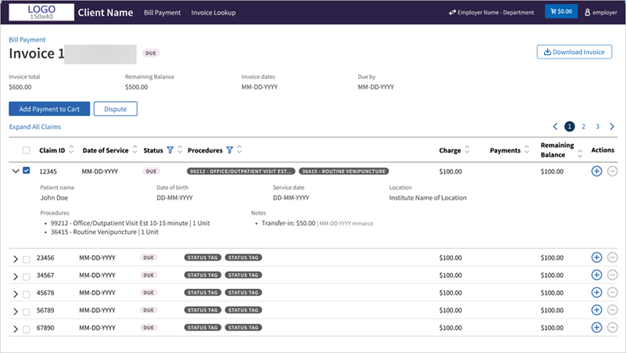
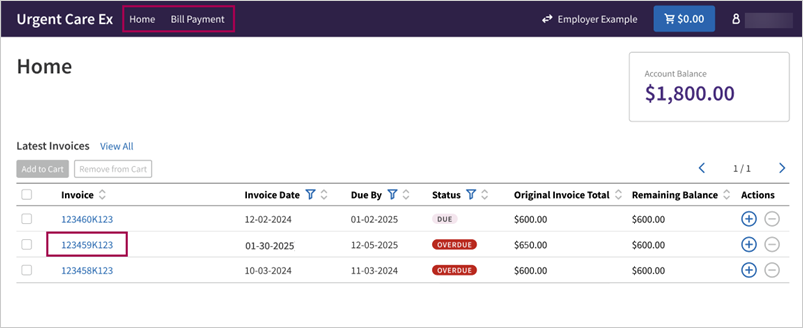
On the Home page, you'll see the latest issued invoices and their status, along with your total account balance, in the top right widget. You can add invoices to your payment cart directly from this page. To start the payment process use the Action button to the left of each invoice to add or remove from the payment cart.
Bulk actions can be made to add or remove multiple invoices to your cart by clicking the box next to the invoice ID column header.
| Column | Description |
|---|---|
| Invoice | The invoice ID, which is a hyperlink that takes you to detailed information on the invoice. |
|
Invoice Date |
The date the invoice was first billed. |
|
Due By |
The date payment is due before it is considered overdue. |
|
Status |
The current status, which can be Due, Overdue, In-Review , Closed, Pending. |
|
Original Invoice Total |
The amount when the invoice was first billed. |
|
Payments |
The total payments made on the invoice. |
|
Remaining Balance |
The amount remaining which needs to be paid on the invoice. |
On this page you can see all open invoices and a history of paid invoices. Payment history only displays payments made through the portal. You can select individual invoices or use the bulk edit button to add them to your payment cart.
This page shows claims and their procedure information related to a specific invoice. To view information about each claim including patient data, procedures and payments, click the action button for that claim. Additionally, you have the option to add the invoice to your cart for payment.
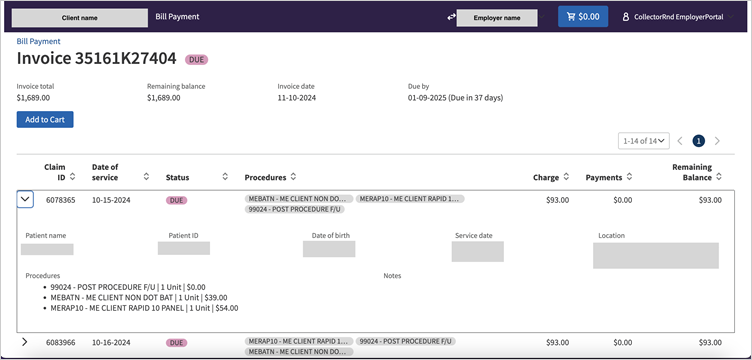
| Invoice details include | Description |
|---|---|
|
Invoice total |
The original amount when the invoice was first billed. |
|
Remaining total |
The total of charges minus payments, plus transfer-ins, minus transfer-outs, and adjustments. |
|
Invoice date |
The date of the last billed invoice. |
|
Due by |
The date by which payment is due before it is considered overdue. |
Click the cart icon to navigate to the payment cart page, you'll see the invoices you've selected for payment. Click Proceed to Payment button to start the payment process.
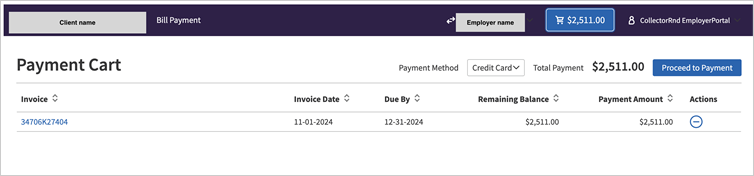
Note: The Employer Portal limits payments to paying invoices in full, and only accepts credit cards.
-
After clicking Proceed to Payment.
-
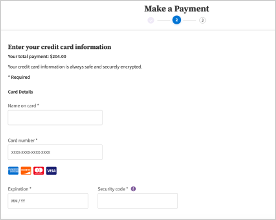
Employers can enter in their credit card information in the secure credit card processing tool.
 .
.
Note: This tool is PCI compliant.
-
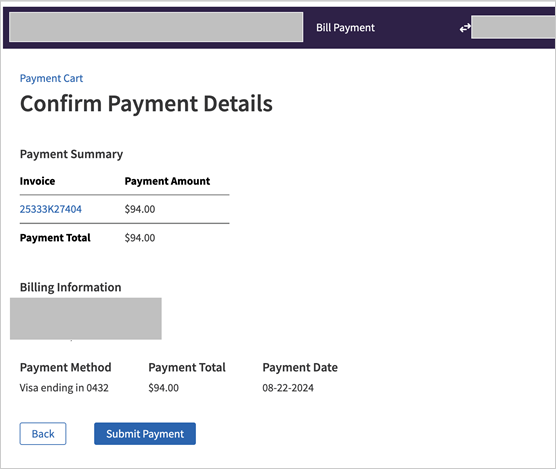
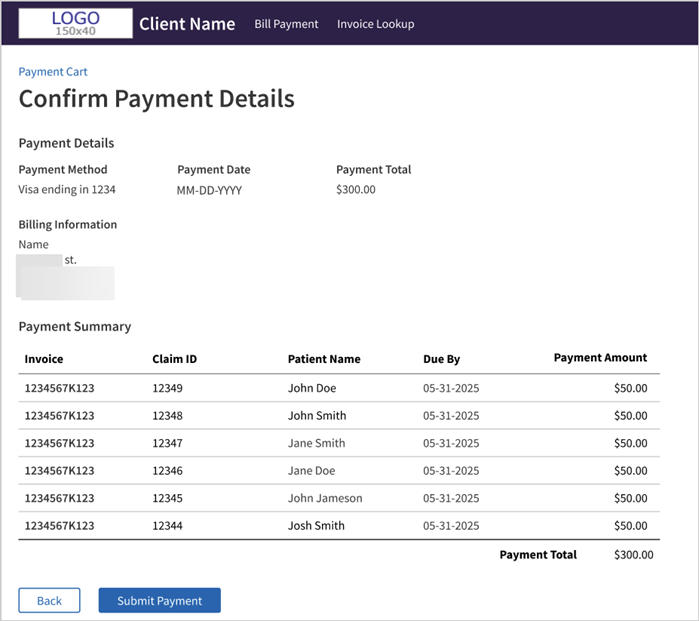
After entering and verifying the credit card information, employers will be taken to the confirm payment detail page, where they can review and ensure all information is correct before submitting the payment.
-
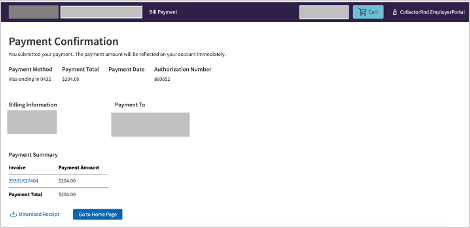
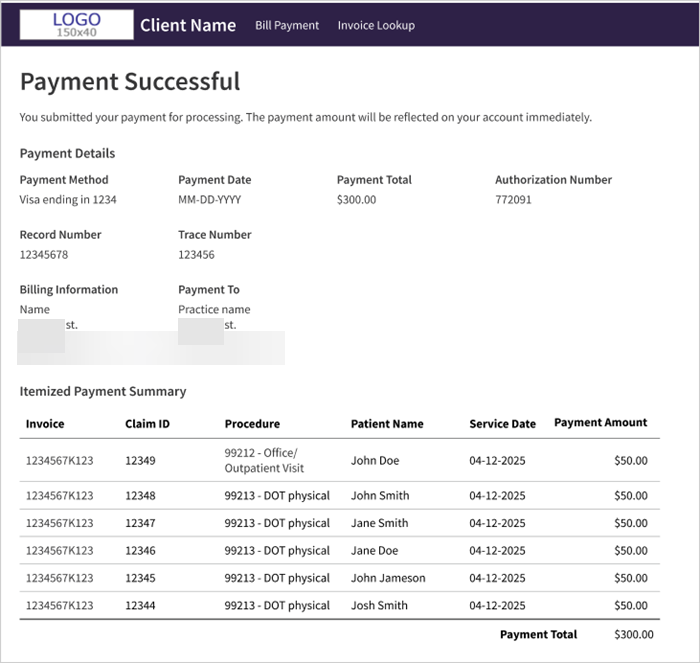
Once payment is complete, employers get routed to the receipt page and have the option to download their receipt.
-
Currently, since payers can only make full invoice payments, the invoice remains the best option for confirming details such as: the Service Date, Patient Name, and Charge Amount. The following image is an example of the receipt.
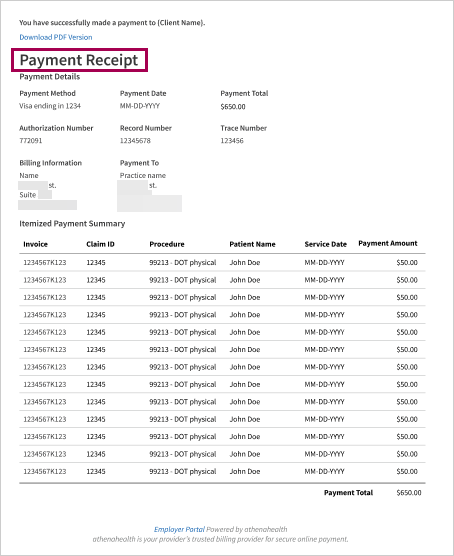
You can submit claim-level payments with itemized receipts
-
Claims can be paid individually using a credit card
-
Itemized receipts are generated per procedure
-
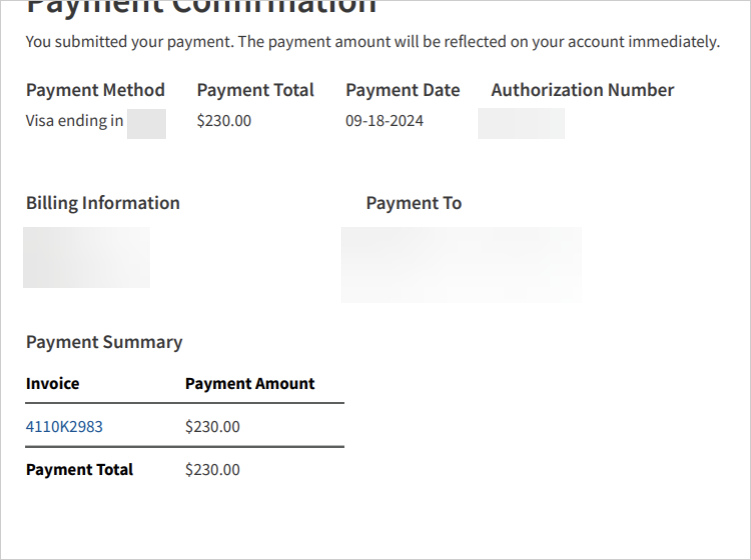
Receipts are both stored in payment history and emailed to the user after each successful payment
Employers using the Employer Portal can pay for individual claims directly by adding specific claims to their payment cart and completing the transaction with a credit card.
After each successful payment, they will receive an itemized receipt detailing the procedures covered. This receipt will be automatically emailed for their records and stored in their payment history for future access.
This feature provides the following benefits:
-
Claims can be paid individually using a credit card; this allows for better control of what you're paying because you no longer need to pay the whole invoice at once.
-
Itemized receipts are generated per procedure which provides better visibility and transparency into the claim.
-
Receipts are both stored in payment history and emailed to the user after each successful payment to ensure easy access.
Employers can add claims from their cart in three ways:
- Use the plus icon in the Actions column for an individual claim.
- Check the boxes for multiple claims and click Add Payment to Cart to add in bulk.
- Check the box of one claim and click Add Payment to Cart to add one at a time.
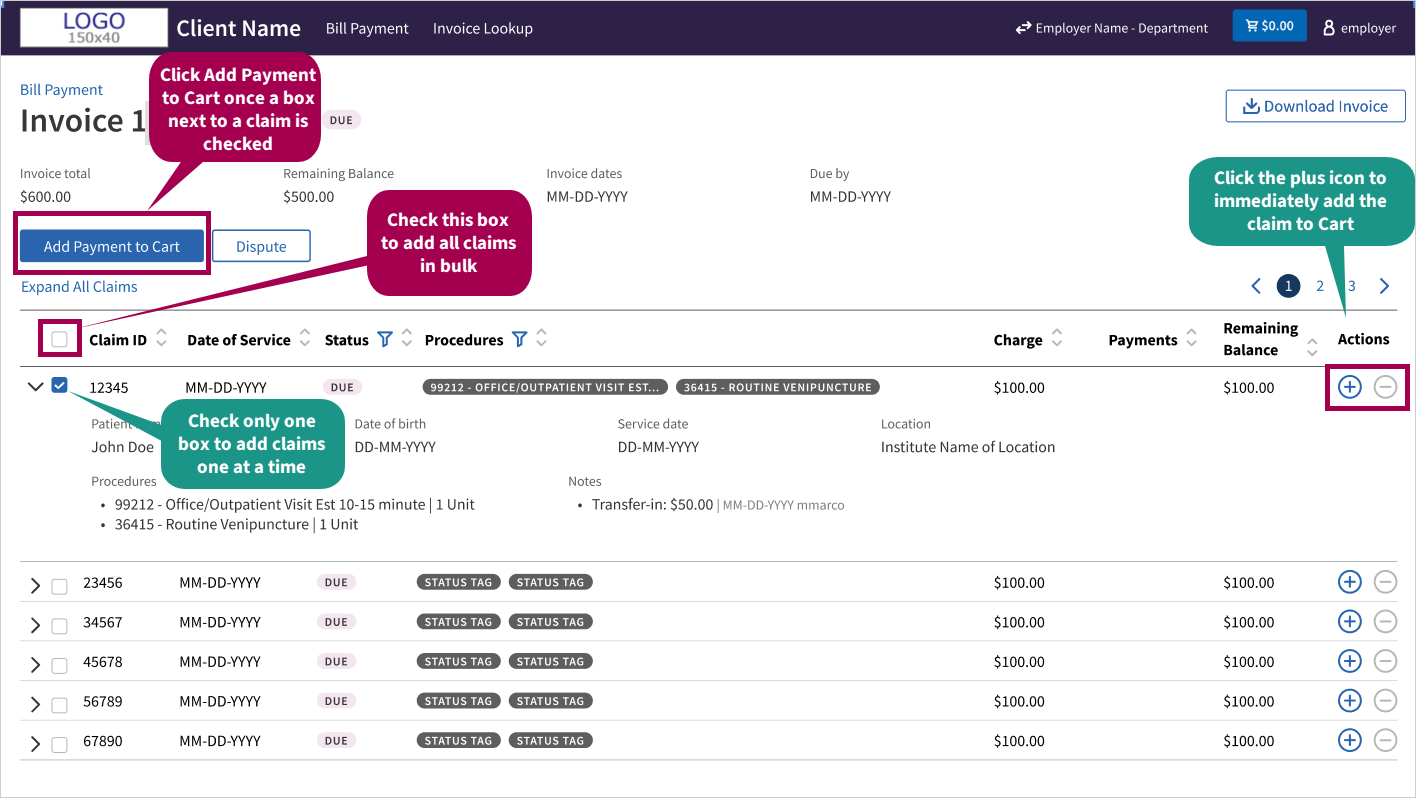
Tip: Click the image for a closer look.
Note: If some claims from an invoice are already in the cart, you can click Add Invoice to Cart from the homepage. This will only add the remaining claims that haven’t been added yet.
To remove from Cart on the Invoice Detail page, click the minus icon. Go to the Cart for more control removing claims.
Once a claim is added to the payment cart, employers will see the associated Claim ID alongside the Invoice ID. This added visibility helps employers confirm which specific claims are selected for payment.
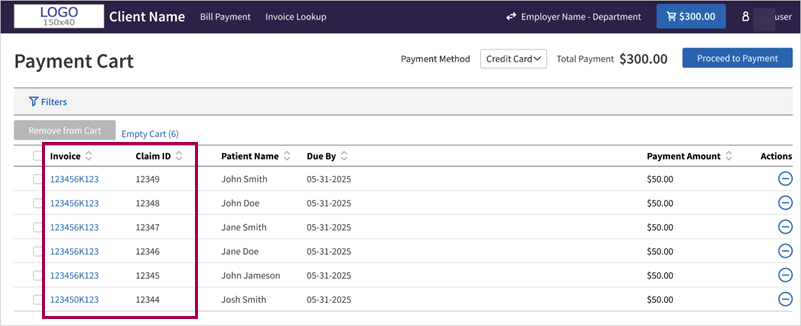
Employers can remove claims from their cart in four ways:
- Click Empty Cart to remove all claims immediately.
- Use the minus icon in the Actions column for an individual claim.
- Check the boxes for multiple claims and click Remove from Cart to add in bulk.
- Check the box of one claim and click Remove from Cart to add one at a time.
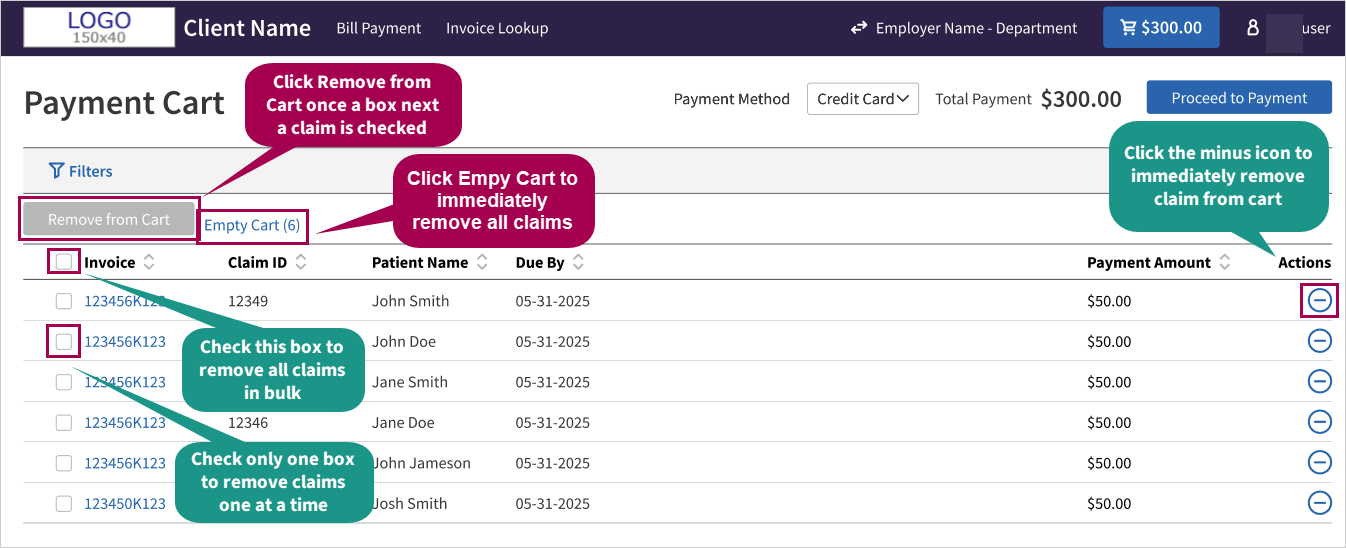
Tip: Click the image for a closer look.
After employers enter credit card information, they are prompted to confirm the payment.
At this step, the Employer Portal
displays the individual claims included in the payment.
After each successful payment, an itemized receipt is automatically generated. The receipt details each procedure included in the payment.
After each successful payment, an itemized receipt will be automatically emailed to the user who completed the transaction.
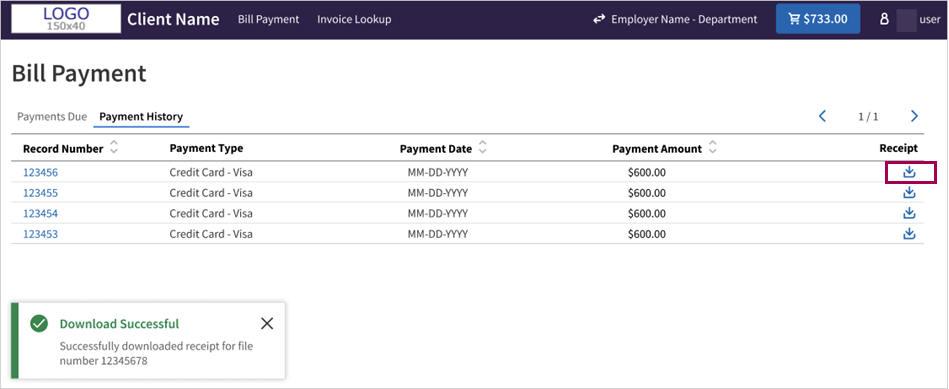
Employers can find past receipts anytime from the Payment History page.
Employers can click Invoice Lookup in the Main Menu to access the Invoice Lookup page.
Searching by Invoice ID or Claim ID lets employers find any open or paid invoice that was issued through the Employer Portal.

You can download PDF copies of invoices directly from the Employer Portal. Once downloaded, you can follow your usual workflow for printing downloaded PDFs from your local computer.
For each invoice, you can download on-demand. They also have the option to download one or more issued versions of an invoice.
-
Enables you to quickly download and save an invoice
-
Mirrors your usual workflow for printing invoices
Note: The invoice you can download as a PDF is the same version sent via mail or email through our Proofpoint email service. If users prefer to pay by check, they can retrieve the return stub included in the invoice PDF and mail it back with their check.
From the Employer Portal:
-
Display the Home or Bill Payment page.
-
Click the invoice you want to download to open the Invoice Detail page.
-
Click Download Invoice.
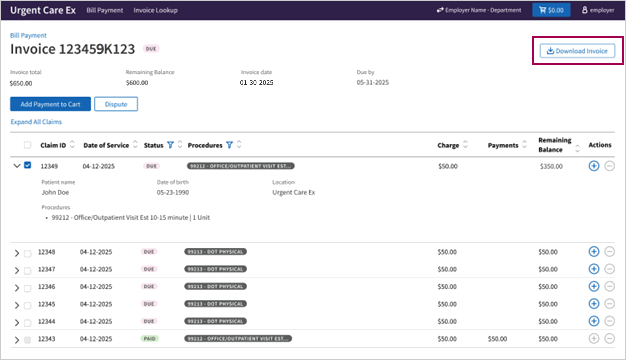
-
After you click Download Invoice, check the Downloads folder on your local computer to ensure the PDF of the invoice downloaded successfully.
If there are multiple issued versions of an invoice, you can click the downward arrow in the Download Invoice button to reveal a list of those versions ordered by date.
Check the box for issued version of the invoice you want to download.
Follow your usual workflow for printing PDFs on your local computer.
When a corporate payer disputes a claim in the portal.

When you click Dispute, you can dispute the claim in the Submit Dispute window.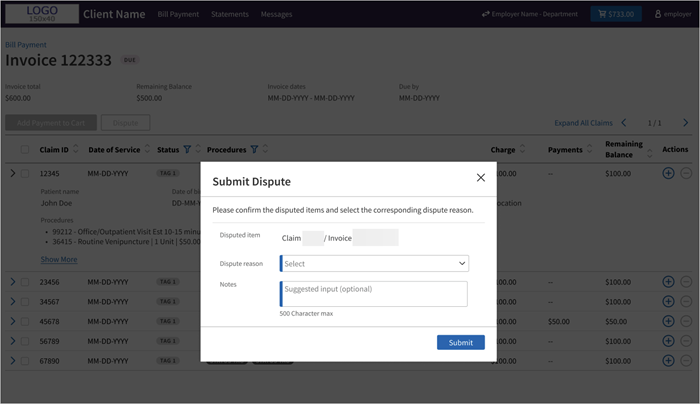
- Go to the invoice of the claim you are disputing.
- Click Action for the specific claim.
- Click Dispute.
- Disputed item — No action required. This field displays the claim and invoice numbers.
- Dispute reason — Choose a dispute reason. This is a required field.
- Notes — Optional. Add a note. 500 character limit.
- Click Submit.
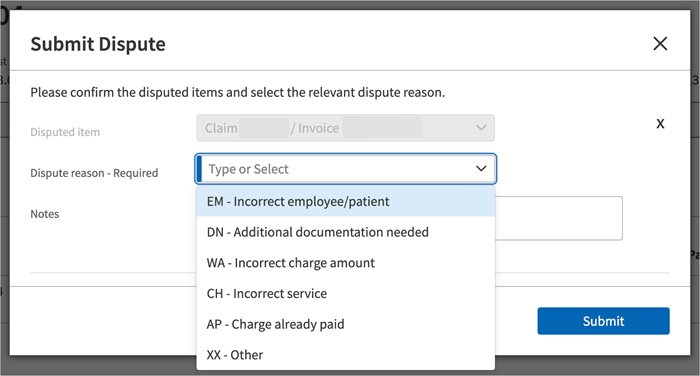
| Kickcode | Dispute reason in Employer Portal | Dispute reason on claim note in athenaOne |
|---|---|---|
| EM | Incorrect employee/patient |
The corporate payer does not recognize this employee/patient, or the service was provided to the wrong employee/patient. |
| DN | Additional documentation needed |
The corporate payer requires additional documentation (such as lab results, chain of custody, outcomes of a physical, etc.) for payment. |
| WA | Incorrect charge amount |
The corporate payer has indicated that the charge on the claim does not match the contracted rate. |
| CH | Incorrect service |
The corporate payer has indicated an issue with the billed procedure, which may be incorrect or outside of their protocols. |
| AP | Charge already paid |
The corporate payer has indicated that the charge(s) on this claim have already been paid. |
| XX | Other |
The corporate payer has denied this claim. |
The claim will be placed in HOLD status in athenaOne, ,with a claim note indicating the reason for the dispute.
Review the claim in HOLD status, address the issue, and re-drop the claim. The invoice will be re-issued the next day.
Once resubmitted, the claim will move to BILLED status, and the portal will update the claim status to “Due” or “Overdue,” as applicable.
Registered portal users will receive an email notification for various invoice statuses: when a new invoice is billed, when an invoice becomes overdue, or when an invoice is re-issued. These email notifications will be sent to each registered user's email address on file.
The following image provides an example of the email notification for the first overdue invoice.
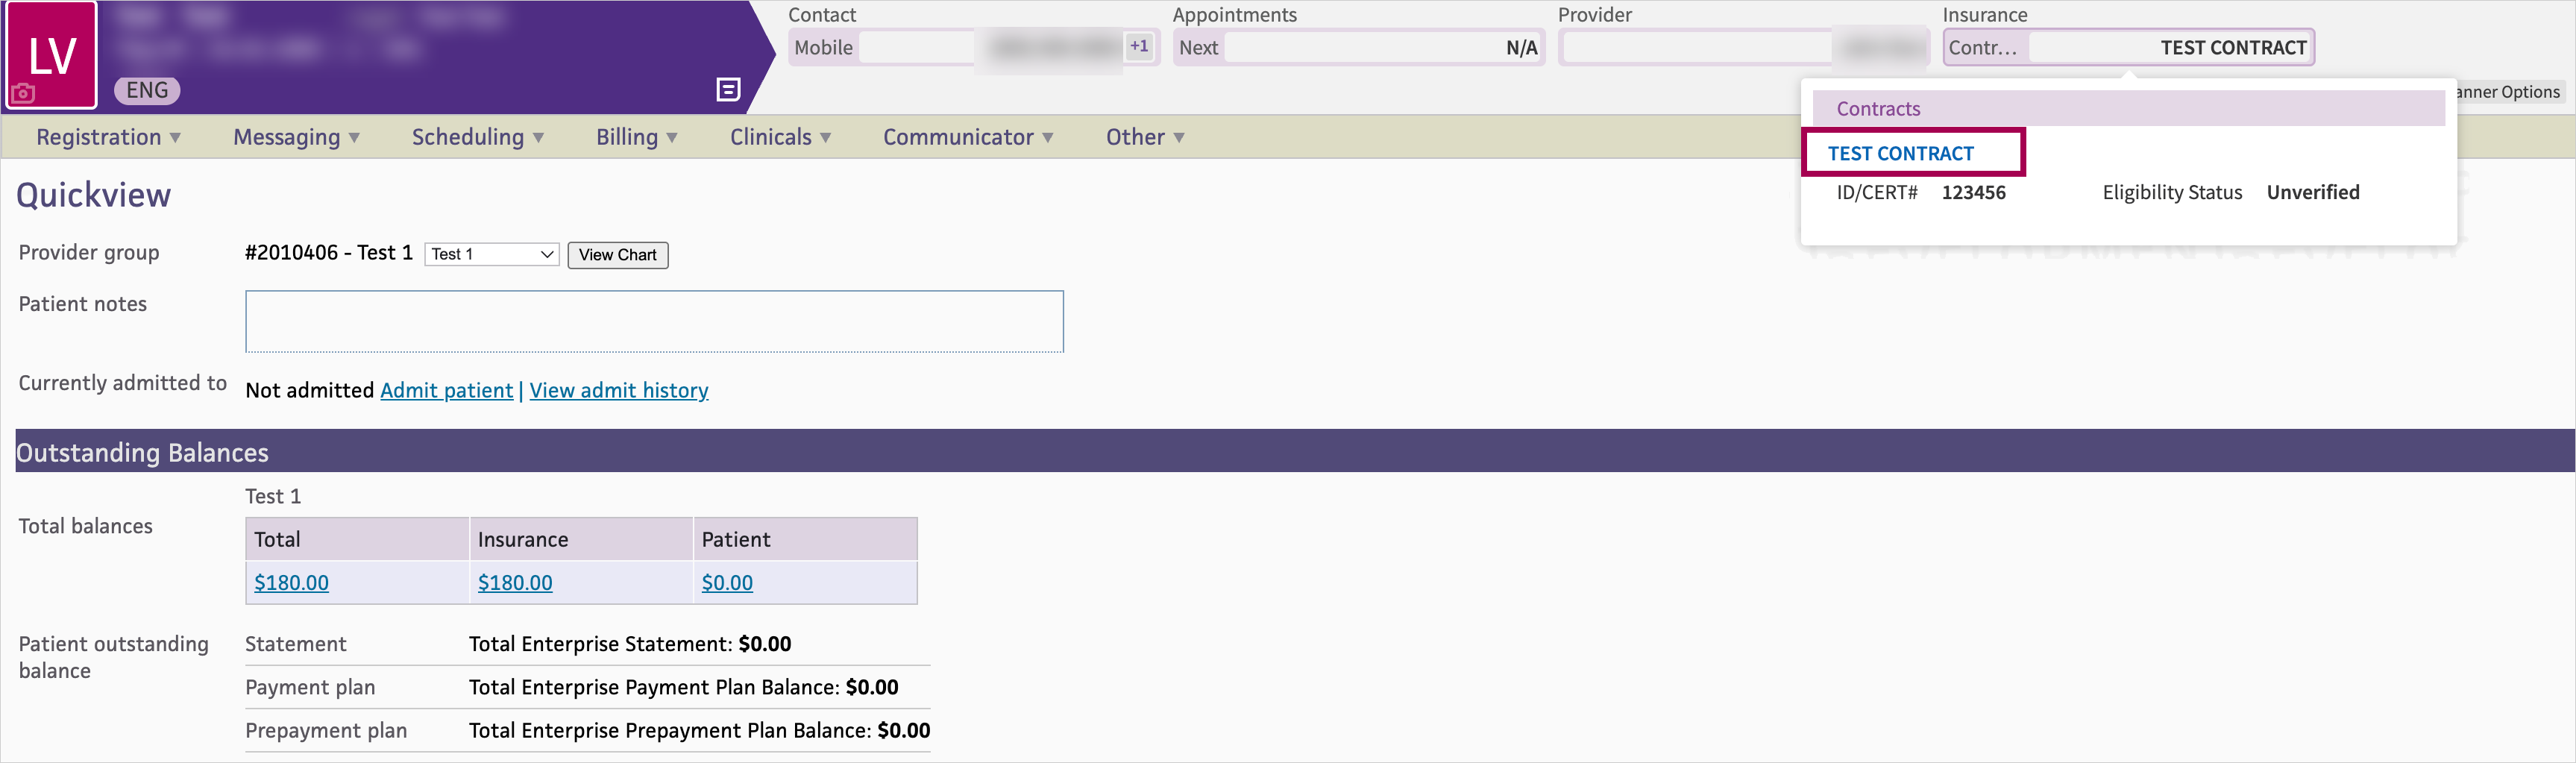
You can quickly access an employer’s contracted services directly from the patient banner, improving care efficiency.
You can access this field under Insurance > Contracts on the following pages:
-
The encounter

-
Quickview
-
Search by patient ID or name to open the patient banner.
- Click the Contract field (visible only if linked to a corporate account).
- Click the Employer link in the Contracts box.
-
View the detailed Contracted Services window over athenaOne.
The following image is an example of the Contracted Services window. The window opens on the Contracted Services tab by default. You can also open the Account Information, Contacts, and Billing tabs in this window: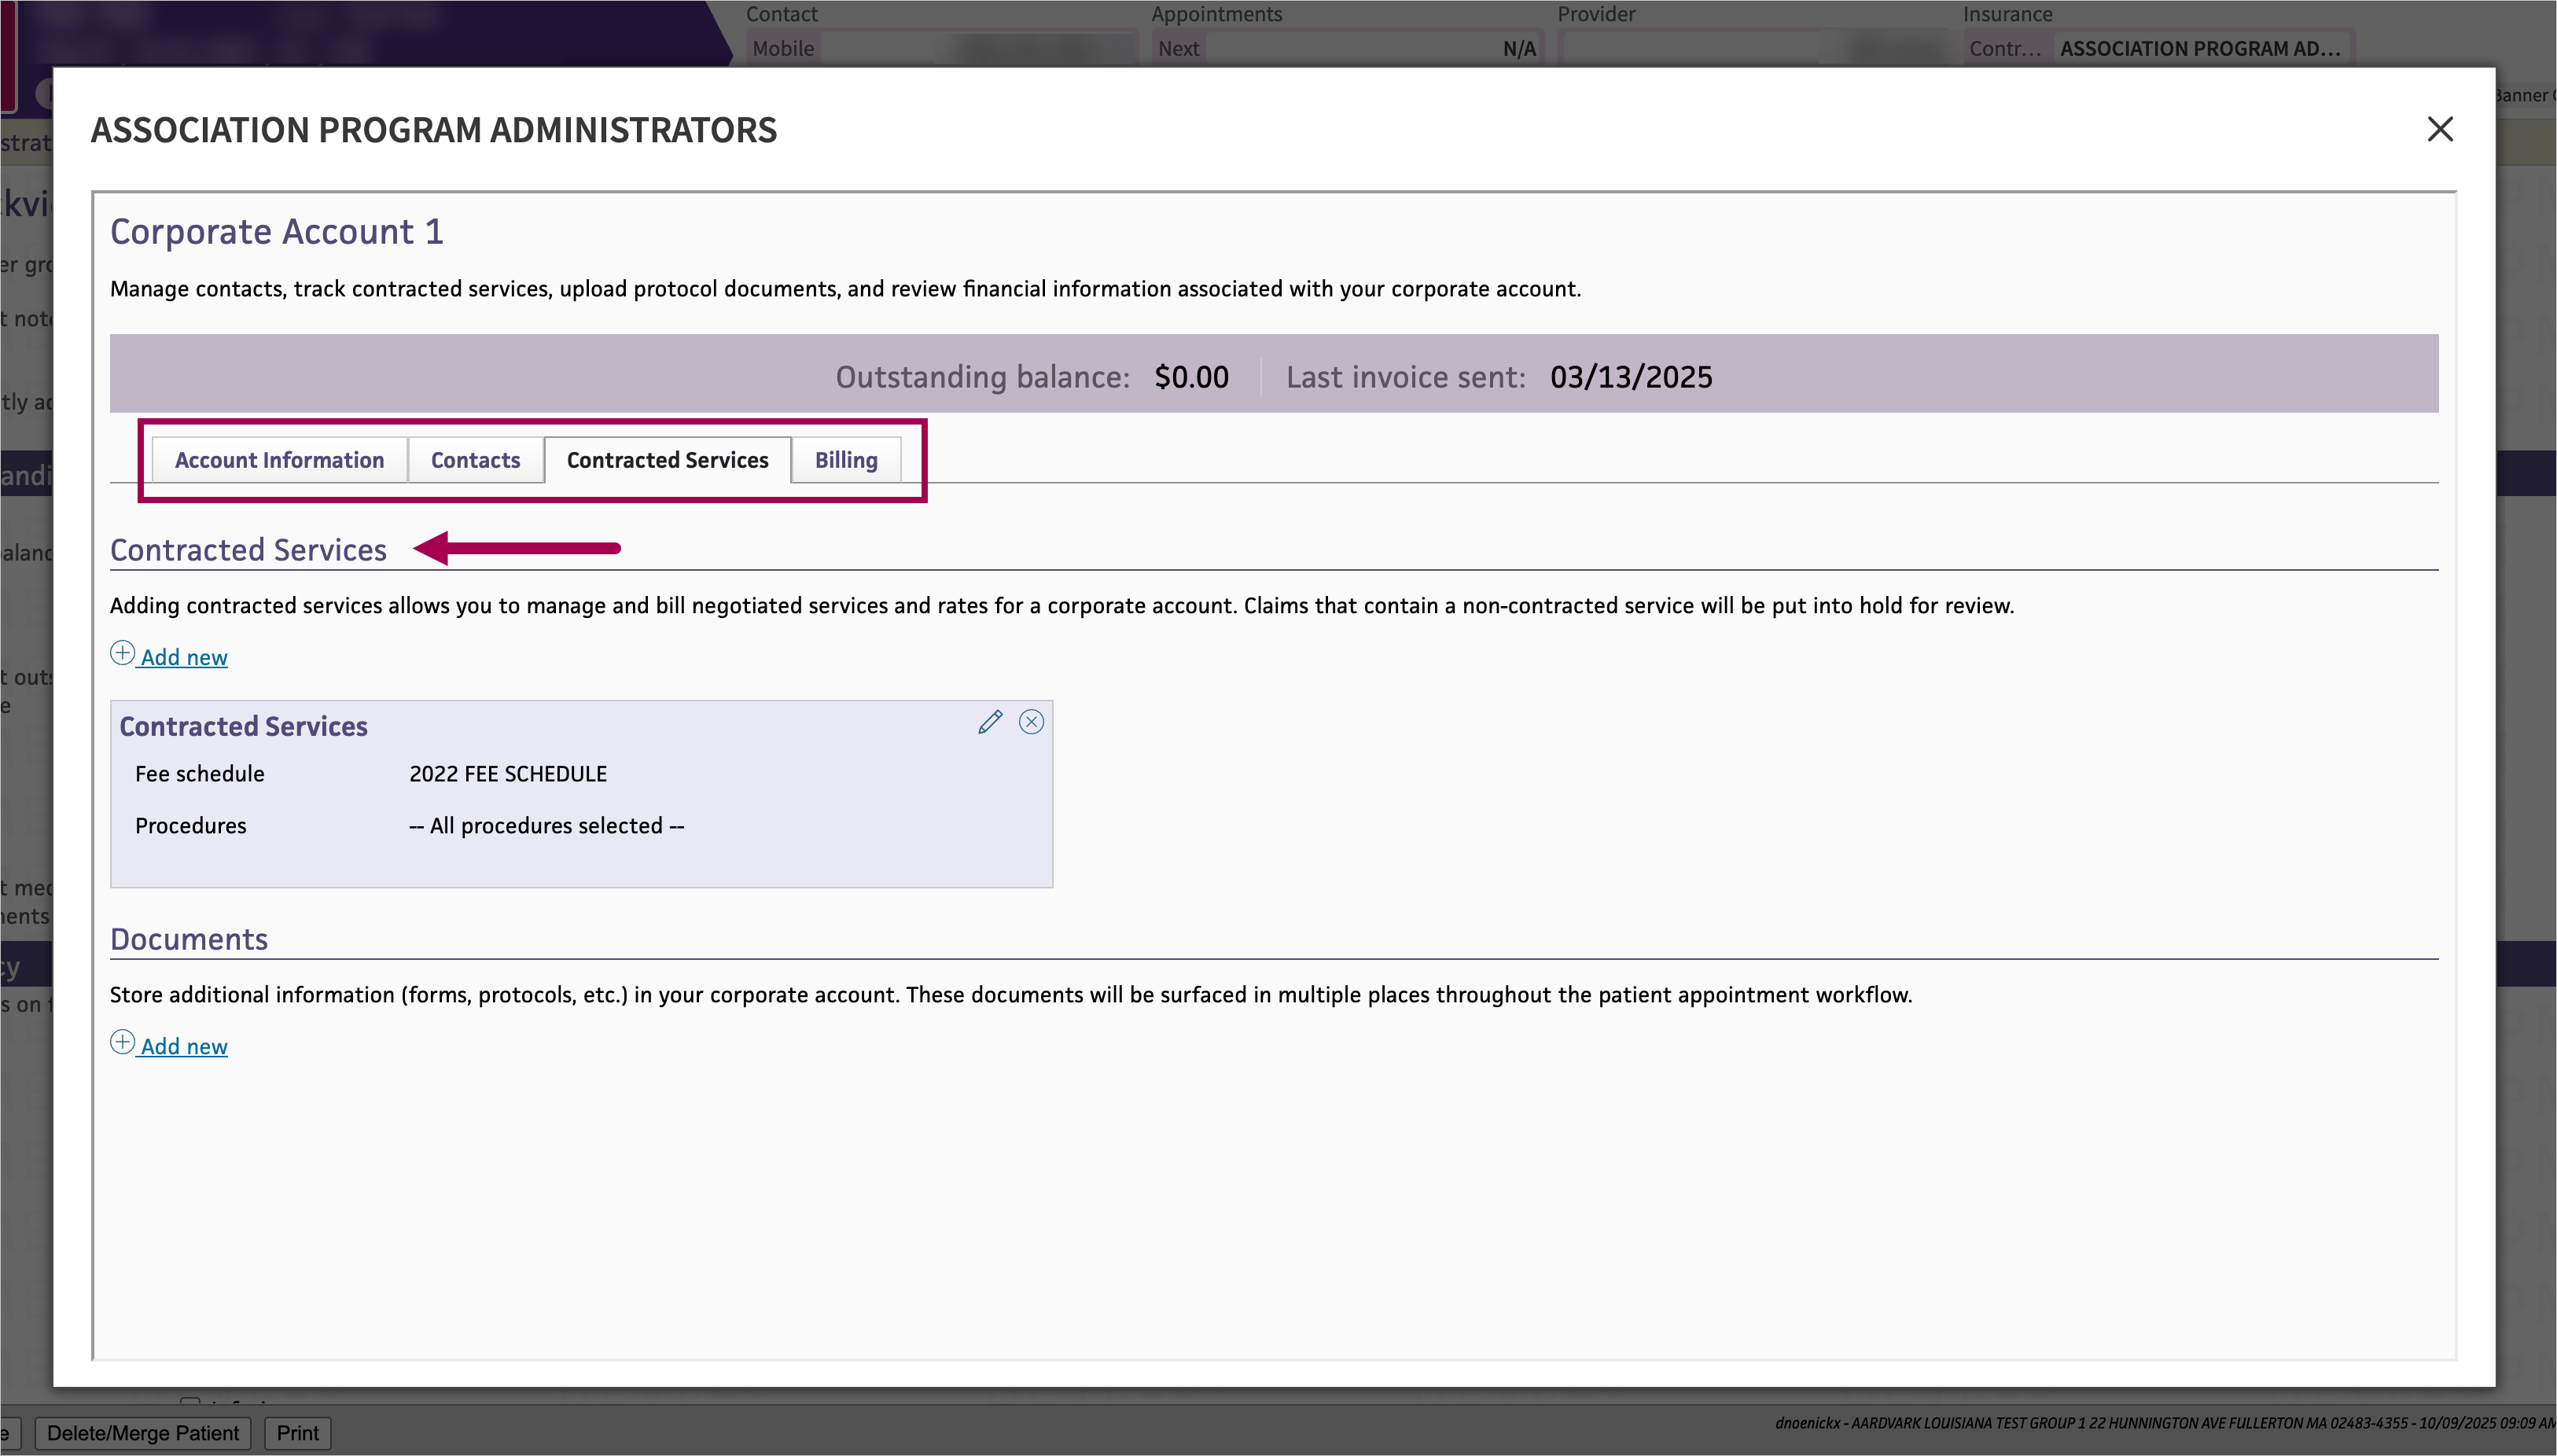
If you have read-only access, you’ll only see the Contracted Services, Contacts, and Documents associated with the Corporate Account.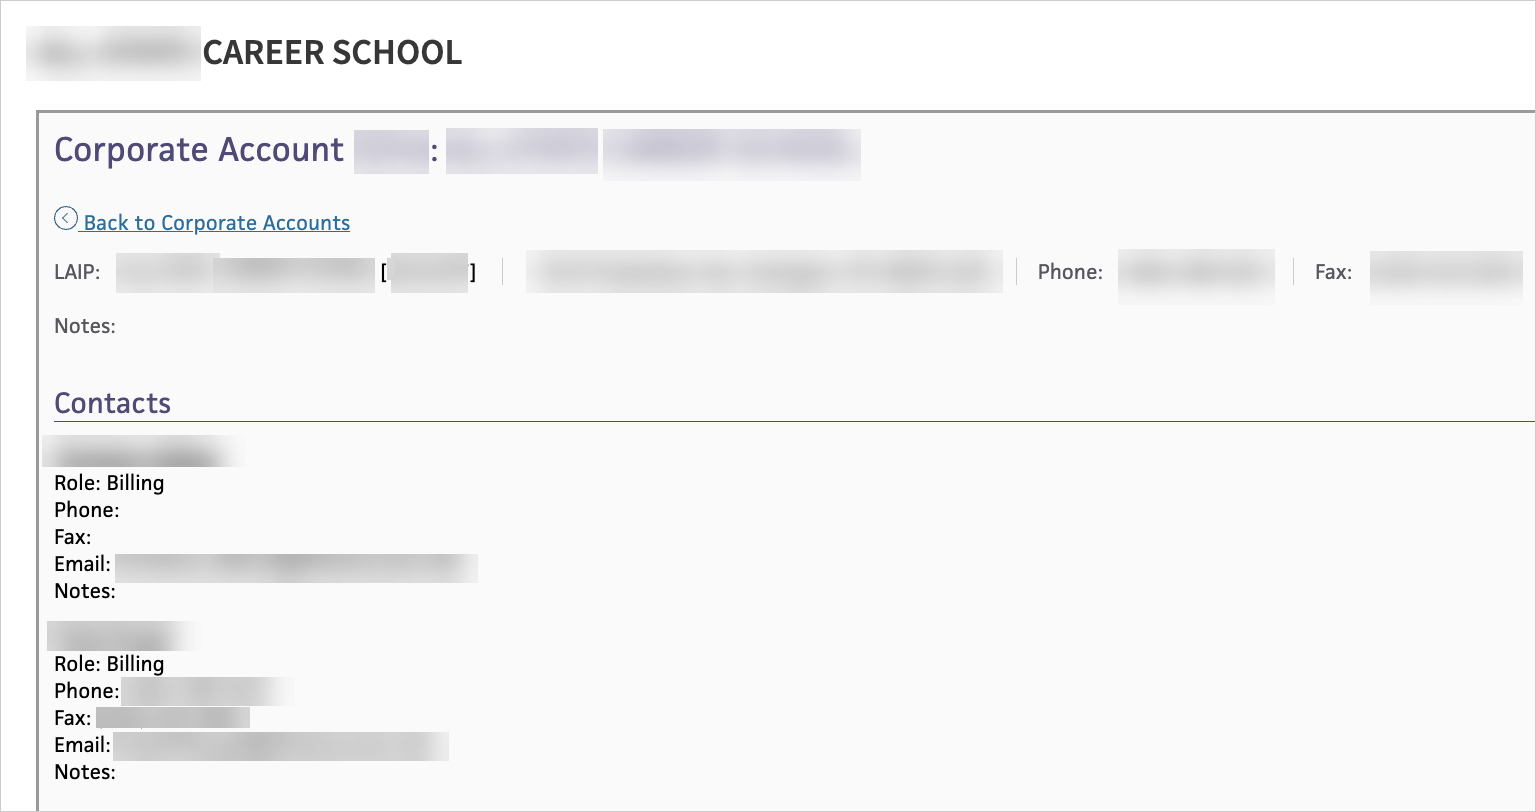
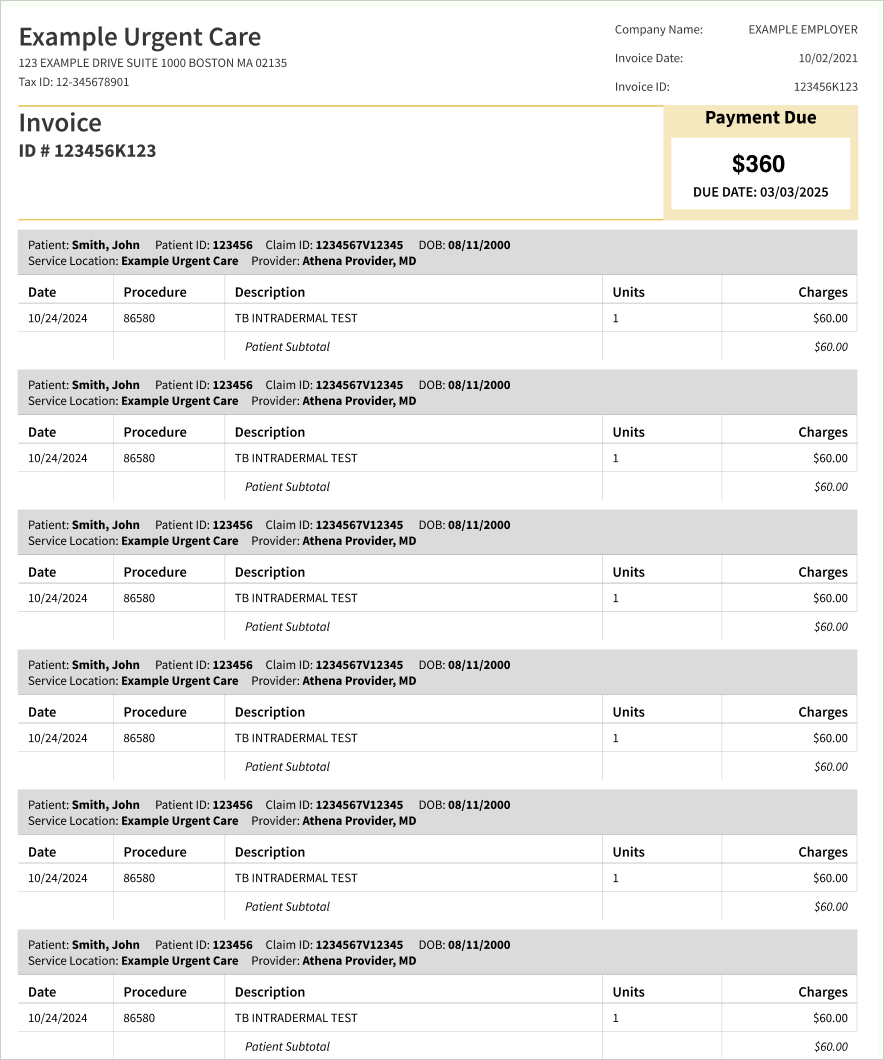
We updated the corporate invoice layout to improve clarity and increase visibility of online payment options.
The new layout helps drive adoption of the Employer Portal by making online payment paths more prominent. These enhancements apply to all practices using the Corporate Billing feature.
-
Shows units per charge which makes pricing easier to understand.
-
Enables more visible online payment options that help drive Employer Portal adoption.
-
Employer Portal (Recommended) payment option — A new, prominent tile highlights the Employer Portal as the preferred experience for managing invoices, making payments, and contesting charges.
-
Claim details now include Units — Service line items now display a Units column, making quantity and pricing clearer for employers reviewing charges.
All existing billing logic and how payments are processed remains unchanged.
As part of our ongoing efforts to standardize and streamline invoice delivery, employer invoices will now be produced in black and white, printed single-sided, and will no longer include return envelopes. These updates do not impact invoice content, formatting, or payment processing options. Employers may continue to remit payment using the existing methods outlined on the invoice.
The following images are examples of:
-
Sample invoice page one

-
Sample invoice page two
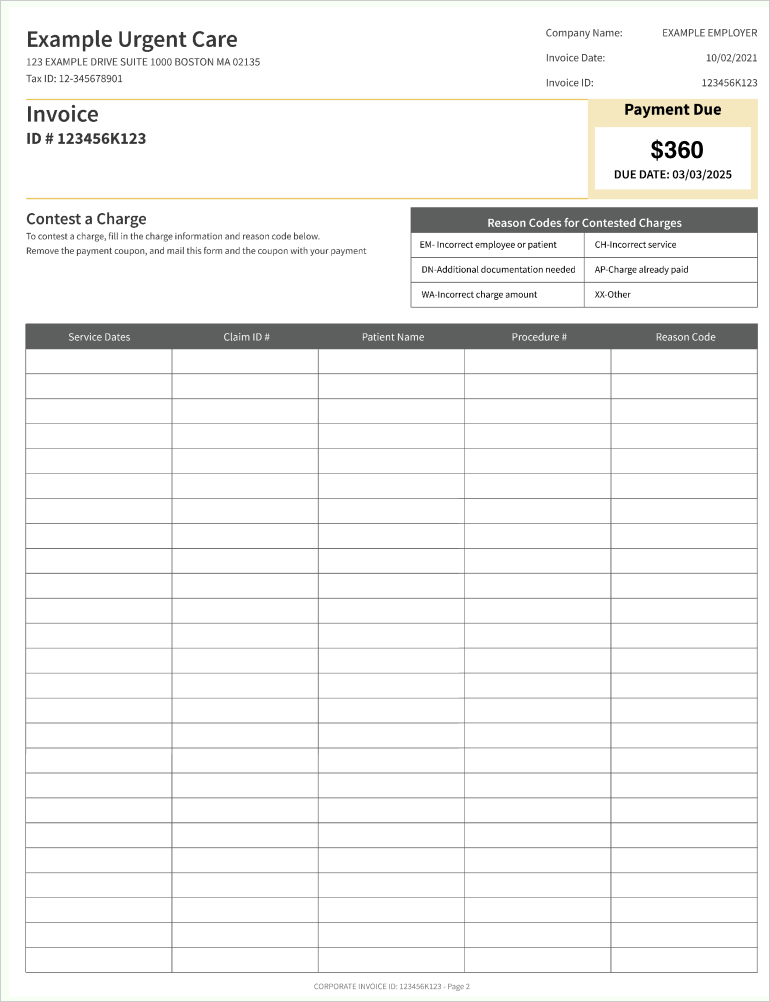
-
Sample invoice page three
Note
At this time, the Employer Portal will not support the following practice-level invoice settings:
-
Display SSN on Invoice
-
Suppress “TC-” and “OC-” prefixes
-
Allow an unlimited number of overdue invoices
-
Override the hours of operation or billing contact phone number shown on the invoice