 User Guide — Hospital Order Sets
athenaOne for Hospitals & Health Systems
Table of Contents
To create a standard hospital order set
To create a custom hospital order set
To add a global order set to your list of hospital order sets
Introduction
You can create standard and custom hospital order sets for use in your hospital facility. Custom order sets can contain headings, notes and instructions, and "single select" order groups.
By default, active orders are discontinued automatically after a patient is discharged. Upon request, you can prevent lab and radiology orders from automatically closing after a patient is discharged. This allows results that are received after the patient is discharged to be tied to the order placed during the stay.
Note: To access the Hospital Order Sets page, you must have the Inpatient Admin role.
To create a standard hospital order set
- Display the Hospital Order Sets page: On the Main Menu, click Settings
 > Clinicals. In the left menu,under Practice Links — Order Configuration, click Hospital Order Sets.
 - Click the plus icon
 to add a new order set.
 - Click Standard and enter a short, descriptive Name for this order set. This is the name that will appear when you search for the order, and in your list of hospital orders sets on the Hospital Order Sets page.
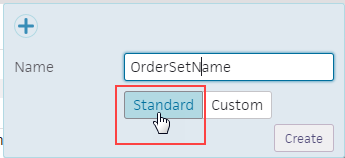
- Click Create. Additional fields appear.
Complete the header information
- Name — This is the name you entered for the order set.
- Description — Enter a short description for this order set.
- Type — This is the type of order set you selected.
- Providers — All is selected by default. To limit access to the order set, you can click Selected, and select only the providers who should use this order set. All
- Departments — All is selected by default. To limit access to the order set, you can click Selected, and select only the departments who should use this order set.
Add orders
- Click the plus icon next to ORDER ENTRY to add orders.
- Search for and select the orders to include in this order set.
Enter order details for each order in the order set (optional)
- For each order in the order set, click an order to expand the order details.
- Complete the fields in each order form.
Preview the order set
- Click Preview to view the order set as it will appear at order entry. Click outside the window to close the preview.
Publish the order set
- Click Publish, and then click Yes to confirm that you want to publish the order set.
The new order set appears in the Hospital Order Sets list, with Standard in the Status column.
To create a custom hospital order set
- Display the Hospital Order Sets page: On the Main Menu, click Settings > Clinicals. In the left menu,under Practice Links — Order Configuration, click Hospital Order Sets.
- Click the plus icon to add a new order set.
- Click Custom and enter a short, descriptive Name for this order set. This is the name that will appear when you search for the order, and in your list of hospital orders sets on the Hospital Order Sets page.
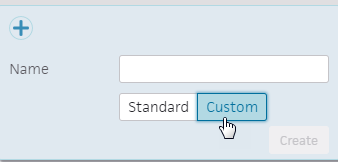
- Click Create. Additional fields appear.
Complete the header information
- Name — This is the name you entered for the order set.
- Description — Enter a short description for this order set.
- Type — This is the type of order set you selected.
- Providers — All is selected by default. To limit access to the order set, you can click Selected, and select only the providers who should use this order set. All
- Departments — All is selected by default. To limit access to the order set, you can click Selected, and select only the departments who should use this order set.
Add orders
- Click the plus icon next to ORDER ENTRY to add orders.
- Search for and select the orders to include in this order set.
Add layout components
- Click the plus icon next to ORDER ENTRY to add headings, text boxes, and to make orders optional.
- Under Layouts, you can select from the following components:
Section heading — Creates an untitled section heading, which you can rename to create meaningful categories in your order set (e.g., Lab, Imaging, Diet, Medications).
Text box — Creates placeholder text that you can change into notes or instructions related to each section in these text boxes.
Single select — Creates a group of order options from which the ordering provider can select a single order option at order entry time. A start and end area appear within a section.
Sub group — Creates a sub group under a section headings. Each sub group you create appears as a "show-hide" drop-down under the heading at order entry time. This makes it easier for the ordering provider to access and select orders in the order set.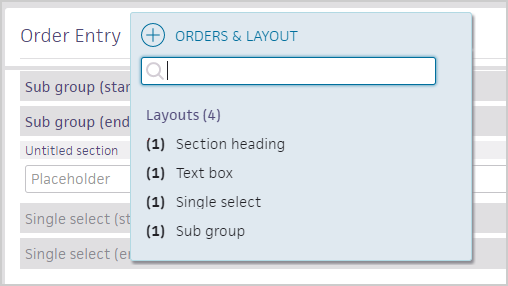
Organize and label the order set content
- You can drag and drop orders, headings, and text boxes to the desired position.
You can click and hold the set of dots to drag a component.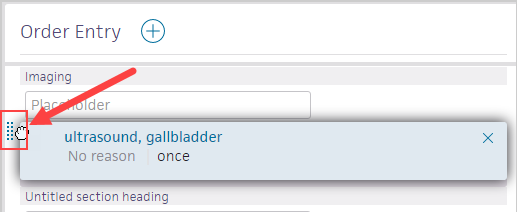
- Click each unlabeled Sub group (start) and section heading to rename them.
- You can click a text box to enter a note or instructions.
- You can drag and drop orders and components to rearrange them. Click the dots icon to grab the order and drag and drop an order, heading, text box, or sub group.
- To create a group of orders from which the ordering provider can select only one, you can drag orders between Single select (start) and Single select (end).
You can use this feature to include several similar orders, so a provider can select a single order from among several choices at order entry.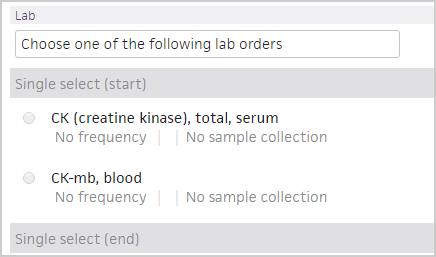
Enter order details for each order in the order set
- For each order in the order set, click an order to expand the order details.
- Complete the fields in each order form.
Note: The lock icon indicates that the field cannot be edited at order entry time. By default, all order form fields are "locked."
You can click a lock icon to "unlock" the field and make it editable at order entry time.

- To save time at order entry, you can also check individual orders so that they are automatically selected at order entry. The preview shows these order as checked and ready to be signed.
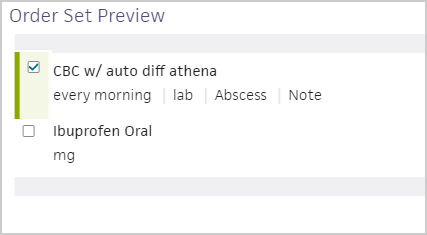
Preview the order set
- Click Preview to view the order set as it will appear at order entry. Click outside the window to close the preview.
Publish the order set
- Click Publish, and then click Yes to confirm that you want to publish the order set.
The new order set appears in the Hospital Order Sets list, with Custom in the Status column.
To add a global order set to your list of hospital order sets
- Display the Hospital Order Sets page: On the Main Menu, click Settings > Clinicals. In the left menu,under Practice Links — Order Configuration, click Hospital Order Sets.
- Scroll down to the to the Global Order Sets heading and click the down arrow
 to display the list of global order sets.
 - Click the global order set to copy, and then click Save as Local in the upper right corner.
Edit the header fields
- Name — Enter a short, descriptive name for the new order set. This is the name that will appear when you search for the order, and in your list of hospital orders sets on the Hospital Order Sets page.
- Description — Enter a short description for this order set.
- Providers — All is selected by default. To limit access to the order set, you can click Selected, and select only the providers who should use this order set.
- Departments — All is selected by default. To limit access to the order set, you can click Selected, and select only the departments who should use this order set.
Pre-select orders in the order set
- Individual orders appear under each order type.
Check the boxes to select which orders appear pre-selected at order entry time. Your selections are automatically saved. - Optionally, you can click an order to enter order details and sig.
Note: The lock icon indicates that the field cannot be edited at order entry time. By default, all order form fields are "locked."
You can click a lock icon to "unlock" the field and make it editable at order entry time.
Note: Off-formulary orders are indicated in red. You can click SUBSTITUTION (at the right) to search for a substitute formulary order.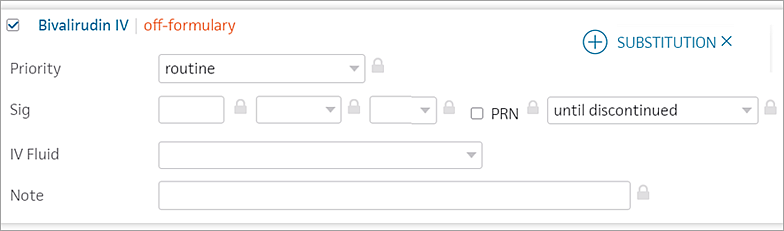
Preview and publish the order set
- Click Preview (at the upper right) to view the order set.
- Click Publish (at the upper right) to make the order set available at order entry time.
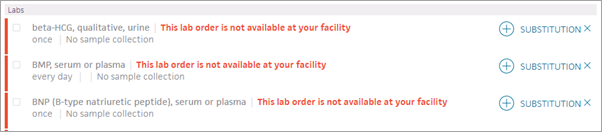
When a local order set contains unsupported orders, the total number is displayed at the top of the page and the Publish button is disabled.
(Unsupported orders are lab or imaging orders that cannot be fulfilled by your hospital.)

Additionally, the unsupported orders in the order set editor are called out with an orange bar.
When this occurs, click the plus sign
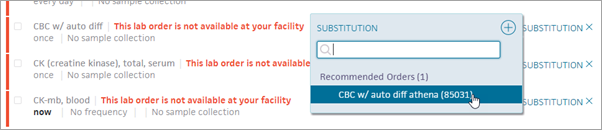
If you select one of the recommended orders, any information you entered in the Sig of the original order will be included.
Note: Any local order sets your organization currently has that contain unsupported orders will be automatically changed to Draft status. If this occurs, please review the order sets in question and substitute the unsupported orders as needed.
To edit a published hospital order set
- Display the Hospital Order Sets page: On the Main Menu, click Settings > Clinicals. In the left menu,under Practice Links — Order Configuration, click Hospital Order Sets.
- Locate the order to edit in the list, and click the order set in the list and click Revert to Draft.
- Edit the order set as needed.
- Click Publish to save your changes and publish the order set.