Population Health Messages
athenahealth Population Health
To access your Population Health messages:
- Use the Messages pane (on the right side of many Population Health pages) to read recent messages from other users.
- Use the Messages page to read all your messages and to create new messages.
Note: Please use the News and Messages page to send organization-wide messages.
On the Main Menu, click Settings![]() >Under ADMIN, click Message
>Under ADMIN, click Message
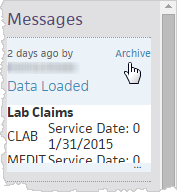
The Messages pane appears on the right side of many Population Health pages
Your organization must use athenahealth Population Health to access Population Health Messages.
To send and receive Population Health bookmarked messages to other users, you must have the "Population Management: Admin: Messages" user permission.
To send Population Health messages to all users, you must have the "Population Management: Admin: Messages: Can send to all users" user permission.
You can search and sort your list of messages by:
- Message Name
- Post Date
- Expire Date
Archive messages to organize your backlog of messages. When you point to a message in the right panel of your home page, Archive appears in the upper right corner. Click this link to archive the message.

The message moves to your Archived list on the Messages page.
Note: Your archived messages will still expire on the date set by the message sender.
When you click VIEW ALL MESSAGES at the bottom of the Messages pane on the home page, you see two tabs:
- Messages — The default tab displays all messages not in the archive.
- Archived — Click this tab to view your archived messages.
- Display the Messages page: On the Main Menu, click Settings
 >Under ADMIN, click Message.
 - Click Create a new message.
The Create A New Message page appears. - Complete these fields:
- Name — Enter a name for your message. This is an internal name that you can use to view and edit your message.
- Message — Type a message.
Note: You can use the tools above the message area to add styles and formatting to your message. - Attach Bookmark — Select an existing bookmark to add to your message.
- Attach Document — Select an existing document to add to your message.
- Post on — Choose the date to post the message.
- Expire on — Choose the message's expiration date.
- Select one of these options to choose whether you want all users to see this message or just certain users:
- All Users
- Specific Users — If you choose this option, check the boxes next to the names of individuals to select who will receive the message.
- Select Message Tags — Choose tags for the message.
- Click Post.
The Messages page appears.
Note: On the specified date, your message is posted on the home page of all users, or users you selected.
- Display the Messages page: On the Main Menu, click Settings
 >Under ADMIN, click Message.
 - Enter search criteria in one or more of the search fields: Message Name, Post Date, or Expire Date. You can select dates from the drop-down calendar for Post Date and Expire Date.
For example: Enter a keyword or any character string under Message Name. Only messages that contain the entry in their name appear in the message list.
- To clear a search field, click the X on the right side of the field. Press Return when all search fields are clear to restore the full message list.
-
On your home page, point to a message in the Messages pane on the right.
Archive appears in the upper right corner.
-
Click Archive.
The message moves to your Archived list. To view archived messages, see instructions below.
-
In the Messages pane on the right side of the Quality Manager page, click VIEW ALL MESSAGES.
The Messages page appears.
-
Click the Archived tab.
Your archived messages appear.