Embedded OB Workflow
Access the Embedded OB Worksheet
Complete the following to access the embedded OB Worksheet within or outside of a patient encounter.
Assign appointment types to supported OB layouts
Before you begin, your clinic or EMR administrator must assign OB appointment types to one of three supported layouts: OB Standard Office Visit, OB Exam Only Visit, or OB Nurse Visit.
Important
You must have administrative rights in athenaOne to assign appointment types to encounter layouts.
For detailed configuration steps, see Assign appointment types to a supported OB layout.
Schedule a patient for an OB visit
Create an appointment for a patient. In the appointment, select an appointment type that is assigned to one of the three supported OB encounter layouts. Click the appointment in your inbox to start the encounter.
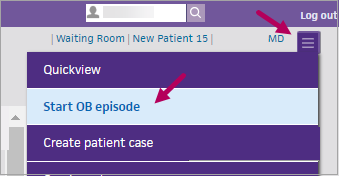
Start an OB episode for the patient as needed
To start an OB episode for the patient, click the menu  (upper right) in an encounter or from the patient’s chart, and select Start OB Episode.
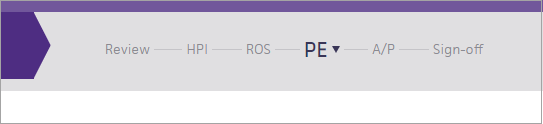
The OB Worksheet appears in the Exam stage of the encounter.

Verify embedded OB Worksheet access
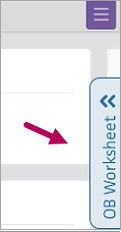
If the patient doesn’t have an open OB episode, the legacy version of the OB encounter layout appears. Check the encounter navigation bar. If configured, OB Worksheet appears in the bar.
Configured for embedded OB Worksheet access:

Note
When configured, the Exam tab now includes all exam sections: HPI, ROS, PE, and Procedure Documentation.
Not configured:
Access the OB Worksheet outside of an exam
If desired, you can access the OB Worksheet at intake, from a chart briefing, or during encounter prep. These access points allow you to modify the worksheet as needed during each stage of a patient's visit.
Note
When you access the embedded OB Worksheet from an exam, the Pregnancy Problems section stays anchored at the top of the worksheet, even as you scroll down. When accessed from outside of an exam, Pregnancy Problems do not stay anchored to the top as you scroll.
Access the OB Worksheet at intake
To access the Intake workflow, select an appointment and then click Go to Intake. In the Intake form, click OB Worksheet in the checklist. The embedded OB worksheet opens.

Update the worksheet. All sections of the worksheet are available from the OB Worksheet tab in the Intake Prep form, as is the Worksheet Actions button.
Access the OB Worksheet from a chart briefing
The chart briefing is the initial page that opens when you access a patient's chart. If needed, you can access the OB Worksheet and update it outside of a patient encounter.
In the top navigation bar, enter the patient's name or ID in the search bar and click Search  .
.

-
If your search returns multiple results: The Find Patient page appears. Locate the correct patient and click Chart in the action menu to the right of the patient's name.
-
If your search returns a single result: The patient's Quickview opens. Click View Chart.

In the patient's chart, click the blue tab that appears on the right side of the page. The OB Worksheet opens. Update the worksheet as described in the sections of this guide that follow.
Note
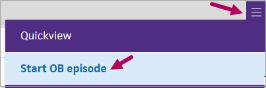
If the blue tab doesn't appear, it means that the patient doesn't have an active OB episode. Click the menu button and select Start OB Episode.
Access the OB Worksheet during encounter prep
You now have access to the embedded OB Worksheet at both Intake and Exam prep. To access the encounter prep workflow, select a future appointment and then click Go to Intake Prep or Go to Exam Prep, located in the green action menu on the initial page of the patient's chart.
Note
The 'go to prep' options only appear when you access an appointment from the Clinician home page. The appointment must also be assigned to a provider with a specialty. You can begin encounter preparation as soon as an appointment is booked.
Note
During encounter prep, the row in the Prenatal Visits flowsheet associated with your encounter will not appear unless the patient is checked in.