Configure Intake
This page allows you to configure the Intake workflow so clinical staff can:
-
See only the sections they need in the Intake checklist
-
Access additional information — in chart tabs and flowsheets — without leaving the Intake workflow
Note: If you do not configure the Intake workflow, all sections and tabs are shown by default.
On the Main Menu, click Settings![]() > Clinicals. In the left menu,under Practice Links — Chart/Encounter, click Configure Intake
> Clinicals. In the left menu,under Practice Links — Chart/Encounter, click Configure Intake
You must have one of the following permissions to access the Configure Intake page:
- Clinicals Admin
- Clinicals Admins: Configure Intake Checklist
- Superuser - Clinicals
Note: The Clinicals Admin permission grants access to the Configure Intake page only when assigned as a standalone permission in a user's profile. If Clinicals Admin is included as part of a local role, it will not provide access. To enable access through a local role, assign the Clinicals Admins: Configure Intake Checklist permission instead.
-
Display the Configure Intake page: On the Main Menu, click Settings
 > Clinicals. In the left menu,under Practice Links — Chart/Encounter, click Configure Intake.
 -
Include Chart Tabs in Intake? — Click the toggle to turn chart tabs off or on.
Note: Chart tabs are turned on by default. -
Decide what to apply the Intake configuration to:
-
Specialty — Select a specialty.
By default, athenaOne selects all appointment types for this specialty in the Appointment Type field. -
Appointment Type — Select all applicable appointment types.
athenaOne lists the Intake sections from each encounter layout that's associated with the appointment types you've selected.
Tip: To quickly clear the appointment types that athenaOne selected by default, clear the Select all check box.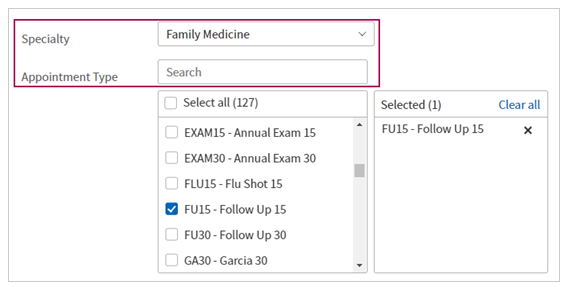
-
-
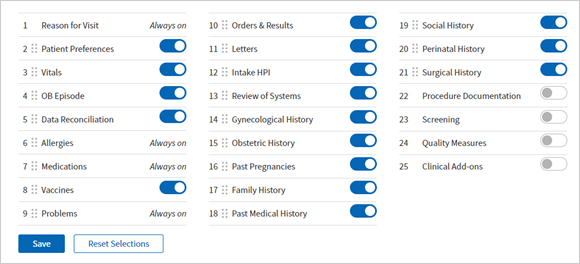
Ensure that only the sections you want to include are turned on. (By default, all sections are turned on.)
-
In the list of Intake sections, click the toggle for a section to turn it off.
-
The toggle turns white to indicate that the section is turned off.
-
Sections you turn off appear at the bottom of the list.
-
-
Re-order sections. Select
 then drag and drop the section to where you want it to appear in the sequence of sections.
-
Click Save.
athenaOne adds the Intake configuration to the table in the Specialty/Appointment Type Configurations section. -
Confirm that the configuration saved: Check that the Intake configuration is listed in the table in the Specialty/Appointment Type Configurations section.

-
Display the Configure Intake page: On the Main Menu, click Settings
 > Clinicals. In the left menu,under Practice Links — Chart/Encounter, click Configure Intake.
 -
Scroll down to Specialty/Appointment Type Configurations.
-
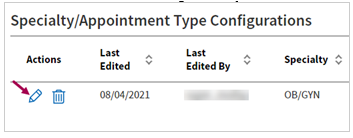
Click
 next to the configuration you want to edit.
-
Change any of the following:
- Include Chart Tabs in Intake? — Click the toggle to turn chart tabs off or on.
Note: Chart tabs are turned on by default - Specialty – Select a different specialty for the Intake checklist.
- Appointment Type – Select each appointment type that applies to the Intake checklist you want to modify. If you want the Intake checklist to apply to all appointment types, check Select all.
- Sections that appear – Click
 next to a section to turn it off. The toggle turns white to indicate that it is off.
 - Sequence of sections – Select
 then drag and drop the section to where you want it to appear.
- Include Chart Tabs in Intake? — Click the toggle to turn chart tabs off or on.
-
Click Save to save the edited configuration.
-
Display the Configure Intake page: On the Main Menu, click Settings
 > Clinicals. In the left menu,under Practice Links — Chart/Encounter, click Configure Intake.
 -
Scroll down to Specialty/Appointment Type Configurations.
-
Click
 next to the configuration you want to delete.
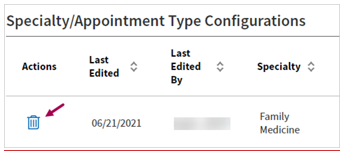
athenaOne asks you to confirm that you want to delete this configuration. -
Click Delete to confirm that you want to delete this configuration.
athenaOne displays a message to indicate whether you successfully deleted the configuration.
Note: After you delete an Intake checklist configuration, all Intake sections are shown by default for the specialties and appointment types that had been affected by the configuration.
You can configure your Intake workflow to help prevent errors, perform Intake more quickly and efficiently, and simplify training for new staff.
During the Intake stage of an encounter, clinical staff can add sections back into the Intake checklist as needed by clicking SHOW/HIDE SECTIONS and selecting the sections.
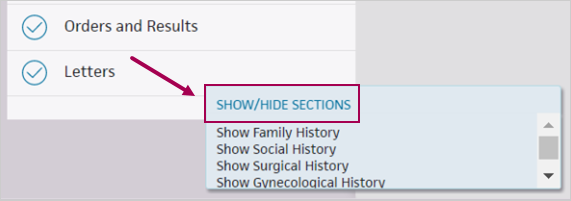
For patient safety reasons, you cannot turn off these sections:
-
Reason for Visit
-
Allergies
-
Medications
-
Problems
Note: On the Configure Intake page, these sections do not include a toggle and instead state "Always on."

Important: When you hide a section in the Intake checklist, that section remains hidden during Intake even if there is incoming data for the section.
Incoming data could be:
-
Health forms from the patient portal
-
Reconciled information from patient record sharing
-
Information from an accelerator, such as an encounter plan
This data will be available in the patient chart and will be visible during the Exam stage. However, the data will remain hidden during Intake, unless the Medical Assistant clicks SHOW/HIDE SECTIONS to show the hidden section.
We recommend that you show any section that you want your staff to see during Intake.
What happens if I add a new configuration for all appointment types for a specialty when a configuration already exists for some specific appointment types in that specialty?
Your new configuration for all appointment types will replace the configuration you had for some specific appointment types.
What happens if I add a new configuration for some specific appointment types for a specialty when a configuration already exists for all appointment types in that specialty?
athenaOne will add your new configuration for some appointment types. Your previous configuration for all appointment types will include only the appointment types that are not in your new configuration.
| Configure intake checklist by specialty and appointment types | |
|---|---|
| Specialty |
Select a specialty to apply the Intake configuration to.
Note: By default, athenaOne selects all appointment types for this specialty in the Appointment Type field. |
| Appointment Type |
Select all applicable appointment types to apply the Intake configuration to.
athenaOne lists the Intake sections from each encounter layout that is associated with the appointment types you have selected. By default, all sections are turned on, but you can click sections to turn them off.
Tip: To quickly clear the appointment types that athenaOne selected by default in the Appointment Type field, clear the Select all check box. |
| Specialty/Appointment Type Configurations | |
| Actions |
Click Click |
| Last Edited | Indicates when the Intake configuration was last edited. |
| Last Edited By | Indicates who last edited the Intake configuration, |
| Specialty | Lists the specialty that the Intake configuration applies to. |
| Appointment Type | Lists the appointment types that the Intake configuration applies to. |
| Sections | Lists the sections that are turned on for the Intake configuration. |