 Intake Stage for athenaClinicals
Intake is the second stage of the 5-stage patient encounter.
When you log in to athenaOne, the Clinician home page appears, with the Clinical Inbox on the left, the schedule in the center, and news and announcements on the right.
Tip: You can click the plus icon ![]() to add tasks assigned to other users to your Clinical Inbox.
to add tasks assigned to other users to your Clinical Inbox.
For providers — how to access an encounter
- In the Clinical Inbox, click the Encounters row to display the list of encounters assigned to you (and to any users you added to your Clinical Inbox). Next, click a patient name in the list of encounters.
Note: A green bar appears next to the names of patients who are checked in.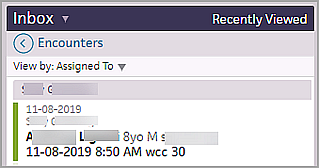
- In the Clinician home page schedule, click a patient name with the Intake stage completed (indicated by a green bar and shading).

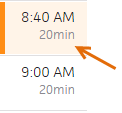
- In the Clinician home page schedule, click a patient name that has been checked in for the appointment (indicated by an orange bar and shading).
- If you complete both the Intake and Exam stages of an encounter, click the arrow next to Done with Intake and select one of these options (the patient status changes to "with provider"):
- Done with Intake, go to Exam

- Ignore alerts, go to Exam

- From the Clinician home page, go to the schedule.
- Click a future appointment.
athenaOne opens the patient briefing. - Click Go to Intake Prep.
The intake checklist appears, and the patient banner indicates that you are working in Intake Prep mode.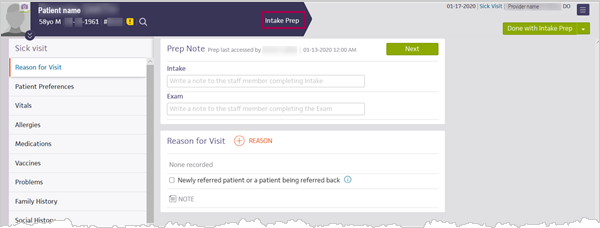
- Document sections as you would during an encounter.
Note: The checkmarks next to the Intake checklist items do not appear in Intake Prep mode. athenaOne marks items in this checklist as reviewed only during the encounter. - Enter any notes and reminders in the following fields in the Prep Note section (located in the Reason for Visit item of the Intake checklist). Both Intake and Exam notes are visible during the Intake and Exam stages of the encounter.
Note: Any notes that you add in this section are visible only to your practice. The notes are not included in the audit history or in Chart Export.- Intake — Enter notes, instructions, and reminders for the person performing intake.
Note: After you mark the Intake stage as Done, you cannot edit these notes or add additional notes in this field. - Exam — Enter notes and reminders for the person performing the exam.
Note: After you mark the Intake stage as Done, you cannot edit these notes or add additional notes in this field.
- Intake — Enter notes, instructions, and reminders for the person performing intake.
- Click Done with Intake Prep.
Note: When the Intake stage of the encounter begins, the data is converted to active encounter documentation and can be modified as needed during the encounter.
Note: If another user made changes to the patient chart or encounter information since you started making changes, a message at the bottom of the page displays the username of the person who made the changes and the time that the changes were saved. Click REFRESH Chart to obtain the latest updates.
- To begin the Intake stage, click Go to Intake in the upper right corner of the screen.
The Intake checklist appears in the left panel, starting with Reason for Visit.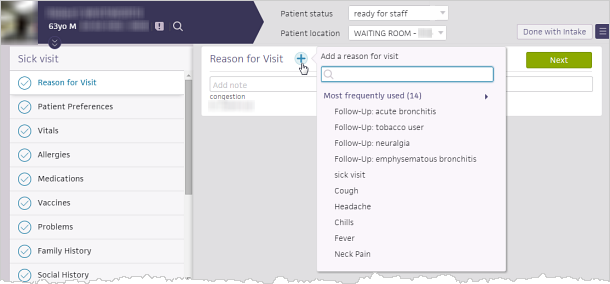
Tip: You can update the patient location and patient status at the top of the screen during the Intake stage of the encounter and at any step during the Exam stage. - Record the reason for the visit. You can select one or more reasons from the list, or click the plus icon
 to create a new reason. The Follow-Up reasons category includes all items in the patient's Problems list. The All reasons category is sorted by most frequently used.
Note: If you select a reason for visit or follow-up reason that has an associated encounter plan, that encounter plan is triggered for the encounter. - Click outside the Add Reason selector to close it.
The selected reasons appear in the Reason for Visit section.
Note: If you have the Clinicals: Requires Chief Complaint/Encounter Reason user role or permission, you must select a reason for a patient's visit during the Intake or Exam stage. If you attempt to open another page or advance to the next stage of the patient encounter before you select a reason for the visit, athenaOne automatically opens the Add Reason selector. - To add more information about why the patient is here today, click the Add note icon
 .
.
Note: If the patient sent a question to the provider during self check-in, the question appears in the Patient question field in the Reason for Visit section.
- Click the Next button.
The next section appears in the center panel. As you complete a section, the checkmark icon darkens in the checklist, and the word Reviewed appears at the bottom of the section. (athenaOne marks a section as "Reviewed" only if you scroll to view the entire section.)
Note: At the bottom of most checklist items you can click the Add note icon to document a patient's health status and history.
Clinical quality measures that need attention are indicated by the orange vertical bar. The relevant fields are highlighted to remind you to complete the actions required to fulfill the measures. The alerts disappear when you take the necessary actions, indicating that you have satisfied the measure.
Tip: You don't need to display the checklist items in order and click the Next button after each item. As long as you click in each item, in any order, and scroll to view the entire section, the checkmark icon darkens in the checklist, and Reviewed appears at the bottom of the section. - Vitals — Height values recorded in the past year are autopopulated in the Vitals section for patients over 18 years old. For patients under 18, height values recorded in the past 3 months are autopopulated.
Tip: You can click Growth Chart to view the growth chart. Click outside the growth chart to close it. - Medications — Click the add to D&O icon
 to add a previously ordered medication to the Diagnoses & Orders cart for today's visit.
 - Problems — Add and update problems and individual problem notes, view active and historical problems, move active problems to the historical list, or reactivate historical problems.
Complete screening questionnaires (optional)
If your practice uses screening questionnaires, click the Screening item in the checklist. You can use screening questionnaires to assess risk for or severity of certain disorders or conditions, such as autism and depression. These questionnaires result in a score, and they often include guidelines and proposed treatment actions that you can use to determine next steps for the patient.
- Check the box next to the screening questionnaire that you want to administer.
The questionnaire appears.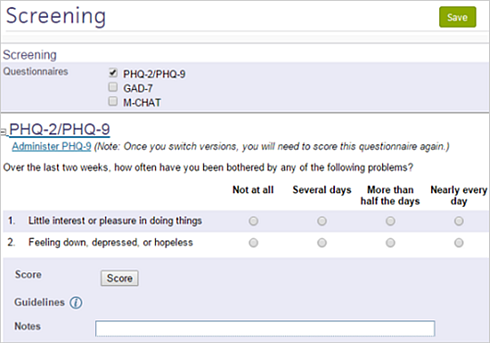
- Enter the responses into the form.
- Click Score.
The score and any associated guidelines appear below. - Click the Save button.
Complete the Intake stage
- When you complete the checklist, click Done with Intake.
Your Clinician home page appears, and athenaOne generates an Intake Summary section for the encounter, which appears when you begin the Exam stage of the encounter.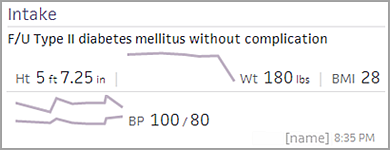
Note: If you have not completed all the requirements in the checklist and you click Done with Intake, the first section with remaining tasks appears. To dismiss these tasks, select Ignore these alerts and continue in the menu next to the button.
-
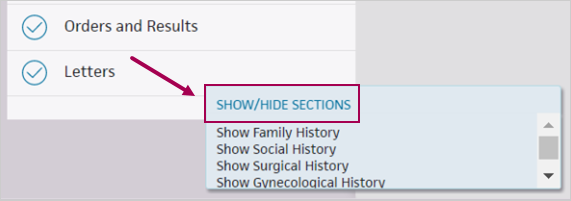
During the Intake stage of an encounter, click SHOW/HIDE SECTIONS at the bottom of the Intake checklist.
-
Select the section you want to add to the checklist.
athenaOne adds the section to the Intake checklist for this encounter only.
Note: If you change your mind and want to hide a section you added, click SHOW/HIDE SECTIONS and select to hide that section.
-
During the Intake stage of an encounter, click one of the following sections:
-
Vitals
-
Medications
-
Visual Acuity
-
Intraocular Pressure
-
-
At the top of the section, click
 to see the flowsheet.
- During the Intake or Exam stage of an encounter, click the appointment type that appears at the top right of the screen, just under the Find patient tool.

- Search for an appointment type or select one from the list.
- If the appointment type you've selected changes content in the encounter layout, an alert appears.
- Click Change to confirm your choice, or click Cancel.
If you are enrolled in quality programs, you see alerts in the Intake and Exam stages of the encounter that remind you to review the medication list before closing the encounter. You must review the patient's medication list before you can close the encounter.
Note: For more information about this quality measure, see Medication Reconcilation on the Success Community.
Important: After you review a patient's medication list, the medication alerts may persist if data reconciliation is needed. You can complete the Intake stage or close the encounter if you choose to reconcile this data later.
- In the patient encounter, click Go to Intake in the upper right corner of the screen.
If you are enrolled in quality programs, an orange vertical bar appears to the left of the Medications step of the Intake checklist and the Done with Intake button. - Click Medications in the Intake checklist.
Note: If your practice prefers to review a patient's medications during the Exam stage, click the arrow next to the Done with Intake button and select Ignore alerts and continue. - Review the patient's medication list.
Note: You can indicate that a patient's medication list was not reviewed along with the reason why. Click Reviewed at the bottom of the medication list and then select a reason from the menu. For more information, see To record the reason that the medications list was not reviewed. - In many states, you can access a real-time prescription drug monitoring report in athenaOne to review a patient's controlled substance prescription information. If a prescription drug monitoring report is available, clinical providers see a link to the report (see Providers who can access PDMP reports).
- Click Prescription drug monitoring report to display the report.
Note: The report may take a few seconds to appear because athenaOne is requesting the data in real time. - Review the prescription drug monitoring report. For more information about the report, see Contents of Bamboo Health reports and Contents of LogiCoy report.
Note: Due to legal restrictions in most states, athenaOne does not save the PDMP report in the patient chart. - Close the report and continue with the encounter.
Your username and the date now appear with the link to indicate that you viewed the PDMP report.
- Click Prescription drug monitoring report to display the report.
- Click Done with Intake.
Note: If you click Done with Intake before reviewing the medication list, athenaOne opens the Medications step in the Intake checklist so that you can review the medication list.
For more information, see Patient Record Sharing.
- To begin the Intake stage, click Go to Intake in the upper right corner of the screen.
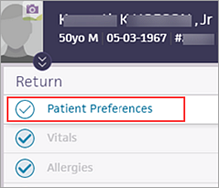
The Intake checklist appears in the left panel. - Click Patient Preferences (near the top of the checklist).
- Scroll down to the Patient Record Sharing section.

- Confirm that the patient or the minor patient's guardian consents to sharing patient information.
- To enable patient record sharing for the patient, click the Opt in button.
When a patient participates in patient record sharing, athenaOne connects external medical records to your patient automatically. If athenaOne could not determine whether a record belongs to a patient and you did not select a patient profile or confirm matching medical records on the Quickview or during Check-in, you can confirm the connection during the Intake stage.
- To begin the Intake stage, click Go to Intake in the upper right corner of the screen.
The Intake checklist appears in the left panel. - Click Patient Preferences (near the top of the checklist).

- Scroll down to the Patient Record Sharing section.
athenaOne displays potential matching medical records. - If you see the message "We found a similar patient profile for [patient name]. Review the profile to determine if it's a correct match," do one of the following:
- athenaOne displays the most likely profile match. If the match is correct, click the Verify button to connect the patient to the profile.

- If the profile displayed does not match your patient, click MORE OPTIONS to display other potential matches. Click the patient profile that corresponds to your patient, or click No correct matches.
- Review each potential matching record to verify that it belongs to your patient.
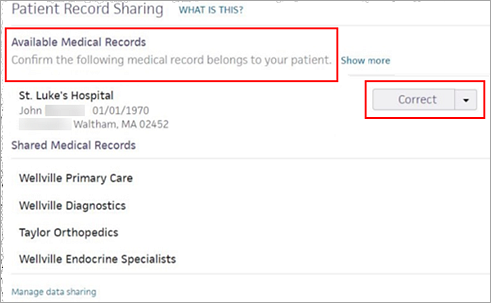
- For each record, select an option from the menu.
- Select Correct to connect the record to the patient.
- Select Incorrect to reject the record.
You can mark an encounter as a transition of care encounter in the Reason for Visit step of the Intake checklist or in the Review step of the Exam stage. The best practice is for an MA, nurse, or other staff to mark the encounter as a transition of care encounter during the Intake stage.
Note: For more information, see Transition of care documents and the Medicaid PI HIE measure on the Summary of Care Record/Continuity of Care Document page.
- To begin the Intake stage, click Go to Intake in the upper right corner of the screen.
The Intake checklist appears in the left panel with the Reason for Visit section at the top.
- Newly referred patient or a patient being referred back — Select this option if you are seeing the patient for any of the following reasons:
- First time, as the result of a referral.
- After the patient has completed care with a provider that you referred the patient to.
- Follow-up visit after a recent discharge from a hospital or emergency room.
- Complete the Intake stage.
See To complete transition of care documentation during the encounter.
From the Intake workflow, clinical staff can complete the Intake checklist and refer to information in chart tabs and flowsheets.
Your practice can configure the Intake checklist on the Configure Intake page so you see only the sections you need for each specialty and appointment type.
The Intake checklist appears on the left during the Intake stage of an encounter.
Marking items as completed
As you complete items in the Intake checklist, the check icon darkens (changing from ![]() to
to ![]() ) and Reviewed appears at the bottom of the section to indicate that the items are complete.
) and Reviewed appears at the bottom of the section to indicate that the items are complete.
You can either complete the checklist items:
-
In order — By clicking Next after each item; or,
-
In any order — By clicking each item and scrolling to view the entire section
Satisfying quality measures
Clinical quality measures that need attention are indicated by the orange vertical bar. The relevant fields are highlighted to remind you to complete the actions required to fulfill the measures. The alerts disappear when you take the necessary actions, indicating that you have satisfied the measure.
Completing Intake checklist items
The following list describes all of the items that your practice can include in the Intake checklist, along with helpful tips for completing each item.

|
Click the plus icon to select a reason, or enter and save a new reason for the visit. You can also use the Reasons for Visit page to create new reasons for patient visits.
|

|
Click the plus icon to select patient preferences for pharmacies, labs, and imaging facilities and to update the patient's care team. You can also enable and manage patient record sharing for the patient. The Patient Portal status of the patient appears at the top of this item. To register the patient or a family member for the Patient Portal, click Manage Portal Account. See also: Care Team section, Patient Record Sharing, and Patient Portal.
|

|
Record the patient's vitals. (The last reading recorded for a vital during an encounter appears to the right of the entry field.) Click the plus icon to add a row for each vital. See also: Configure Vitals and User Preferences.
|

|
Click this option to reconcile data in the patient chart with data received in a summary of care record or Patient Portal document. See also: Data Reconciliation.
|

|
Click the plus icon to add allergies. This action updates the list of allergies in the patient chart. If the patient has no known allergies, check the NKDA checkbox. See also: Allergies section.
|

|
Click the plus icon to add medications. This action updates the list of medications in the patient chart. If the patient is not taking any medications, check the No medications reported checkbox. See also: Medications section.
|

|
Click the plus icon to record vaccinations. This action updates the list of vaccinations in the patient chart. See also: Vaccines section.
|

|
Click the plus icon to add problems to the patient's list of problems. This action updates the list of problems in the patient chart. If the patient has no known problems, check the No known problems checkbox. See also: Problems section.
|

|
Click the plus icon to record gynecological history. This action updates the gynecological history in the History section of the patient chart. See also: Gyn History.
|

|
Click the plus icon to record obstetric history. This action updates the obstetric history in the History section of the patient chart. See also: Obstetric History.
|

|
Click the plus icon to record past pregnancies. This action updates the past pregnancies history in the History section of the patient chart. See also: Past Pregnancies.
|

|
Click the plus icon to record family history. This action updates the family history in the History section of the patient chart. See also: Family History.
|

|
Click the plus icon to record social history. This action updates the social history in the History section of the patient chart. See also: Social History.
|

|
Click the plus icon to record surgical history. This action updates the surgical history in the History section of the patient chart. See also: Surgical History.
|

|
Click the plus icon to record past medical history. This action updates the past medical history in the History section of the patient chart. See also: Past Medical History.
|

|
You can use screening questionnaires to assess risk for, or severity of, disorders or conditions such as autism and depression. These questionnaires result in a score and often include guidelines and proposed treatment actions. You can track a patient's questionnaire results over time using the Graph link in the screening questionnaires flowsheet. See also: Screening section.
|

|
If relevant service type add-ons are configured, update them using the Clincial Add-Ons section.
|

|
Click each measure needing data or attention.
|

|
To configure HPI templates, see History of Present Illness Templates.
|

|
To configure ROS templates, see Review of Systems Templates.
|

|
The Procedure Documentation item is available in the Intake checklist for encounters mapped to any of these global encounter layouts: Standard Office Visit, OB Standard Office Visit, Structured Procedure Visit, and OB Structured Procedure Visit.
To configure procedure documentation templates, see Procedure Templates.
|

|
Click the plus icon to add orders and results. Orders appear in the D&O cart for the encounter.
|

|
Click the plus icon to add letters during the Intake stage of the patient encounter. You can add, edit, and approve letters; these letters appear in the Sign-off stage of the encounter. See also: Letters section. |
You can access the patient chart without leaving Intake or opening a new tab. To view data in the patient chart during Intake, click a chart tab on the left.
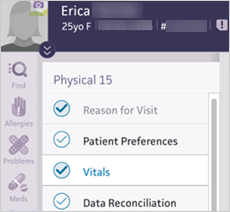
Note: On smaller screens, some Intake sections may not be visible when a chart tab is open. To see all Intake sections, click the chart tab again to close the tab.
If you cannot see chart tabs during Intake
If your practice prefers not to include chart tabs in the Intake stage, they may have turned off the setting that allows you to see chart tabs during Intake.
You can view the following flowsheets during Intake with one click:
- Vitals
- Medications — There is one flowsheet per medication.
- Visual Acuity, if the section is configured for your practice
- Intraocular Pressure, if the section is configured for your practice
At the top of the section, click ![]() to see the flowsheet.
to see the flowsheet.
 to mark the note confidential. See