Quality Program Enrollment
The Program Enrollment page enables quality managers to view and edit your practice's quality program and measure enrollments right in athenaClinicals. Using the self-serve Program Enrollment page, quality managers can adjust measure enrollments for their providers without having to go through the support case process:
- Allows you to manage enrollments by individual provider or by measure, or make those adjustments in bulk.
- Includes a Specialty filter for some programs so that you see only measures relevant to your practice.
- Adds program intelligence to highlight any invalid enrollments.
- Displays your adjustments in athenaClinicals within two hours of your updates.
Note: This dashboard allows reporting for the current year and up to two prior years. Select the desired year using the Year filter before viewing.
Pre-requisite: Before enrolling new providers, they must be configured on the Providers page (Main Menu > Settings  > Billing. In the left menu, click Providers):
-
Enter a valid NPI
-
Enable the Create encounters at check-in setting
Introduction
You can update your own program enrollments rather than requesting updates through the support case process. Users with the Clinicals Admin: Quality Manager Admin role or the Program Enrollment: Quality Manager permission can adjust enrollments by individual provider or measure and in bulk on the self-serve Program Enrollment page. Saved changes appear in athenaClinicals within two hours*.
Quality managers can self-enroll providers in these programs:
- Healthcare Effectiveness Data and Information Set (HEDIS)
- MIPS Individual and Group by category (For attestation - athenahealth submits)
- MIPS Individual and Group Not for Attestation by category (athenahealth does not submit)
- MVP Individual and Group by MVP and category (athenahealth submits)
- Patient-Centered Medical Home (PCMH)
- Patient-Centered Specialty Practice (PCSP)
- PI Medicare
- Pharmacy Quality Alliance (PQA)
- Uniform Data System (UDS)
Notes:
-
*If there are too many unenrollments, the changes will show up in athenaClinicals within 24 hours. This includes any other changes made on the same day.
-
For Accountable Care Organizations (ACOs), see this O-help topic: To enter an Accountable Care Organization (ACO) entity ID for a medical group. You can also see these two articles on the Success Community: About Accountable Care Organizations and 2025 Quality program support: What you need to know.
-
Current year enrollment opens on January 15 and closes on January 14 of subsequent year. Once enrolled, athenahealth will automatically roll over providers year to year. For enrollment additions and removals completed between November 20 and January 14, changes will be reflected by February 15.
-
If providers or groups are deemed inactive, athenahealth may automatically unenroll them from any MIPS submission (also known as For Attestation) programs. An inactive status, for the purpose of MIPS automatic unenrollment, is defined as having no encounters or claims processed in athenaOne for at least 21 months for individual providers and 33 months for MIPS groups.
How do I get to this page?
From the Main Menu, click Quality > Program Enrollment.
Automatic MIPS Enrollment
Individual clinicians with a MIPS Eligible as an individual status are automatically enrolled in the MIPS Individual for attestation program for each performance category after the first clinical encounter. We leverage the publicly available data from CMS' Quality Payment Program (QPP) website to make that determination for individual eligible clinicians. This is performed as a safety net by athenahealth to reduce the risk that new providers will be penalized for not submitting data.
Benefits
While auto-enrollment happens under certain conditions, the self-serve Program Enrollment page is always available and has these advantages:
-
Allows you to select only desired quality measures, vs system defaults.
-
Allows for enrollment as an individual, as a group, or both.
-
Allows for enrollment in the MIPS Not for Attestation option for those that would prefer athenahealth not submit on your behalf.
-
Enables enrollment for providers who are currently ineligible or opt-in eligible. This includes providers reporting under a new TIN, as the QPP may not publish eligibility until November or December of the current year, which is too late to effectively influence performance in measures.
-
Reduces the risk of problems that can happen when we depend on an automated process, which sometimes struggles to reconcile/match providers in athenaClinicals with the QPP.
-
Allows for quick enrollment without having to wait for encounters, Medicare claims, or for eligibility scripts that notify clinicians of care gaps, or other required actions, like Registration of Intent for Public Health Registries.
Additional MIPS Enrollment Details
MIPS Eligibility is determined by the CMS and is published at QPP Eligibility Lookup. See the MIPS Program Eligibility FAQ for more information.
athenaOne offers two type of enrollments that may be selected for each of the MIPS performance categories: Quality, Promoting Interoperability (PI), and Improvement Activities (IA):
-
For Attestation (FA) Default submission program
-
Measures appear on the MIPS Dashboard and in other quality tools, such as the Quality Management Report (QMR), eCQM Data Report, and the Quality Tab in patient charts.
-
Choose For Attestation programs if you want athenahealth to submit data on your behalf.
-
-
Not-for-Attestation (NFA)
-
Measures appear in quality tools, excluding the MIPS Dashboard.
-
athenahealth will not submit data on your behalf. Providers can self-submit or simply monitor results, for example in the Quality Management Report.
-
Consider if ineligible or opt-in eligible and submission is not desired.
-
MIPS Value Pathways subgroup enrollments.
- MIPS Promoting Interoperability for performance periods other than a full year.
eCQM measure type: Refers to electronic Clinical Quality Measures (eCQM) that have a measure ID that begins with "CMS" and use the QRDA file format.
New providers may enroll eCQMs in athenahealth's standard MIPS program that supports submission given that athenaClinicals supports data aggregation of results that use QRDA-I files from a previous EHR (when reporting under the same TIN) in support of full year reporting requirements.
CQM measure type: Refers to non-electronic Clinical Quality Measures (CQM) that have a numeric only measure ID and use the JSON file format.
Enrollment in the standard MIPS program that supports submission is restricted to clinicians with a billed patient encounter dated January 1st or earlier to ensure compliance with the full year reporting requirement. athenaClinicals does not support data aggregation of CQM results that use JSON files. The CQM measure selection box will be grey for new providers without a January 1st or earlier encounter.
New providers should plan on enrolling CQMs in the MIPS Not-for-Attestation program their first year on athenaClinicals. This program allows for measures to be triggered in quality tools, including the Quality Tab in patient charts, but does not support athenahealth submission services.
Scenarios that require enrollment through the case process are:
MIPS eCQM and CQM measures
How to use Program Enrollment
The self-serve Program Enrollment process consists of two key steps:
-
Activation: Begin by activating the measures relevant to your practice. This action automatically enables the associated program, streamlining your workflow. The list of measures available for provider enrollment will be customized based on your selections, making it easier to proceed. Click Save Activation.
-
Enrollment: Once you have activated the necessary measures, click Enroll Providers to access the next enrollment page. If the button is disabled, it indicates that no measures have been activated; ensure that you Save Activation to enable the Enroll Providers button.
Additionally, built-in alerts  will inform you if your selected measures do not meet program requirements, providing essential guidance throughout the enrollment process. For instance, if you have activated only three MVP Quality measures and the program mandates a minimum of four measures including a High priority measure, an alert displays the requirements of the MVP program. Be sure to save your activations. Alerts disable the Enroll Providers button until the necessary requirements are met.
To confirm enrollment, use one of the following methods at least two hours after saving changes:
-
Quality > Pay for Performance Dashboard: Select a program and drill down to verify the list of providers and view the number of measures for each. Click the number of measures to see the list of enrolled measures.
-
Reports > Report LIbrary > Clinicals > Cross-Practice Quality Program and Clinical Guideline Enrollment Report
Accessing the Program Enrollment page
On the Main Menu in athenaClincials, click Quality and then under Quality Setup, select Program Enrollment. Here's a look at the Program Enrollment page:
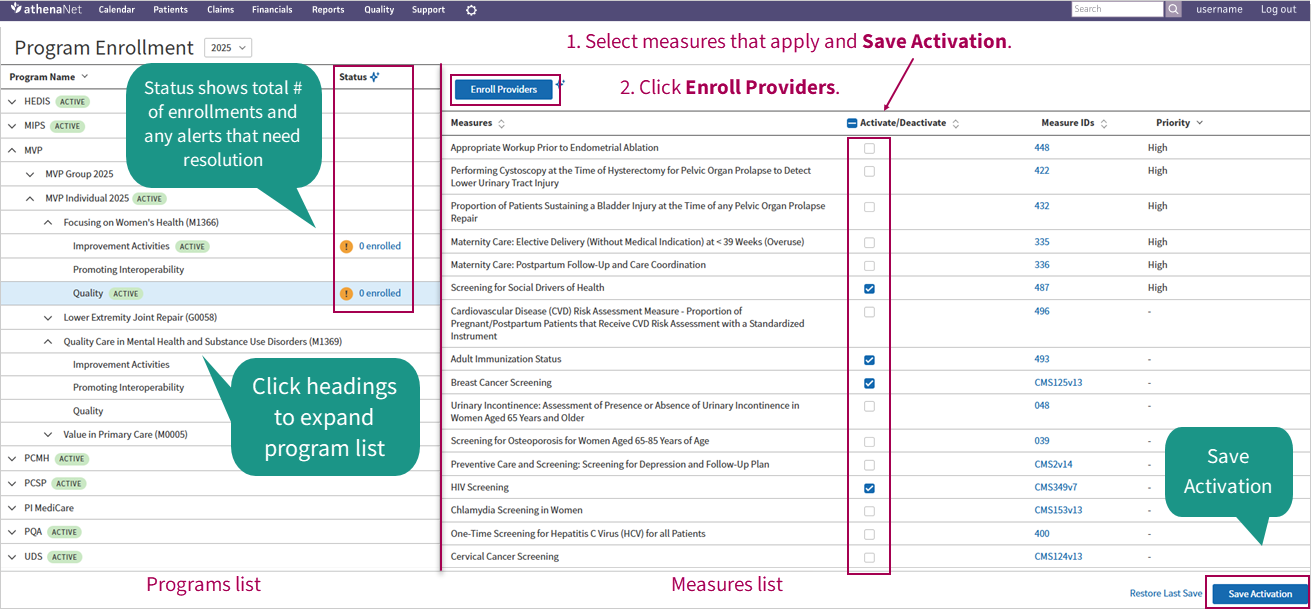
Tip: Hover over the image to see an expanded view.
The Program Enrollment page shows the program list on the left and corresponding measures list on the right. This is the page where you "activate" the measures and programs you want to participate in.
Programs list
The Program Name column shows a shortened list of program names with a single heading that can be expanded to show like-programs underneath. This collapsed listing improves navigation and makes it easier to find programs more quickly.
The enrollment Status column shows you the current enrollment status of any given program summarized with icons for Active programs  and any Alerts that need resolution. The status indicates the total number of enrollments in the program as a ratio; for example, 2 of 19 where two of the 19 enrollments need further attention. An alert might be an incomplete or invalid enrollment—for example, not having enrolled any providers in the measures yet. Here's a closer look:
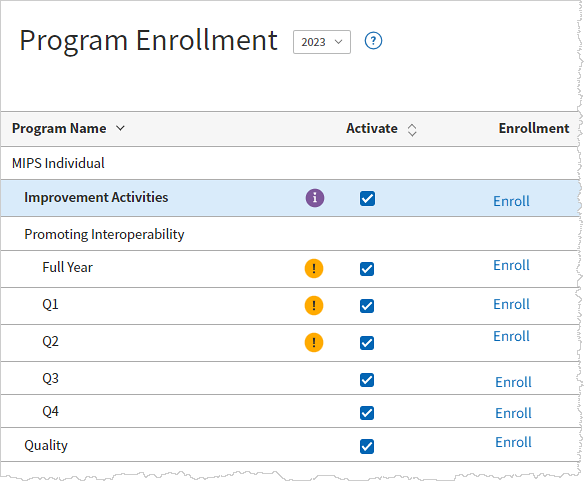
The enrollment status displays an at-a-glance description of the progress of your enrollment activity which is easily clicked and takes you directly to the enrollment task needing attention.
When you expand and click a program name from the left, the measures list on the right refreshes with the appropriate measures corresponding to the programs selected.
Measures list
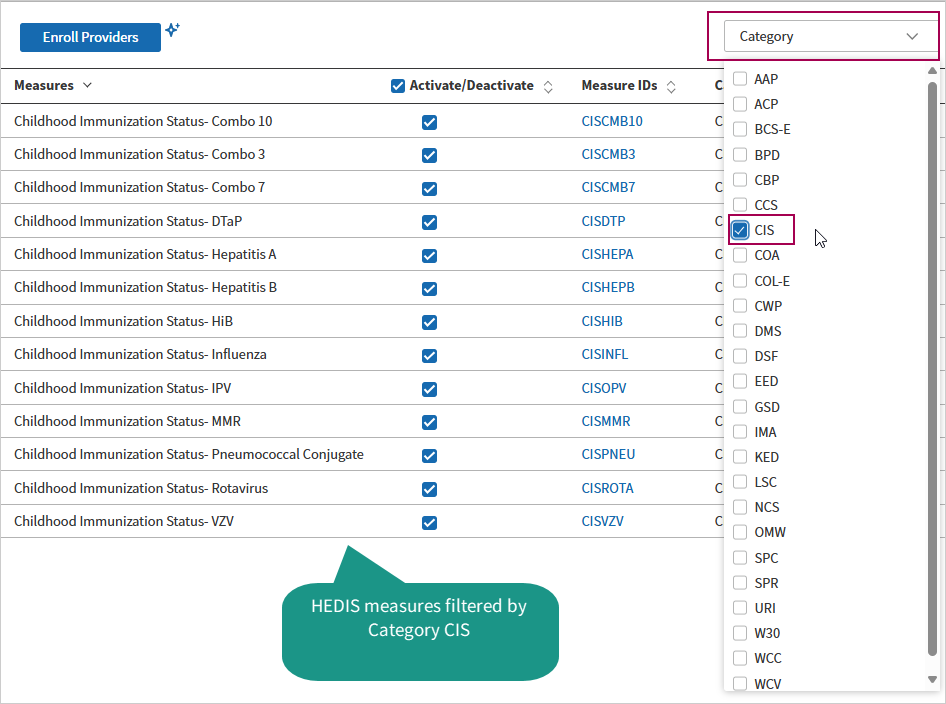
The Measures list in the right pane sorts measures alphabetically. Depending on the program, you might see a Specialty or Category filter above the list of measures on the right. This filter helps you focus on the measures that are most relevant to you by narrowing down the options.
Under the Activate/Deactivate column, check the box for each measure you want to make available for enrollment. Click the checkbox in the column heading to bulk select all the measures in the program. The up (^) and down (v) icons  to the right of the column headings allow you to re-group and sort the list of measures. The measure set shown in the Measures list is based on the program selected.

Once you've selected the measures you want to make available for enrollment, click the Save Activation button at the bottom of the measures list in the lower right of the page to save your selections. When measure activation (and thereby program activation) is saved, the Enroll Providers or Enroll Groups button becomes available.
Click Enroll Providers to advance to the next Enrollment page.
Enrollment Setup page
The next Enrollment page is where you enroll providers or groups into the measures you activated on the previous page. On this second Enrollment page, you'll find two tabs at the top: the Providers tab and the Measures tab. Both tabs serve the same purpose, allowing you to manage enrollments. You can choose the method that best suits your preference—whether you prefer to navigate through your list of providers or make enrollments by measures first. The choice is yours!
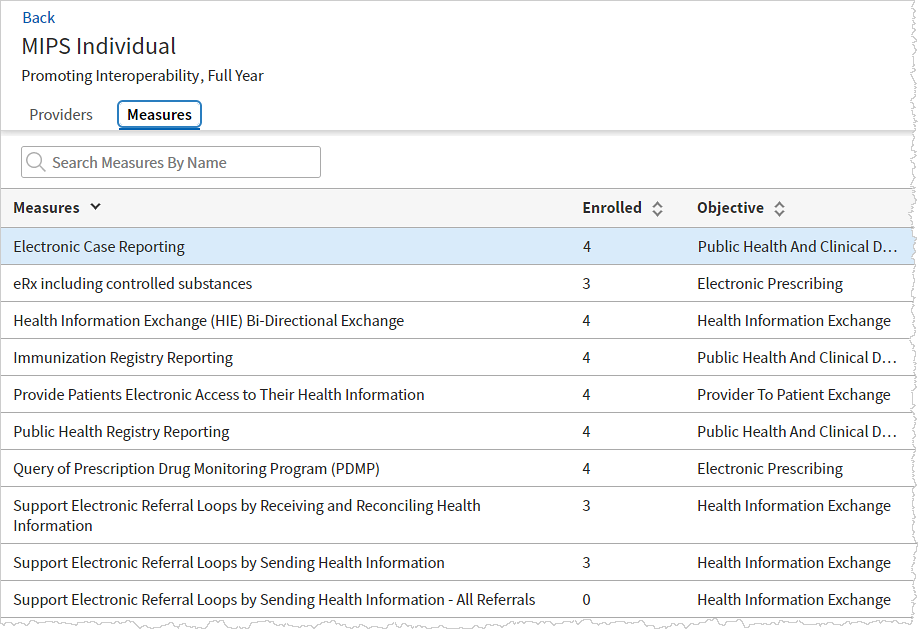
Providers tab
When you first land on the Providers tab, your list of providers displays on the left and the measure list to the right may be empty. You'll need to click Add to populate the list of measures with those you've activated.
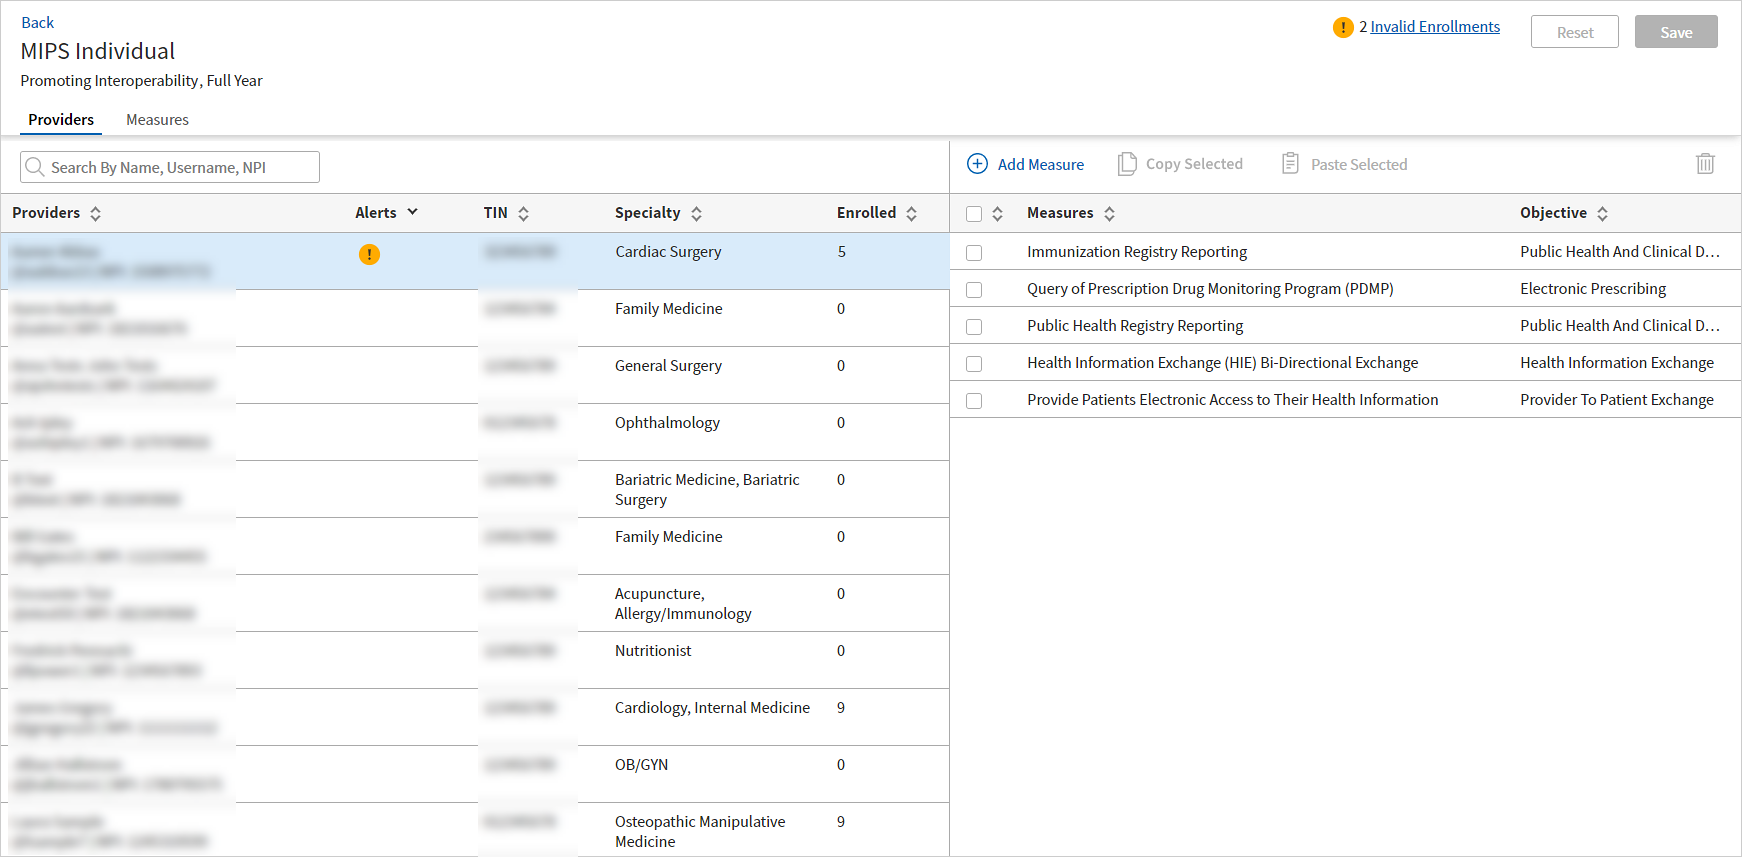
To enroll a provider, select each measure that applies from the list or bulk select all the measures by selecting the check box in the column heading of the measure list:
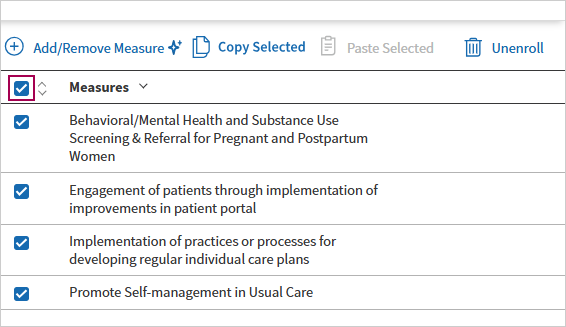
Measures tab
The Measures tab lists the activated measures within that program on the left, and the providers already enrolled in that measure on the right. If this is the first time landing on the Measures tab, you may need to Add your providers first to populate the list of providers. Here's the left half of the Measures tab,
To enroll a provider in a measure, you'll click ![]() Add/Remove Provider. The Add/Remove Provider window opens. Note in this screenshot that the measure already has a provider enrolled in it:
Add/Remove Provider. The Add/Remove Provider window opens. Note in this screenshot that the measure already has a provider enrolled in it:
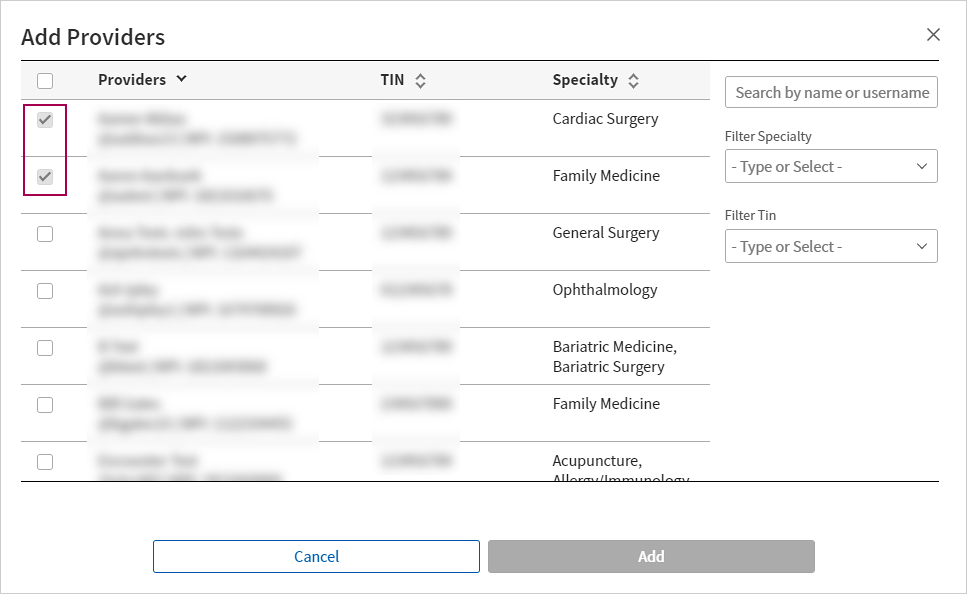
You can search for a provider, filter by specialty, or filter by TIN to find the provider you want. You'll check the box beside the providers to enroll in the measure and then click Save.

Alerts
There are plenty of guardrails in place to coach you through self-serve enrollments.
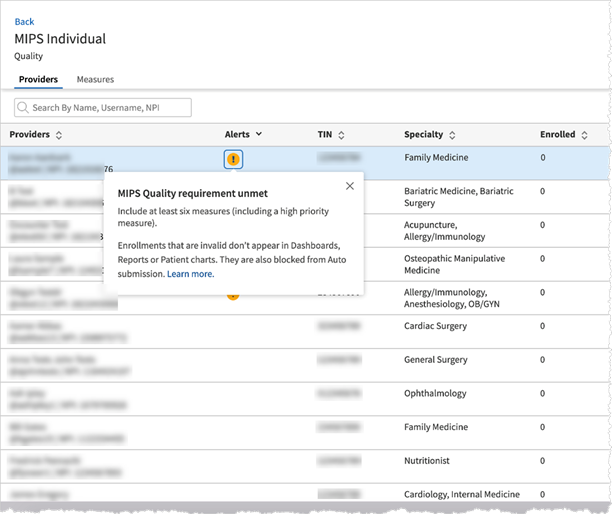
Error alerts:
These alerts indicate that your enrollments currently do not meet the program requirements and need correction before you can see them in dashboards, reports and patient charts. Some examples include:
-
MIPS Quality requirement unmet - Include at least six measures (including a high priority measure).
-
MIPS PI requirements unmet - Include mandatory measures:
- e-Prescribing excluding controlled substances OR
- e-Prescribing including controlled substances
Warning alerts:
These alerts indicate that you are not meeting certain best practices, but these enrollments will be available in dashboards, reports, and patient charts. Some examples include:
- MIPS IA Recommendation - we recommend including all activities.
Each alert provides guidance on how to fix the invalid enrollment. Any pre-existing invalid enrollments will be cleaned up by the system and will require corrections before you can see them back in the reports/dashboards.
User access and permissions
You must have Clinicals Admin: Quality Manager Admin role to access this functionality. The permission within the Clinical Admin: Quality Manager Admin role that specifically gates access to the Program Enrollment page is Program Enrollment: Quality Manager.
To enroll a provider in a measure
-
Display the Program Enrollment page: On the Main Menu, click Quality > Program Enrollment.
-
Click a Program Name from the list of programs on the left to expand the row and navigate to the program you want to enroll your provider into.
Note
As you expand the program rows, any activated measures appear in the list of measures in the right pane.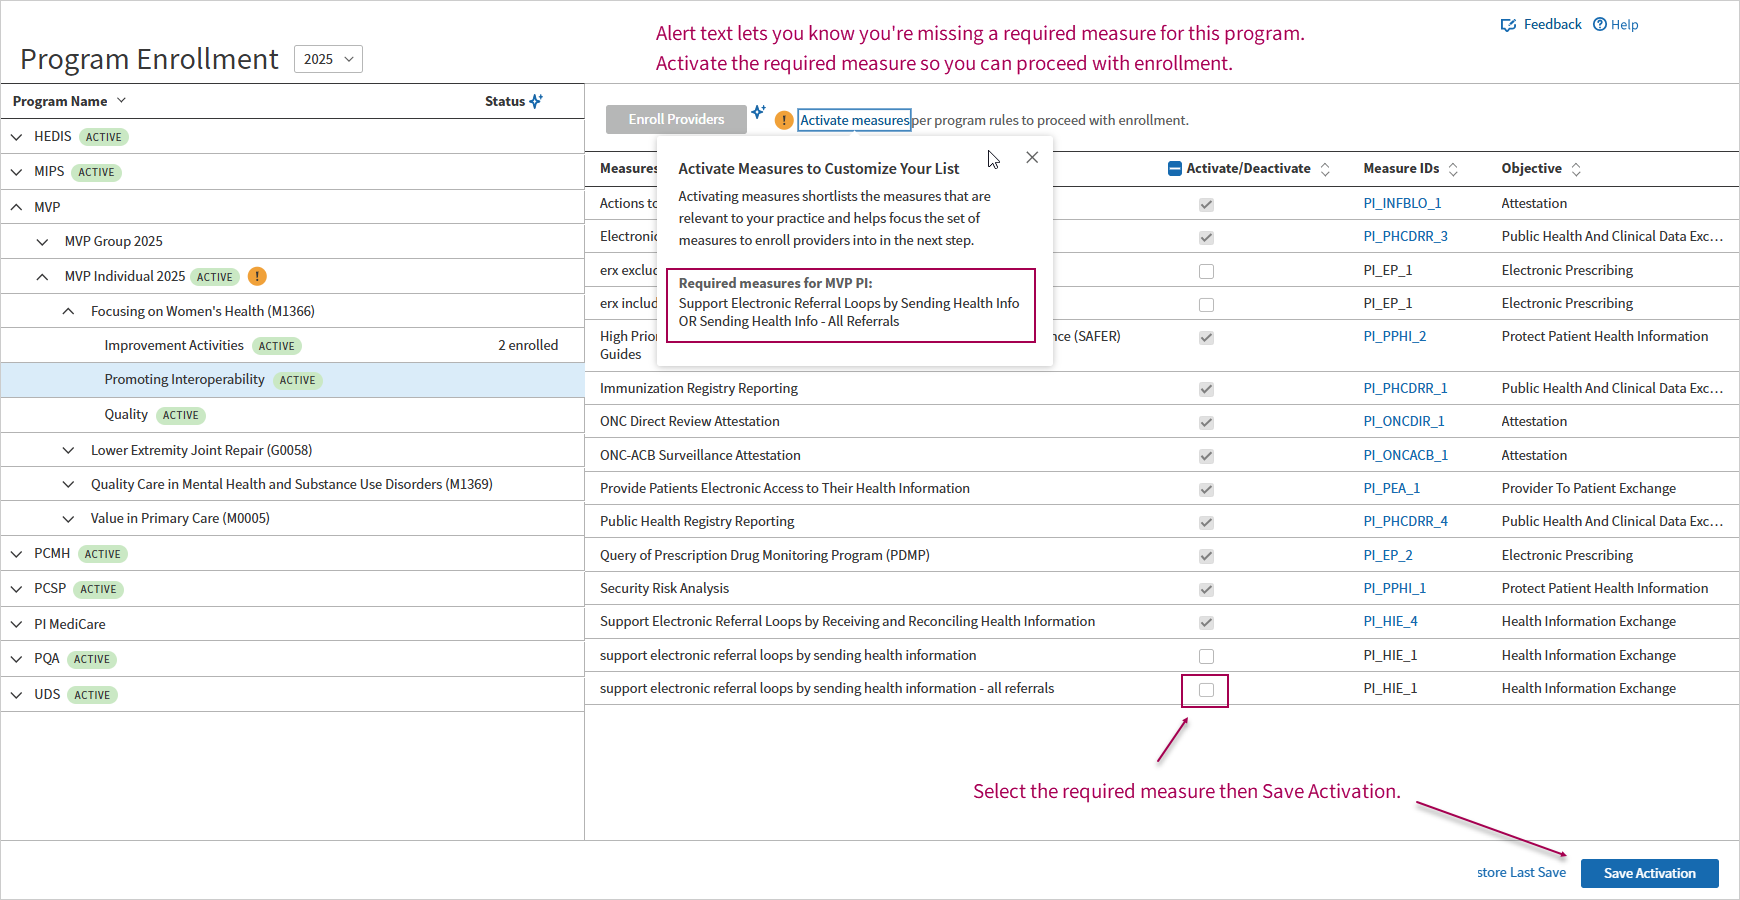
-
Review any alerts and ensure you've activated the minimum required set of measures for the program. Click Save Activation. The Enroll Providers button becomes enabled after you've activated a minimum of required measures for the program.
-
Click Enroll Providers or Enroll Group as appropriate. The second Enrollment setup page opens where you connect providers to measures (on the Providers tab) or measures to providers (on the Measures tab).
-
On the Providers tab, click the Add button in the Measures list on the right if there are no measures listed. The Add/Remove Activated Measures dialog opens where you can follow the alerts to select the appropriate activated measures and then click Save.
-
Select a provider from the list on the left and then select each measure you want to enroll them into on the right. To select all the activated measures in the list, select the check box at the top of the column.
-
Click Save Enrollment.
Tip:
To save time, click Copy Selected above the list of measures, select the next provider, and then click Paste Selected to copy the same set of measures to the next provider's enrollment.

To unenroll a provider from a program or measure
-
On the Main Menu, click Quality > Program Enrollment. The Program Enrollment page opens.
Click a program name from the list of programs on the left to expand the row and navigate to the program you want to unenroll your provider from.
Note:
As you expand the program rows, any activated measures appear in the list of measures in the right pane.
-
Review the measures and ensure you have activated or deactivated the required measures.
-
Click the Enroll Providers button. The selected program page opens with the list of providers on the left and the list of measures on the right.
-
Select the provider from the list on the left.
-
Click Unenroll at the top of the column. In the Unenroll provider/groups from programs dialog that opens, click Unenroll.
-
Click Save Changes.