Text Macros
athenaOne for Hospitals & Health Systems
Practice managers can use this page to manage text macros used by providers in your practice. For a selected macro, you can grant access to multiple selected providers or to all providers in your practice.
On the Main Menu, click Settings![]() > Clinicals. In the left menu,under Practice Links — Exam, click Text Macros
> Clinicals. In the left menu,under Practice Links — Exam, click Text Macros
You can search and refine the list of macros displayed on the My Text Macros and Text Macros pages using the search and filter fields at the top of the page. For example, you can filter the list to display only the macros used in the Physical Exam section of the encounter by a specific provider.
- Display the My Text Macros or the Text Macros page.
- My Text Macros page: On the Main Menu, click Settings
 > Text Macros.
 - Text Macros page: On the Main Menu, click Settings
 > Clinicals. In the left menu,under Practice Links — Exam, click Text Macros.
 - Search macros — Enter the full or partial name of a text macro.
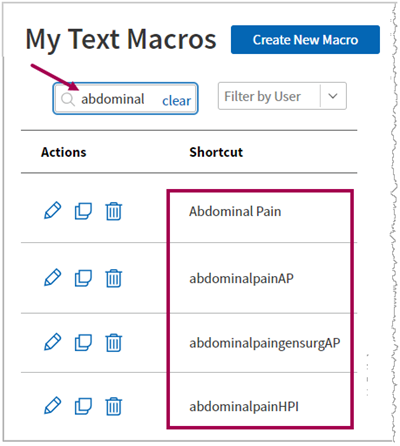
- User — Select a username from the menu.
- Filter by Section — Select one of these encounter sections or note fields:
- All — Display all text macros for the selected user.
- HPI, Physical Exam, Review of Systems, or Assessment and Plan — Display all text macros configured for the selected encounter section.
- Patient Instructions or Discussion Note — Display all text macros configured for the selected text field (used in the Assessment & Plan section).
- Action Note — Display all text macros configured for action notes in document tasks.
- Patient Note — Display all text macros configured for the Note to Patient field in lab and imaging results.
- Patient Case — Display all text macros configured for the Case Description field in patient cases.
- To change your search terms, click clear.
You can create text macros for use with athenaClinicals and athenaOne for Hospitals & Health Systems.
- Display the Text Macros page: On the Main Menu, click Settings
 > Clinicals. In the left menu,under Practice Links — Exam, click Text Macros.
 - Click Create New Macro to add a new macro.
Additional fields appear. - Shortcut — Enter a name for the macro (2-50 characters with no spaces). This name will appear in the list of macros available for use.
- Available sections — Select the encounter section or note field where the macro should appear, or select All to make the macro available in all macro-enabled fields.
Note: You can select Patient Case to configure text macros only for the Case Description field in patient cases. - Expansion text — Enter the reusable text.
- Users — Select the providers who can use the macro.
- Click Add.
You can edit, delete, or copy an existing macro using the icons next to the macro.
Note: We recommend you create text macros through the Text Macros page.
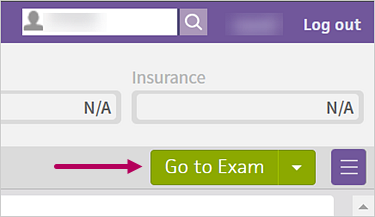
- From the patient briefing, in the top right corner, click Go to Exam from the green workflow menu.
The Exam stage appears. - Complete the Review, HPI (History of Present Illness), and ROS (Review of System) steps as usual.
- Click PE (Physical Exam) from the workflow menu.

The Physical Exam step appears. - Click the add icon
 next to Procedure Documentation and select the appropriate procedure template.
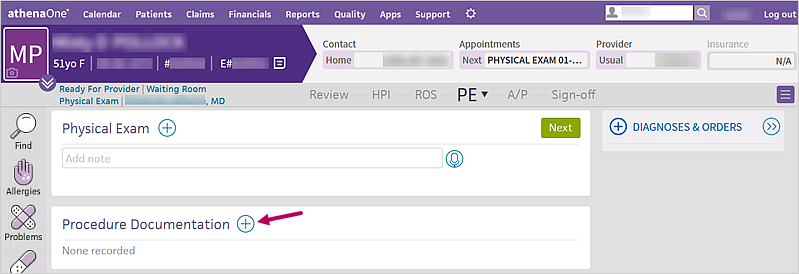
The procedure template appears. -
Complete the procedure template.
-
Type out the text that you want the macro to contain.
-
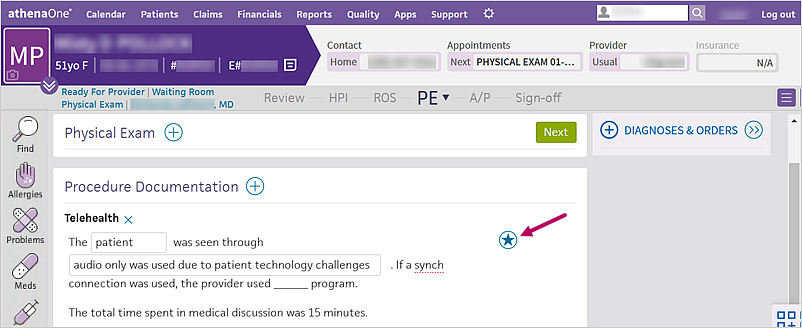
Hover your cursor over the right side of the Procedure Documentation section and click the save as macro icon
 .
.
- Shortcut — Enter a name for the text macro.
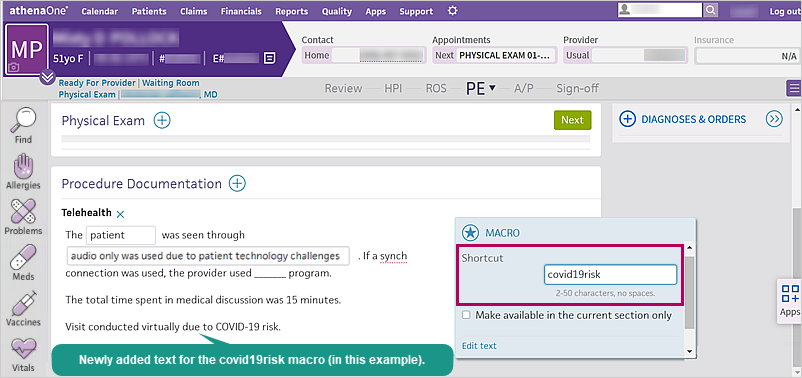
Note: If you want the text macro to only appear in the Procedure Documentation section and nowhere else in the Exam, check the Make available in the current section only box. - Click Edit text.
The Text field expands, displaying the procedure template content as well as the text you added. - Text — Delete the procedure template content. Make sure only the text you want to appear in the text macro is in the Text field.
Important: In the example below, the Telehealth procedure template content has been deleted from the Text field. Only the text "Visit conducted virtually due to COVID-19 risk" will appear when the covid19risk text macro is used.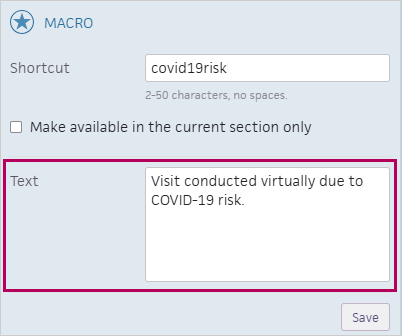
If you don't delete the procedure template content, then it will also appear whenever you use the text macro. - Click Save.
- From the patient briefing, in the top right corner, click Go to Exam from the green workflow menu.

The Exam stage appears. - Complete the Review, HPI (History of Present Illness), and ROS (Review of System) steps as usual.
- Click PE (Physical Exam) from the workflow menu.

The Physical Exam step appears. - Click the add icon
 next to Procedure Documentation and select the appropriate procedure template.
The procedure template appears. -
Complete the procedure template.
-
To enter a text macro, press the period key on your keyboard and type out the name of the text macro.
The text macro menu appears, displaying a list of available text macros beginning with the letters you typed.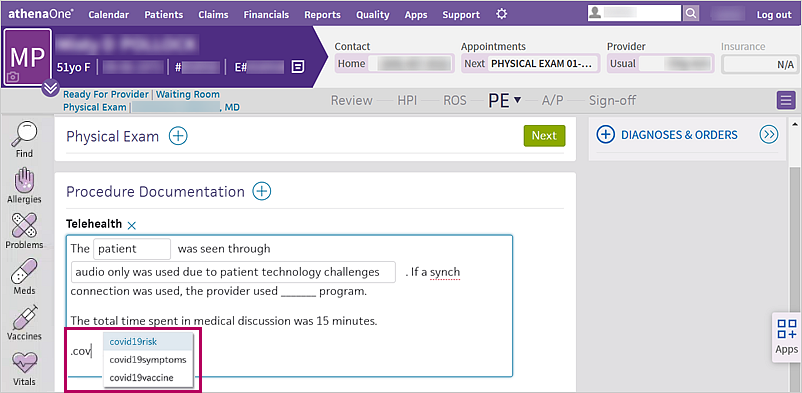
-
Select the text macro you want to use.
The text macro auto-populates within the procedure template.
You can add a drop-down menu to a text macro to create a menu of selectable options. Configuring the drop-down menu to default to null (or a blank selection) is not supported and can result in lost information.
Note: This syntax was created by athenahealth and is not part of standard HTML code. For information about supported HTML coding for text macros, see Supported HTML.
- Display the My Text Macros or the Text Macros page.
- My Text Macros page: On the Main Menu, click Settings
 > Text Macros.
 - Text Macros page: On the Main Menu, click Settings
 > Clinicals. In the left menu,under Practice Links — Exam, click Text Macros.
- My Text Macros page: On the Main Menu, click Settings
- Click Create New Macro to add a new macro, or click the edit icon
 next to the name of an existing macro in the list.
The text macro fields appear. - Shortcut — Enter or edit the name of the macro (2-50 characters with no spaces).
- Available sections — Select the encounter section or note field where the macro should appear, or select All to make the macro available in all macro-enabled fields.
Note: You can select Patient Case to configure text macros only for the Case Description field in patient cases. - Expansion text — Enter the reusable text. To include a drop-down menu, enter the menu options in braces, for example:
Patient has abnormalities on {{brain|cervical|thoracic|lumbosacral}} MR imaging.
To preview how the macro displays in the exam, click Preview.
Note: Configuring drop-down menus to default to null (or a blank selection) is not supported in athenaOne syntax and could result in lost information. - Users — Select the providers who can use the macro.
Note: This field appears on the Text Macros page only. - Click Save.
The Manage My Text Macros page is the only page where you can subscribe to and unsubscribe from a text macro.
These options are not available on the Text Macros page.
-
Display the Text Macros page: On the Main Menu, click Settings
 > Clinicals. In the left menu,under Practice Links — Exam, click Text Macros.
 -
Filter by User – Select the provider whose text macros you want to see.
-
Click
 to subscribe to a text macro. Click minus
  to unsubscribe.
- Display the Encounter Plans page: On the Main Menu, click Settings
 > Clinicals. In the left menu,under Practice Links — History/Intake, click Encounter
Plans.
 - Click Create New Plan.
- Encounter plan name — Enter a short, descriptive name for the encounter plan.
- Users — Click All to make this encounter plan available to all providers in your practice, or click Selected to make the encounter plan available only to the providers that you select from the list.
- Specialty — If your practice uses the multispecialty feature, click All to make this encounter plan available to all specialties in your practice, or click Selected to make the encounter plan available only to the specialties that you select.
Note: Verify that the encounter plan is not associated with both specific providers and an entire specialty. In this case, the encounter plan is available only to the selected providers, not the entire specialty.
You can use encounter reasons, chief complaints, templates, and order sets that belong to specific providers or specialties when you create practice-wide encounter plans; warning messages appear to help ensure informed choices.
Encounter plan triggers
- Reasons for visit — Select the reasons that will activate the encounter plan from the list.
- Follow-up reasons — Enter the appropriate set of follow-up SNOMED problems that require particular templates, diagnoses, or orders as part of the current encounter.
Encounter plan actions
- Structured Templates — Select the templates to activate for the encounter reasons or follow-up reasons used in the encounter plan.
- Saved Findings — Select the saved findings to activate for the encounter reasons or follow-up reasons used in the encounter plan. For each set of saved findings, the list includes the section of the encounter where you saved the findings: History of Present Illness (HPI), Physical Exam (PE), and Review of Systems (ROS).
Note: Saved findings appear in the encounter plan only for the provider that created the saved finding. - Text Macros — Select the macros to activate for the encounter reasons or follow-up reasons used in the encounter plan. You can add only section-specific macros to encounter plans, including HPI, ROS, and PE Notes, and Assessment & Plan, Discussion Notes, and Patient Instructions.
Note: Any rendering provider that uses this encounter plan can use any macro available in the plan, even if the provider cannot access the macro otherwise. - Diagnoses — Select the diagnoses to activate for the encounter reasons or follow-up reasons used for the encounter plan.
- In the Search tool, enter text to view a list of matching diagnoses.
- If a diagnosis contains refine> next to it, you can either click refine> to select a more specific diagnosis, or you can add the unrefined diagnosis.
- The diagnosis appears as a blue row in the Diagnoses and Orders Detail form.
Refine a diagnosis (optional)
- In the Diagnoses and Orders Detail form, diagnoses that need to be further refined are indicated by the suffix (refinable), and an option to refine the term (REFINE) appears next to the Edit icon
 . To refine the diagnosis, click REFINE and select additional modifiers to get to a more specific diagnosis.
If you add an unrefined diagnosis, the diagnosis will need to be refined by the user at order entry.
Select orders for each diagnosis
- Diagnoses and Orders Detail — Add orders to associate with the diagnoses. You can also select ICD-10 codes to associate with the diagnoses.
- Click Save.
Text macros allow you to save text via a shortcut that you can use in any macro-enabled field to display that saved text. Macros can be shared with other providers or be specific to a certain provider. You can configure a text macro for use in specific sections of the encounter, or you can configure a macro for use in any macro-enabled field.
- Providers can create macros at the point of care as they work through an encounter or at any time using the My Text Macros page.
- Practice managers can configure text macros for multiple providers at once using the Text Macros page.
Tip: When a text macro includes a table, you can use the arrow keys to move between cells.
You can create and use text macros in the following macro-enabled fields.
- Notes
- Assessment note
- Diagnosis-level assessment (4000 characters maximum)
- Patient Instructions
- Discussion Notes
- Note to provider
- Internal Note
- Notes field (4000 characters maximum)
- Notes field
- Notes field
- Action Note field (3500 characters maximum; plain text only; no HTML code)
- Note to Patient field
- Case Description field (plain text only; no HTML code)
Macros and most macro-enabled note fields do not have a character limit with these exceptions:
- The Diagnosis-level assessment field in the A/P section and the HPI template note in the HPI section have a 4000‑character limit.
- The Action Note field for documents has a 3500‑character limit.
A macro that exceeds the character limits in those fields cannot be used.
Important: Do not copy and paste text from MS Word documents or similar text editors into any text macro. Such text contains hidden characters that do not render properly.
You can enter a period (".") followed by the shortcut name to search for previously saved content.
After you enter a period (".") in a macro-enabled field, a list of macros appears. As you continue to type, the list updates to match your search criteria. This list includes the most frequently used macros at the top. Macros that you have never used appear alphabetically.
In addition, the list of macros that appears in the search results list corresponds to:
- Username
- Encounter section (for example, HPI)
- Patient age
- Patient gender
Within text macros, you can format text and create fields to select or enter data. This allows you to maintain consistency while customizing the details for each patient.
Use only supported HTML tags and athenaOne syntax when formatting text and creating fields in athenaOne templates, forms, letters, and text macros. Other coding is not supported and will be automatically removed over time to prevent potential problems.
Note: If you are not familiar with HTML coding, please contact the CSC from athenaOne > Support > Success Community > Contact Client Support Center.
Supported HTML tags
Not all HTML tags are supported. You can use the following HTML tags to apply these formatting options:
| Format | HTML Tags | Example Code | Example Output |
|---|---|---|---|
| Bold | <strong>, <b> | <strong>Urgent</strong> | Urgent |
| Italics | <em>, <i> | <em>Patient chart</em> | Patient chart |
| List |
<ul>, <ol> |
<ul><li>Last name</li><li>First name</li><li>DOB</li></ul> |
• Last name • First name • DOB |
| Line break | <br> |
athenahealth<br>311 Arsenal St.<br>Watertown, MA<br> |
athenahealth 311 Arsenal St. Watertown, MA |
| Paragraph | <p> |
<p>At athenahealth, we are building a healthcare ecosystem.</p> <p>We strive to make healthcare work as it should.</p> |
At athenahealth, we are building a healthcare ecosystem. We strive to make healthcare work as it should. |
| Table |
<table> is the full table. <tr> is a table row. <td> is a cell within a row. <th> is a header cell within a row. |
<table><tr><th>First name</th><th>Last name</th></tr><tr><td>Jane</td><td>Doe</td> </tr><tr><td>John</td><td>Smith</td></tr></table> |

Note: The table scrolls horizontally if the column widths exceed the page size. |
| Non-breaking space | |
<p>1 2 3</p> |
1 2 3 |
Supported athenaOne syntax
You can also use syntax that is specific to athenaOne to create the following types of fields:
| Type of Field | athenaOne Syntax | Example Code | Example Output |
|---|---|---|---|
| Dropdown | {{1|2|3}} | Patient will come back in {{1|2|3|4}} weeks for a follow-up. | Patient will come back in 2 weeks for a follow-up. |
| Date | {{DATE}} | Pain started on {{DATE}}. | Pain started on 10/01/2019. |
| Time |
{{TIME}} |
Injection given at {{TIME}}. |
Injection given at 10:05 AM. |
| Date Time | {{DATETIME}} |
Completed at {{DATETIME}}. |
Completed at 10/02/2019 3:45 PM. |
| Default Date Time | {{DATETIME|MM/DD/YYYY HH:MM AM/PM}} |
Complete by {{DATETIME|12/31/19 5:00 PM}}. |
Complete by 12/31/2019 5:00 PM. |
Notes:
-
athenaOne may display text macros differently on the Text Macros and My Text Macros pages than in the note fields where the text macros are used.
-
Configuring drop-down menus to default to null (or a blank selection) is not supported in athenaOne syntax and could result in lost information.
For instructions on creating a drop-down menu in a text macro, see To create a drop-down menu in a text macro.
Follow these best practices when formatting text and creating fields in athenaOne templates, forms, letters, and text macros.
| Best Practice | Reason | To Resolve Issues |
|---|---|---|
| Use only supported HTML tags and athenaOne syntax | Unsupported coding is not recognized by athenaOne and will not work as expected. | Remove or replace any unsupported coding. |
| Ensure all HTML syntax have opening and closing tags Exception: A line break <br> doesn't require a closing tag. |
Some commands require an opening and closing HTML tag to render properly. | Add any missing opening and closing HTML tags. Example: Close each paragraph HTML tag (<p>) with a corresponding </p> tag. (A <p> tag that isn't closed adds extra spacing.) |
| Check that you coded only one break for each new line | Using both the <br> tag and pressing the ENTER key results in two line breaks. | Remove extra line breaks in the HTML code. Example: Remove any returns that are after a <br> tag. |
| Limit the use of HTML bold tags (<strong> and <b>) in long text macros. | When the macro is used in the Diagnosis-level assessment field or the HPI template note, the <strong> and <b> tags may cause the macro's character count to exceed the 4000-character limit. | Remove any <strong> and <b> tags that are not essential. |
The following fields do not support formatting in text macros:
- Action Note field in documents
- Case Description field in patient cases
- Note to provider field in orders
- Internal Note field in orders
You may have used a formatted text macro (that is, a text macro that contains HTML code or athenaOne syntax) in a field that does not support formatting. Since the field is unable to recognize and translate the code into a format or field, it displays the code like any other text, making it visible in your note or description.
Preop diagnosis:
Postop diagnosis:
Procedure:
Anesthesia:
Surgeon:
Assistant(s):
Estimated Blood Loss:
IV Fluids:
Urine output:
 Show me