Device Management
athenaOne for Hospitals & Health Systems
This page allows you to install and configure athenaOne Device Manager (ADM), a unified framework for athenaOne device integration that is compatible with the Windows operating systems using the Chrome or Microsoft Edge browser. ADM also allows you to configure your browser for use with athenaOne and to clear your browser cache.
Important: athenahealth focuses support on the latest version of ADM only. Users who submit technical support cases with an earlier version of ADM will be asked to upgrade ADM as part of the support process. For best results, we recommend that you download the latest version of ADM.
Latest version of ADM currently available: ADM 3.1.4.0
On the Main Menu, click Settings![]() > Device Management
> Device Management
You must have administrator privileges on a computer to install, update, or uninstall athenaOne Device Manager. If you do not have administrator privileges, contact your organization's IT department for assistance.
To access the Device Management page, you must have the Practice Set-Up: Manage athenaOne Devices permission. This permission allows you to view, add, edit, and delete content on the Device Management page and is included in the following roles:
- CCP Client Devices
- *Clinicals-only Practice Superuser
- Management - Collector
- Management - Communicator
- *Practice Set-Up
- *Practice Set-Up: Implementation Wizard Superuser
- *Practice Superuser
- Superuser - Collector
Note: No role or permission grants view-only access to the Device Management page. Users who do not have permission to view and configure data on the Device Management page can still have ADM installed on their computer and use devices connected via ADM.
ADM requires users' computers to meet the following system requirements.
Operating systems
Windows 11.
Note: ADM is not available for the macOS, iOS, Android, or Chrome operating systems.
Browsers
Chrome or Microsoft Edge
Important: athenaOne no longer supports Internet Explorer.
.NET Framework
Version 4.8 or greater.
Note: If a compatible version of .NET Framework is not already available on the computer, you are prompted to install .NET v4.8 as part of the ADM installation.
Ports
Port 46000 or 46001 must be available on localhost/127.0.0.1.
Note: For most computers, one of these ports is typically available by default.
Antivirus software configuration
Antivirus software may need to be updated with an exemption to enable local communication between the ADM Windows service and tray application.
- Most antivirus software has an option to allow specific traffic. To allow ADM to connect successfully, add ports 46000 and 46001 on localhost (127.0.0.1) to your list of allowed sites.
- If you use the Sophos HTTPS Decrypt and Scan configuration, we also recommend adding a URL exception for wss://127.0.0.1:46000/* and wss://127.0.0.1:46001/*.
The specific devices you can set up to work with athenaOne depend on which athenahealth products and services you use. For a list of supported devices and how to use them, please visit the Learning Portal. On the Main Menu, click Support. Under RESOURCES, click athenahealth Learning Portal. On the Learning Portal, search for "Clinical device."
Note: You must manually install ADM 3.1.4.0 from the Device Management page (see To update athenaOne Device Manager). After you install ADM 3.1.4.0, ADM is automatically updated when you restart your computer if a newer version is available.
To check the status of the automatic update feature for your practice, click the Install & Update tab on the Device Management page (the status of the automatic update feature appears at the top of the tab).
If an automatic upgrade fails, ADM reverts to its current version. You can still manually install any updates from the Device Management page.
Important: The ADM automatic update feature is enabled by default. To disable the feature for your practice, please contact the CSC.
Note on Fujitsu ScanSnap scanner
If you used the Fujitsu ScanSnap scanner with athenaOne Device Manager 3.0 or an earlier version of ADM, you need to download the Fujitsu ScanSnap device software on the Device Management page after upgrading to athenaOne Device Manager 3.1 or newer.
To use your devices with athenaOne, you must:
- Install the ADM application
- Add devices to the Device Management page
- Install ADM device modules
- Install device software
- Test the devices
The ADM application runs in the background on your computer and provides the device modules that allow your devices to connect to athenaOne.
Note: Once installed, your device modules are updated automatically.
Note: You must have administrator privileges on a computer to install, update, or uninstall athenaOne Device Manager. If you do not have administrator privileges, contact your organization's IT department for assistance.
- If needed, install any pending Windows updates and restart your computer.
- Display the Device Management page: On the Main Menu, click Settings
 > Device Management.
Note: You can also install ADM from the athenaOne login page by clicking the Configure browser link below the Password field. - Click the Install & Update tab.
- Under ADM Installer (Group Deployment), in the Latest Version section, click Download EXE (single computer) or Download MSI (group deployment).
Note: athenahealth always recommends using the latest version of ADM, but you can download a previous version of the software in the Older Version section if your organization needs time to prepare for the updated version. - Open the file you downloaded and follow the instructions in the installation wizard to install ADM.
You may be prompted to run the setup "With Configuration" (the wizard configures the browser for use with athenaOne) or "Without Configuration" (the wizard does not configure the browser). If you select "Without Configuration," you can configure the browser later. - Restart your computer.
- To enable automatic installation of the latest version of ADM (if the automatic update feature is not enabled), contact the CSC and request ADM Auto-Update to be enabled.
- Display the Device Management page: On the Main Menu, click Settings
 > Device Management.
 - Click the Devices tab.
- If the device is already listed on the Devices tab, go to the next section (Install the device module). If the device is not listed in the Devices table, click Add Device.
Additional fields appear. - Device — Select a device from the menu.
- Departments — Click All to use the device in all departments, or click Selected to choose the departments that can use the device.
- For clinical devices only:
- Display Name — Name the device for your practice. This name is displayed at the point of use in your workflow.
- Suppress Interpretation — Select this option to suppress the interpretation of imported test results.
- Click Save or Save and Add Another.
- Display the Device Management page: On the Main Menu, click Settings
 > Device Management.
 - Click the Devices tab.
- In the Module column, click Install v#.#.#.# to manually install the device module. If you do not click this link, the device module is installed automatically at the point of use.
Note: If no link is available, the device you're trying to connect does not require an ADM module. Skip this step and install the device software. - Click Save.
Install any software provided by the device vendor that is not already installed on your computer. Some device software may be available on the Device Management page after the device is added to the page.
Note: You may need to contact your organization's IT department to install the device software.
- Display the Device Management page: On the Main Menu, click Settings
 > Device Management.
 - Click the Devices tab.
- If a link is provided in the Device Software column of the Devices section, click Download device software or How to Install.
- If you see Download device software, click the link, open the download file, and follow the instructions in the installation wizard to install the device software.
- If you see How to Install, click the link and follow the instructions to download the required device software. You may need to directly download and install the software on the Device Management page, or you may need to contact the device vendor for installation instructions.
- If you do not see a link in the Device Software column, the device may not require an ADM software installation.
Your device is now enabled for use with athenaOne.
Note: Your device may need additional configuration to make it ready for use with athenaOne. For additional device-specific instructions, contact your device vendor or see the Devices topic on the Success Community for more information.
If you were already using your device, it should work after you install ADM. You may need to close and reopen the browser to make sure that it registers the connection to ADM. Verify that ADM is connected on the Device Management page.
- Display the Device Management page: On the Main Menu, click Settings
 > Device Management.
 - Verify that ADM is running.
- If the device does not appear to be connected:
- Make sure that your device is plugged in to power and is connected to the computer from which you installed ADM and the device software.
Example: Bluetooth-enabled devices may require the computer to be configured on the device and the device to be paired with the computer. - You may need to restart the computer and/or close and reopen the browser to successfully register the connection to ADM.
- Make sure that your device is plugged in to power and is connected to the computer from which you installed ADM and the device software.
New versions of ADM are available for download on the Device Management page. If you have ADM Auto Update enabled, the latest version of ADM is installed automatically, and no further action is needed (to enable ADM Auto Update, contact the CSC). If you do not have ADM Auto Update enabled, you can manually install new versions of ADM.
Note: You must have administrator privileges on a computer to install, update, or uninstall athenaOne Device Manager. If you do not have administrator privileges, contact your organization's IT department for assistance.
- If needed, install any pending Windows updates and restart your computer.
- Display the Device Management page: On the Main Menu, click Settings
 > Device Management.
 - Click the Install & Update tab.
Note: athenahealth always recommends using the latest version of ADM, but you can download a previous version of the software in the Older Version section if your organization needs time to prepare for the updated version. - Under ADM Installer (Group Deployment), in the Latest Version section, click Download EXE (single computer) or Download MSI (group deployment).
Note: If you are a system administrator, you can deploy ADM to multiple computers using the Download MSI (group deployment) option. You can use the .msi file if your computer is running .NET Framework 4.8 or above. - Restart your computer.
If an update to a device module is available, the module is updated automatically at the point of use. To manually update a device module, follow these instructions.
- Display the Device Management page: On the Main Menu, click Settings
 > Device Management.
 - Click the Devices tab.
- In the Module column, click Install v#.#.#.# to manually install the device module.
- Click Save.
- Display the Device Management page: On the Main Menu, click Settings
 > Device Management.
 - Click the Devices tab.
- In the Action column, click the edit icon
 .
.
The Edit Device window appears. - Device — The device is automatically selected based on the row you clicked on the Device Management page.
- Departments — Select All or Selected.
- Click Save.
Important: Deleting a device may affect all users in your organization.
- Display the Device Management page: On the Main Menu, click Settings
 > Device Management.
 - Click the Devices tab.
- In the Action column, click the delete icon
 .
.
The Delete Device confirmation appears. - Click Yes, delete or Cancel.
Required: You must have the Practice Set-up: Manage athenaOne Devices role and permission to add, edit, and delete devices on the Device Management page to access the Device Insights dashboard.
- On the Main Menu, click Settings
 > Device Management.
 - Click the Device Insights tab.
This window displays the device data used across your practice that you can choose to display within a specific date range. Your practice name is automatically populated in the Practice drop-down menu. - Click one of the tabs in the Select Date Range options to display the device information (User, Machine Name, Department, ADM Version, Modules, Browser, and Operating System) that are recorded within the selected date range.
- Last 7 days (default) — This displays the device information recorded in last 7 days.
- Last 30 days — This displays the device information recorded in last 30 days.
- Last 60 days — This displays the device information recorded in last 60 days.
- Last 90 days — This displays the device information recorded in last 90 days.
- Custom — Choose From Date and To Date and click Go. This displays the device information recorded between the chosen dates.
Note: In Custom date range, you can choose up to a maximum of 90 days.
- From the listed device information, select any drop-down data to filter out the entries you want to display.
Note: By default, the drop-down list shows only the only first 100 data entries. To filter out based on a data entry that is not displayed, type the first few characters to get the data entries populated accordingly.
- Click
 Download CSV to download the report of the displayed or filtered ADM Insights data for the selected date range as a CSV file to your local storage location.
Note: To download the entire data for the selected date range, ensure that no filter is applied or click Clear all to remove the filters that you added. - Under Analytics, on the right side of the page, click any of the device information tabs.
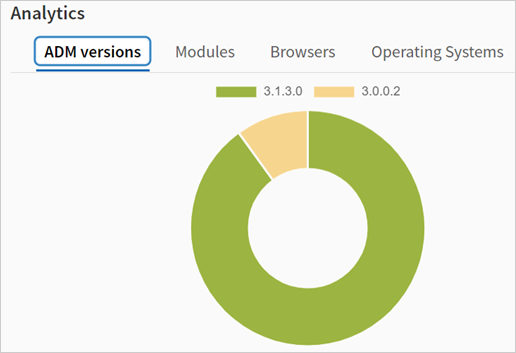
- ADM versions — This displays the analytics of the different ADM versions used within your practice for the selected date range.

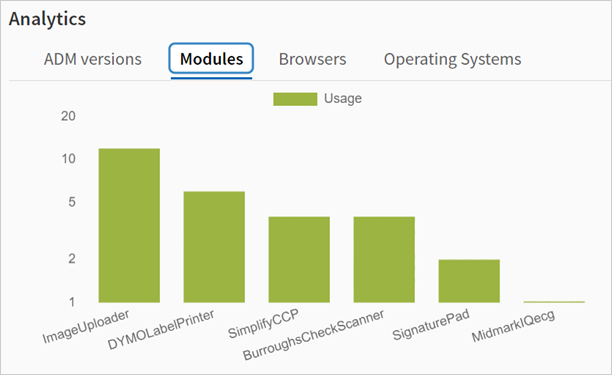
- Modules — This displays the analytics of the different ADM modules accessed within your practice for the selected date range.

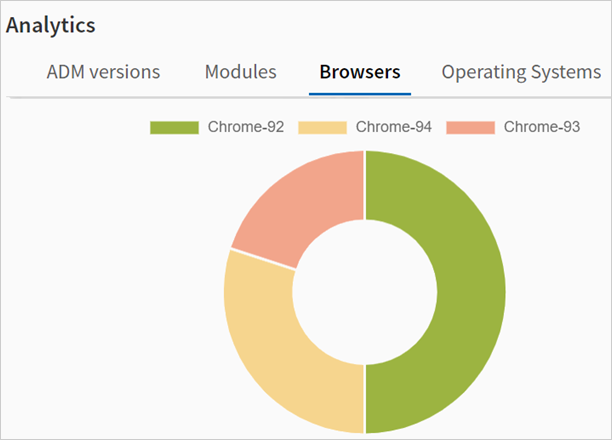
- Browsers — This displays the analytics of the different browsers the users use within your practice for the selected date range.

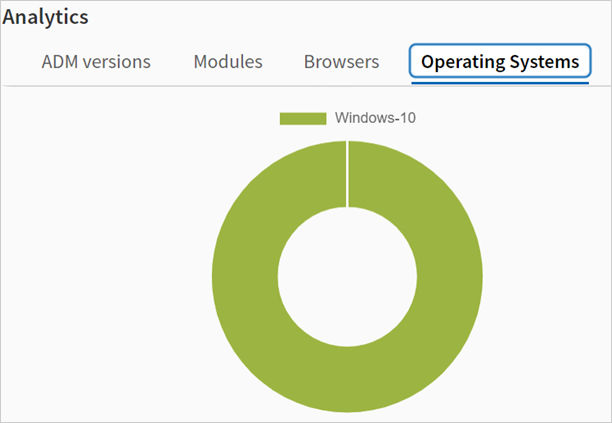
- Operating Systems — This displays the analytics of the different operating systems the users use within your practice for the selected date range.

- ADM versions — This displays the analytics of the different ADM versions used within your practice for the selected date range.
See the related FAQs.
You can uninstall ADM from the Control Panel of your Windows computer.
- Open the Windows Control Panel.
- Click Uninstall a program.
- Search for athenaOne Device Manager.
- Double-click athenaOne Device Manager.
- Click Yes.
The athenaOne Device Manager (ADM) is an application on your computer. ADM manages the device modules that athenaOne needs to communicate with your devices (a module is a device-specific driver). After the athenaOne Device Manager program is installed and configured, the Device Management page shows the status of connected devices from the Windows system tray.
The athenaOne Device Manager provides support for all integrated devices on your computer when you use the Chrome or Microsoft Edge browser to run athenaOne. The athenaOne Device Manager also allows you to configure the browser for use with athenaOne on a PC and to clear your browser cache.
Note: You may need to contact your IT department to install, update, or uninstall ADM.
Clinical device integration with athenaClinicals offers several benefits, including:
- Improved provider productivity
- Reduced staff overhead
- Expedited encounter workflows
We prioritize our medical device integration work based on the strength of these benefits, the needs of our clients, and the technical capabilities of specific medical device manufacturers. We also require medical device manufacturers to provide a PC-based workflow that can be easily integrated with athenaClinicals.
Currently, Midmark and Hillrom-Welch Allyn Instruments are the medical device manufactures that meet our requirements. They are among the most popular medical device manufacturers with athenahealth organizations and provide devices with an easily interfaced, PC-based workflow. We will continue to monitor and consider the medical device integration needs of our clients.
Although athenaClinicals integrates with Midmark and Welch Allyn Instruments, we do not support questions or issues with the device software or hardware. Please direct any technical questions or concerns about these devices to the manufacturer.
Required: You must have the Practice Set-up: Manage athenaOne Devices role and permission to add, edit, and delete devices on the Device Management page to access the Device Insights dashboard.
The Device Insights tab on the Device Management page provides a centralized view of device usage across your practice. On the Device Insights tab, you can:
- Analyze and improve the performance of your practice by generating reports of the data and analytics of the devices used within your practice.
- Use this data to troubleshoot your devices and plan for any upgrades.
- View a comprehensive visual representation of the following device information within your practice:
- User
- Machine Name
- Department
- ADM Version
- Modules
- Browser
- Operating System
To learn how to use the Device Insights dashboard, see To view device usage across your practice.
Data is only populated on the Device Insights dashboard when users perform ADM workflows.
The data on the Device Insights dashboard is updated every 24 hours. Data is not reflected in real time.
If you have access to multiple Practice IDs and use the same username, you can select another practice in the Practice field.
On the Device Insights dashboard there is a link to share your feedback. Please use this functionality to provide feedback.
If your scanner supports duplex scanning, you can scan two-sided documents. You can scan documents with barcodes, which are routed to the associated patient charts. You can scan up to 200 pages. To use the document scanning feature, you must use:
- athenaOne Device Manager (ADM) 3.0 or later
- Windows OS
- Fujitsu ScanSnap or other TWAIN-integrated scanner
- USB-connected scanner
You can connect your scanner module from the Device Management page or from the Add Document page.
Note: This feature requires the scanner to be connected directly to your computer with a USB cable. Wireless and network scanners are not supported.
From the Device Management page
Follow the instructions on the Device Management page: To set up a device for use with athenaOne.
From the Add Document page
- Display the Add Document page: On the Main Menu, click Patients. Under DOCUMENTS, click Add Document. You can also display the Add Document page as follows:
- In the patient chart, click the Menu icon
 and select Add document.
 - On the Patient Actions Bar, click Clinicals, and then click Add Document.
On the Find a Patient page, click Add Document for the patient you need.
- In the patient chart, click the Menu icon
- Click Set Up Scanner.
The Set up a scanner window appears. - If you have not already upgraded to ADM 3.0 or later, click Download ADM v#.#.#.# and follow the installation prompts.
A green checkmark appears next to Install athenaOne Device Manager if your ADM version is up to date. - Click Install device modules.
- Are you using Fujitsu ScanSnap — Click Yes or No to indicate what kind of scanner you're connecting.
- Click Install Module.
athenaOne downloads the scanner module. This download may take a few minutes. A green checkmark appears when the device module has been successfully installed. - Connect the scanner to your computer and install the scanner's driver.
Important: For all TWAIN-supported desktop scanners, you must install the latest available version of the manufacturer's TWAIN driver. The software is available on their website.
| Add device fields | |
|---|---|
| Device | Select the device to set up. |
| Departments | Select the departments that use the device (or select All). |
| Display Name | For clinical devices only, you can assign a name to the device for your practice. |
| Suppress Interpretation | For clinical devices only, you can select whether to suppress the interpretation of imported test results. |
| Devices table, column headings | |
| Device | Name of the device (for example, Midmark EKG). |
| Display Name | Name that your practice assigned to the device. Note: This field is available for clinical devices only. |
| Status | Indicates whether the device is connected. |
| Departments | Departments that use the device. |
| Module | Installation file and version number of the driver that ADM requires to connect the device to athenaOne. |
| Device Software | Additional software and guidance needed to engage with the device. |
| Action | Click the edit icon |