 User Guide — Scan Vaccine Barcodes
You can use a hand-held scanner to scan 2D barcodes affixed to vaccine vials to error-check key information (lot number, expiration date, and manufacturer) and store this information in athenaClinicals.
Note: athenaOne does not support the use of 1D or linear barcode scanners.
For information about supported barcode and card scanners, see the How-to Guide: Vaccine and Barcode Scanner on the Success Community.
Note: You cannot scan barcodes for vaccines that are dispensed in two separate vials (for example, Pentacel, which is supplied in one vial containing DTaP-IPV and another vial containing HiB, and requires combining the contents of the two vials into a single syringe at the time of administration). The CDC continues to work with vaccine manufacturers to improve barcoding consistency for these vaccines.
If you use athenaOne with the Chrome or Microsoft Edge browser, you can enable the Scan vaccine barcodes feature on the Device Management page. If you use a different browser, please contact the CSC from athenaOne > Support > Success Community > Contact Client Support Center to ask that the Scan vaccine barcodes feature be enabled for your department or practice.
Only administrative users can add or edit the vaccine barcode scanner on the Device Management page.
- Display the Device Management page: On the Main Menu, click Settings
 > Device Management.
Note: If your practice has used the vaccine barcode scanner previously, the device is already listed in the Devices table. - If the vaccine barcode scanner is not listed in the Devices table, click Add new.
Additional fields appear. - Device — Select Vaccine Barcode Scanner.
- Departments — Click All to use the device in all departments, or click Selected to choose the departments that can use the device.
- Click Save.
Note: You can also scan a vaccine barcode in the document view of the order for vaccines that were ordered earlier in the encounter or in a different encounter.
- In the Exam stage of the patient encounter, click A/P in the navigation bar.
- Click the plus icon
 next to Diagnoses & Orders.
 - Search for and select the vaccine.
- Click the new vaccine order to expand the details.
- Click the Administer tab and then click VIEW MORE at the bottom of the order details.
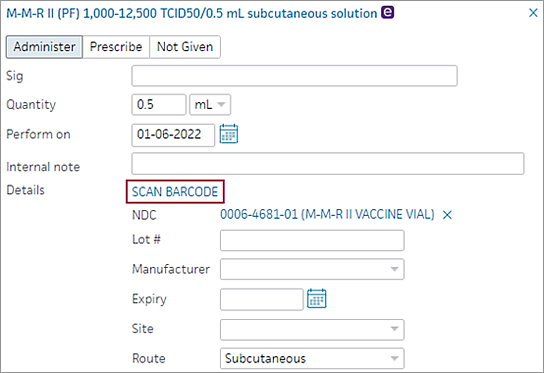
- Click Scan Barcode.

- When you see the message "Ready to Scan," scan the barcode on the vaccine vial with your hand-help scanner.
The NDC, Lot #, Manufacturer, and Expiry fields are populated automatically (if the corresponding data is available). You can edit these fields if necessary.
Note: If you scan a new barcode, the NDC, Lot #, Manufacturer, and Expiry fields are overwritten. - Review the information that appears in the Lot #, Manufacturer, and Exp Date fields.
Note: You receive an error message if you:
- Scan a vaccine that does not match the order
- Scan the wrong barcode type
- Scan an expired vaccine
- Overwrite existing data
For information about supported barcode and card scanners, see the How-to Guide: Vaccine and Barcode Scanner on the Success Community.
The CDC encourages vaccine manufacturers to affix 2D barcodes to vaccine vials. Most medical device quality 2D scanners work with athenaClinicals. You can review the CDC's growing list of vaccines that have 2D barcodes here: http://www.cdc.gov/vaccines/programs/iis/2d-vaccine-barcodes/.
Note: Please refer to the user guide that came with your device for additional tips that are specific to your scanner.
- Make sure the room is well lit.
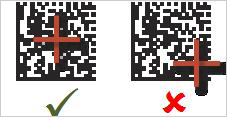
- Position the vial so that nothing is directly behind it. For example, hold the vial in the air with your finger tips or stand the vial on a table. Do not hold the vial against a wall, a piece of paper, or another object.
- Hold the scanner at various distances from the vial to determine which distance works best with your scanner.
- If your scanner projects cross hairs, position them in the middle of the barcode.

- Hold your hand steady when you press the scanner button.
- Ability to recognize and translate data matrix (2D) barcodes
- USB connector cable
- Ability to set up as a "keyboard wedge" (a device that translates readings from the barcode scanner into keyboard strokes)
- Ability to scan using a trigger
- Medical device quality, disinfectant ready (recommended)
If you use athenaOne with the Chrome or Microsoft Edge browser, you can enable the Scan vaccine barcodes feature on the Device Management page. If you use a different browser, please contact the CSC from athenaOne > Support > Success Community > Contact Client Support Center to ask that the Scan vaccine barcodes feature be enabled for your department or practice.
Set up the scanner as a "keyboard wedge" (a device that translates readings from the barcode scanner into keyboard strokes). For most computers, you do this by connecting the scanner to your computer with a USB cable and accepting all the default selections as your operating system installs the device.
Please refer to the user guide that came with your barcode scanner for detailed instructions.