 User Guide — Data Imports — Self-Service Data Conversion using the Data Conversion Manager
athenaOne for Hospitals & Health Systems products
 Overview
What is Self-Service Data Conversion?
We are making it easier for practices joining athenahealth to migrate data from legacy EHRs into athenaOne to ensure continuity of your patient care.
With the new data validation feature in athenaOne, also known as the Data Conversion Manager (DCM), you will be able to understand if your Demographics, Appointments, Insurance, Fee Schedule, or C-CDA document import files are ready for import before the import begins. You will be able to map foreign headers to athenaOne accepted headers and undergo record validation which will provide an approximate success and highlight any key issues with your file before the import process. You will also be able to monitor the status of your data migration to athena through an easy and intuitive tool that highlights the stages of import. Across all of our data migration offerings, you must engage with your Onboarding, Customer Success, or Import Project Manager resource to import data into your athenaOne context.
When value mapping is available for your request, you can resolve unsupported source values directly in DCM after record validation. Map these values to athenahealth-accepted values, review your changes, and submit them for revalidation. This workflow replaces offline Excel value mapping. See What is value mapping? and To resolve values using value mapping.
Benefits of Self-Service Data Conversion
- Manage import files using an intuitive file management and data validation tool in athenaOne.
- Identify mapping errors or data integrity concerns during data validation that happens before data import.
- Download import specifications to understand required data format and data dictionaries.
- Map foreign headers to athenaOne accepted headers.
- Resolve unsupported source values in DCM and submit mappings for revalidation.
- Save mapping progress automatically, resume later, and download a summary of mapping decisions.
Supported and Unsupported Data types
It is important to understand the Self-Service Data Conversion has limitations. The data types listed below are the types of patient data supported for a self-service project. You should work with your Onboarding or Import Project Manager to determine which data types should be in scope for your data migration project.
Supported Data types
Collector
- Patient Demographics
- Appointments
- Patient Insurance*
- Fee Schedule
Note: *Patient Insurance import is not applicable for practices with Advanced Institutional Billing Setup setting turned ON (i.e. FQHCs)
Clinicals
- Document, for C-CDA document import projects.
C-CDA document imports support image and PDF document files uploaded through Practice Files 2.0 and a documents index file uploaded in Data Conversion Manager. Other clinical data remains outside the self-service data conversion scope unless your athenahealth team confirms it is supported for your project.
The indexed C-CDA document import workflow supports image and PDF document files uploaded through Practice Files 2.0 and requires a documents index file uploaded in Data Conversion Manager. Other clinical data remains outside the self-service data conversion scope unless your athenahealth team confirms it is supported for your project.
Note: Eligible customers can use a separate AI-powered legacy document import workflow without preparing an import metadata file. That workflow has limited availability, requires an open imports project and an Imports PM, and is not self-service. The indexed C-CDA workflow described in this guide continues to require a documents index file.
How to perform Data Conversion?
You need to provide collector data or, for C-CDA document imports, a documents index file, document.csv, in accordance with athenahealth data type specifications. Once athenahealth receives the source system data, it imports the data into athenaOne to the fullest extent feasible, aligning with athenahealth’s standards and predefined structured fields. You are responsible for performing data conversion and mapping to athenahealth’s standards and specifications.
For the workflows described in this guide, you need to provide collector data or, for indexed C-CDA document imports, a documents index file, document.csv, in accordance with athenahealth data type specifications. Once athenahealth receives the source system data, it imports the data into athenaOne to the fullest extent feasible, aligning with athenahealth’s standards and predefined structured fields. You are responsible for performing data conversion and mapping to athenahealth’s standards and specifications.
athenahealth will provide guidance to you on data type specifications and provide support throughout the data conversion and import efforts.
It is the assumption that you will perform only necessary data conversion or translation and mapping to meet athenahealth’s data type specifications and will not manipulate patient data with malintent.
Roles and Responsibilities
athenahealth will designate an Imports Project Manager (PM) to oversee the imports workstream during the data import. The Imports PM will assist you throughout the migration process, managing import activities, developing project plans as needed, and offering guidance on type specifications.
You review validation results, complete value mapping when needed, and submit the request for review. Notify your Imports PM after submission so the import team can continue the import process. Your Imports PM coordinates the preview import and provides instructions for your quality assurance review.
Data Conversion Manager
The core of the data validation is utilizing the Data Conversion Manager (DCM). The DCM is a client-facing tool in athenaOne that allows for file upload, record validation, and import submission. The DCM supports file header mapping and online value mapping, provides recommendations to take on the file(s) to improve import success, and provides a validation summary. Header mapping matches source column names to athenahealth headers; value mapping matches unsupported source values to accepted athenahealth values. For C-CDA document imports, DCM pairs the documents index file with document ZIP files uploaded in Practice Files 2.0.
To navigate to the Data Conversion Manager, click Settings  > ADMIN > Practice Manager.
For instructions on how to use the DCM, click here.
What is specifications file?
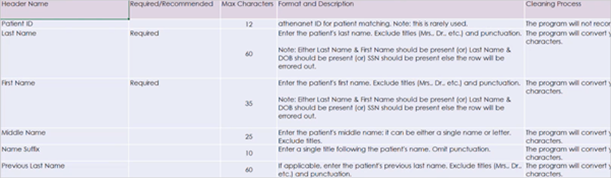
The specifications file indicates the list of fields to be imported into athenaOne with header name, required / recommended, maximum characters, format and description, and cleaning process. Using the specifications file, the import file for the respective data type can be created by extracting data from the legacy EHR and transforming to meet the athenahealth specification.
For C-CDA document imports, use the Document specifications to create the documents index file, document.csv. Complete all required and recommended headers for each row so DCM can match each document to the correct patient and document metadata.
For the indexed C-CDA document import workflow in DCM, use the Document specifications to create the required documents index file, document.csv. Complete all required and recommended headers for each row so DCM can match each document to the correct patient and document metadata.
The separate AI-powered legacy document import workflow can extract patient demographic information and document file paths without a metadata file prepared by you. This does not change the index file or required-header requirements for the DCM workflow described here.
Note: The required fields like first name, last name, and date of the birth of a patient are mandatory to be filled prior mapping and validation of fields. In addition, when creating the data file, only valid values and pre-defined format are accepted for certain fields and the valid values are provided in the specifications file for reference.
What is header validation?
Header validation or header mapping refers to validating that the headers in the provided import file match the headers in the athenahealth specification. If headers are not mapped, the data contained in this column will not be imported. If required headers are not mapped, the import cannot be proceeded.
Matching headers skips header mapping only. Record validation may still identify unsupported values that require value mapping.
What is record validation?
Record validation refers to checking of individual rows in a dataset file whether the required or mandatory fields are present and to check validation rules for each record. For C-CDA document imports, validation checks the documents index file and, when the ZIP file is selected before validation is initiated, validates the actual document files included in the ZIP file.
Review the validation summary for clean records, records with warnings, and records with errors. When Start value mapping is available, use it to resolve unsupported values, then submit the mappings for revalidation before proceeding with the import request.
What is value mapping?
Value mapping matches unsupported values in an import file to values accepted by athenahealth. After record validation, the Value Mapping page groups values by header and identifies values with errors and warnings.
Important: Map all error values. An unmapped error value prevents the affected record from importing. Mapping warning values is optional; if you leave a warning value unmapped, that value is not imported.
Mapping a warning value is separate from choosing whether to include or exclude records with warnings in the validation summary. Review both your mappings and the records selected for import.
You can unmap an incorrect mapping, choose another accepted value, save your progress, and resume later. Review your mappings and submit them for revalidation before submitting the request for review. See To resolve values using value mapping.
Importing Legacy Data into Preview for Quality Assurance Testing
All data should first be imported into the Preview environment before being imported into Production. This allows you the opportunity to review the imported data and conduct quality assurance (QA). Your athenahealth Imports Project Manager (PM) will provide QA instructions once your data has been imported into Preview.
You are responsible for executing all necessary validation and quality assurance in the Preview environment to ensure that the legacy data has been accurately imported. As a best practice, it is recommended that you review the imported legacy data for a sample of at least 20-50 patients in athenaOne, comparing them to the records in your source system.
If the imported data meets your standards, it can then be moved to Production, completing the data migration. If the data does not meet your expectations, you will have the opportunity to correct any issues and re-upload a new file for import.
User access and permissions
You must have the Client role with Billing Admin: Practice Files permission to access this functionality.
Step-by-step instructions
To upload a file using the Data Conversion Manager page
Use these steps for DCM imports, including indexed C-CDA document imports. For an eligible AI-powered legacy document import, follow Importing legacy documents using AI and coordinate submission with your Imports PM.
-
On the Main Menu, click Settings
> ADMIN > Practice Manager.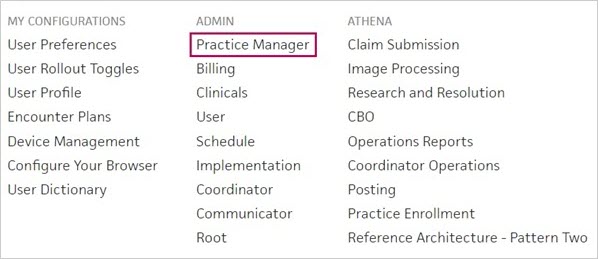
-
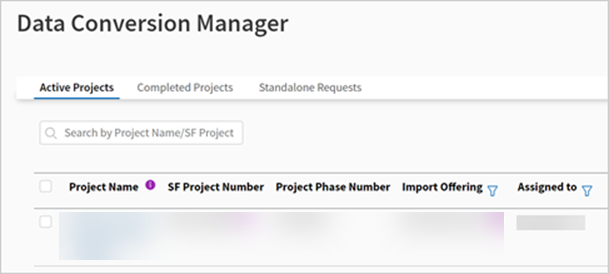
In the left menu, under PRACTICE LINKS - Miscellaneous, click Data Conversion Manager. The Data Conversion Manager page is displayed with active projects indicating the Project Name, SF Project Number, Project Phase Number, Import Offering, SF Stage, Go live Date, Total Requests, and to whom the project is Assigned to.
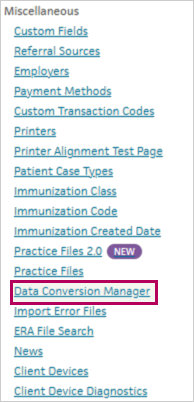
Tip: Alternatively, enter Data Conversion Manager text in the search box.
-
Project Name — Click the project name for which data needs to be imported. The appropriate project page is displayed.
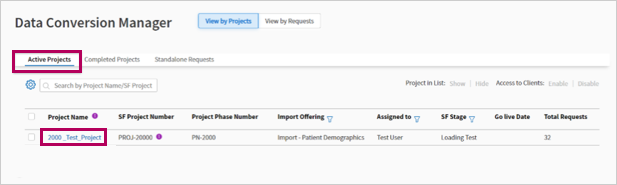
Tip: You can also search by project name or project number in the search bar available in the Data Conversion Manager page.
Important: In case of no projects or multiple projects displayed, or not sure which one to select, please contact your Import Project manager or Onboarding Project Manager for access. You may use the Standalone Requests page in some cases, however you should use the project in most cases.
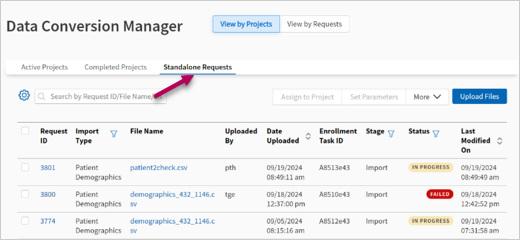
-
Upload Files — Click Upload Files.

-
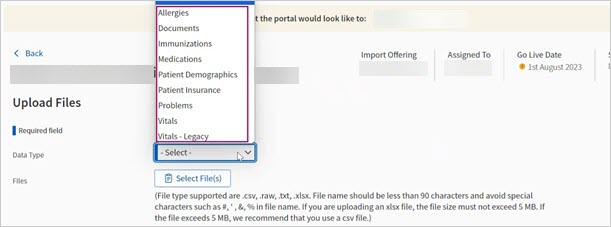
Data Type — Select the data type for which data import is required from the drop-down. For C-CDA document imports, select Document.
-
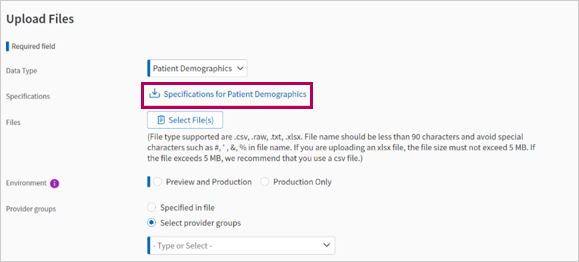
Specifications - Click Specifications for <<data type>> to download the specifications file. The specification will include all required and recommended fields/headers as well as supported values for mapping. For C-CDA document imports, use the Document specifications to prepare the documents index file,
document.csv.Note: The specifications file varies based on the selected data type. Also, it is recommended to include as many of the following fields to improve patient matching such as Legacy Patient ID, SSN, Phone Number, Address, Sex.
Note: For C-CDA document imports, the documents index file can be a .csv, .raw, .txt, or .xlsx file. File names must be fewer than 90 characters and cannot include special characters such as #, ', &, or %. If you use an .xlsx file, the file cannot exceed 5 MB. The index file should include only the headers from the Document specifications; remove the row that identifies each field as recommended or required before upload.
-
Files — Click Select File(s) to select the extracted data file for the required data type. For C-CDA document imports, click From Practice Files 2.0 to select the document ZIP file or files uploaded in Practice Files 2.0, and click From device to upload the documents index file,
document.csv.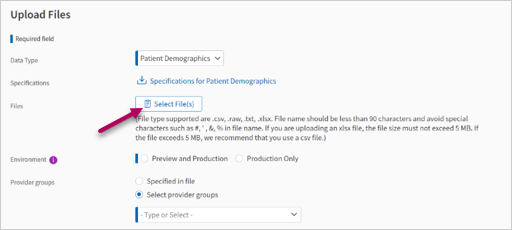
-
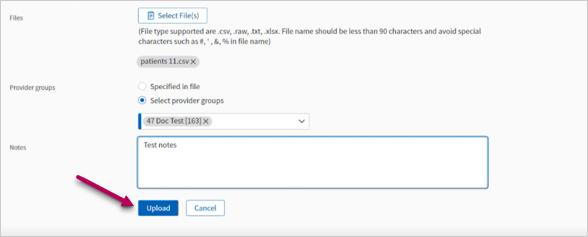
Click Upload. The required data type file is now uploaded for header validation and record validation. The 'Notes' field can be considered optional. For C-CDA document imports, validation includes the documents index file and the selected document ZIP file or files.
-
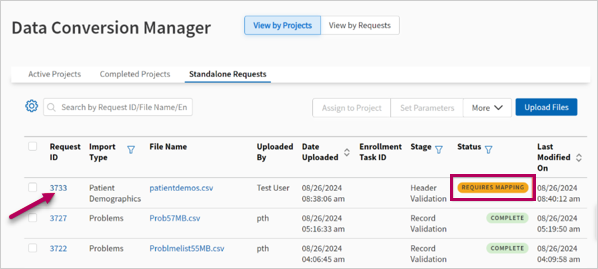
Once the file is uploaded in Data Conversion Manager page and if the file requires header mapping, the status reflects REQUIRES MAPPING for the specific import type.
Note: If all required headers exist in the file and are a 1:1 match to athenaOne specifications, this will skip the mapping step. If the file doesn't require mapping, skip to step 5.
For value mapping, if all required headers match athenaOne specifications, header mapping is skipped. Continue with record validation. This does not skip value mapping when record validation identifies unsupported values.
-
Click the corresponding Request ID against the import type.
-
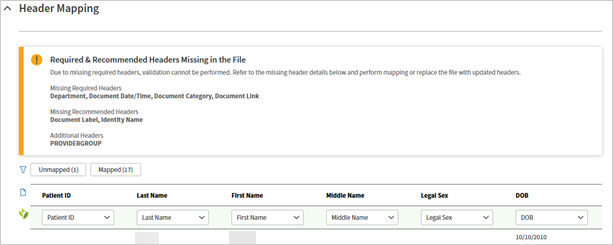
Click the Header Mapping drop-down.
-
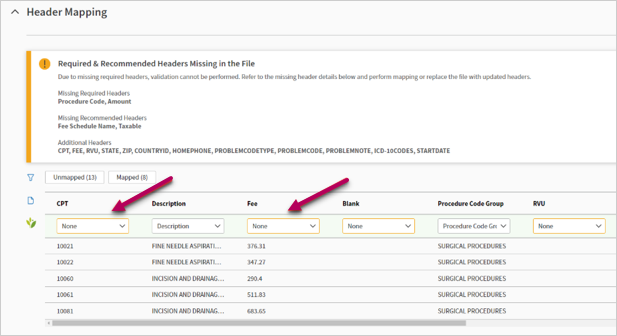
Review the headers that are highlighted orange and map the headers based on the athenahealth specifications document.
Note: All required fields must be mapped to proceed with the next steps.
-
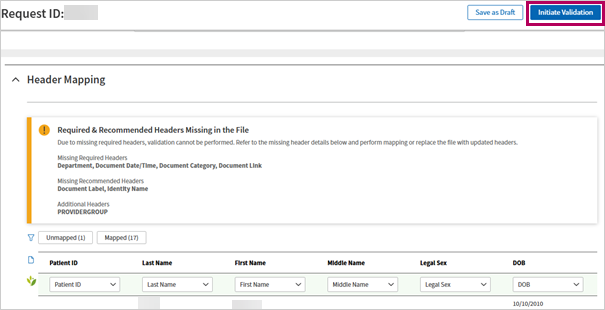
Click Initiate Validation once any required header mapping is completed.
-
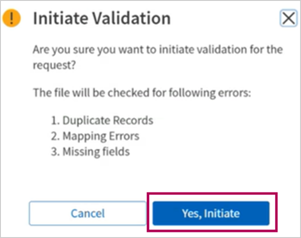
Now, confirm Yes, Initiate. The request ID with the uploaded file now moves to Record Validation stage.
-
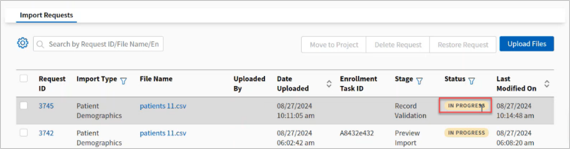
The validation stage checks for duplicate records, mapping errors, missing fields, and provides an estimate of how many records are eligible for import. For C-CDA document imports, the validation stage also checks the actual document files in the selected ZIP file or files. During validation, the status reflects as "IN PROGRESS".
-
Once the record validation stage has a “COMPLETE” status, you can review the validation summary by selecting the request ID.
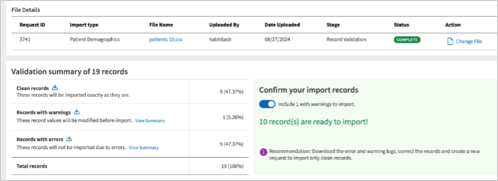
You can view the validation summary where the system indicates the clean records, records with warnings, records with errors. For C-CDA document imports, review errors for both documents index rows and document file references. You can download the logs of duplicate, error, and warning records to view them individually in the .csv format.
After reviewing the warnings, you have the option to include or exclude the records flagged in the warning summary, upon import. You can toggle between them using the toggle under “Confirm your import records".
Note: Record with Warning(s) indicates the non-mandatory or non-required fields that are missing. Record with Error(s) indicates when a mandatory or required field is missing, or any text is provided instead of numeric value.
For value mapping, warnings can identify missing optional fields or unsupported optional values. Errors can identify missing required fields, unsupported required values, or an invalid format, such as text in a numeric field. Use value mapping for unsupported values shown in the Value Mapping page. Correct other file issues as indicated by the validation results.
-
After you have reviewed the validation summary, you can either submit your file for import, or you can change the import file after making changes to the import file based on findings from the validation summary.
Review the issues in the validation summary. If Start value mapping is available, follow To resolve values using value mapping to correct unsupported values and revalidate the request. For issues that require changes to the source file, correct and upload the file again.
-
Once validated, click Submit for Import.
For the value mapping workflow, review the updated validation results and click Submit for Review.
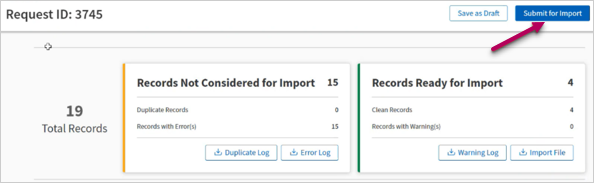
Note: You must inform your athenahealth Import Project Manager to proceed with next steps to import your data. For C-CDA document imports, inform your Import Project Manager after you upload both the documents index file and the related document ZIP file or files. This is a mandatory step and if you do not, your request will not be imported.
To resolve values using value mapping
Use this procedure after record validation when Start value mapping is available for your request in DCM. See To upload a file using the Data Conversion Manager page for the upload, header mapping, and initial validation steps.
Important: Map all error values so the affected records can be imported. Warning values are optional; unmapped warning values are not imported. See What is value mapping?.
-
Open the request ID in DCM and review the completed validation summary.
-
Click Start value mapping, click Next, and then click Proceed to value mapping.
-
On the Value Mapping page, select a header in the left panel under Headers with error values or Headers with warning values.
-
Under Unmapped values, select the source value to map. Select the corresponding value under Available athena values, and click Map. A green checkmark indicates that the source value is mapped.
Note: To correct a mapping, click Unmap, select another accepted value, and map it again.
-
Repeat for the remaining error values and any warning values you want to map. You can use these options as you work:
- Exit and Resume Later saves your progress automatically. Select Resume value mapping when you are ready to continue.
- Download summary downloads your mapping decisions in Excel format for review.
- Complete pending mapping returns you to values that still need mapping.
-
Click Review and submit and review your mappings. Use Modify mapping to change or unmap a value. To submit later, click Exit and Submit later.
-
When ready, click Submit for validation. In the confirmation dialog box, click Yes, proceed. DCM revalidates the request using your mappings.
-
When revalidation is complete, review the updated validation summary and the records selected for import. Resolve any remaining issues before proceeding.
-
Click Submit for Review. Notify your athenahealth Imports Project Manager so the import team can continue with the preview import.
Note: Notifying your Imports Project Manager is required. Submitting your mappings for validation does not complete the import. Your Imports Project Manager will provide instructions for quality assurance testing in Preview.
To initiate a preview import after value mapping
The import team performs these steps after the customer submits the completed mappings for review.
-
Open the submitted request ID for the file import in DCM.
-
Review the file details and select the details required to preview the import.
-
Click Initiate Preview Import.
-
In the Initiate import dialog box, click Yes, proceed to import the file from DCM to the New Import Wizard (NIW).