Pharmacy Dispense
athenaOne for Hospitals & Health Systems
Use this page to generate and print dispense reports of medications to pull from the central pharmacy to dispense to other departments in your organization. This report provides an efficient way to see which medications nurses need for patients across units and floors.
Note: If your hospital does not maintain stock areas outside the central pharmacy, you can contact the CSC to have the Stock Area Management functionality turned off.
On the Main Menu, click Ancillaries. Under Pharmacy, click Pharmacy Dispense.
You must be logged in to a department that uses athenaOne for Hospitals & Health Systems, your facility must use stock areas outside of the central pharmacy, and you must have the Inpatient Clinicals: Medication Preparation Workspace permission.
- Display the Pharmacy Dispense page: On the Main Menu, click Ancillaries. Under Pharmacy, click Pharmacy Dispense.
- Time frame — Enter a start time, select either the current or next day, and select a number of hours from the start time.
Note: The number of additional hours cannot be more than 72 hours after the start time. - Type — Select IVs or Non-IVs.
- Patient locations — Select one or more departments to include.
- Verification status — Select a verification status to include.
- Include PRNs — Select Yes or No.
- Include orders fulfilled by non-pharmacy stock areas — Select Yes or No.
- Click Print Report & Labels to generate and print the dispense report and all associated medication labels.
Note: athenaOne prints one label per order for non-IVs. athenaOne prints one label per dose for IVs. - Do the following, depending on your browser:
- Microsoft Edge: When you click Print Report & Labels, the report is downloaded so that you can print it. Click Save in the download dialog box. The report opens in a new tab, where you can print it using the browser print command.

- Chrome: When you click Print Report & Labels, the report opens in a new tab, where you can print it using the Chrome print command.
- Safari: Printing labels in Safari is not supported.
Note: You may need to disable your ad blocker for Microsoft Edge and Chrome.
- Microsoft Edge: When you click Print Report & Labels, the report is downloaded so that you can print it. Click Save in the download dialog box. The report opens in a new tab, where you can print it using the browser print command.
- Check Save as a preset report if you want to use this report again in the future.
- Display the Pharmacy Dispense page: On the Main Menu, click Ancillaries. Under Pharmacy, click Pharmacy Dispense.
- Time frame — Enter a start time, select either the current or next day, and select a number of hours from the start time.
Note: The number of additional hours cannot be more than 72 hours after the start time. - Type — Select IVs or Non-IVs.
- Patient locations — Select one or more departments to include.
- Verification status — Select a verification status to include.
- Include PRNs — Select Yes or No.
- Include orders fulfilled by non-pharmacy stock areas — Select Yes or No.
- Click View Report to generate and display the dispense report.
- Select one or more labels in the list to print or check Select all at the top to print all labels.
- Click Print Labels.
Note: athenaOne prints one label per order for non-IVs. athenaOne prints one label per dose for IVs.
- Display the Pharmacy Dispense page: On the Main Menu, click Ancillaries. Under Pharmacy, click Pharmacy Dispense.
- Time frame — Enter a start time, select either the current or next day, and select a number of hours from the start time.
Note: The number of additional hours cannot be more than 72 hours after the start time. - Type — Select IVs or Non-IVs.
- Patient locations — Select one or more departments to include.
- Verification status — Select a verification status to include.
- Include PRNs — Select Yes or No.
- Include orders fulfilled by non-pharmacy stock areas — Select Yes or No.
- Click Print Report to print the dispense report without medication labels.
- Do the following, according to the browser you use:
- Microsoft Edge: When you click Print Report, the report is downloaded so that you can print it. Click Save in the download dialog box. The report opens in a new tab where you can print it using the browser printing tool.
- Chrome: When you click Print Report, the report opens in a new tab where you can print it using the Chrome print command.
- Safari: Printing labels from Safari is not supported.
Note: You may need to disable your ad blocker for Microsoft Edge and Chrome.
- Display the Pharmacy Dispense page: On the Main Menu, click Ancillaries. Under Pharmacy, click Pharmacy Dispense.
- Click the edit icon
 next to the report you want to edit.
The report opens. - Edit the fields as necessary.
- Click Save Changes.
- Display the Pharmacy Dispense page: On the Main Menu, click Ancillaries. Under Pharmacy, click Pharmacy Dispense.
- Click the edit icon next to the report you want to edit.
The report opens. - Click Delete Report.
Dispense reports include the following information:
- Location
- Patient name and date of birth
- Dispensable, if available
- Number of doses
- Order information
- Verification status
Note: The status appears only if you selected the Verified and Not Verified option when configuring the report.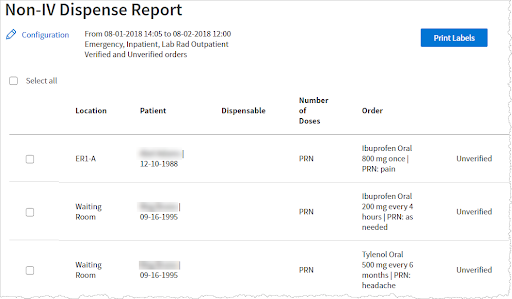
To change the information included in the report, click Configuration at the top of the page to return to the Pharmacy Dispense page.
The Pharmacy Dispense report excludes orders filled from stock areas designated on the Stock Area Management page. athenaOne identifies and excludes orders when:
- The order is verified by a packaged drug groups (PDG).
- The order's PDG maps to a stock area.
- The related stock area serves a department that matches the patient's current location.
After you run a report, you can batch print labels for the medications it includes. You can select individual labels or check Select all at the top of the list to print labels for all medications in the report. athenaOne prints labels for each administration of a medication, including the dose.