 User Guide — Order Entry for IV Medications
athenaOne for Hospitals & Health Systems
Table of Contents
To enter an IV medication order
To enter a push IV medication order
To enter an IV medication order
- Display the patient's Order Entry page: In the patient chart, click the arrow in the green workflow menu (at the upper right) and select Go to Orders. (The options available in the green workflow menu depend on your user role.)
- Click the plus icon
 next to Order Entry to display the search tool.
 - Search for and select the type of IV medication to order. In the search results, IV medications appear with IV following the medication name.

- Click the new order form to expand the details.
- Ordering provider (appears for nurses only) — Select the ordering provider, and then use the menu to the right to select how the order was given (verbal, phone, written, etc.).
- Priority — Select the priority for this order.
- STAT: urgency to administer order.
- now: intended to be given within the next 30 minutes.
- routine: based on routine for that frequency in the facility, for example, twice a day.
- schedule - start first order by specific time. Enter a start time and date.
Enter the sig
Note: To enter a free-text sig instead of using the structured fields, uncheck the Structured checkbox at the far right of the Sig field.
- Sig — Enter quantity, select units, and select duration from the available options.
Note: Dosage in mg allows you to set a schedule for it (for example, 10 mg every 8 hours) versus mg/hr., which allows for a continuous rate until discontinued. - PRN — Select this option for orders that will be administered as needed.
Note: If PRN is selected, enter additional instructions in the Notes field.
Weight-based dosing calculator
- You can click the Calculator icon
 to access the weight-based dosing tool.
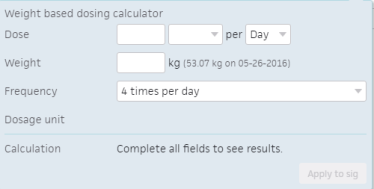
Specify IV fluid
- Infusion details — Select either Push, No Diluent, or Diluent and complete any additional fields as needed.
Note: In most settings, you are not required to specify infusion details during order entry. If you don't, this information will be provided by the pharmacist during order verification. -
First dose/Next dose — This field is calculated automatically, based on the Sig and Priority.
- If the Priority is STAT or now, this field is labeled Next dose.
- If the Priority is routine, this field is labeled First dose.
- If the Priority is scheduled, this field does not appear.
- Note — Enter a note (optional).
- Click the Sign Orders button.
Signing orders
Note: Orders can be entered by a nurse, but must be signed by a physician, according to hospital and legal guidelines.
- To sign all orders for this patient, scroll to the top of the page and check Select all.
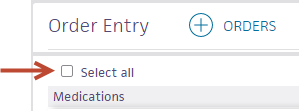
- To sign only selected orders, check the box for each order to sign.
- Click Sign Orders.
To enter a push IV Medication order
- Display the patient's Order Entry page: In the patient chart, click the arrow in the green workflow menu (at the upper right) and select Go to Orders. (The options available in the green workflow menu depend on your user role.)
- Click the plus icon next to Order Entry to display the search tool.
- Search for and select the type of push IV medication to order. In the search results, push IV medications appear with (PF) IV following the medication name.
- Click the new order form to expand the details.
- Ordering provider (appears for nurses only) — Select the ordering provider, and then use the menu to the right to select how the order was given (verbal, phone, written, etc.).
- Priority — Select the priority for this order:
- STAT: urgency to administer order.
- now: intended to be given within the next 30 minutes.
- routine: based on routine for that frequency in the facility, for example, twice a day.
- schedule - start first order by specific time. Enter a start time and date.
Enter the sig
Note: To enter a free-text sig instead of using the structured fields, uncheck the Structured checkbox at the far right of the Sig field.
- Sig — Enter quantity, select units, and select duration from the available options.
Note: Dosage in mg allows you to set a schedule for it (for example, 10 mg every 8 hours) versus mg/hr., which allows for a continuous rate until discontinued. - PRN — Select this option for orders that will be administered as needed.
Note: If PRN is checked, enter additional instructions in the Notes field.
If PRN is checked, the Priority selected for the order should be either routine or scheduled.
Weight-based dosing calculator
- You can click the Calculator icon to access the weight-based dosing tool.
- Infusion details — Select Push.
-
First dose/Next dose — This field is calculated automatically, based on the Sig and Priority.
- If the Priority is STAT or now, this field is labeled Next dose.
- If the Priority is routine, this field is labeled First dose.
- If the Priority is scheduled, this field does not appear.
- Note — Enter a note (optional).
- Click the Sign Orders button.
Signing orders
Note: Orders can be entered by a nurse, but must be signed by a physician, according to hospital and legal guidelines.
- To sign all orders for this patient, scroll to the top of the page and check Select all.
- To sign only selected orders, check the box for each order to sign.
- Click Sign Orders.
To enter an insulin IV order
- Display the patient's Order Entry page: In the patient chart, click the arrow in the green workflow menu (at the upper right) and select Go to Orders. (The options available in the green workflow menu depend on your user role.)
- Click the plus icon next to Order Entry to display the search tool.
- Search for and select the insulin medication you need.
- Click the new order form to expand the details.
- Ordering Provider — Select the ordering provider, and then use the menu to the right to select how the order was given (verbal, phone, written, etc.).
- Priority — Select the priority for this order:
- STAT: urgency to administer order.
- now: intended to be given within the next 30 minutes.
- routine: based on routine for that frequency in the facility. For example: twice a day.
- schedule - start first order by specific time.
- Administration — Select Standard (a set dose amount).
- Administration — Select Standard. Additional fields appear.
- Sig — Enter the sig.
- Infusion details — Select Dilution. Additional fields appear.
- Diluent — Select the diluent.
- Concentration — Enter the concentration.
- Infusion rate — This is calculated automatically.
- Note — Enter any relevant notes for administering the insulin.
Signing orders
Note: Orders can be entered by a nurse, but must be signed by a physician, according to hospital and legal guidelines.
- To sign all orders for this patient, scroll to the top of the page and check Select all.
- To sign only selected orders, check the box for each order to sign.
- Click Sign Orders.
To enter an insulin IV order — sliding scale
- Display the patient's Order Entry page: In the patient chart, click the arrow in the green workflow menu (at the upper right) and select Go to Orders. (The options available in the green workflow menu depend on your user role.)
- Click the plus icon next to Order Entry to display the search tool.
- Search for and select a medication administered on a sliding scale.
- Click the new order form to expand the details.
- Ordering provider (appears for nurses only) — Select the ordering provider, and then use the menu to the right to select how the order was given (verbal, phone, written, etc.).
- Priority — Select the priority for this order.
- STAT: urgency to administer order.
- now: intended to be given within the next 30 minutes.
- routine: based on routine for that frequency in the facility, for example, twice a day.
- schedule - start first order by specific time. Enter a start time and date.
- Administration — Select sliding scale.
Note: When a sliding scale insulin order is administered, athenaOne calculates the units of insulin to be administered based on the glucose value entered, using the sliding scale that was selected when the order was created.
Enter the sig
Note: To enter a free-text sig instead of using the structured fields, uncheck the Structured checkbox at the far right of the Sig field.
- Sig — Enter the quantity, units, and duration from the available options.
Note: Dosage in mg allows you to set a schedule for it (for example, 10 mg every 8 hours) versus mg/hr., which allows for a continuous rate until discontinued. - PRN — Select this option for orders that will be administered as needed.
Note: If PRN is selected, enter additional instructions in the Notes field. For PRN, the Priority selected for the order should be either routine or scheduled. -
First dose/Next dose — This field is calculated automatically, based on the Sig and Priority.
- If the Priority is STAT or now, this field is labeled Next dose.
- If the Priority is routine, this field is labeled First dose.
- If the Priority is scheduled, this field does not appear.
- Note — Enter a note (optional).
- Click the Sign Orders button.
Signing orders
Note: Orders can be entered by a nurse, but must be signed by a physician, according to hospital and legal guidelines.
- To sign all orders for this patient, scroll to the top of the page and check Select all.
- To sign only selected orders, check the box for each order to sign.
- Click Sign Orders.
To enter an order for a patient-controlled analgesic (PCA)
- Display the patient's Order Entry page: In the patient chart, click the arrow in the green workflow menu (at the upper right) and select Go to Orders. (The options available in the green workflow menu depend on your user role.)
- Click the plus icon next to Order Entry to display the search tool.
- Search for and select the type of PCA IV medication to order. In the search results, PCA IV medications appear with IV PCA following the medication name.
- Click the new order form to expand the details.
- Ordering provider (appears for nurses only) — Select the ordering provider, and then use the menu to the right to select how the order was given (verbal, phone, written, etc.).
- Priority — Select the priority for this order:
- STAT: urgency to administer order.
- now: intended to be given within the next 30 minutes.
- routine: based on routine for that frequency in the facility. For example: twice a day.
- schedule - start first order by specific time. Enter a start time and date.
- Dose unit — Select a unit of measure for the medication.
- Loading dose — Enter the dose to administer before the PCA is started.
- PCA dose — Enter the dose the patient can self-administer.
- Lockout interval — Enter the amount of time between PCA doses, in minutes.
- Basal dose — Enter a basal dose of the medication to be administered hourly.
- Clinician bolus — Enter a bolus amount and the maximum number of boluses per hour.
- Hourly limit — Enter the total amount of the medication that the patient can receive per hour.
- Total duration — Specify the duration of the PCA.
- Note — Enter a note (optional).
Signing orders
Note: Orders can be entered by a nurse, but must be signed by a physician, according to hospital and legal guidelines.
- To sign all orders for this patient, scroll to the top of the page and check Select all.
- To sign only selected orders, check the box for each order to sign.
- Click Sign Orders.
Note: By default, active orders are discontinued automatically after a patient is discharged. Upon request, you can prevent lab and radiology orders from automatically closing after a patient is discharged. This allows results that are received after the patient is discharged to be tied to the order placed during the stay. The implementation settings to prevent lab and radiology orders from closing are:Do Not Send Lab Order Cancellation Messages at Discharge set to ONDo Not Send Radiology Order Cancellation Messages at Discharge set to ONYou must have superuser permissions or the Inpatient Admin - Internal role to enable these features. Note: To access the Hospital Order Sets page, you must have the Inpatient Admin role.