Order Entry
athenaOne for Hospitals & Health Systems
You can view, enter, and sign orders, and view recent changes to orders. Once entered, orders with "ask at order entry" questions include a link to view More order details.
Physicians and nurses can enter orders for hospital patients in Pre-admission, Admission in progress, Admitted, and Discharge in progress statuses.
Orders can be entered by a nurse, but must be signed by a physician, according to hospital and legal guidelines.
Note: By default, orders are closed automatically after a patient is discharged. Upon request, you can prevent lab orders from automatically closing after a patient is discharged.
Related user guides:
In the patient chart, click the arrow in the green workflow menu (at the upper right) and select Go to Orders. (The options available in the green workflow menu depend on your user role.)
You must be logged in to a department that uses athenaOne for Hospitals & Health Systems. and you must have one of the following user permissions to access this page:
- Inpatient Clinicals: Enter Orders
- Inpatient Clinicals: Edit Orders
- Display the patient's Order Entry page: In the patient chart, click the arrow in the green workflow menu (at the upper right) and select Go to Orders. (The options available in the green workflow menu depend on your user role.)
- Search — Click the plus icon
 next to Order Entry to display the search tool.
 - Search for and select the type of nursing order you need.
- Click the new order form to expand the details.
- Ordering Provider — Select the ordering provider, and then use the menu to the right to select how the order was given (verbal, phone, written, etc.).
- Priority — Select the priority for this order.
- STAT — Urgency to administer order.
- now — Intended to be given within the next 30 minutes.
- routine — Based on routine for that frequency in the facility, for example, twice a day.
- scheduled — Start first order by specific time.
- Frequency — Select from the available frequency options (for example, every other day).
- PRN — Select this option for orders that will be administered as needed.
Note: If PRN is checked, enter additional instructions in the Notes field. - Note — Enter any relevant notes for the order.
Signing orders
Note: Orders can be entered by a nurse, but must be signed by a physician, according to hospital and legal guidelines.
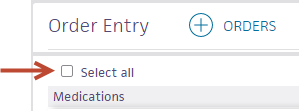
- To sign all orders for this patient, scroll to the top of the page and check Select all.
- To sign only selected orders, check the box for each order to sign.
- Click Sign Orders.
- Display the patient's Order Entry page: In the patient chart, click the arrow in the green workflow menu (at the upper right) and select Go to Orders. (The options available in the green workflow menu depend on your user role.)
- Click the plus icon
 next to Order Entry to display the search tool.
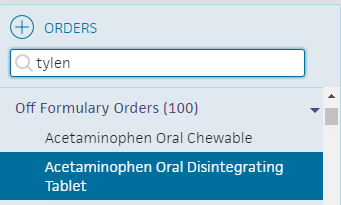
 - Search for and select the type of medication to order. In the search results, relevant pharmacy formulary medications, as well as off-formulary meds appear.
- Click the new order form to expand the details.
- Ordering provider — Select the ordering provider, and then use the menu to the right to select how the order was given (verbal, phone, written, etc.).
- Priority — select the priority for this order:
- STAT: urgency to administer order.
- now: intended to be given within the next 30 minutes.
- routine: based on routine for that frequency in the facility. For example: twice a day.
- schedule - start first order by specific time.
Enter the sig
Note: To enter a free-text sig instead of using the structured fields, uncheck the Structured checkbox at the far right of the Sig field.
- Sig — Enter quantity, select units, and select duration from the available options.
Note: Dosage in mg allows you to set a schedule for it (for example, 10 mg every 8 hours) versus mg/hr., which allows for a continuous rate until discontinued.
Practices in Ohio and Nevada: If you practice in the state of Ohio or Nevada, new prescription orders for controlled substances and gabapentin include the Days supply field, which indicates the number of days for which a prescription should be dispensed. - PRN — Select this option for orders that will be administered as needed
Note: If PRN is checked, enter additional instructions in the Notes field.
If PRN is checked, the Priority selected for the order should be either routine or scheduled. -
First dose/Next dose — This field is calculated automatically, based on the Sig and Priority.
- If the Priority is STAT or now, this field is labeled Next dose.
- If the Priority is routine, this field is labeled First dose.
- If the Priority is scheduled, this field does not appear.
- Patient's own medication will be used — Check whether the patient's medication is to be used.
Signing orders
Note: Orders can be entered by a nurse, but must be signed by a physician, according to hospital and legal guidelines.
- To sign all orders for this patient, scroll to the top of the page and check Select all.

- To sign only selected orders, check the box for each order to sign.
- Click Sign Orders.
The new medication order appears in the MAR.
- Display the patient's Order Entry page: In the patient chart, click the arrow in the green workflow menu (at the upper right) and select Go to Orders. (The options available in the green workflow menu depend on your user role.)
- Click the plus icon
 next to Order Entry to display the search tool.
 - Search for and select the type of IV fluids to order.
- Click the new order form to expand the details.
- Ordering provider (appears for nurses only) — Select the ordering provider, and then use the menu to the right to select how the order was given (verbal, phone, written, etc.).
- Priority — Select the priority for this order:
- STAT: urgency to administer order.
- now: intended to be given within the next 30 minutes.
- routine: based on routine for that frequency in the facility, for example, twice a day.
- schedule - start first order by specific time. Enter a start time and date.
- Sig — Complete the sig.
Note: If you're ordering a bolus, select a unit and not a rate (for example, mL instead of mL/hr) to ensure a stop time can be entered in the MAR. - Click the Sign Orders button.
- Display the patient's Order Entry page: In the patient chart, click the arrow in the green workflow menu (at the upper right) and select Go to Orders. (The options available in the green workflow menu depend on your user role.)
- Click the plus icon
 next to Order Entry to display the search tool.
 - Search for and select the type of push IV medication to order. In the search results, push IV medications appear with (PF) IV following the medication name.
- Click the new order form to expand the details.
- Ordering provider (appears for nurses only) — Select the ordering provider, and then use the menu to the right to select how the order was given (verbal, phone, written, etc.).
- Priority — Select the priority for this order:
- STAT: urgency to administer order.
- now: intended to be given within the next 30 minutes.
- routine: based on routine for that frequency in the facility, for example, twice a day.
- schedule - start first order by specific time. Enter a start time and date.
Enter the sig
Note: To enter a free-text sig instead of using the structured fields, uncheck the Structured checkbox at the far right of the Sig field.
- Sig — Enter quantity, select units, and select duration from the available options.
Note: Dosage in mg allows you to set a schedule for it (for example, 10 mg every 8 hours) versus mg/hr., which allows for a continuous rate until discontinued. - PRN — Select this option for orders that will be administered as needed.
Note: If PRN is checked, enter additional instructions in the Notes field.
If PRN is checked, the Priority selected for the order should be either routine or scheduled.
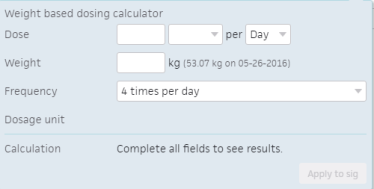
Weight-based dosing calculator
- You can click the Calculator icon
 to access the weight-based dosing tool.
- Infusion details — Select Push.
-
First dose/Next dose — This field is calculated automatically, based on the Sig and Priority.
- If the Priority is STAT or now, this field is labeled Next dose.
- If the Priority is routine, this field is labeled First dose.
- If the Priority is scheduled, this field does not appear.
- Note — Enter a note (optional).
- Click the Sign Orders button.
Signing orders
Note: Orders can be entered by a nurse, but must be signed by a physician, according to hospital and legal guidelines.
- To sign all orders for this patient, scroll to the top of the page and check Select all.

- To sign only selected orders, check the box for each order to sign.
- Click Sign Orders.
- Display the patient's Order Entry page: In the patient chart, click the arrow in the green workflow menu (at the upper right) and select Go to Orders. (The options available in the green workflow menu depend on your user role.)
- Click the plus icon
 next to Order Entry to display the search tool.
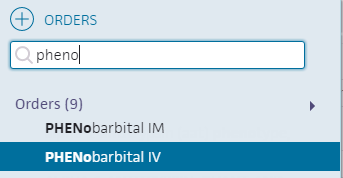
 - Search for and select the type of IV medication to order. In the search results, IV medications appear with IV following the medication name.
- Click the new order form to expand the details.
- Ordering provider (appears for nurses only) — Select the ordering provider, and then use the menu to the right to select how the order was given (verbal, phone, written, etc.).
- Priority — Select the priority for this order.
- STAT: urgency to administer order.
- now: intended to be given within the next 30 minutes.
- routine: based on routine for that frequency in the facility, for example, twice a day.
- schedule - start first order by specific time. Enter a start time and date.
Enter the sig
Note: To enter a free-text sig instead of using the structured fields, uncheck the Structured checkbox at the far right of the Sig field.
- Sig — Enter quantity, select units, and select duration from the available options.
Note: Dosage in mg allows you to set a schedule for it (for example, 10 mg every 8 hours) versus mg/hr., which allows for a continuous rate until discontinued. - PRN — Select this option for orders that will be administered as needed.
Note: If PRN is checked, enter additional instructions in the Notes field.
If PRN is checked, the Priority selected for the order must be either routine or scheduled.
Weight-based dosing calculator
- You can click the Calculator icon
 to access the weight-based dosing tool.
- Infusion details— Select No Dilution. Additional fields appear.
- Infusion rate — For intermittent IVs, you must set an infusion rate and duration.
If you enter an infusion rate in the first field, the duration is automatically calculated using the value you enter.
If you enter a duration in the second and third fields, the infusion rate is calculated automatically.
For continuous IVs (IVs ordered as a rate), these fields are calculated automatically and cannot be edited. -
First dose/Next dose — This field is calculated automatically, based on the Sig and Priority.
- If the Priority is STAT or now, this field is labeled Next dose.
- If the Priority is routine, this field is labeled First dose.
- If the Priority is scheduled, this field does not appear.
- Note — Enter a note (optional).
- Click the Sign Orders button.
Signing orders
Note: Orders can be entered by a nurse, but must be signed by a physician, according to hospital and legal guidelines.
- To sign all orders for this patient, scroll to the top of the page and check Select all.

- To sign only selected orders, check the box for each order to sign.
- Click Sign Orders.
- Display the patient's Order Entry page: In the patient chart, click the arrow in the green workflow menu (at the upper right) and select Go to Orders. (The options available in the green workflow menu depend on your user role.)
- Click the plus icon
 next to Order Entry to display the search tool.
 - Search for and select the type of IV medication to order. In the search results, IV medications appear with IV following the medication name.

- Click the new order form to expand the details.
- Ordering provider (appears for nurses only) — Select the ordering provider, and then use the menu to the right to select how the order was given (verbal, phone, written, etc.).
- Priority — Select the priority for this order.
- STAT: urgency to administer order.
- now: intended to be given within the next 30 minutes.
- routine: based on routine for that frequency in the facility, for example, twice a day.
- schedule - start first order by specific time. Enter a start time and date.
Enter the sig
Note: To enter a free-text sig instead of using the structured fields, uncheck the Structured checkbox at the far right of the Sig field.
- Sig — Enter quantity, select units, and select duration from the available options.
Note: Dosage in mg allows you to set a schedule for it (for example, 10 mg every 8 hours) versus mg/hr., which allows for a continuous rate until discontinued. - PRN — Select this option for orders that will be administered as needed.
Note: If PRN is checked, enter additional instructions in the Notes field.
If PRN is checked, the Priority selected for the order should be either routine or scheduled.
Weight-based dosing calculator
- You can click the Calculator icon
 to access the weight-based dosing tool.
Specify IV fluid
- Infusion details —— Select Dilution. Additional field appear.
Note:You are not required to specify infusion details during order entry. If you don't, this information will be provided by the pharmacist during order verification. - Diluent — Select the diluent.
- Concentration — This value is calculated automatically based on the total drug and total volume. You cannot edit this field.
- Infusion rate — For intermittent IVs, you must set an infusion rate and duration.
If you enter an infusion rate in the first field, the duration is automatically calculated using the value you enter.
If you enter a duration in the second and third fields, the infusion rate is calculated automatically.
For continuous IVs (IVs ordered as a rate), these fields are calculated automatically and cannot be edited. -
First dose/Next dose — This field is calculated automatically, based on the Sig and Priority.
- If the Priority is STAT or now, this field is labeled Next dose.
- If the Priority is routine, this field is labeled First dose.
- If the Priority is scheduled, this field does not appear.
- Note — Enter a note (optional).
- Click the Sign Orders button.
Signing orders
Note: Orders can be entered by a nurse, but must be signed by a physician, according to hospital and legal guidelines.
- To sign all orders for this patient, scroll to the top of the page and check Select all.

- To sign only selected orders, check the box for each order to sign.
- Click Sign Orders.
- In the patient chart, click the arrow in the green workflow menu (at the upper right) and select Go to Orders. (The options available in the green workflow menu depend on your user role.).
- Click the plus icon
 next to Order Entry to display the search tool.
 - Search for and select the admixture medication to order.
- Click the new order form to expand the details.
- Ordering provider (appears for nurses only) — Select the ordering provider, and then use the menu to the right to select how the order was given (verbal, phone, written, etc.).
- Priority — Select the priority for this order:
- STAT: urgency to administer order.
- now: intended to be given within the next 30 minutes.
- routine: based on routine for that frequency in the facility, for example, twice a day.
- schedule - start first order by specific time. Enter a start time and date.
Enter the sig
Note: To enter a free-text sig instead of using the structured fields, uncheck the Structured checkbox at the far right of the Sig field.
- Sig — Enter quantity, select units, and select duration from the available options.
Note: Dosage in mg allows you to set a schedule for it (for example, 10 mg every 8 hours) versus mg/hr., which allows for a continuous rate until discontinued. - Infusion details — Select Dilution.
Note: You are not required to provide infusion details; you can sign the order without them. - Select a diluent and complete the Concentration fields.
The Infusion rate is calculated automatically.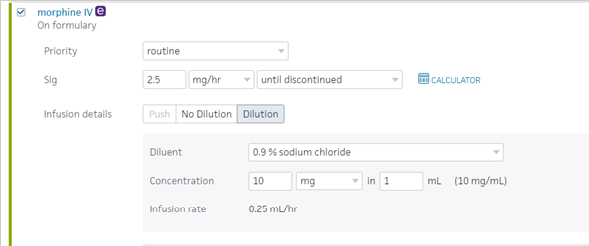
- Click Sign Orders.
- Display the patient's Order Entry page: In the patient chart, click the arrow in the green workflow menu (at the upper right) and select Go to Orders. (The options available in the green workflow menu depend on your user role.)
- Click the plus icon
 next to Order Entry to display the search tool.
 - Search for and select the insulin medication you need.
- Click the new order form to expand the details.
- Ordering Provider — Select the ordering provider, and then use the menu to the right to select how the order was given (verbal, phone, written, etc.).
- Priority — Select the priority for this order:
- STAT: urgency to administer order.
- now: intended to be given within the next 30 minutes.
- routine: based on routine for that frequency in the facility. For example: twice a day.
- schedule - start first order by specific time.
- Administration — Select Standard (a set dose amount).
- Administration — Select Standard. Additional fields appear.
- Sig — Enter the sig.
- Infusion details — Select Dilution. Additional fields appear.
- Diluent — Select the diluent.
- Concentration — Enter the concentration.
- Infusion rate — This is calculated automatically.
- Note — Enter any relevant notes for administering the insulin.
Signing orders
Note: Orders can be entered by a nurse, but must be signed by a physician, according to hospital and legal guidelines.
- To sign all orders for this patient, scroll to the top of the page and check Select all.

- To sign only selected orders, check the box for each order to sign.
- Click Sign Orders.
- Display the patient's Order Entry page: In the patient chart, click the arrow in the green workflow menu (at the upper right) and select Go to Orders. (The options available in the green workflow menu depend on your user role.)
- Click the plus icon
 next to Order Entry to display the search tool.
 - Search for and select the type of lab order you need (e.g. CBC with diff).
- Click the new order form to expand the details.
- Ordering Provider — Select the ordering provider, and then use the menu to the right to select how the order was given (verbal, phone, written, etc.)
- Referring provider — Click the drop-down menu and select the referring provider.
- Priority — Select the priority for this order:
- STAT: urgency to administer order.
- now: intended to be given within the next 30 minutes.
- routine: based on routine for that frequency in the facility. For example: twice a day.
- schedule - start first order by specific time.
- Frequency — Select from the available frequency options (for example, every other day).
- Specimen Collector — Select who should collect the sample.
Note: If nurse is selected, an item will appear on the Nursing Task list - Specimen Source — Select the site where the source was collected. Recording the specimen's source can aid in assessing the order results.
- Duration — Select the duration for the order.
- Note — Enter any relevant notes for the order.
Signing orders
Note: Orders can be entered by a nurse, but must be signed by a physician, according to hospital and legal guidelines.
- To sign all orders for this patient, scroll to the top of the page and check Select all.

- To sign only selected orders, check the box for each order to sign.
- Click Sign Orders.
- Display the patient's Order Entry page: In the patient chart, click the arrow in the green workflow menu (at the upper right) and select Go to Orders. (The options available in the green workflow menu depend on your user role.)
- Click the plus icon
 next to Order Entry to display the search tool.
 - Search for and select the type of therapy order you need. (Therapy order types include Occupational Therapy, Physical Therapy, Respiratory Therapy, and Speech Therapy.)
- Click the new order form to expand the details.
Note: The available detail fields may vary with the order type. - Ordering provider — Select the ordering provider, and then use the menu to the right to select how the order was given (verbal, phone, written, etc.).
- Priority — Select the priority for this order:
- STAT: urgency to administer order.
- now: intended to be given within the next 30 minutes.
- routine: based on routine for that frequency in the facility, for example, twice a day.
- schedule - start first order by specific time.
- Intensity — Select the level of intensity.
- Frequency — Select from the available frequency options (for example, every other day).
- PRN — Select this option for orders that will be administered as needed.
Note: If PRN is selected, enter additional instructions in the Notes field. - Duration — Select the duration for the therapy.
- Note — Enter any relevant notes for the order. For example, include additional information for the respiratory therapist such as the diagnosis or reason for the order.
Signing orders
Note: Orders can be entered by a nurse, but must be signed by a physician, according to hospital and legal guidelines.
- To sign all orders for this patient, scroll to the top of the page and check Select all.

- To sign only selected orders, check the box for each order to sign.
- Click Sign Orders.
- Display the patient's Order Entry page: In the patient chart, click the arrow in the green workflow menu (at the upper right) and select Go to Orders. (The options available in the green workflow menu depend on your user role.)
- Click the plus icon
 next to Order Entry to display the search tool.
 - Search for and select the type of imaging order you need.
- Click the new order form to expand the details.
- Ordering provider — Select the ordering provider, and then use the menu to the right to select how the order was given (verbal, phone, written, etc.)
- Referring provider — Click the drop-down menu and select the referring provider.
- Priority — Select the priority for this order:
- STAT: urgency to administer order.
- now: intended to be given within the next 30 minutes.
- routine: based on routine for that frequency in the facility. For example: twice a day.
- schedule - start first order by specific time.
- Reason for exam — Enter the reason for the imaging exam.
- Frequency — Select from the available frequency options (for example, every other day).
- First task — Select the time for the first task.
- Note — Enter any relevant notes for the order. For example, you can provide additional information for the radiologist such as the diagnosis or reason for the order.
- Click the Sign Orders button.
Signing orders
Note: Orders can be entered by a nurse, but must be signed by a physician, according to hospital and legal guidelines.
- To sign all orders for this patient, scroll to the top of the page and check Select all.

- To sign only selected orders, check the box for each order to sign.
- Click Sign Orders.
You can enter a single diet order which includes all aspects of the patients diet. For instance, you can add a diet order for "Regular Diet" and then select specific attributes, such as Kosher or Gluten Free.
Note: To enter dietary orders, you must have a physicians, nursing, or dietician role.
- Display the patient's Order Entry page: In the patient chart, click the arrow in the green workflow menu (at the upper right) and select Go to Orders. (The options available in the green workflow menu depend on your user role.).
- Click the plus icon
 next to Order Entry to display the search tool.
 - Enter "Diet" to search for and select the dietary order you need (for example, Regular Diet, Diabetic Diet, Heart Healthy Diet, Renal Diet, NPO Diet.
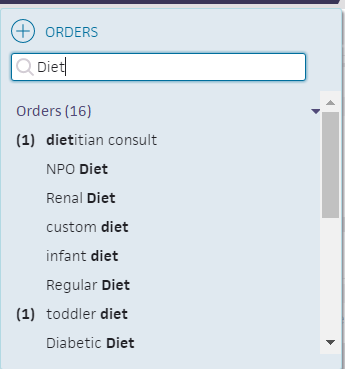
Note: If none of the diet orders and their attributes are adequate, you can select custom diet and build the diet you need. - Click the new order form to expand the details, and then click view more in the lower right corner of the order form.
Additional attribute fields may appear, depending on the order type. - Complete the available fields as needed.
Note: If a food attribute is not available, you can enter it in the Notes field of the order. - Click the Enter Orders button.
Note: If you add more than one code status order, athenaOne automatically updates the patient's code status with the most recent order, and sets previous code status orders to "Completed." Code status changes are listed in the order view's in the Recent Changes section, under the Code Status heading.
If you discontinue the active code status order, by clicking the ![]() icon on the order, athenaOne updates the patient's code status to "Code Status: Unconfirmed" until you add a new code status order.
icon on the order, athenaOne updates the patient's code status to "Code Status: Unconfirmed" until you add a new code status order.
- Display the Order Entry page: In the patient chart, click the arrow in the green workflow menu (at the upper right) and select Go to Orders. (The options available in the green workflow menu depend on your user role.)
- Click the plus icon
 next to ORDERS to add a new order.
 - Enter "code status" in the search bar and select it from the list.
- Click the order to expand the details.
- Ordering provider — Select the ordering provider if different from who automatically appears.
Note: This field appears if you are a nurse. - Order type — Select an order type, for example, verbal, phone, written, or fax.
Note: This field appears if you are a nurse. - Code Status — Select a code status from the menu.
- Note — Enter notes about this order.
- Click Enter Order (as a nurse) or Sign Order (as a physician).
Note: If you select Other for the code status and enter text in the text field, "Code Status: See Order" appears in the patient banner to notify you to view the extended status in order view.