 Sign-off Stage for athenaClinicals
Sign-off is the fourth stage of the 5-stage patient encounter.
The billing workflow begins in the Sign-off stage of the encounter. In Sign-off, providers can access the Billing tab and enter charges for the visit.
The Billing tab is available both before and after the encounter is closed. athenahealth recommends that providers complete the billing information during the Sign-off stage of the encounter, after the clinical documentation is complete.
- After you complete the A/P step of the Exam stage of the encounter, click the Next button to proceed to the Sign-off stage.
The Sign-off Summary appears in the center pane, and the Exam stage navigation bar changes to highlight Sign-off.
The Encounter Information and Summary sections appear at the top of the page. - To view letters and Patient Care Summaries, hover the cursor over an item in the Letters section (below the Summary) to highlight it, and click VIEW (at the far right).
Complete the billing information
- Click the Billing tab on the right side of the screen to display the Billing tab.
- Enter charges.
- If service type add-ons are configured, you can select add-ons and enter or review any relevant information in the Clinical Add-Ons section.
At charge entry, when you click Save & Enter Charges to create a claim, the selected service type add-ons also appear in the claim. - Click Save & Mark Reviewed to save your changes.
The Billing Tab Review Complete box at the bottom of the page is automatically checked off. - Click Sign & Close (or Close). Your home page appears.
Note: To reassign the encounter to a supervising provider for sign-off, click the down arrow next to Sign & Close and select Send for Review.
- If your billing staff needs to work on additional billing, they can access the Checkout Claim: Billing tab of the encounter in their Non-Clinical Inbox in the Missing Slips row.
To move the encounter to REVIEW status and assign it to a provider
- In the Summary section, highlight and click the summary.
- Select the Move to review option.
- Click the assigned-to provider name to display the search tool, and search for the provider you need.
- Click outside the box to save the selected provider.
Complete the Sign-off step
-
Performed by — athenaOne automatically sets the Performed by field to the encounter's rendering provider at check-in. You can change the selection to the provider who actually performed the encounter. The Performed by provider must be set to a person provider before you can close the encounter.
- When you complete the exam, click the Close button to save and close the encounter. The encounter is now ready for checkout. If the Close button is gray, click it to open the Performed by selector to select a person provider.
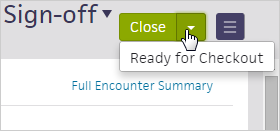
Alternatively, you can select Ready for Checkout from the Close button menu to notify front-desk staff that the patient is ready for checkout, but keep the encounter open for additional documentation.
Scribes can record their signature in the Sign-off stage before a provider closes the encounter. athenaOne updates the time stamp, which appears in the Full Encounter Summary, from "Encounter scribed for PROVIDER by SCRIBE" to "Encounter signed by SCRIBE as scribe on DATE at TIME."
- In the Sign-off stage, click on the appointment type name in the Summary section.
The section expands.
- Select the Documented by scribe option.
The option changes to Documented by scribe, scribed by .
. - Click the plus icon
 and select your name from the list.
 - Click outside the Summary section to save your changes.
- Click Sign as Scribe.
athenaOne records your username and the date and time. - Exit the encounter.
- The provider later selects the encounter from the Encounters row of the Clinical Inbox.
The Sign-off stage appears. - The provider clicks Close to close the encounter.
athenaOne records the provider's username and time stamp. - After the encounter is closed, you can click Full Encounter Summary and scroll down to the Encounter Sign-Off section to view your signature and time stamp.

- In the Sign-off stage of the encounter, click the down arrow next to Sign & Close and select Send for Review.

- Enter the supervising provider's name in the search field, and select the provider's name from the matching list.
- Click Send for Review.
You must have the Clinicals: Encounter Sign-off user permission to amend a closed encounter.
Whenever possible, close encounters only after you complete documentation. If you need to edit or add information to an encounter after it is closed, we recommend that you amend the encounter as soon as possible so that you can edit it using the encounter workflow.
You can use the encounter workflow to amend an encounter if no sections were modified after the encounter was first closed.
Display the closed encounter
- Click the closed appointment in the schedule, or you can:
- Click the patient's name in the schedule to display the patient briefing.
- Click the Visits chart tab to open the Visits and Cases section of the patient chart.
- Click the view more icon
 next to the encounter that you want to amend.
 - Under the Summary heading, click EDIT encounter.
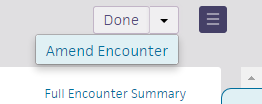
- In the upper right corner, click the down arrow next to Done and select Amend Encounter.

The Document step of the Sign-off stage appears, with the encounter ready for amendment.
Make changes to the encounter
- Document your amendment.
- Click Close Amendment.
The home page appears. A banner appears notifying you that you have completed sign-off for the encounter.
Important: The updates that you make to chart sections while amending the encounter are not reflected in the patient chart after you close the amendment. After you amend an encounter, you must open the patient chart and make the same edits.
Display the closed encounter
- Click the closed appointment on the schedule, or click the patient's name in the schedule to display the patient briefing.
- Click the Visits chart tab to open the Visits and Cases section of the patient chart.
- Click the view more icon
 next to the encounter that you want to amend.
 - Under the Summary heading, click go to encounter.
The closed encounter view appears.
Open the full encounter summary
- In the upper right corner, click the arrow next to Done and select Amend Encounter.

The full encounter summary re-opens for amendment. - Click the section to edit.
A new window appears with either the structured or free-text version of the section. You can use the format buttons at the top of the free-text section to bold, italicize, and add bulleted or numbered lists. - Make the necessary edits and click outside the section to save.
Note: Some sections may require a manual save. To ensure that your edits are saved, click the Save button in the top right corner.
The summary view is updated to reflect your changes. - After you make your edits, review the encounter summary to ensure that the amendment is accurate.
- Click the Close Amendment button.
The home page appears. A banner appears notifying you that you have completed the Sign-off stage for the encounter.
Important: The updates that you make to chart sections while amending the encounter are not reflected in the patient chart after you close the amendment. After you amend an encounter, you must open the patient chart and make the same edits.
After you close an amendment, your updates are reflected in the full encounter summary and in the Visits section of the patient chart. The Use for icon no longer appears next to the sections that were amended in free-text mode in the Visits section. If you import the entire previous encounter to today, no amended sections appear (to avoid the propagation of incorrect information).
Note: If you added orders to the Assessment & Plan as part of your amendment, and those orders are missing required information, the button appears with an orange vertical bar. If this occurs, go back and address any items that require attention and then click the Sign & Close Amendment button.
To delete encounters, you must have the Clinicals: Encounter Sign-off permission and either the Clinicals: Delete Encounter permission or the Clinicals Deletion role.
- In the Sign-off stage of the encounter, scroll to the bottom of the page and click Delete Encounter.
The Delete Encounter window opens. - Reason — Select the reason for deleting the encounter from the menu.
- Enter a note, if applicable.
- Click Delete.
With the Allow Multiple Signatures on Encounters feature, multiple providers can sign a single encounter. This feature is useful when more than one provider participates in a patient encounter and needs to sign the encounter, or if a nurse practitioner or resident documents encounters and is required to sign, in addition to the supervising provider.
- All providers complete all relevant documentation.
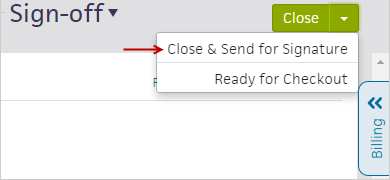
- The first provider selects Close & Send for Signature from the Close button menu, which closes the encounter and applies the provider's signature.

The Send Encounter for Signature window appears for you to search for and select a second provider. - Click the Close & Send button to send the encounter to the second provider to sign.
The second provider receives the encounter in the Encounters section of the Clinical Inbox as a signature task, indicated by the Requires Signature status. - The second provider selects the encounter from the Clinical Inbox.
The closed encounter summary appears. - To sign the encounter, the second provider selects Done from the Sign Encounter button menu. This action signs the encounter and removes the task from the provider's Clinical Inbox.
Note: If you receive a signature task and you do not believe that you have enough information to sign the encounter, or if you received the task in error, you can select Decline Signature Request. Please note that the encounter is already closed, so selecting this option simply closes the open task in your Clinical Inbox. - Repeat these steps for any additional providers that need to apply their signature.
Note: You can apply additional signatures to closed encounters only. This ensures that the encounter details are complete and that each provider is applying their signature to the final encounter details. If any amendments are required, we recommend that the amending provider wait until all open signature tasks have been closed. They can then amend the encounter and sign the amendment.
Note: If the first provider clicks the Close button instead of selecting Close & Send for Signature from the button menu, athenaOne closes the encounter and applies the signature. To send the encounter to additional providers, the first provider must select the encounter again in the Clinical Inbox to send it to additional providers for sign-off.
With the Encounter Diagnosis Required feature, your practice can require that providers add an ICD-10 diagnosis to the Assessment & Plan before they can close a patient encounter or send an encounter for review.
When this feature is enabled, the options to close or reassign the encounter are unavailable until the provider adds a valid diagnosis. If the provider clicks Close or Send for Review without documenting a diagnosis, the provider is redirected to the Assessment & Plan section and the Diagnoses & Orders cart opens automatically. After adding a diagnosis, the provider can proceed with closing or reassigning the encounter.
This is an opt-in feature. To enable this feature for your organization at the department level, contact your CSM or the CSC: On the Main Menu, click Support > Success Community > Contact Client Support Center.
athenaOne alerts you when another user has made conflicting changes to the encounter that you have been working in. When the Multi-User Conflicts page appears, you determine the best version of the encounter to keep, and the encounter is updated accordingly.
User A is documenting in the Social History, and User B is documenting in the Assessment/Plan.
- User A saves the work that she has done on the Social History, and the encounter is saved as usual.
- User B tries to save the work he has entered in the Assessment/Plan.
- The Multi-User Conflicts page appears and displays the following warning message:
Another user edited this page while you made changes. Please choose which version of changes you wish to keep. If you want to incorporate their changes with yours, choose 'Cancel' and update your change to include theirs. - The Multi-User Conflicts page displays the Assessment/Plan from the encounter that User A saved, as well as the Assessment/Plan that User B was in the process of saving. Items that were added or modified are highlighted.
Note: User A's changes to the Social History are not displayed because User A saved the encounter first and because User B did not edit the Social History. - User B determines that his version of the Assessment/Plan is valid and clicks OK.
- The encounter is saved, incorporating the changes that User B made to the Assessment/Plan, as well as the changes that User A made to the Social History, thus updating the full encounter to reflect all the work that was done within the visit.