 User Guide — Clinical Inbox
The Clinical Inbox provides access to clinical tasks and documents that await action by physicians, administrative staff members, or athenahealth staff.
Note: In April 2026, athenahealth updated and enhanced this user guide to improve clarity and usability.
Your athenaOne home page appears when you first log in to athenaOne. To return to your home page from anywhere in athenaOne, click the athenaOne logo at the upper left of your screen. You can click your username in the upper right corner of the screen to select your default home page. Your options depend on your user role and your practice configuration: clinician or non-clinician.
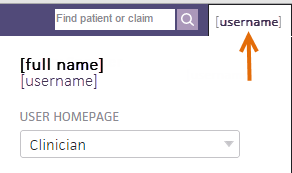
If you select Clinician from the USER HOMEPAGE menu, the Clinical Inbox appears in the left pane of your screen when you log in to athenaOne.
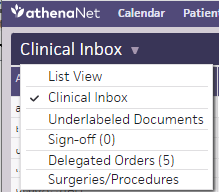
The Clinical Inbox has two views: the list view, which appears in the left pane of your clinician home page, and the grid view, which appears if you select the Clinical Inbox option from the Inbox menu (at the top of the left pane of your clinician home page).
- When you log in to athenaOne, your Clinical Inbox appears in the left panel.
Tip: You can click to add tasks assigned to other users to your Clinical Inbox.
 - Click any row in your inbox to review urgent tasks, outstanding orders, or clinical documents.
These items appear in a worklist in the left panel. - Click an item to open it in the center panel.
- Click
 in the upper right corner to add a note, assign a document to another user, and more. These options are available for some document types for the following Inbox task types:
- Orders/Rxs/Auths
- Lab/Imaging
- Clinical Documents
- Need Followup
- Patient Cases
- Click
 to return to your Clinical Inbox.
 - You can click the Inbox down arrow to toggle between the list view and the grid view. Using this menu, you can also access the Underlabeled Documents Worklist, Sign-off, Delegated Orders, and Surgeries/Procedures workflows.
Note: The Delegated Orders work queue appears only for users who have the Clinicals: Order/Prescription sign-off role or permission. - To view tasks assigned to an unconfigured user, click View them in your inbox at the bottom of your Inbox.

To go back to the original Inbox view, click the back arrow .
.
Tip: To add the unconfigured user to your Inbox view, click at the upper right corner of the Inbox. Scroll to the bottom of the list of users or search and select Unconfigured user. See User Guide — Clinical Inbox Tasks Assigned to Unconfigured User for more information.
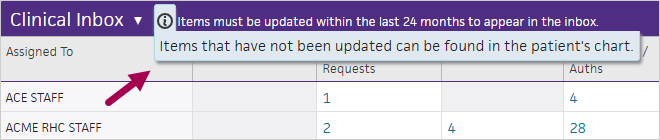
The Clinical Inbox displays only open tasks that were updated within the last 24 months. Items that fall outside of the 24-month lookback period are identified and automatically removed from the Clinical Inbox each Sunday at 4 a.m. ET. The lookback period applies to both athenaOne desktop and mobile (on both Android and iOS devices).
Items that have expired from appearing in the Clinical Inbox are still considered open and are available for you to review in the patient's chart. For your awareness, the grid view of the Clinical Inbox displays a message with details on the 24-month lookback period for inbox items. A similar message appears at the bottom of the inbox in athenaOne mobile.
To identify your tasks that have expired from the Clinical Inbox, you can run the Clinical Inbox Lookback Limit: Expired Tasks report. This report returns open items that haven't been updated in the last 24 months, including documents, orders, and results.
Exceptions- Patient cases routed to the Clinical Inbox from the Patient Portal (that is, the Source field displays Portal) are not automatically removed from the inbox. These items continue to appear regardless of when they were last updated.
- Patient-related letters that haven't been updated in the last 24 months may expire and be removed from the Clinical Inbox outside of the weekly refresh each Sunday.
The Clinical Inbox organizes your clinical tasks and documents into several key categories to help you efficiently manage your workload. These categories are consistent across both the list view and grid view of the Clinical Inbox.
| Category | Description |
|---|---|
| Admin/Phone Messages |
Administrative documents and phone message tasks that need processing or follow-up. |
| Appointment Requests |
Appointment requests sent to the practice, often originating from patient portals or administrative staff. |
| Encounters |
Patient encounters assigned to you or users you follow. It shows patients currently checked in or with upcoming visits. Green bars indicate patient check-in status and readiness for the provider. |
| Lab/Imaging |
Lab and imaging results that need review or reconciliation. Abnormal or high-priority results are highlighted with a red badge to draw attention. In the list view, a boxed number in red indicates the number of lab/imaging results that came back as abnormal and are considered higher priority for review. High priority items are marked as abnormal. If a lab order is associated with several received lab results, the number of associated results is indicated under the patient's name in the worklist.
|
| Need Followup |
Tasks flagged as requiring additional follow-up actions or monitoring. |
| Orders/Rxs/Auths |
All orders, prescriptions, and authorizations requiring your attention. This category covers medication orders, lab orders, imaging orders, and prior authorization requests. The colors indicate the appointment status and are sorted in order of priority by default. |
| Patient Cases |
Patient cases that require follow-up or action, such as clinical issues or patient inquiries routed to the Clinical Inbox. |
| Patient in Office |
Tasks related to patients currently in the office. |
| Total |
A comprehensive worklist showing all tasks assigned to you or your configured users, aggregating all categories. |
| Urgent Tasks |
Displays tasks marked as urgent due to clinical priority, such as STAT orders or flagged documents needing immediate attention. A task is flagged as urgent under these circumstances:
|
| Unknown Documents |
Documents that cannot be classified into other categories, often requiring review or reclassification. |
| Unconfigured User |
All tasks assigned to users in your practice who are not yet configured as a row in any user's Clinical Inbox. If a document or encounter is assigned to a username that does not appear as a row in any Clinical Inbox in your practice, the task appears in a row labeled Unconfigured User in your Clinical Inbox. athenaOne also moves documents assigned to users without permissions to access the Clinical Inbox (and users whose access has expired) to the Unconfigured User row in the Inbox. Note: athenaOne runs a script hourly that searches for documents assigned to users without access to the Clinical Inbox and moves them into the Unconfigured User row. Another athenaOne script runs nightly to clear everything out of that row. The row is then repopulated the next time that the hourly script runs. This means that documents are automatically moved into the row once an hour, but only moved out once a day. |
The Clinical Inbox has two views: the list view and the grid view. The list view appears in the left pane of your clinician home page in athenaOne and presents your clinical tasks and documents as a vertical list.
- The number of outstanding tasks for an Inbox item appears on the right side of each row in the Inbox.
- Use the View by: menu at the top of the Inbox to sort the list by Type or Assigned to.
- Click an Inbox row to display a scrollable worklist in the (same) left panel. Click a worklist item to display the item details in the center panel. Click the left arrow icon to return to the original view of your Inbox.
- The Urgent Tasks row appears at the top of the Inbox if any urgent tasks are assigned to you.
- If you click the Total row in the Inbox, a worklist appears with all tasks requiring your attention. Any urgent tasks are filtered to the top of the list and highlighted with an orange bar.
- The status bar at the bottom right of the screen displays badges representing different task types or priorities. Clicking a badge opens a filtered worklist of those tasks.

Note: Task badges are updated every two minutes; newly assigned tasks are not displayed immediately.
The task sorting for all worklists in the Inbox is as follows:
- Urgent status (any urgent tasks are filtered to the top of the list and highlighted with an orange bar)
- Date (most recent at the top)
- Type (all rows appear)
- Assigned to (all rows, grouped by user)
When you click a row, you can further sort the items in the worklist by Priority, Assigned To, or Result Category (for worklists where result tasks appear).
For the following categories where result tasks appear, the Result Category sort option is available: Lab/Imaging, Urgent Tasks, Patient in Office, and Total. The Result Category option sorts tasks by result criticality (critical then abnormal then unknown then other then normal), then by urgency, and finally by created date.
You can configure the list view of your Clinical Inbox without affecting the grid view. This allows you to focus only on tasks assigned to you, or to monitor the tasks of other selected users.
To add tasks or users, click ![]() at the top of the Inbox. You can click Users (n), Provider/Department Staff (n), or Practice Roles (n) and scroll through the list, or you can use the search tool. This list includes users in all the departments configured in the grid view of the Clinical Inbox, as well as any selected departments. Uppercase indicates roles configured in your current and selected departments. Select or deselect users to follow or unfollow these users.
at the top of the Inbox. You can click Users (n), Provider/Department Staff (n), or Practice Roles (n) and scroll through the list, or you can use the search tool. This list includes users in all the departments configured in the grid view of the Clinical Inbox, as well as any selected departments. Uppercase indicates roles configured in your current and selected departments. Select or deselect users to follow or unfollow these users.
Configure the inbox across multiple departments
By default, if you work in multiple departments, you can view tasks across departments for the users you configured to view in your Inbox, regardless of the department you selected when you logged in to athenaOne. If you have not previously configured any users, your Inbox shows only your tasks, across departments. When you access the Clinical Inbox, athenaOne verifies your current department access and displays only those departments that you're authorized to view since your last login.
Note: Your organization must have the Department Login Permissions feature.
- Display the athenaOne home page: On the Main Menu, click the athenaOne logo.
- From the Inbox menu, select List View.
- Click at the top right of the Inbox. A list of all departments appears on the left, and a list of users and roles appears on the right.
- Select at least one department on the left to refine the list of users and roles that appears on the right.
Note: Refining the list by department is not equivalent to displaying tasks assigned to all users and roles in the Inbox. After you select a department, you still need to select an item under Users and roles before tasks appear in your inbox. - Select the users or roles of interest on the right, under Users and roles.
Tip: You can search for a specific user by entering the user's full name or username in the search field and then selecting the full name in the list of search results. Or, you can browse for users by expanding the Users or Practice Roles category, scrolling through the list, and selecting a user or role.
The Clinical Inbox has two views: the list view and the grid view. The grid view provides a matrix-style layout that organizes clinical tasks by users, roles, and departments. This view is designed to help managers, team leads, or clinicians overseeing multiple users monitor and manage tasks across a group rather than focusing on an individual task list.
- To access the grid view of the Clinical Inbox, select Clinical Inbox from the Inbox menu.
- Your individual username row appears in bold in the Clinical Inbox grid.
Note: If no tasks are currently assigned to a user, that user's row does not appear in the Clinical Inbox grid. - Click a linked number in a row/column intersect to display the list of tasks in that category below the grid. You can then click a column header to sort the list by that column.
- In the status bar below the Clinical Inbox grid are badges that you can use to display a worklist of your inbox tasks (urgent tasks are represented by the red digit). You can click the blue or red badge to display the tasks in the list view or the grid view of the Clinical Inbox.

-
athenaOne saves the display of the last worklist that you selected (a linked number in a row/column intersect), so that the next time you log in to athenaOne, the Clinical Inbox display reflects your previous worklist.
Select departments to display in the grid view
In the grid view of the Clinical Inbox, you can select the users, roles, and departments whose tasks you want to see.
Note: To select departments, your organization must have the Department Login Permissions feature. If you have access to only one department, see Select users and roles to display in the grid view.
- From the Inbox menu on the clinician home page, select Clinical Inbox to display the grid view.
- At the upper right corner of the grid view, click to display the department and user selections. The USER AND ROLES selector displays a list of departments and a list of users.
- To see only tasks for the users and roles in your department of login, select Limit inbox to log in department option.
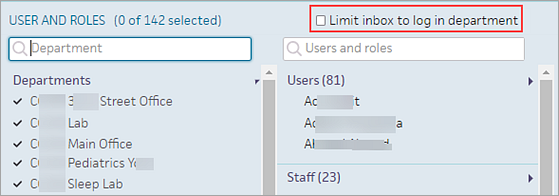
- To configure the departments that appear, hover over Departments to display the SELECT ALL and CLEAR ALL options. The list of selected departments determines which users and roles appear on the right side of the window.
Note: If you have never selected any departments, you see only the SELECT ALL option; if all departments are selected, you see only the CLEAR ALL option. - Select and remove departments. You can also use the Department search box to find and select departments.
- You can select user and role tasks for the departments you select. See Select users and roles to display in the grid view.
Select users and roles to display in the grid view
- From the Inbox menu on the clinician home page, select Clinical Inbox to display the grid view.
- At the upper right corner of the grid view, click to display the USER AND ROLES selector.
Note: If you have access to more than one department, you also see the department selector. - To configure the users and roles that appear in the Clinical Inbox, hover the cursor over Users to display SELECT ALL and CLEAR ALL. You can also hover over Staff, Practice Roles, and athenahealth to select or clear all items.
Note: If you have never selected any users, you see only the SELECT ALL option; if all users are selected, you see only the CLEAR ALL option. - Select and remove users. You can also use the Users and roles search box to find and select users and roles.
Configure fields in worklists
You can choose which fields appear for worklists in Clinical Inbox categories and change the order in which those fields are listed. The configuration you choose applies to all worklists in the same inbox category. Additionally, each user at your practice can have their own set of configurations, and those configurations don't impact one another. For a list of available worklist fields, see the Field Reference table.
- From the Inbox menu on the clinician home page, select Clinical Inbox to display the grid view of the Clinical Inbox.
- Click a linked number in a row/column intersect to display the list of tasks in that category.
- Click Configure Fields.

- To display or hide a field, turn the toggle on or off. To rearrange the order of fields, drag and drop a field into a new position in the list.
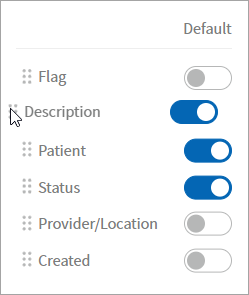
Your changes apply automatically. To reset to the default configuration, click Default.
You can display a list of the last 40 tasks you viewed in the Clinical Inbox. The tasks appear in order from most recent to least recent.
Note: Only individual documents appear in the list. When you open a consolidated task in the Clinical Inbox, each individual document appears on one row on the Your Recently Viewed Tasks page. For more information about consolidated tasks, see About consolidated tasks.
- From either the list view or the grid view of the Clinical Inbox, click Recently Viewed. If you cannot see the Recently Viewed link, see Test Datacenter Connectivity.
Note: In the grid view of the Clinical Inbox, the Recently Viewed link is at the top right.
The Your Recently Viewed Tasks page appears. - Orange bar — Ready for staff
- Green bar — Ready for provider
- Red bar — Priority or urgent (appears if the Priority option is selected for a task)
- Click a row in the list of Recently Viewed Tasks to open the task in the patient chart.
- To return to the Clinical Inbox, click Back to Inbox at the top of the page. The list view or the grid view appears, depending on the view you used last.
You can search for documents in the Clinical Inbox, documents that were deleted, and documents assigned to a patient chart that are not listed in the inbox. Use the filter fields on the Document Search page to help you locate the documents that you need.
Tip: If you do not filter the document search by date (using the Created between field) or by document class (using the Document Class field), the search could take several minutes to run, particularly at large practices, and the results may not be specific enough.
- Display the Document Search page: On the Main Menu, click Patients. Under DOCUMENTS, click Document Search.
- Document ID — Enter the document ID number, if known.
- Created between — Enter a date range for the document, if known.
- Patient ID — Enter the patient ID associated with the document, if known, or enter the first few letters of the patient's name and select the name from the matching list.
- Clinical Provider — Enter the first few characters of the provider's name, then select the clinical provider from the matching list.
- Document Class — Select the document class.
- Document Subclass — If you selected a document class, you can also select a document subclass (depending on the document class you selected).
- Document Status — Select the document status.
- Document Source — Select the source of the document.
- Clinical Order Type — Enter the first few characters of the order type, then select it from the matching list.
- Created By — Enter the first few letters of the first name, last name, or username of the athenaOne user who created the documents you are searching for and select the user from the matching list.
Note: You cannot search by credential, position, specialty, or provider group. If the letters you entered result in more than 200 matches, a message instructs you to enter more characters. For more information, see Searching for documents created by a specific user. - Click Search. The document search results appear.
You can click a column header to sort the list by that column.
You can take actions on inbox items directly from the Clinical Inbox via the Quick Action Menu, accessible from the grid view of the Clinical Inbox.

Take the following steps to access the Quick Action Menu:
- From the Inbox menu on the clinician home page, select Clinical Inbox to display the grid view of the Clinical Inbox.
- Click a linked number in a row/column intersect to display the list of tasks in that category.
- To display the Quick Action Menu, right-click the inbox item or hover over the item and click the more options icon
 .
. - Select an option from the menu and complete the fields in the pop-up window.
- Click Save. When you select Reassign, Add Action Note, or Close, you can click Save to complete the action or click the down arrow
 to save and complete an additional action:
- Save & Create Order — Completes the quick action and navigates you to the Order Group page.
- Save & Schedule Appointment — Completes the quick action and navigates you to the Schedule Appointment page.
The following table describes the quick actions available for items in the Clinical Inbox. Available actions vary by document type.
| Action | Description |
|---|---|
| Add Action Note |
Add an action note to the document. Note: Click Save to complete the action, or click the down arrow to also create an order or schedule an appointment. |
| Add Orders |
Navigates you to the Order Group page. |
| Close |
Select a reason for closing the document (when applicable), add an action note, and close the document. Note: Click Save to complete the action, or click the down arrow to also create an order or schedule an appointment. |
| Complete Review |
When you click Complete Review, you can select one of two options to complete your review:
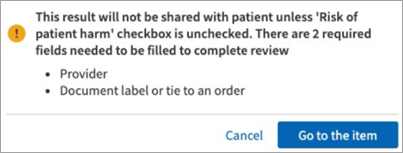
If you select both Share with patient and Discussed with patient, Share with patient takes precedence. When you click Complete Review, an error message appears if the result document is missing provider information, missing a document label, or marked as "Risk of patient harm or legal violation—do not send to patient." This is one example of this error message:
|
| Delete |
Select a reason for deleting the document (when applicable), add an action note, and delete the document. This action is available only when Delete is an option on the document view. You must have deletion permissions (the Clinicals: Delete Document permission or Clinicals Deletion role) to delete a document. |
| Go to Quickview |
Navigates you to the patient's Quickview page. |
| Mark Notification Completed |
For the following documents in NOTIFY status, you can click Mark Notification Completed to close the document:
|
| Reassign |
Reassign the patient case to another user and add an action note. Note: Click Save to complete the action, or click the down arrow to also create an order or schedule an appointment. |
| Reply to Patient via Portal (or Reply to Sender) |
Patient cases only. Select to ensure your response is sent to the patient as a message on the Patient Portal. |
| Report Failed Contact Attempt |
Report an unsuccessful attempt to contact the patient about the case. |
| Schedule Appointment |
Navigates you to the Schedule Appointment page. |
| Snooze |
Patient cases only. Snooze a patient case to remove the case temporarily from the Clinical Inbox and return to it later. For more details, see Snooze patient cases and To snooze a patient case from the Clinical Inbox. |
Note: If the patient is unknown, some quick actions (Go to Quickview, Add Orders, and Schedule Appointment) are not available.
The following table lists the available actions for each inbox category.
| Inbox category | Quick actions |
|---|---|
| Encounters |
|
| Appointment Requests |
|
| Patient Cases |
|
| Order/Rxs/Auths |
|
| Lab/Imaging |
Note: Complete Review and Close apply only to interface and Marketplace Partner API lab results and are available only if the lab result document is in REVIEW status. |
| Clinical Documents |
|
| Admin/Phone Messages |
|
| Unknown Documents |
|
| Need Followup |
|
| Total |
|
| Patient in Office |
|
| Urgent |
|
You can expand specific items in the Clinical Inbox to see relevant details via the Quick Overview. Currently, this functionality is available only for patient cases and lab results.
Take the following steps to access the Quick Overview:
- From the Inbox menu on the clinician home page, select Clinical Inbox to display the grid view of the Clinical Inbox.
- Click a linked number in a row/column intersect to display the list of tasks in that category.
-
Hover over a task and click the down arrow
 .
.
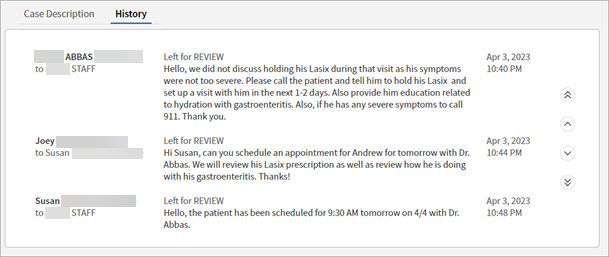
Patient cases
For patient cases, the Quick Overview displays the case description and action note history.

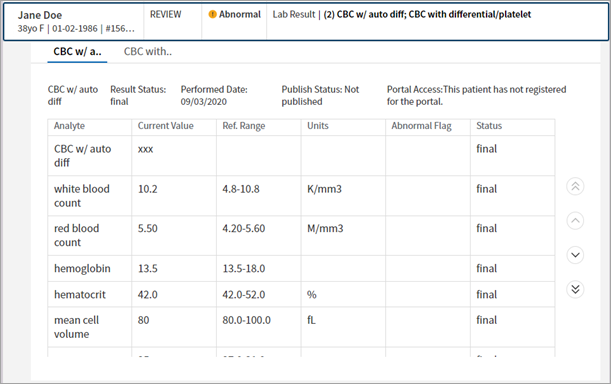
Lab results
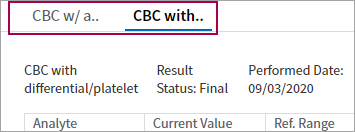
For interface and Marketplace Partner API lab results, the Quick Overview displays the following result details:
- Result details — Result name, result status, performed date, publish status, and portal access.
- Analyte data — Analyte, current value, reference range, units, abnormal flag, and status.
- Result note.
For consolidated result tasks with multiple results, the Quick Overview includes a tab for each result. Click a tab to view details for that result:
Depending on your screen size, the Quick Overview may display a menu listing each result in the consolidated result task, rather than separate tabs. Select a result to view the details:
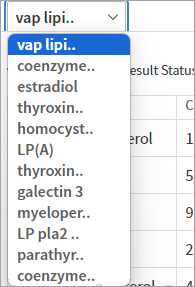
Note: You can still click the result task to navigate to the result document or open the consolidated document view.
From the grid view of the Clinical Inbox, you can select one or more documents in a worklist and reassign them to another user.
- From the Inbox menu on the clinician home page, select Clinical Inbox to display the grid view of the Clinical Inbox.
- Click a linked number in a row/column intersect to display the list of tasks in that category.
- Click Reassign.
Checkboxes appear next to each item, and a Reassign button appears above the worklist.

- To select a document to reassign, check the box next to that row. To select all documents on the same worklist page, check the box at the top of the column. The number of selected documents appears above the worklist.
Note: You cannot reassign encounter documents from the Clinical Inbox. - Click Reassign above the worklist. A pop-up window opens.
- Reassign to (required) — Search for and select a user.
- Action Note (optional) — Enter an action note. This note is added to all selected documents.
- Click Save. A progress bar appears above the worklist and displays "Complete" when all documents have been reassigned.
To help keep your Clinical Inbox more manageable, athenaOne closes certain document types after a period of inactivity. The document types subject to the auto-close feature include:
- Patient Info orders in NOTIFY status without action for at least 30 days
- Patient Care Summaries in NOTIFY status without action for at least 30 days
- Patient record documents in REVIEW or SUBMIT status without action for at least 60 days
- Documents for patients deceased for more than 90 days, without action for at least 60 days
- Orders in FOLLOWUP or PERFORM status without action for at least 180 days
- Orders in SUBMIT status without action for at least one year
When you create an in-house order, a result document is created automatically in DATAENTRY status, assigned to the provider staff, and tied to the order. When the result is closed, the order moves to CLOSED status automatically.
When an in-house order has a result, only the result — not the order — appears in the Clinical Inbox. When a test interpretation is configured for the office order type, the interpretation always appears in the Clinical Inbox.
Note: The result and interpretation documents associated with the in-house order represent the work that needs to be done to fulfill the order; these documents appear in the Clinical Inbox, but the order itself is not listed in the Clinical Inbox.
The in-house order does not appear in the Clinical Inbox under these circumstances:
- The clinical encounter is open, and the in-house order and the encounter are both assigned to the same person (amended encounters can also have an OPEN status).
- The in-house order is tied to a result but is not tied to an interpretation document.
- The in-house order is tied to a result and to an interpretation document, and the status of the result is not CLOSED.
To minimize the number of tasks in your Clinical Inbox, athenaOne does not display tasks that can be accessed through an existing item in the Clinical Inbox.
- Documents attached to an open encounter when both the encounter and the documents are assigned to the same user — When a document with a class of PRESCRIPTION, ORDER, PATIENTINFO, VACCINE, DME, or SURGERY is attached to an open encounter, only the encounter appears in the Clinical Inbox; these documents are not displayed separately in the Clinical Inbox.
- In-house orders in PERFORM status are not displayed separately in the Clinical Inbox because the in-house order is associated with a lab result and an interpretation document. For more information, see How in-house lab orders and results appear in the Clinical Inbox.
By default, consolidated tasks contain in a single document all lab or imaging results from a patient encounter or order group. The consolidated task displays the number of orders and which orders have or do not have results.
To find consolidated result documents in the Clinical Inbox, look for order names that are preceded or followed by a numeral in parentheses (this numeral indicates the number of results included in the consolidated result document).
You can choose to consolidate lab and imaging results by patient, instead of by encounter or order group. If you choose this option, lab and imaging results are consolidated when the results are for the same patient, even if the results are from separate encounters or order groups. Consolidated results by patient must also:
- Share the same result type
- Have the same status
- Be assigned to the same athenaOne user
To enable the grouping of consolidated results by patient (not based on encounter or order group), create a support case from athenaOne > Support > Success Community > Contact Client Support Center.
You can customize which fields appear for worklists in Clinical Inbox categories. Some fields may not be enabled to display by default. Not all fields are available for all inbox categories.
| Worklist Fields for Clinical Inbox Categories — Grid View | |
| Patient | Patient demographic information. |
| Status | Status of the task or document. |
| Description | Description of the task or document. |
| Patient Status |
Patient check-in status and location. |
| Related Facility |
Provider listed on the document, or the provider the document was sent from or is to be submitted to. For Patient Cases, this field displays the outside provider, lab, or pharmacy listed on the patient case. |
| Department | Department associated with the task or document. |
| Preferred Provider | Provider listed on the document. |
| Provider |
Provider listed on the patient case or the preferred provider listed on the appointment request. This field appears only in the worklist for Patient Cases. |
| Provider/Location |
Depending on the Clinical Inbox category, this field displays the following information:
|
| Usual Provider | The patient's usual provider as seen in the patient's Quickview. |
| Rendering Provider |
Provider from encounter review documents. This field appears only in the worklist for Clinical Documents. |
| Ordering Provider |
Name of the ordering provider listed on the order document. This field appears only in worklists for Orders/Rxs/Auths and Need Followup. |
| Primary Insurance | The patient's primary payer as seen in the patient's Quickview. |
| Case Policy | The patient's first listed case policy as seen in the patient's Quickview. |
| Perform Date |
Date the order was performed as listed on the order. This field appears only in worklists for Orders/Rxs/Auths, Need Followup , Total, and Urgent. |
| Date of Service |
Date the order will be performed. This applies to surgery, procedure, imaging, and consult orders. This field appears only in worklists for Orders/Rxs/Auths, Need Followup , Total, and Urgent. |
| Encounter Date |
Date the encounter is scheduled to occur. This field appears only in worklists for Orders/Rxs/Auths, Need Followup , Total, and Urgent. |
| Created | Date the task or document was created. |
| Last Updated | Date and time the task was last modified. Hover over the date to see the most recent action taken on the task. |
| Source | Source of the task or document. |
| Time In Inbox |
How long an item has been available in the Clinical Inbox. This field indicates when an item entered the inbox and isn't necessarily consistent with when the item was created. If a status change removes an item the Clinical Inbox (for example, a document is submitted, closed, or deleted), and that item later returns to the Clinical Inbox, the Time In Inbox value resets. Reassigning an item doesn't reset the Time In Inbox value. Note: Between 2023 and 2024, athenahealth rebuilt the Clinical Inbox for organizations using athenaOne. As a result, depending on when the Clinical Inbox was rebuilt for your organization, 2023 or 2024 is considered to be the earliest year that an item could have entered the inbox. Items received after your organization's inbox rebuild date reflect an accurate Time In Inbox age. |