 Quick Reference — To export a patient chart
You can export a patient's chart data by selecting the data to export in a printable format, or by exporting all data into a Continuity of Care Document (CCD) file. Your practice must have the Chart Export feature enabled to export patient chart data.
To export chart sections
- In the patient chart, click the Menu icon
 and select Chart export.
The Chart Export window appears. This window has these sections: Chart Sections, Continuity of Care Document, and Patient Record Creation History.
Note: You can click each section to expand it or collapse it. - Date Range — You can select the date range from the menu or specify the dates in the From and To fields.
Note: The default date range, Year-to-Date, displays a From date that corresponds to the first day of your organization's fiscal year. - Formal Health Record — Select this option to export the documents and parameters that should be used when generating a patient's official medical record. athenaOne automatically moves the selected items to the Selected Attachments section.
- Include Confidential Patient Information — Select this option to include in the chart export information from the Confidential section of the Patient Demographic Information.
Note: This option is not available if you selected the Formal Health Record option. - To select the sections of the patient's chart that should appear in the export, select items in the Available Attachments section and click the right arrow icon
 .
.
Items displayed in bold with a number in parentheses contain information. Items shown in gray italics with (0) do not contain any information for the patient.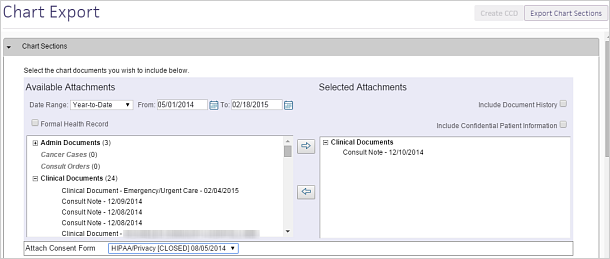
- Attach Consent Form — Select a consent form to include in the export.
- Click Export Chart Sections.
A preview of the exported data appears.
To export a Continuity of Care Document
-
In the patient chart, click the Menu icon
and select Chart export.
The Chart Export window appears, displaying three sections: Chart Sections, Continuity of Care Document, and Patient Record Creation History..
Note: You can click each section to expand it or collapse it. - Click the Continuity of Care Document section to expand it.
Note: Unless the CCD format is specifically needed, athenahealth recommends that you send a CCDA document instead. - Click Create CCD.
athenaOne automatically retrieves the appropriate data from the patient's chart, based on the most recent encounter.
A new window appears. You can view or save continuity of care documents in .xml format. -
To share the exported data, you can:
-
Send to — Search for and select the receiving provider.
The Direct field appears if the provider has a Direct address.
Note: If this field does not appear, the selected recipient does not have a Direct address. Consequently, Direct Messaging cannot submit the CCD. The CCD goes to the sender’s inbox in REVIEW status. -
In the patient actions bar at the bottom of the page, click Submit and select one of the following methods:
-
By Direct — To send the file to the receiving provider using Direct Messaging.
-
By electronic file — To send the file electronically to a receiving provider that uses athenaOne, using a secure means (such as encrypted email).
-
Repository — To burn the file onto a disc (preferred) or thumb drive (less secure) and give it to the patient, who can deliver it to the receiving provider.
-
-
Click Save.
-
To view the Patient Record Creation History
-
After you click Export Chart Sections or Create CCD, you can see a list of previous chart exports in the Patient Record Creation History section of the chart export. Click the view links to see Chart Documents and Continuity of Care Documents.