 User Guide — Summary of Care Record/Continuity of Care Document
athenaClinicals or athenaClinicals for Hospitals & Health Systems
This page describes the summary of care record (also known as a continuity of care document) that you send and receive when a patient transitions from one setting of care to another (settings of care include hospital, primary care practice, specialty care practice, long-term care, home health, and rehabilitation facility).
For any referral or transition of care, athenaOne automatically sends the receiving provider a summary of care record (SCR) in CCDA format for every relevant order via Direct Messaging.
Note: If two providers share a chart group, athenaOne does not create summary of care records for referrals from one provider to the other. For more information about chart groups, see Chart Groups Feature.
- From the Assessment / Plan section of an encounter or from a new order group, create an order for which you need to send a summary of care record, such as a procedure, surgery, or referral.
Note: Some referral orders are classified as type Other in athenaClinicals. athenaOne automatically creates a summary of care record for all orders that could be considered procedure, surgery, or referral orders. - Select a clinical provider for the order.
athenaOne creates the summary of care record (in CCDA format) and automatically selects Include summary of care record.
Note: You must select a receiving provider before you move the order to SUBMITTED or SCHEDULED status for the order to be counted as a transition of care. - If you do not want to send the CCDA document, deselect the Include summary of care record option.
Important: You will not receive credit for the Health Information Exchange (HIE) measures if you do not send the summary of care record. - Sign the order and save it.
After the order is moved to SUBMITTED or SCHEDULED status, the summary of care record is automatically sent to the clinical provider associated with the order.
-
In the patient chart, click the Menu icon
 and select Chart export.
The Chart Export window appears, displaying three sections: Chart Sections, Continuity of Care Document, and Patient Record Creation History..
Note: You can click each section to expand it or collapse it. - Click the Continuity of Care Document section to expand it.
Note: Unless the CCD format is specifically needed, athenahealth recommends that you send a CCDA document instead. - Click Create CCD.
athenaOne automatically retrieves the appropriate data from the patient's chart, based on the most recent encounter.
A new window appears. You can view or save continuity of care documents in .xml format. -
To share the exported data, you can:
-
Send to — Search for and select the receiving provider.
The Direct field appears if the provider has a Direct address.
Note: If this field does not appear, the selected recipient does not have a Direct address. Consequently, Direct Messaging cannot submit the CCD. The CCD goes to the sender’s inbox in REVIEW status. -
In the patient actions bar at the bottom of the page, click Submit and select one of the following methods:
-
By Direct — To send the file to the receiving provider using Direct Messaging.
-
By electronic file — To send the file electronically to a receiving provider that uses athenaOne, using a secure means (such as encrypted email).
-
Repository — To burn the file onto a disc (preferred) or thumb drive (less secure) and give it to the patient, who can deliver it to the receiving provider.
-
-
Click Save.
-
Important: You can export health information in a CCDA document for a patient whose record is restricted or blocked (see Privacy Information). The provider remains responsible for protecting data under applicable federal and state privacy laws. For example, federal law requires a patient's consent for a substance use provider to disclose information to another provider; it is the provider's responsibility to obtain this consent.
You can export health information in a CCDA document for one or more patients now, or you can schedule the job for a later time or as a recurring job.
Note: You can create a CSV file that includes the patient IDs of the patients for whom you want to export information in CCDA format. The CSV file must have one column (only) with the column heading "PATIENTID"; this column should contain numeric data (patient IDs) only.
- Display the Manage Data Exports page: On the Main Menu, click Settings
 > Clinicals. In the left menu,under Practice Links — Other, click Manage Data Exports.
The New Export Job tab is displayed. - Select CCDA from the drop down to export CCDA. The default selected export type is CCDA.
- Patients — Specify the patients whose health information you want to export in a CCDA document.
- All Patients — Select this option to export the records of all patients.
- Patient ID List — Enter the patient IDs for which you want to export CCDA documents. To enter more than one patient ID, separate the IDs with a comma (1234,5678,9012).
Note: You can enter up to 120 patient IDs. - Upload CSV File — Click Choose File and select the local CSV file that contains the list of patient IDs for which you want to export records in CCDA format.
Note: The CSV file must have one column (only) with the column heading "PATIENTID"; this column should contain numeric data (patient IDs) only.
-
Select the appropriate CCDA standard for export. USCDI is selected by default but you can choose to export CCDAs in MU3 standard, if required.
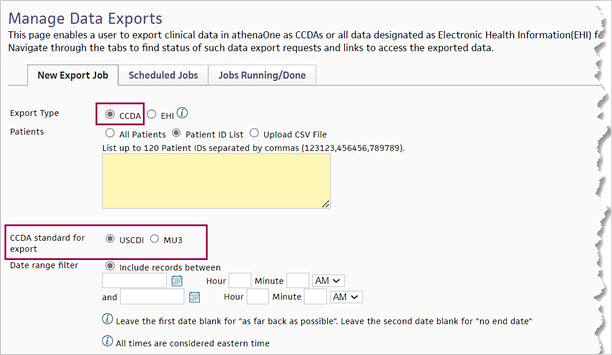
- Date range filter — You can specify a range of encounter dates to include in the exported CCDA document, or you can specify all patient records before a specific number of days, weeks, or months. Select one of these options:
- Include records between — Specify dates to include clinical data that occurred during this period of time in the exported CCDA file. You can also specify the beginning and end time of the encounters.
Note: If you do not specify either a start date or an end date, all clinical data for the patients are included in the CCDA file. - Include records for the prior — Enter the number of days, weeks, or months and select the time frame: Day(s), Week(s), or Month(s). Encounters that occurred before the specified number of days, weeks, or months are included in the exported CCDA file.
- Run this export — Specify when you want to create the exported CCDA files.
- Now — Run the report immediately.
Note: If you specified fewer than 120 patients in this export request and select the Now option, the export job begins now. However, if you specified more than 120 patients (or if you selected the All Patients option from the Patients field), the export will begin during non-business hours — that is, from 8 p.m. to 7 a.m. ET. - Once — Specify the date and time to export the files.
- Monthly — Specify the start date and end date to export the files, as well as the day of the month and the time that the report will be generated (hour and minutes). You can leave the end date blank.
- Save to location — For each report, athenaOne creates a .zip file that contains one .xml file per patient ID for ambulatory patients and two .xml files per patient ID for hospital patients. These files are saved on the athenaOne Practice Files page (On the Main Menu, click Settings
 >Practice Manager. In the left menu,under Practice Links — Miscellaneous, click Practice Files).
 - Email when job is completed — You can enter an email address to notify the recipient when an export job is completed.
Note: Click Add Recipient to add additional email addresses.
 - Reason to schedule this export — You can select a reason for scheduling the export from the menu. This field helps athenahealth understand the use cases that cause practices to schedule exports.
Note: If you do not see a good option in the menu, select Other, then enter your reason in the Specify other reasons text box. - Description (optional) — You can enter a description of the CCDA export job (up to 200 characters are allowed).
- Click Submit. If you scheduled a one-time job or a recurring monthly job, the Scheduled Jobs tab appears with the new CCDA export request at the top of the list.
Note: If you chose to run the export now for fewer than 10 patients, do not leave the Manage Data Exports page until the export is completed. When the export is completed, you will receive an email notification indicating the location the exported files were added to.
When you tie a recent order to a CCDA document, you satisfy Merit-based Incentive Payment System (MIPS) and Medicaid Promoting Interoperability (PI) Health Information Exchange (HIE) quality measures.
- In the patient chart, select the Find tab.
- Select the Type view.
- Click Clinical document, then click Record of care.
The list of CCDA documents appears. - Select the CCDA document that you want to review.
- Document Label — To see a list of recent orders, click
 Select a document label.
 - Recent Orders — Review the list of recent orders. If a recent order pertains to the CCDA document, select the order to tie it to the document:
The recent order you selected appears in the Document Label field. - Click Save.
You can mark an encounter as a transition of care encounter in the Reason for Visit step of the Intake checklist or in the Review step of the Exam stage. The best practice is for an MA, nurse, or other staff to mark the encounter as a transition of care encounter during the Intake stage.
Note: For more information, see Transition of care documents and the Medicaid PI HIE measure on the Summary of Care Record/Continuity of Care Document page.
- To begin the Intake stage, click Go to Intake in the upper right corner of the screen.
The Intake checklist appears in the left panel with the Reason for Visit section at the top.
- Newly referred patient or a patient being referred back — Select this option if you are seeing the patient for any of the following reasons:
- First time, as the result of a referral.
- After the patient has completed care with a provider that you referred the patient to.
- Follow-up visit after a recent discharge from a hospital or emergency room.
- Complete the Intake stage.
See To complete transition of care documentation during the encounter.
You can mark an encounter as a transition of care encounter in the Reason for Visit step of the Intake checklist or in the Review step of the Exam stage. The best practice is for an MA, nurse, or other staff to mark the encounter as a transition of care encounter during the Intake stage.
Note: For more information, see Transition of care documents and the Medicaid PI HIE measure on the Summary of Care Record/Continuity of Care Document page.
Before you begin the Exam stage, review the Quality tab, which displays HIE Receive and Incorporate measure details for encounters marked as transition of care. "Needs data" indicates that you must discuss the electronic summaries related to transition of care with the patient during the exam. athenaOne removes the measure from the tab after you satisfy the measure.
- To begin the Exam stage, click Go to Exam in the upper right corner of the screen.
The Newly referred patient or a patient being referred back option appears in the Reason for Visit section. - Confirm with the patient that this encounter is a transition of care. If the Newly referred patient or a patient being referred back option is not selected, select it now.
Note: If the encounter is not a transition of care, deselect the Newly referred patient or a patient being referred back option if this option is selected. - Scroll down to Documents for Discussion.
Electronic summaries related to the transition of care are listed.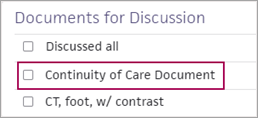
Note: Documents labeled "Summary of care," "Continuity of care," "Referral note," or "Discharge summary" satisfy the HIE: Receive and Incorporate measure. Any other documents related to a transition of care that appear in the Documents for Discussion section do not satisfy the measure.
If transition of care documents are available
- Discuss each summary of care document with the patient.
- Check the box next to each document after you review it, or check the Discussed all box.
If transition of care documents are not available
- If no transition of care documents are available for this encounter, specify whether you requested the document from the provider.

- Electronic summary wasn't found. Have you requested it? — Select an option.
- Click Yes if you contacted the organization that the patient is coming from to request the summaries in CCDA format. The encounter is excluded from the HIE measure.
Note: Keep the encounter open until you receive the transition of care documents. Return to the encounter and select YES when you receive the documents. - Click No if you will not contact the organization that the patient is coming from to request a transition of care summary. The HIE measure is counted as unmet for this encounter.
After you complete the Exam stage, "Transition of Care Encounter" appears in the encounter summary and the full encounter summary.
You can configure your personal view of incoming summary of care records — by reordering and hiding sections — on the My C-CDA Section Order and Display Preferences page.
After you configure your default settings on the My C-CDA Section Order and Display Preferences page, the settings are reflected in C-CDA clinical documents that you receive. When you open a C-CDA document for a patient, only the sections that you selected appear, displayed in the order that you set.
Table of contents
The Table of contents at the top of an inbound C-CDA document is visible at all times and allows you to select a section to review.
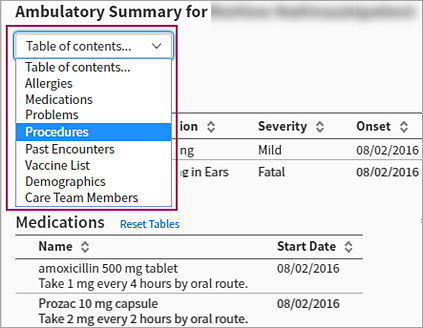
Number of hidden sections appears
If you hid sections of inbound C-CDA documents on the My C-CDA Section Order and Display Preferences page, the number of hidden sections appears below the Table of contents.

To change your default display preferences for inbound C-CDA documents, click C-CDA Settings. The My C-CDA Section Order and Display Preferences page appears, where you can reset your preferences.
The terms "summary of care record" and "continuity of care document" are often used interchangeably. In athenaOne, these terms refer to encrypted health information in CCDA format that is sent to known, trusted recipients at transitions of care.
Note: If two providers share a chart group, athenaOne does not create summary of care records for referrals from one provider to the other. For more information about chart groups, see Chart Groups Feature.
CCDA stands for "Consolidated Clinical Document Architecture" and refers to the format standard for these documents that was developed by the HL7 standards organization. For information about the secure protocol used to send summary of care records, see Direct Messaging.
The purpose of an outbound CCDA document is for electronic health record (EHR) interoperability, so that patients can seamlessly transition their health history from one care setting to another on any EHR system. The government has defined structured templates that require this health data to be stored in a specific format, so that it is readable on all systems.
Note: For complete information about the Health Information Exchange (HIE) measures for the Medicaid Promoting Interoperability (PI) program, see this CMS document.
To ensure compliance with the content and formatting standards set forth by the Office of the National Coordinator for Health Information Technology (ONC), the CCDA templates used to consolidate structured sections of a patient's chart are in a fixed, non-editable format. You cannot redact or remove any section of the CCDA portion of an outbound summary of care record (the CCDA portion of the summary of care record contains the health history content).
Note: You can still edit text in the upper letter portion of the summary of care record.
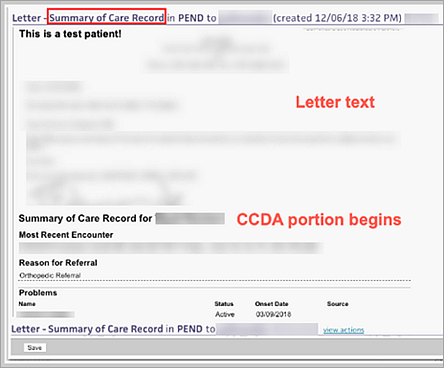
If you want to customize the health history content that you send with a referral order, you must use a letter template other than the summary of care record.
Caution: Sending a custom letter does not satisfy the Health Information Exchange measure related to summary of care record documents.
The following sections of a summary of care record cannot be blank. These sections must include the most recent information known by the provider or hospital when the summary of care document is generated.
- Current problem list
- Current medication list (vaccines do not need to be included)
- Current medication allergy list
In addition, the information in these sections of the CCDA summary of care record must be reconciled with the patient chart (see Data Reconciliation).
The government has defined structured CCDA document templates to store patient health data, so that the data is readable on all systems. To ensure electronic health record interoperability, athenahealth creates CCDA documents that are compliant with the content and formatting standards set forth by the Office of the National Coordinator (ONC).
athenaOne uses the following standard CCDA templates.
The care plan document template is used when you create a document from the care plan in athenaClinicals (see athenaClinicals Care Plan).
The CCDA care plan document template includes the following sections:
- Patient Demographics
- Care Team Members
- Health Concerns
- Goals
- Health Status Evaluations/Outcomes
- Interventions
- Care Team
The continuity of care template is used when patients retrieve their health history using the My health / Health Records page on the Patient Portal (or the Patient Information Center). For more information, see To download and transmit health records from the Patient Portal or the Patient Information Center.
The CCD continuity of care template includes the following sections:
- Allergies
- Assessment
- Care Team Members (Ambulatory Only)
- Family History
- Functional Status
- Goals
- Health Concerns
- History of Present Illness
- Immunizations
- Hospital Discharge Instructions (Hospital Only)
- Legal Authenticator
- Medical Equipment
- Medical History
- Medications
- Mental Status
- Notes
- Past Encounters
- Patient Demographics
- Payers
- Physical Exam
- Plan of Treatment
- Problems
- Procedures
- Reason for Referral
- Reason for Visit
- Results
- Review of Systems
- Social History
- Vitals
- Care Team
The data portability template is used when a provider generates a patient health record using the CCDA - Manage Data Export Jobs page.
The CCDA data portability template includes the following sections:
- Advance Directives
- Allergies
- Assessment
- Care Team Members (Ambulatory Only)
- Family History
- Functional Status
- Goals
- Health Concerns
- Hospital Discharge Instructions (Hospital Only)
- Immunizations
- Medical Equipment
- Medical History
- Medications
- Mental Status
- Notes
- Past Encounters
- Patient Demographics
- Payers
- Plan of Treatment
- Problems
- Procedures
- Reason for Referral
- Results
- Social History
- Vitals
- Care Team
Note: The discharge summary template is available only if you use athenaOne for Hospitals & Health Systems.
The discharge summary template is used when a provider completes the discharge of a patient from the hospital and a summary of care record is generated and sent to the receiving provider via Direct Messaging.
The CCDA discharge summary template includes the following sections:
- Admission Medications
- Allergies
- Assessment
- Family History
- Functional Status
- Goals
- Health Concerns
- History of Present Illness
- Hospital Course
- Hospital Discharge Diagnosis
- Hospital Discharge Instructions
- Hospital Discharge Medications
- Immunizations
- Legal Authenticator
- Medical Equipment
- Mental Status
- Notes
- Past Encounters
- Patient Demographics
- Payers
- Physical Exam
- Plan of Treatment
- Problems
- Procedures
- Results
- Review of Systems
- Social History
- Vitals
- Care Team
The referral note template is used when a provider creates a referral order that includes a transition of care document.
The CCDA referral note template includes the following sections:
- Allergies
- Assessment
- Care Team Members (Ambulatory Only)
- Family History
- Functional Status
- Goals
- Health Concerns
- History of Present Illness
- Immunizations
- Legal Authenticator
- Medical Equipment
- Medical History
- Medications
- Mental Status
- Notes
- Past Encounters
- Patient Demographics
- Payers
- Physical Exam
- Plan of Treatment
- Problems
- Procedures
- Reason for Referral
- Reason for Visit
- Results
- Review of Systems
- Social History
- Vitals
- Care Team
You can send a summary of care record when you send an order via athenaOne order sharing to another athenaClinicals practice that is an athenaCoordinator receiver (see athenaOne Order Sharing).
If you are a specialist who refers a patient back to another provider, you should include a summary of care record with this transition event. To do this, place an additional order called "Transition of Care" (available in the Other category) and select the provider to whom you want to send the summary of care record. athenaOne automatically selects the Include summary of care record option and generates the summary of care record so that you can send it to the selected provider.
Transition of care is the movement of a patient from one setting of care to another (settings of care include hospital, primary care practice, specialty care practice, long-term care, home health, and rehabilitation facility).
The Promoting Interoperability programs includes the Health Information Exchange (HIE): Receive and Incorporate measure. This measure calculates the percentage of transition of care encounters that are linked to an electronic summary in Consolidated Clinical Document Architecture (CCDA) document format.
Note: Information for the HIE: Receive and Incorporate measure appears on the Pay for Performance Dashboard under the PI Medicaid - 2019 (Behavioral 90 day) program bar.
To satisfy the HIE measure for transition of care documents, a summary of care record or continuity of care document must meet these specifications:
- The document is in Consolidated Clinical Document Architecture (CCDA) format (see Summary of Care Record/Continuity of Care Document).
- The document has not been deleted.
Note: Closed electronic summaries appear in the Documents for Discussion section only at the patient's first visit after the document arrived. - The document has not been selected in another encounter.
The following electronic summaries linked to transition of care encounters satisfy the HIE: Receive and Incorporate measure:
- Summary of care records
- Continuity of care records
- Referral notes
- Discharge summaries
Note: Other documents related to transition of care may appear in the Documents for Discussion section of the Exam stage. athenahealth recommends that you review these documents as you provide care, but these documents do not satisfy the HIE: Receive and Incorporate measure.
Transitional care management (TCM) encounters are follow‑up visits after a patient is discharged from one of these facilities:
- Hospital
- Long-term care center
- Rehabilitation
- Skilled nursing
Every TCM encounter is a transition of care encounter, but transition of care encounters also include newly referred patients and patients returning to a provider after completing care that the provider referred them to.
You can find transition of care documents using the Find tab in the patient chart and in the Clinical Inbox. You can also use the Document Search page:
- Document Class — Select Clinical Document.
- Document Subclass — Select Record of Care.
Before you begin the Exam stage, athenahealth recommends that you review the Quality tab. The tab displays HIE Receive and Incorporate measure details for encounters marked as transition of care.
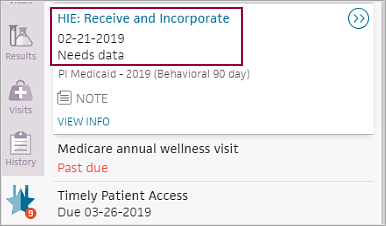
"Needs data" indicates that you must discuss the electronic summaries related to transition of care with the patient during the exam. athenaOne removes the measure from the Quality tab after you satisfy the measure.
The transition of care workflow satisfies the Health Information Exchange (HIE): Receive and Incorporate measure of the Medicaid Promoting Interoperability program. To satisfy the measure, your organization must complete these tasks:
- During the Intake or Exam stage of the encounter, mark the encounter as a transition of care (see To mark an encounter as a transition of care encounter).
- During the Exam stage of the encounter, review and discuss the electronic summaries related to the transition of care with the patient (see To complete transition of care documentation during the encounter).
Note: A return encounter counts toward the current year's quality measure reporting, even if a patient returns to your organization after completing care that you referred them to in a prior year.
You are required to complete the transition of care workflow if your organization participates in Medicaid Promoting Interoperability programs. If your organization does not participate in Medicaid Promoting Interoperability programs, you can turn this feature off by opening a support case or by contacting your Customer Success Manager.
Important: If you turn off this feature and then later decide to report on the HIE measure, you cannot capture transition of care data retroactively.
When a Direct message is received, athenaOne attempts to match the message to a patient using these patient demographics: first name, last name, and date of birth. If athenaOne finds a patient match, the summary of care record is tied to the patient's chart and assigned in REVIEW status to the provider username associated with the Direct address.
To verify that a Direct message was matched to a patient automatically, open the document and scroll down to the Document History. In the following example, the document was tied to the patient's chart and assigned to the provider username "dstewart29."

Note: You can create task assignment overrides to automatically assign the documents to a staff username (see To create a task assignment override for Direct messages).
When you receive a summary of care record via Direct Messaging, a new Data Reconciliation tab appears in the patient chart. This tab guides you through the process of merging information from the summary of care record into the patient chart. For more information, see Data Reconciliation.
If athenaOne cannot match the Direct message to a patient using the patient demographics, the document is assigned to the provider's staff username in HOLD status with this action note: "The patient for this document cannot be conclusively identified. Please update the patient id to be used for this document and select Interface Data Corrected. The patient information is:"

Note: Because Direct Messaging is used to send summary of care records for transitions of care, many inbound documents will pertain to new patients who are referred to a provider from a trading partner. Therefore, many messages will probably not be tied to a patient chart.
The provider's staff should match the document to an existing patient or create a new patient through registration.
Note: You must have permissions to view clinical documents and register new patients to perform these steps.
- Open a CCDA file in HOLD status.
- Click register new patient at the top of the page.
Some demographic fields are populated automatically. - Complete the patient registration.
- Click Save to return to the document.