Reasons for Visit
This page allows you to create, update, and delete reasons for patient encounters. Reasons are selected from the Reason for Visit list in the Intake stage of the encounter.

On the Main Menu, click Settings![]() > Clinicals. In the left menu,under Practice Links — History/Intake, click Reasons for Visit
> Clinicals. In the left menu,under Practice Links — History/Intake, click Reasons for Visit
To view and edit this page, you must have the Clinicals Admin: History/Intake role associated with your user profile.
- Display the Reasons for Visit page: On the Main Menu, click Settings
 > Clinicals. In the left menu,under Practice Links — History/Intake, click Reasons for Visit.
 - Click Add new. The Input fields appear.
- Name — Enter the text of the encounter reason. This text appears in the Reason for Visit list in the Intake stage of the encounter.
- Provider Username — Click Selected and then select the usernames of the providers who will use this reason; click All to make this reason for visit available to all providers.
- Specialty — Click Selected and then select the provider specialties that will use this
reason; click All to make this reason for visit
available to all specialties.
Note: The Specialty filter appears only if your practice has multispecialty filtering enabled. - Laterality — Select this option to display laterality options for this reason for visit.
- Ordering — Do not use this field. (Reasons for visit are ordered by your usage of the reasons and by patient age and sex.)
- Click Save. The
new reason for visit appears in the list on this page, and also appears in the Reason for Visit list in the Intake stage of the encounter.
You can edit and delete reasons for visit. You can click Show deleted (n) at the top of the Reasons for Visit list to display deleted encounter reasons.
If your practice uses multispecialty filtering of clinical content, you can create reasons for specific specialties. But remember that the Provider Username and Specialty filters can only exclude users. You cannot use the filters in combination to select certain providers and then add certain specialties. Instead, you can create two identical reasons for visit, and then use the Provider Username filter for one, and the Specialty filter for the other.
To ensure that athenaOne records a reason for the visit during an encounter, the user permission "Clinicals: Requires Chief Complaint/Encounter Reason" requires the user to select a reason for visit during the Intake or Exam stage of the encounter.
If you have the Clinicals: Requires Chief Complaint/Encounter Reason user role or permission, you must select a reason for a patient's visit during the Intake or Exam stage of the encounter. If you attempt to open another page or advance to the next stage of the patient encounter before you select a reason for the visit, athenaOne automatically opens the Add Reason selector.
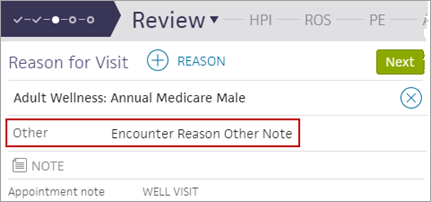
In Classic athenaClinicals, the Encounter Reasons/Chief Complaint chart section allowed you to enter a free-text encounter reason in the Other field. If a practice user entered a free-text encounter reason in the Other field in Classic athenaClinicals, you can see Other as the reason for visit in the Intake and Exam stages of the encounter and in the encounter summary.
Note: The reason entered in the Other field in Classic is read-only and cannot be edited. Any notes entered in the Encounter Reasons/Chief Complaint section in Classic can be viewed in the Note field.
For example, if a colleague entered a free-text encounter reason in the Other field in Classic athenaClinicals, you can see Other and the free-text reason in the Review step of the Exam stage when you view this encounter.

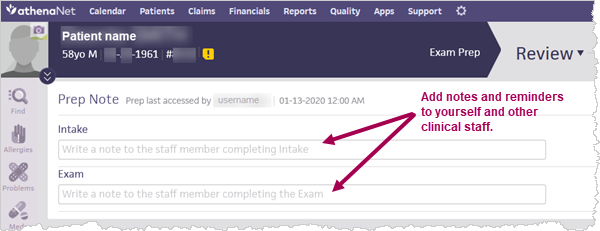
While entering encounter preparation information, you can add notes, reminders, and instructions in the Prep Notes section for yourself and other clinical staff to see during the encounter. You can continue to add and edit notes up until the Intake stage is complete. This section appears in the Review step of an Exam and in the Reason for Visit item of the Intake checklist.

- On the Main Menu, click Settings
 > Clinicals. In the left menu,under Practice Links — History/Intake, click Reasons for Visit.
 - Click Add new. The Input fields appear.
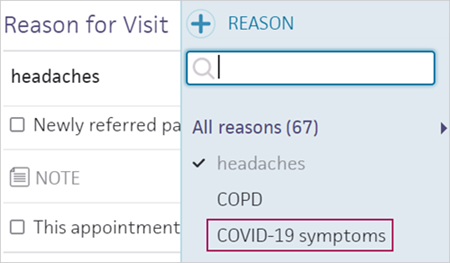
- Click the Plus icon
 to add a reason for visit.
 - Select COVID-19 symptoms.

- After you select COVID-19 symptoms as the reason for visit, you can take the following actions in the Exam stage of the encounter:
- HPI section — Select the COVID-19 Symptoms template to begin documenting symptoms.
- PE section — Select the COVID-19 Exam template.
Note: This template is based on the existing athenahealth Upper Respiratory PE template.
See Coronavirus Disease (COVID-19) on the Success Community for information about additional resources.
| Name |
Enter the text of the reason for visit in the Reason for Visit field. This text appears in the Reason for Visit list in the Intake stage of the encounter. |
|---|---|
| Provider Username |
Click Selected and then select the usernames of the providers who will use this reason; click All to make this reason for visit available to all providers. |
| Specialty |
The Specialty filter appears only if your practice has multispecialty filtering enabled. Click Selected and then select the provider specialties that will use this reason; click All to make this reason for visit available to all specialties. |
| Laterality |
Select this option to display laterality options for this reason for visit. |
| Ordering | Do not use this field. (Reasons for visit are ordered by your usage of the reasons and by patient age and sex.) |