 Exam Stage for athenaClinicals
Exam is the third stage of the 5-stage patient encounter.
- From the Clinician home page, go to the schedule.
- Click a future appointment.
athenaOne opens the patient briefing. - Click Go to Exam Prep.
The stages of an encounter appear in the patient banner, and the patient banner indicates that you are working in Intake Prep mode.
- Document sections as you would during an encounter.
Exception: You cannot sign orders or close the encounter. - Enter any notes and reminders in the following fields in the Prep Note section (located in the Review step of the Exam). Both Intake and Exam notes are visible during the Intake and Exam stages of the encounter.
Note: Any notes that you add in this section are visible only to your practice. The notes are not included in the audit history or Chart Export- Intake — Enter notes, instructions, and reminders for the person performing intake.
Note: After you mark the Intake stage as Done, you cannot edit these notes or add additional notes in this field. - Exam — Enter notes and reminders for the person performing the exam.
Note: After you mark the Intake stage as Done, you cannot edit these notes or add additional notes in this field.
- Intake — Enter notes, instructions, and reminders for the person performing intake.
- Click Done with Prep.
Note: When the Exam stage of the encounter begins, the data is converted to active encounter documentation and can be modified as needed during the encounter.
- You can access an encounter in several ways:
- In the Clinical Inbox, click the Encounters row to display the list of encounters assigned to you (and to any users you added to your Clinical Inbox). Next, click a patient name in the list of encounters.
Note: A green bar appears next to the names of patients who are checked in.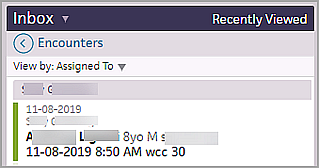
- In the Clinician home page schedule, click a patient name with the Intake stage completed (indicated by a green bar and shading).

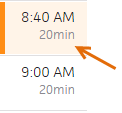
- In the Clinician home page schedule, click a patient name that has been checked in for the appointment (indicated by an orange bar and shading).
- If you complete both the Intake and Exam stages of an encounter, click the arrow next to Done with Intake and select one of these options (the patient status changes to "with provider"):
- Done with Intake, go to Exam

- Ignore alerts, go to Exam

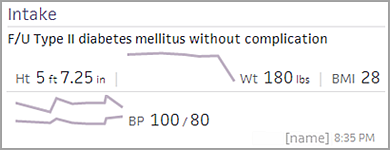
- If you did not select the "go to Exam" option from the Intake menu, the patient's chart appears. The briefing shows the Intake Summary section with the reason for visit, vitals, how the vitals taken today relate to the patient's vitals during recent visits, and the name of the person who completed the Intake stage.
-
To see today's schedule when you are working in a chart or encounter, click the calendar icon in the status bar at the bottom of the page. The schedule closes when you resume your work.

The users and departments displayed in the schedule match your selections on the clinician home page.
- Click Go to Exam.
The Exam navigation bar appears at the top of the screen, so that you can move quickly through the Exam steps (Review, HPI, PE, A/P, and Sign-off), and return to any step in any order:
You can click the Review down arrow to return to the Intake stage, update the Reason for Visit and Patient Status, and complete Screenings and Documents for Discussion.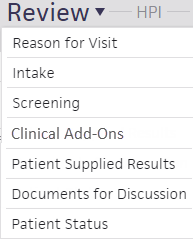
Note: If the patient sent a question to the provider during self check-in, the question appears in the Patient question field in the Reason for Visit section.
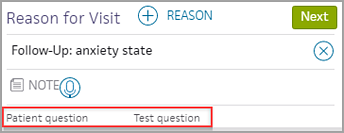
At the far right of your screen, the D&O tab provides quick access to the Diagnoses & Orders cart.

You can toggle the cart open and closed without affecting the rest of the screen:
The Problems section is open on the left, so you can begin the Review step of the Exam stage.
Note: For follow-up visits, or if a previously taken medication was ordered during Intake, the Use for D&O icon ![]() is highlighted.
is highlighted.
- To add a new problem to the list:
- Click the plus icon
 , start typing the problem name, and then select it from the matching list.
 - Record the Onset date and Status, and enter any notes.
- Click Add.
- To add a problem directly to the Assessment & Plan section, click the add to D&O icon
 .
. - Click the Medications chart tab to review and order medications.
Note: You can indicate that a patient's medication list was not reviewed along with the reason why. Click Reviewed at the bottom of the tab and then select a reason from the menu. For more information, see To record the reason that the medications list was not reviewed. - You can click each chart tab to review items in each section.
Use the icons to stop medications and delete items , view flowsheets
  , and add orders to the D&O cart
  .
.
- Click the Next button to proceed to the HPI step.
The History of Present Illness section appears in the center pane, and the Exam stage navigation bar changes to highlight HPI.
HPI is also on the Intake checklist, so this section may have been updated during the Intake stage.
Note: If the provider looks at the section after the clinical staff look at it, athenaOne attributes the review of the section to the provider.
- Add a note in the note field if necessary.
If the note needs to be hidden from patients and family members or caretakers who have access to their health information, click to mark the note confidential. See User Guide — Lock Patient Data for more information.
 - Click the plus icon
 to search for saved findings or previous encounter templates. A list of your commonly used templates and saved findings for this type of encounter and patient history appears.
Note: The rendering provider's name appears in the list of previous templates. - Click an item in a template to expand the section.
- Select a finding. The status of a finding is indicated by color:
- Normal — Gray-green
- Neutral — Light blue
- Abnormal — Pink

- In the upper right corner, click Normal to set the status to normal, or click Clear to reset a status.

Tip: You can click the All Normal or Clear links at the paragraph or sentence level to reset all items to normal status or clear all items in the exam templates. - To add finding-level notes for normal, neutral, and abnormal findings, click Add note below each finding.
Abnormal findings appear in bold in the summary view. - Reported by — You can select an option from the menu to indicate who reported the findings described. For patients under age 10, this option defaults to Parent. For patients age 10 and over, this option defaults to Patient.
- To add a new finding, click the "save favorite" icon
 , enter a name for the new finding, and click Save.
You can save new findings in the HPI, ROS, and PE sections.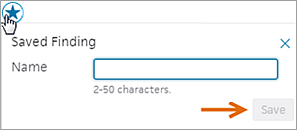
Tip: You can use the Encounter Plans page to add saved findings and text macros to an encounter plan.
- Click the Next button, or click ROS on the Exam navigation bar to proceed to the ROS step.
The Review of Systems section appears in the center pane, and the Exam stage navigation bar changes to highlight ROS.
ROS is also on the Intake checklist, so this section may have been updated during the Intake stage.
Note: If the provider looks at the section after the clinical staff look at it, athenaOne attributes the review of the section to the provider.
- Add a note in the note field if necessary.
If the note needs to be hidden from patients and family members or caretakers who have access to their health information, click to mark the note confidential. See User Guide — Lock Patient Data for more information.
 - Click the plus icon
 to search for saved findings or previous encounter templates. A list of your commonly used templates and saved findings for this type of encounter and patient history appears.
Note: The rendering provider's name appears in the list of previous templates. - Click an item in a template to expand the section.
- Select a finding. The status of a finding is indicated by color:
- Normal — Gray-green
- Neutral — Light blue
- Abnormal — Pink

- In the upper right corner, click Normal to set the status to normal, or click Clear to reset a status.

Tip: You can click the All Normal or Clear links at the paragraph or sentence level to reset all items to normal status or clear all items in the exam templates. - To add finding-level notes for normal, neutral, and abnormal findings, click Add note below each finding.
Abnormal findings appear in bold in the summary view. - Reported by — You can select an option from the menu to indicate who reported the findings described. For patients under age 10, this option defaults to Parent. For patients age 10 and over, this option defaults to Patient.
- To add a new finding, click the "save favorite" icon
 , enter a name for the new finding, and click Save.
You can save new findings in the HPI, ROS, and PE sections.
Tip: You can use the Encounter Plans page to add saved findings and text macros to an encounter plan.
- Click the Next button, or click PE to proceed to the PE step.
The Physical Exam section appears in the center pane, and the Exam stage navigation bar changes to highlight PE.
- Add a note in the note field if necessary.
If the note needs to be hidden from patients and family members or caretakers who have access to their health information, click to mark the note confidential. See User Guide — Lock Patient Data for more information.
 - To add procedure documentation, click the plus icon
 next to "Procedure Documentation."
A list of procedure templates and any previous templates for this patient appear, with your commonly used templates at the top. The rendering provider's name appears in the list of previous templates.
Note: If you have the Multispecialty Practice feature enabled, the list of available templates is filtered by age, gender, and specialty. - Select a procedure template and complete it. Procedure templates appear in the full encounter summary and on the Visits and Cases section in the patient chart.
Note: If the procedure template has been mapped to a procedure code, the Billing tab is pre-populated with the procedure and codes.
- Click the Next button or click A/P to proceed to the Assessment & Plan step.
The Assessment & Plan section appears in the center pane, and the Exam stage navigation bar changes to highlight A/P.
Note: Items that need attention are highlighted with an orange bar.
- Add diagnoses and orders. Your most frequently used selections appear at the top of the list.
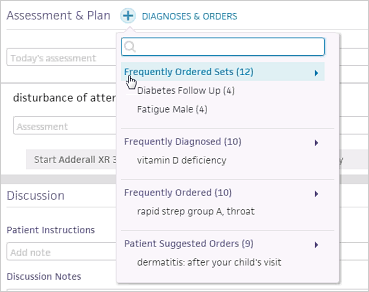
Diagnoses and orders that you select are added to the D&O cart.
Note: When you add a diagnosis that relates to an existing problem, the problem is marked active. You can also click the send to icon to add diagnoses directly to the Problems section of the chart (the problem is marked active).
Note: With the Encounter Diagnosis Required feature, your practice can require that providers add an ICD-10 diagnosis before they can close a patient encounter or send an encounter for review. For more details, see the Features and workflow section in Sign-off Stage for athenaClinicals. - You can assign a procedure to a clinical provider or to a point-of-care test to be performed at an in-house lab.
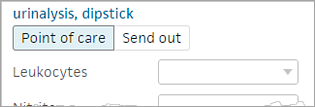
A template automatically appears to immediately add results and interpretations.
Note: If the in-house facility needs additional information to perform the point-of-care lab or imaging test, athenaOne displays ask-on-order-entry (AOE) questions. Answer the AOE questions before you sign and save the order. (To see additional AOE questions, click view more at the bottom of the expanded view of the order.) - Click
 to remove an item.
Tip: You can drag and drop a section to reorder the Assessment & Plan.
A vertical orange bar next to an item indicates that the item requires attention: .
. - If an alert appears in a medication order — for example, an allergy conflict — a message asks you to confirm that you want to sign the order.
Note: This message appears for conflicts and whenever you sign orders.
- When the Sign Orders button is green, click the button to sign all the orders and complete the Assessment & Plan step.
This action also completes the Exam stage of the encounter.
- During the Intake or Exam stage of an encounter, click the appointment type that appears at the top right of the screen, just under the Find patient tool.

- Search for an appointment type or select one from the list.
- If the appointment type you've selected changes content in the encounter layout, an alert appears.
- Click Change to confirm your choice, or click Cancel.
You can see and update the appointment status and location for a patient during any step of the Exam stage. To change a patient's status or location:
- Click the patient status or location in the patient banner.

Note: If no location is displayed, click Select Location. - Select a status or location from the list.
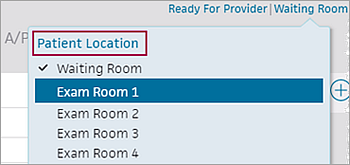
athenaOne displays the updated status or location.
If you are enrolled in quality programs, you see alerts in the Intake and Exam stages of the encounter that remind you to review the medication list before closing the encounter. You must review the patient's medication list before you can close the encounter.
Note: For more information about this quality measure, see Medication Reconcilation on the Success Community.
Important: After you review a patient's medication list, the medication alerts may persist if data reconciliation is needed. You can complete the Intake stage or close the encounter if you choose to reconcile this data later.
- In the patient encounter, click Go to Exam in the upper right corner of the screen.
If you are enrolled in quality programs, an orange vertical bar appears to the left of the Meds chart tab. - Click the Meds chart tab.
- Review the patient's medication list.
Note: If you see the Medications to reconcile alert in the Medications section of the chart, you can also reconcile the patient's medication list. However, you can close the encounter without reconciling the data.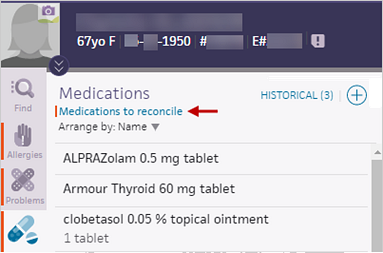
Note: You can indicate that a patient's medication list was not reviewed along with the reason why. Click Reviewed
at the bottom of the medication list and then select a reason from the menu. For more information, see To record the reason that the medications list was not reviewed. - In many states, you can access a real-time prescription drug monitoring report in athenaOne to review a patient's controlled substance prescription information. If a prescription drug monitoring report is available, clinical providers see a link to the report (see Providers who can access PDMP reports).
- Click Prescription drug monitoring report to display the report.
Note: The report may take a few seconds to appear because athenaOne is requesting the data in real time. - Review the prescription drug monitoring report. For more information about the report, see Contents of Bamboo Health reports and Contents of LogiCoy report.
Note: Due to legal restrictions in most states, athenaOne does not save the PDMP report in the patient chart. - Close the report and continue with the encounter.
Your username and the date now appear with the link to indicate that you viewed the PDMP report.
- Click Prescription drug monitoring report to display the report.
- Complete the Exam stage as usual.
Note: You cannot close the encounter until you review the patient's medication list.
You can mark an encounter as a transition of care encounter in the Reason for Visit step of the Intake checklist or in the Review step of the Exam stage. The best practice is for an MA, nurse, or other staff to mark the encounter as a transition of care encounter during the Intake stage.
Note: For more information, see Transition of care documents and the Medicaid PI HIE measure on the Summary of Care Record/Continuity of Care Document page.
Before you begin the Exam stage, review the Quality tab, which displays HIE Receive and Incorporate measure details for encounters marked as transition of care. "Needs data" indicates that you must discuss the electronic summaries related to transition of care with the patient during the exam. athenaOne removes the measure from the tab after you satisfy the measure.
- To begin the Exam stage, click Go to Exam in the upper right corner of the screen.
The Newly referred patient or a patient being referred back option appears in the Reason for Visit section. - Confirm with the patient that this encounter is a transition of care. If the Newly referred patient or a patient being referred back option is not selected, select it now.
Note: If the encounter is not a transition of care, deselect the Newly referred patient or a patient being referred back option if this option is selected. - Scroll down to Documents for Discussion.
Electronic summaries related to the transition of care are listed.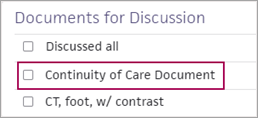
Note: Documents labeled "Summary of care," "Continuity of care," "Referral note," or "Discharge summary" satisfy the HIE: Receive and Incorporate measure. Any other documents related to a transition of care that appear in the Documents for Discussion section do not satisfy the measure.
If transition of care documents are available
- Discuss each summary of care document with the patient.
- Check the box next to each document after you review it, or check the Discussed all box.
If transition of care documents are not available
- If no transition of care documents are available for this encounter, specify whether you requested the document from the provider.

- Electronic summary wasn't found. Have you requested it? — Select an option.
- Click Yes if you contacted the organization that the patient is coming from to request the summaries in CCDA format. The encounter is excluded from the HIE measure.
Note: Keep the encounter open until you receive the transition of care documents. Return to the encounter and select YES when you receive the documents. - Click No if you will not contact the organization that the patient is coming from to request a transition of care summary. The HIE measure is counted as unmet for this encounter.
After you complete the Exam stage, "Transition of Care Encounter" appears in the encounter summary and the full encounter summary.
The Exam stage includes these steps:
- Review — Review information or documents collected since the patient's last appointment, up to and including the Intake stage.
- HPI (History of Present Illness) — Document a patient's symptoms and problems, in your own words. Your practice can configure your own templates, in addition to athenahealth global templates, to expedite and organize this process.
- ROS (Review of Systems) — Document a patient's symptoms and problems in greater detail with these templates separated by body system. Information you record in the HPI and the ROS is not mutually exclusive but is organized in a different way.
- PE (Physical Exam) — The Physical Exam section is the last section with templates, which are designed to document various checks and tests you perform in the encounter.
- A/P (Assessment / Plan) — Enter an assessment and diagnoses, and create orders.