Faxes Received
athenaOne for Hospitals & Health Systems
This page allows you to view and access documents faxed to your practice. You can filter the display by the sender's fax number, the destination department, and other items. Each task listed is linked to the associated document task.
We're partnering with Consensus Cloud Solutions, the leading provider of cloud fax services. This collaboration enables you to leverage our direct eFax integration within athenaOne. With this integration, practices can streamline fax communication, migrate to a digital fax platform and boost your organization's productivity.
On the Main Menu, click Patients. Under RESOURCES, click Faxes Received
With athenaOne for Hospitals & Health Systems, you must have the Inpatient Edit Chart and Inpatient Clinicals: View Chart permissions to access this page.
Before you can use this feature, you must sign a commercial contract with Consensus Cloud Solutions authorizing them to take over the existing fax lines to their network. Please contact your Customer Success Manager for additional details.
Important: The Faxes Received page is accessible to all athenaOne users, regardless of whether they have opted in to the eFax integration.
- Display the Faxes Received page: On the Main Menu, click Patients. Under RESOURCES, click Faxes Received.
- Select a Department to view the associated fax numbers for that department.
- Fax number — There are two lists here:
- Toll Free Number — This list displays the athenahealth provided toll-free fax numbers
- Local Number — This list displays the both active and inactive customer owned fax numbers mapped to the department. These will be the numbers that are currently enrolled in the eFax program.
Important:- You can use any combination of fax numbers (Toll free and Local Number) to search for existing faxes.
- To view only the eFaxes received by a specific department, select only the local number(s)in the Local Number field.
- Sender fax number — To locate faxes from a specific sender, enter the sender's fax number in this field.
- From Remote ID — To filter received faxes based on the remote sender identifier.
- From Date and Time — To filter the list of faxes by date, enter or select a start date.
- To Date and Time — To filter the list of faxes by date, enter or select an end date.
- Patient Name/ID — To locate faxes for a specific patient, enter the patient's name or ID in this field.
- Number of Pages — To filter the list of faxes by the number of pages in the faxed document, enter a number of pages in this field.
- Document Subclass — To filter the list of faxes by the document subclass, select a subclass from the menu.
- Document Barcode ID — To filter the list of faxes by the document barcode ID, enter the barcode ID in this field.
- Provider — To locate faxes for a specific provider, select a provider from the menu.
- Click Apply.
The filtered list of received faxes is displayed.
- Display the Faxes Received page: On the Main Menu, click Patients. Under RESOURCES, click Faxes Received.
- Scroll down and click Unknown for the unprocessed document you want to process.
The Process Document page appears. - Patient — Search for the patient and select the patient from the matching list.
- Class — Select the document class.
Additional fields appear. - Stay — Select the hospital stay dates associated with this document.
- Document Label — Select the document label.
- Document Date — Enter the date that appears on the document.
- Click Save.
- Display the Faxes Received page: On the Main Menu, click Patients. Under RESOURCES, click Faxes Received.
- Double-click a faxed Historical Medical Record in REVIEW status. The faxed document appears.
- Use the linked page numbers to display the last page of the medical record.
- Scroll to the bottom of the page and click the Manage Fax Batch link. The Split Fax Batch page appears. The left side of the page shows a thumbnail of each page in the batch. The page number links at the upper left are for 5-page sections, for faster download.
To split a single batch into multiple documents
- Hover over the thumbnails on the left to display the full image in the Workspace, so that you can determine where to split the batch.
- Click the split pages link under the last page that you wish to separate. For example, if pages 1 through 4 in a batch should be split out as a lab result, click the split pages link under the thumbnail image for page 4. The image for that page appears (in this example, page 4).
Classify the split section of pages
- Use the document class menus at the top of the page to classify each section of pages. The page numbers for a section that you split off appear to the left of the menus. For example, select Lab Result for pages 1-4, and select Medical Record Document - Historical Medical Record for the remaining pages.
To change the way a document is split or to correct splitting errors
- Click the rejoin pages link at the unwanted split. This action merges the two documents into a single document, which can then be reclassified or re-split as necessary.
- Continue in this way for any additional splitting of the medical record for this patient.
- When the entire medical record has been split, click Save and Close to move documents into their appropriate sections in the chart. Documents close upon submission.
Note: You cannot combine documents that were submitted in separate fax batches in athenaOne. To join separate documents into one batch, you can contact the sender and ask them to resend a complete batch or you can print each batch and fax or re-upload them to athenaOne as one batch.
- Display the Faxes Received page: On the Main Menu, click Patients. Under RESOURCES, click Faxes Received.
- Scroll down and click Unknown for the unprocessed document you want to process.
The Process Document page appears. - Patient — Search for the patient and select the patient from the matching list.
- Class — Select the document class.
Additional fields appear. - Stay — Select the hospital stay dates associated with this document.
- Document Label — Select the document label.
- Document Date — Enter the date that appears on the document.
- Click Save.
- In the patient chart, click the Menu icon
 at the upper right corner.
 - Select Add document, and select the document to upload.
The selected document appears in preview mode in the Add Document page. - Tie to Stay — Select the correct stay for the document.
- Document Class — Select the document class.
Additional fields appear, based on the document class selection. - Complete the fields provided.
- Click Save.
- In the patient chart, click the Menu icon at the upper right corner.
- Select Chart export to export the document.
- Under Available Attachments, click the menu to select the appropriate stay.
- Select the documents that you want to export, and click the arrow button to move them to the Selected Attachments section.
- Click Export Chart Sections.
- Display the patient chart and click the search icon
 in the patient banner.
Note: The Tie to Stay selector organizes the documents by individual stay with date ranges, as opposed to current and past stays.
We have developed a custom integration between the athenaOne platform and eFax Corporate, Consensus Cloud Solutions' HIPAA-compliant, HITRUST CSF certified platform. This integration allows you to seamlessly connect your athenaOne account with eFax, providing a cost-effective way to forward faxes to athenaOne.
Each task listed on the Faxes Received page is linked to the associated document task. You can use the next and prev links to page through the list of faxes.
You can use this page to search for incoming faxes by the sender's fax number. For example, if you fax paper documents to your practice — such as signed copies of forms — you can verify that these faxed forms are available in athenaOne.
Note: If your practice has the Department Login Permissions feature enabled, the Faxes Received page is automatically filtered based on the practice fax number assigned to your current department. When you filter the list of faxes, the Practice fax number field displays fax numbers based on your department login permissions.
The Faxes Received page in athenaOne has fields to store both athenahealth toll free fax numbers, as well as customer-owned eFax numbers stored in the Local Number list. Here's an image of the updated page:
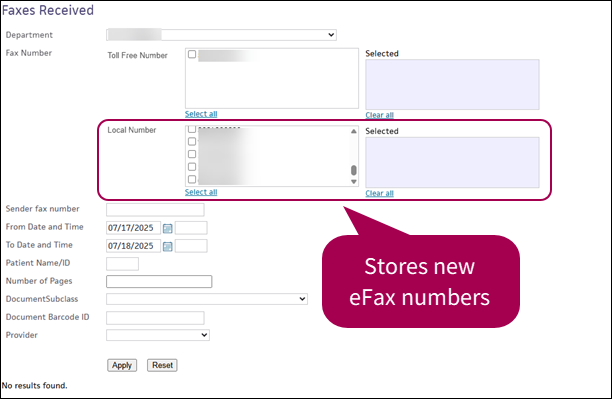
Open the Faxes Received page to select a department. The lists populate with the corresponding numbers for that department.
Document Services hours of operation
The athenahealth Document Services team generally processes documents in two hours or less during the following hours of operation.
| Day | Time (EST) |
| Monday — Friday | 8AM — 8PM |
| Saturday | 9AM — 6PM |
Important: athenahealth has limited staffing for overnight document processing and on Sundays.
| Filter the list of incoming faxes | |
| Fax number |
There are two lists here:
|
|---|---|
| Sender fax number |
To locate faxes from a specific sender, enter the sender's fax number in this field. |
| From Date and Time |
To filter the list of faxes by date, enter or select a start date. |
| To Date and Time |
To filter the list of faxes by date, enter or select an end date. |
| Patient Name/ID | To locate faxes for a specific patient, enter the patient's name or ID in this field. |
| Number of Pages |
To filter the list of faxes by the number of pages in the faxed document, enter a number of pages in this field. |
| Document Subclass |
To filter the list of faxes by the document subclass, select a subclass from the menu. |
| Document Barcode ID | To filter the list of faxes by the document barcode ID, enter the barcode ID in this field. |
| Provider | To locate faxes for a specific provider, select a provider from the menu. |