Procedure Templates
athenaOne for Hospitals & Health Systems
This page allows you to administer templates for documenting medical procedures performed during an encounter. Using procedure templates, you can save a block of text describing a procedure, with custom input fields so that you can record specific details of the procedure when it is performed.
On the Main Menu, click Settings![]() > Clinicals. In the left menu,under Practice Links — Exam, click Procedure
Templates
> Clinicals. In the left menu,under Practice Links — Exam, click Procedure
Templates
You must have the Clinicals Admin: Other Templates user permission to access this page and create, update, and delete custom Procedure section templates, which you use to document medical procedures performed during an encounter.
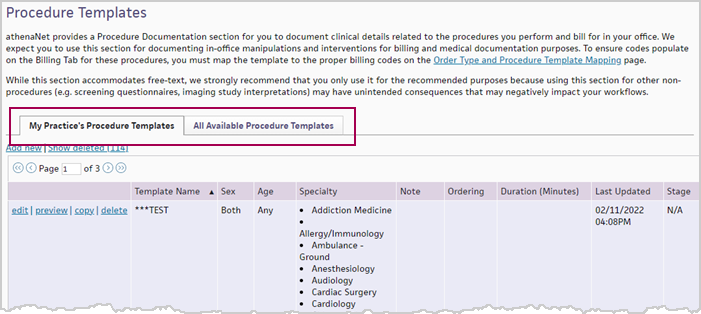
Tabs allow you to jump between My Practice's Templates and All Available Procedure Templates:

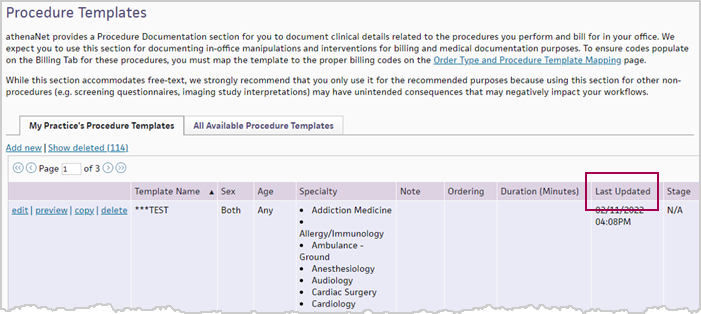
The Last Updated column shows when a template was last updated, including the date and time:

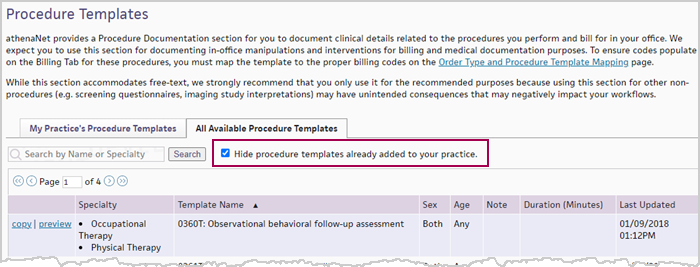
From the new All Available Procedure Templates tab, there is an option to hide procedure templates already added to your practice:

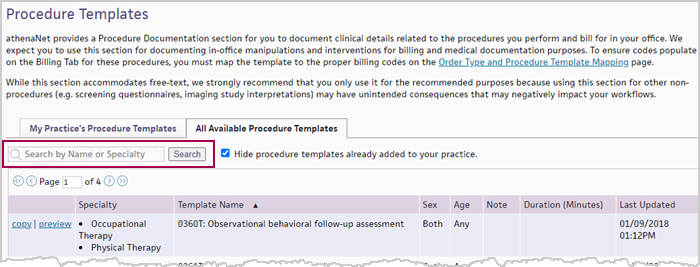
From the new All Available Procedure Templates tab, you can search templates by the template name or specialty:

- Display the
Procedure Templates page: On the Main Menu, click Settings
 > Clinicals. In the left menu,under Practice Links — Exam, click Procedure
Templates.
 - Click Add new. The input fields appear.
- Template name — Enter a unique, short, descriptive name for the new procedure template.
- Sex — Select the patient gender from the menu, or select Both if the template is used for either gender.
- Age range — Enter a minimum and maximum age range.
- Specialty — Click Select all to allow all specialties to use this template, or select the specialties that will use this template.
- Note — Enter any notes about this template.
- Ordering — Enter a digit to indicate the order of this template in the closed encounter summary.
- Duration (minutes) — Select this option to include the minutes field on the template (the minutes are converted to units on the Billing tab). This conversion applies only to time-based CPT codes.
- Template text — Enter a detailed description of the medical procedure. Include blank spaces or underscored spaces (for example, " " or "_____") where encounter-specific findings can be entered. See also: Supported HTML.
- Click Save. The new template appears in the list of templates at the bottom of the page.
- Display the Procedure Templates page: On the Main Menu, click Settings
 > Clinicals. In the left menu,under Practice Links — Exam, click Procedure
Templates.
 - In the list of Existing Global Procedure Templates at the bottom of the page, click copy next to the template to copy.
Tip: You can click a column header to sort the list by that column.
A confirmation message appears at the top of the page, and the selected template now appears in the list of procedure templates. You can also edit the template for use in your practice (see "To edit a procedure template").
You should edit procedure templates only to make minor changes that do not affect the content of the template (minor changes include fixing typos or capitalization). To change the content of a procedure template, create a new template instead (you can copy an existing procedure template and rename it to create a new template).
- Display the Procedure Templates page: On the Main Menu, click Settings
 > Clinicals. In the left menu,under Practice Links — Exam, click Procedure
Templates.
 - Click the edit link for the template that you want to edit.
The template details appear at the top of the page. - Template
name — To copy the existing template, enter a new, unique name for the new template. No two templates can have the same name.
Note: When you change the name of a template, the full encounter summary of closed encounters will show the name of the procedure template as it existed when the template was used during the encounter. - Edit the remaining template details as needed. See also: Supported HTML.
- Click Save to save the template.
- Display the
Procedure Templates page: On the Main Menu, click Settings
 > Clinicals. In the left menu,under Practice Links — Exam, click Procedure
Templates.
 - Click the delete
link to the left of the procedure template that you want to delete.
Note: You can click the undelete link at the top of the page to restore the template.
- Display the Procedure Templates page: On the Main Menu, click Settings
 > Clinicals. In the left menu,under Practice Links — Exam, click Procedure
Templates.
 - Click the Show deleted link at the top of the table to display deleted procedure templates.
- Click the undelete link for the template that you want to restore. The audit history of the procedure template is preserved.
You can copy a global template to add it to your list of existing templates. After you add a template to your list, you can edit the template as needed.
Tip: You can assign gender and age range to your procedure templates. If you specify the gender and age range for a procedure template, the only templates that will appear in the encounter form are those matching the patient's age and gender.
Use only supported HTML tags and athenaOne syntax when formatting text and creating fields in athenaOne templates, forms, letters, and text macros. Other coding is not supported and will be automatically removed over time to prevent potential problems.
Note: If you are not familiar with HTML coding, please contact the CSC from athenaOne > Support > Success Community > Contact Client Support Center.
Supported HTML tags
Not all HTML tags are supported. You can use the following HTML tags to apply these formatting options:
| Format | HTML Tags | Example Code | Example Output |
|---|---|---|---|
| Bold | <strong>, <b> | <strong>Urgent</strong> | Urgent |
| Italics | <em>, <i> | <em>Patient chart</em> | Patient chart |
| List |
<ul>, <ol> |
<ul><li>Last name</li><li>First name</li><li>DOB</li></ul> |
• Last name • First name • DOB |
| Line break | <br> |
athenahealth<br>311 Arsenal St.<br>Watertown, MA<br> |
athenahealth 311 Arsenal St. Watertown, MA |
| Paragraph | <p> |
<p>At athenahealth, we are building a healthcare ecosystem.</p> <p>We strive to make healthcare work as it should.</p> |
At athenahealth, we are building a healthcare ecosystem. We strive to make healthcare work as it should. |
| Table |
<table> is the full table. <tr> is a table row. <td> is a cell within a row. <th> is a header cell within a row. |
<table><tr><th>First name</th><th>Last name</th></tr><tr><td>Jane</td><td>Doe</td> </tr><tr><td>John</td><td>Smith</td></tr></table> |

Note: The table scrolls horizontally if the column widths exceed the page size. |
| Non-breaking space | |
<p>1 2 3</p> |
1 2 3 |
Supported athenaOne syntax
You can also use syntax that is specific to athenaOne to create the following types of fields:
| Type of Field | athenaOne Syntax | Example Code | Example Output |
|---|---|---|---|
| Dropdown | {{1|2|3}} | Patient will come back in {{1|2|3|4}} weeks for a follow-up. | Patient will come back in 2 weeks for a follow-up. |
| Date | {{DATE}} | Pain started on {{DATE}}. | Pain started on 10/01/2019. |
| Time |
{{TIME}} |
Injection given at {{TIME}}. |
Injection given at 10:05 AM. |
| Date Time | {{DATETIME}} |
Completed at {{DATETIME}}. |
Completed at 10/02/2019 3:45 PM. |
| Default Date Time | {{DATETIME|MM/DD/YYYY HH:MM AM/PM}} |
Complete by {{DATETIME|12/31/19 5:00 PM}}. |
Complete by 12/31/2019 5:00 PM. |
Notes:
-
athenaOne may display text macros differently on the Text Macros and My Text Macros pages than in the note fields where the text macros are used.
-
Configuring drop-down menus to default to null (or a blank selection) is not supported in athenaOne syntax and could result in lost information.
You can incorporate customized drop-down menus within a procedure template using HTML code. A custom drop-down menu can have a default option that the user can change.
If you specify a default option in the drop-down menu, include a placeholder null value, such as "None" or "N/A." For example, you can configure a custom menu in a physical exam template that includes the following options: "right-handed male," "left-handed male," "right-handed female," "left-handed female," and "N/A." You can set the default option to "right-handed female" if you primarily see female patients. During an exam, if you aren't sure whether the patient is left-handed or right-handed, you can select "N/A."
Note: If you do not include a placeholder null value in the drop-down menu when you set a default value, you cannot select a blank (null) option for that finding.
When using the custom drop-down menu in the encounter section, the provider can also:
- Edit the selected option (for example, select "mole" and change it to "moles").
- Ignore the drop-down menu and type notes directly into the blank option space.
- Delete the drop-down menu completely (place the cursor after the drop-down menu and press the backspace key).
- Display the Procedure Templates page: On the Main Menu, click Settings
 > Clinicals. In the left menu,under Practice Links — Exam, click Procedure
Templates.
 - Click Add new to create a new template, or click edit for the template that you want to update.
The template details appear at the top of the page. - Template text — To add a time drop-down menu, enter {{ TIME | HH:MM AM }}.
-
Click Preview to see the new time field and the AM/PM drop-down menu.
-
Click Save to save the template.
When the time input field is included in a procedure template, you can enter the time manually in HH:MM format and then select AM or PM. You can also enter "t" or "n" as a shortcut to populate the time field with the current time from your PC; this method automatically includes the AM/PM designation.
You can place multiple drop-down menus next to one another, but you cannot create a drop-down menu from which you select multiple options.
- Display the Procedure Templates page: On the Main Menu, click Settings
 > Clinicals. In the left menu,under Practice Links — Exam, click Procedure
Templates.
 - Click the edit link for the template that you want to update.
The template details appear at the top of the page, and findings appear below. - Template text — Add the following to your template text:
- Enter two open braces "{{" and two closed braces "}}" to create a structure for the drop-down menu.
- Enter the drop-down menu options, separating the options with a line "|". The order in which the options appear is determined by their placement within the braces: {{option 1*|option 2|option 3| etc…}}.
Note: You can add an asterisk (*) next to an option to make it the auto-selected default option. A default option is not required. -
Click Preview to see the new drop-down menu.
-
Click Save to save the template.
| Template name |
The name of the procedure template. This name appears in the Exam stage of the encounter. |
|---|---|
| Sex | Select the patient gender from the list, or select Both if the template is used for either gender. |
| Age range |
Enter a minimum and maximum age range. |
| Specialty |
Click Select all to allow all specialties to use this template, or select the specialties that will use this template. |
| Note | Enter any notes about this template. |
| Ordering |
Enter a digit to indicate the order of this template in a closed encounter summary. After an encounter is closed, the template information in the encounter summary is displayed based on the ordering configured on this page. If you do not assign ordering numbers or if more than one template has the same ordering number, the templates are listed in the encounter summary by name and then by ID.
The template with the lowest ordering number serves as the basis for content organization. The content from the remaining templates is included in one of two ways:
|
| Duration (minutes) |
Select this option to include a minutes field on the procedure documentation template.
If the procedure template is associated with a physical therapy CPT code (97032 – 97036, 97110 – 97124, 97139, 97140, 97530 – 97542, and 97799), the entered minutes also appear on the Billing tab and are converted to units according to the Substantial Portion Methodology Method (SPM) or the 8-Minute Rule. For more information, see Physical Therapy Billing.
If you do not assign the procedure template to a physical therapy CPT code on the Order Type and Procedure Template Mapping page, the minutes field appears on the procedure documentation template but does not appear on the Billing tab. Units are not calculated. |
| Template text |
Enter a detailed description of the medical procedure. Include blank spaces or underscored spaces for example, " " or "_____") where encounter-specific findings can be entered. See Supported HTML. |
| Stage |
This field appears if your practice has the Structured Procedure Documentation functionality enabled.
Select the desired procedure stage from the list, or select N/A to assign the template to no stage, which makes it part of the standard Procedure Documentation section. |
| Column Headings | |
|---|---|
| Template Name |
Name of the template. |
| Sex | Sex of the patient. |
| Age | Age range of the patient. |
| Specialty |
Relevant specialty for this template. |
| Note |
Any notes about this template. |
| Ordering |
Digit that indicates the order of the template in the closed encounter summary. |
| Duration (Minutes) | The number of minutes assigned to the procedure template. |