 User Guide — Structured Procedure Documentation
The Structured Procedure Documentation feature allows providers in your practice to accomplish procedure documentation right from the 5-stage patient encounter workflow. This feature supports the necessary pre-, intra-, and post-procedure documentation requirements, and you can customize each section to fit the needs of your practice.
 User access and permissions
Your practice must use athenaClinicals and have the Structured Procedure Documentation feature enabled.
Configuration pages
Intra-Procedure Medication Totals
Procedure Timeout / Checklist — Ambulatory
Encounter sections
Procedure Documentation Section
Pre-Procedure Documentation Section
Pre-Sedation Assessment Section
Pre-Procedure Medications Section
Intra-Procedure Documentation Section
Intra-Procedure Vitals Section
Intra-Procedure Medications Section
Procedure Timeout / Checklist Section
Post-Procedure Documentation Section
Structured procedure templates and encounter stages
For an encounter that uses Structured Procedure Documentation, clinical staff can complete all pre-procedure sections, including the Procedure Times, Pre-Procedure Vitals, Pre-Procedure Medications, Pre-Procedure Documentation, and Pre-Sedation Assessment, during the Intake stage of the encounter.
These sections are configured to include procedure-specific information such as medications, vitals, and templates used by your practice. Staff can also review the patient's problems, medications, allergies, and history information during Intake.
The appointment includes the Pre, Exam, Intra, Post, A/P, and Sign-off stages.
Clinical staff and providers can review pre-procedure information as well as document intra-procedure and post-procedure details during this stage of the encounter.
- Pre — Review information recorded by your clinical staff in intake, including the Pre-Procedure Vitals, Pre-Procedure Medications, and Pre-Procedure Documentation sections.
- Exam — Complete the HPI, ROS, and PE sections as necessary.
- Intra — Record procedure details including Procedure Times, Procedure Timeout/Checklist, Intra-Procedure Vitals, Intra-Procedure Medications, Intra-Procedure Documentation, Procedure Documentation, and Procedure Outcomes.
- Post — Document post-procedure information using the Procedure Times, Post-Procedure Vitals, Post-Procedure Medications, and Post-Procedure Documentation sections.
- A/P — Add diagnoses, orders, patient instructions, and any follow-up information as needed.
- Sign-off — Review encounter details, complete billing and sign and close the encounter.
Setup
First, use the Assign Appointment Types to Layouts page to map appointment types to a structured procedure encounter layout:
- Structured Procedure Visit
- Exam-Only Structured Procedure Visit
Note: For practices with the OB feature enabled in at least one department, you can also select one of these OB-specific layouts: OB Structured Procedure Visit or OB Exam-Only Structured Procedure Visit.
Next, configure templates to use in the structured procedure sections.
Configure templates and sections
You can configure each procedure-related encounter section to suit the needs of your practice. On the Main Menu, click Settings  >Clinicals. The links to these configuration pages appear in the Task Bar, under PRACTICE LINKS — Exam.
Encounter Section: Procedure Documentation
Configuration page: Use the Procedure Templates page.
Note: This section is also available without the Structured Procedure Documentation feature, but without the Structured Procedure Documentation feature, you cannot assign procedure templates to stages.
Encounter Section: Pre-Procedure Documentation
Configuration page: Use the Procedure Templates page.
Encounter Section: Pre-Procedure Medications
Configuration page: Use the Pre-Procedure Medications page.
Encounter Section: Pre-Procedure Vitals
Configuration page: Use the Configure Procedure Vitals page.
Encounter Section: Intra-Procedure Documentation
Configuration page: Use the Procedure Templates page.
Encounter Section: Intra-Procedure Medications
Configuration page: Use the Intra-Procedure Medications page.
Encounter Section: Intra-Procedure Vitals
Configuration page: Use the Configure Procedure Vitals page.
Encounter Section: Post-Procedure Documentation
Configuration page: Use the Procedure Templates page.
Encounter Section: Post-Procedure Medications
Configuration page: Use the Post-Procedure Medications page.
Encounter Section: Post-Procedure Vitals
Configuration page: Use the Configure Procedure Vitals page.
Encounter Section: Procedure Outcomes
Configuration page: Use the Procedure Complications page.
Encounter Section: Procedure Times
Configuration page: Procedure Times page.
Configuration page: Use the Procedure Roles page.
Encounter Section: Procedure Timeout / Checklist
Configuration page: Use the Procedure Timeout / Checklist page.
After you configure the new sections and elements, you can implement and follow a standard workflow for documenting in-office procedures.
Procedure Time Report
The Procedure Time Report allows you to examine the duration of structured procedure encounters and patient turnaround times.
Practice Managers can run the Procedure Time Report to:
-
Assess the efficiency of structured procedure encounters
-
Examine how long structured procedure encounters take and what patient turnaround time is
-
Identify changes, if necessary, to improve efficiency
Step-by-step instructions
To document a procedure
-
Once all surgery scheduling checklist tasks have been completed for the patient, you can begin documenting the surgery/procedure.
-
From the patient briefing, click Go to Exam in the top-right corner.
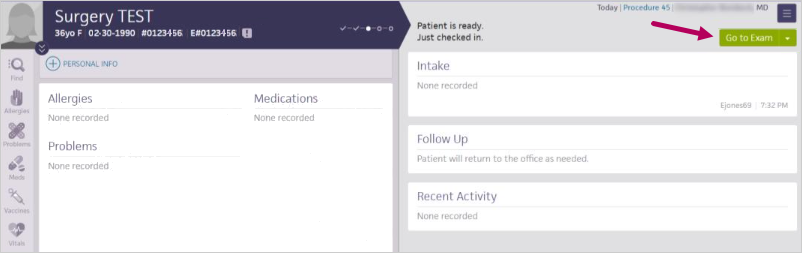
The Pre stage of the exam appears.
-
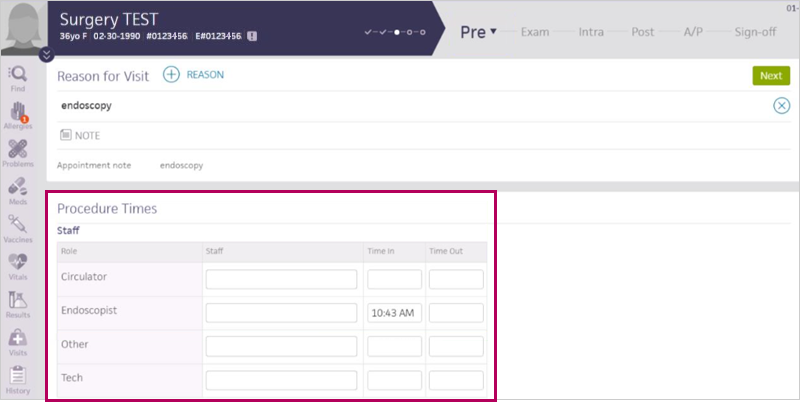
Under the Procedure Times section, complete the following fields:
-
Staff — Enter the name of the clinical staff you want to assign to the procedure.
-
Time in — Enter the time the clinical staff began the procedure.
Note
Enter "n" in the Time in field to automatically input the current time. -
Time out — Enter the time the clinical staff completed the procedure.
-
-
In the Pre-Procedure section, click the add icon
 next to the subsection you want to add to or edit.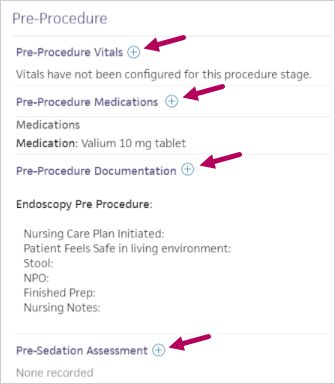
The respective Pre window opens.
-
Make edits as needed. To add additional medication, click the add icon
to the right of the first medication row.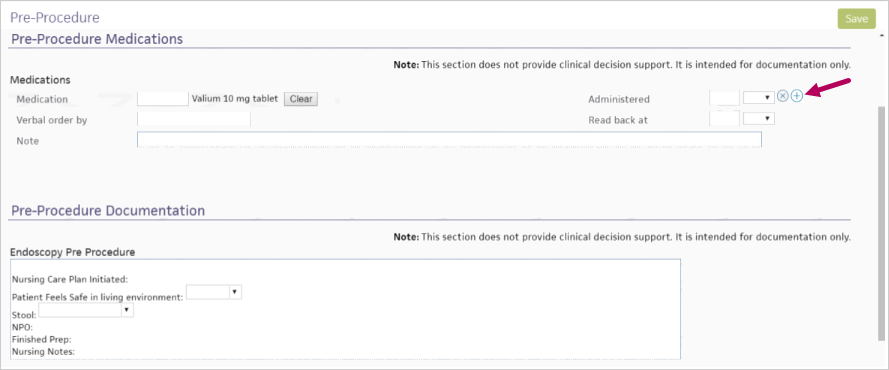
-
Click Save.
The Pre stage of the patient's exam reappears. -
Click Next in the top right corner.
The Exam stage appears. -
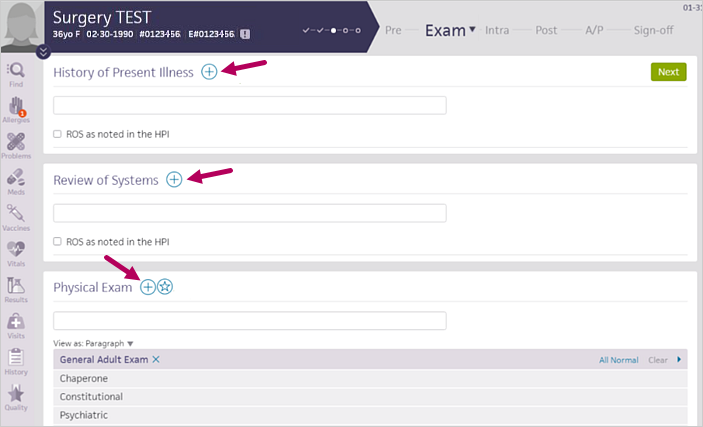
Click the add icon
next to the following sections and complete the templates as needed:-
History of Present Illness
-
Review of Systems
-
Physical Exam
-
-
Click Next in the top right corner.
The Intra stage appears. -
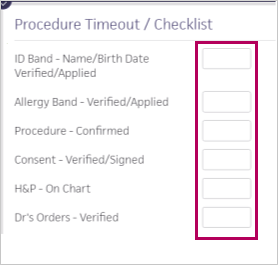
Under the Procedure Timeout / Checklist section, enter "n" in each field of the checklist to input the current time.
-
Under the Procedure Times section, complete the following fields:
- Staff — Enter the name of the clinical staff you want to assign to the procedure.
-
Time in — Enter the time the clinical staff began the procedure.
Note
-
Enter "n" in the Time in field to automatically input the current time.
-
Time in fields from the Pre stage auto-populate in the corresponding Time in fields in the Intra stage.
-
-
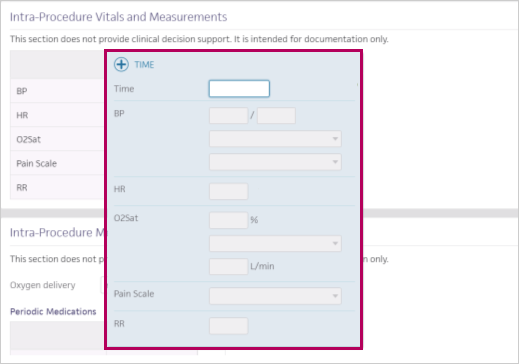
Under the Intra-Procedure Vitals and Measurements section, add the intra-procedure vitals by clicking the add icon
next to TIME and completing the following fields:-
Time
-
BP
-
HR
-
02Sat
-
Pain Scale
-
RR
-
-
To add periodic medications, under the Intra-Procedure Medications section, click the add icon
next to MEDICATION and search for and click the medication you want to add.
The medication appears in the Periodic Medications table. -
Click the add icon
next to TIME and complete the associated time fields, including the time the medication was administered, who administered it, and the quantity of the medication.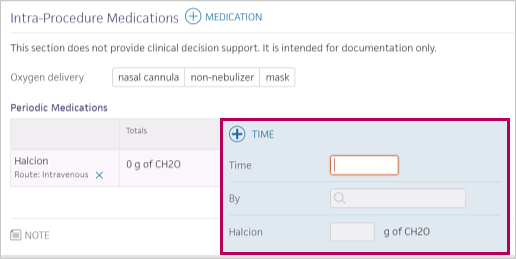
-
Under the Intra-Procedure Documentation section, complete the Intra Procedure fields as needed.
-
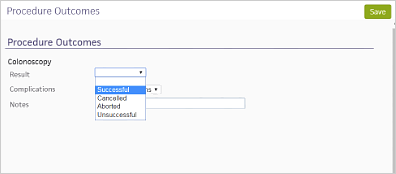
Click the Procedure Outcomes section to make edits.
The Procedure Outcomes window appears. -
Complete the following fields as needed:
-
Result
-
Complications
-
Notes
-
-
Click Save.
-
Click Next in the top right corner.
The Post stage appears. -
Review any procedure times carried over from the Pre and Intra-Procedure sections.
-
Under Procedure, enter "n" in the relevant fields to automatically input the current time as needed.
-
Click the add icon
next to Post-Procedure to add post-procedure vitals, medications, and documentation.
The Post-Procedure window appears. -
Click the add icon
at the end of the vitals or medications rows to add additional entries as needed.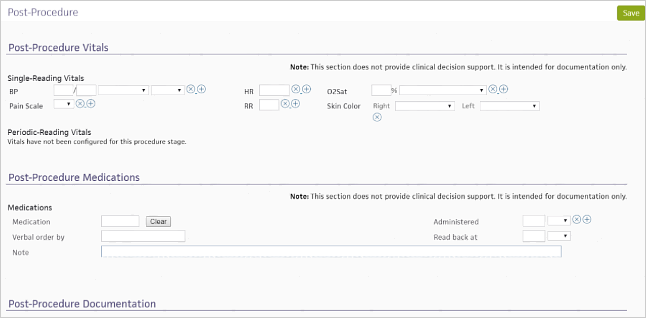
-
Click Save.
-
Click Next in the top right corner.
The A/P (Assessment and Plan) stage appears. -
Complete any additional diagnoses and orders in A/P.
-
Click Next in the top right corner.
The Sign-off stage appears. -
Continue through Sign-off according to your organization’s standard workflow.
Workflow scenario
- Dr. Smith is scheduled to perform a procedure.
- His patient arrives and is brought into the pre-op area, where the clinical staff prepares the patient for the procedure.
- The staff displays the Intake checklist and updates the patient location to the exam room.
- The staff reviews the patient's history and documents information in the Procedure Times, Pre-Procedure Vitals, Pre-Procedure Medication, Pre-Procedure Documentation, and Pre-Sedation Assessment sections.
- After intake is complete, the staff member clicks Done with Intake.
- Before the procedure, Dr. Smith visits the patient. He displays the Exam stage and clicks the Review link to review the Pre-Procedure information. He also documents the HPI, ROS, and PE as necessary.
- The clinical staff moves the patient to the operating room to be prepped for the procedure.
- The staff member displays the Exam stage and updates the patient location.
- While the provider performs the procedure, the clinical staff documents the information in the Procedure Times, Procedure Timeout/Checklist, Intra-Procedure Vitals, Intra-Procedure Medications, Intra-Procedure Documentation, and Procedure Documentation sections.
- After the procedure is complete, the patient is brought to the recovery room.
- The clinical staff documents information in the Procedure Times, Post-Procedure Vitals, Post-Procedure Medications, and Post-Procedure Documentation sections.
- While the patient is in recovery, the provider displays the Exam stage to document the surgical note, including the Procedure Outcomes section, the A/P section, patient instructions, and follow-up.
- The provider reviews the encounter summary, completes billing, and closes the encounter.
- The patient is discharged with instructions and follow-up information.