 User Guide — Appointment Schedule Calendar
Review this end-to-end user guide to learn more about the complete Appointment Schedule experience.
You can view and book appointments from an improved calendar experience.
Book and manage appointments without searching for a patient via the new Appointment Schedule calendar:
- Schedule appointments from the Appointment Schedule calendar.
- Edit, reschedule, or cancel appointments faster from one easy to access location: the Appointment Schedule calendar.
- Quickly see if a booked appointment is for an athenaTelehealth online visit.
- Enter the Appointment Schedule calendar from all existing entry points to the legacy scheduling experience.
Note: This feature is not available for organizations using athenaOne for Hospitals & Health Systems.
The Appointment Schedule experience is the recommended appointment scheduling destination. With this feature, you can solely rely on the Appointment Schedule calendar to complete your scheduling workflows.
In addition, this means that all existing entry points to the legacy scheduling experience lead to the Appointment Schedule calendar by default if you have the Try New Appointment Schedule option enabled. You can disable the Try New Appointment Schedule option to return to the legacy appointment scheduling experience.
On the Appointment Schedule Calendar the default view is the Day view.
Hover over the images for a larger view:
-
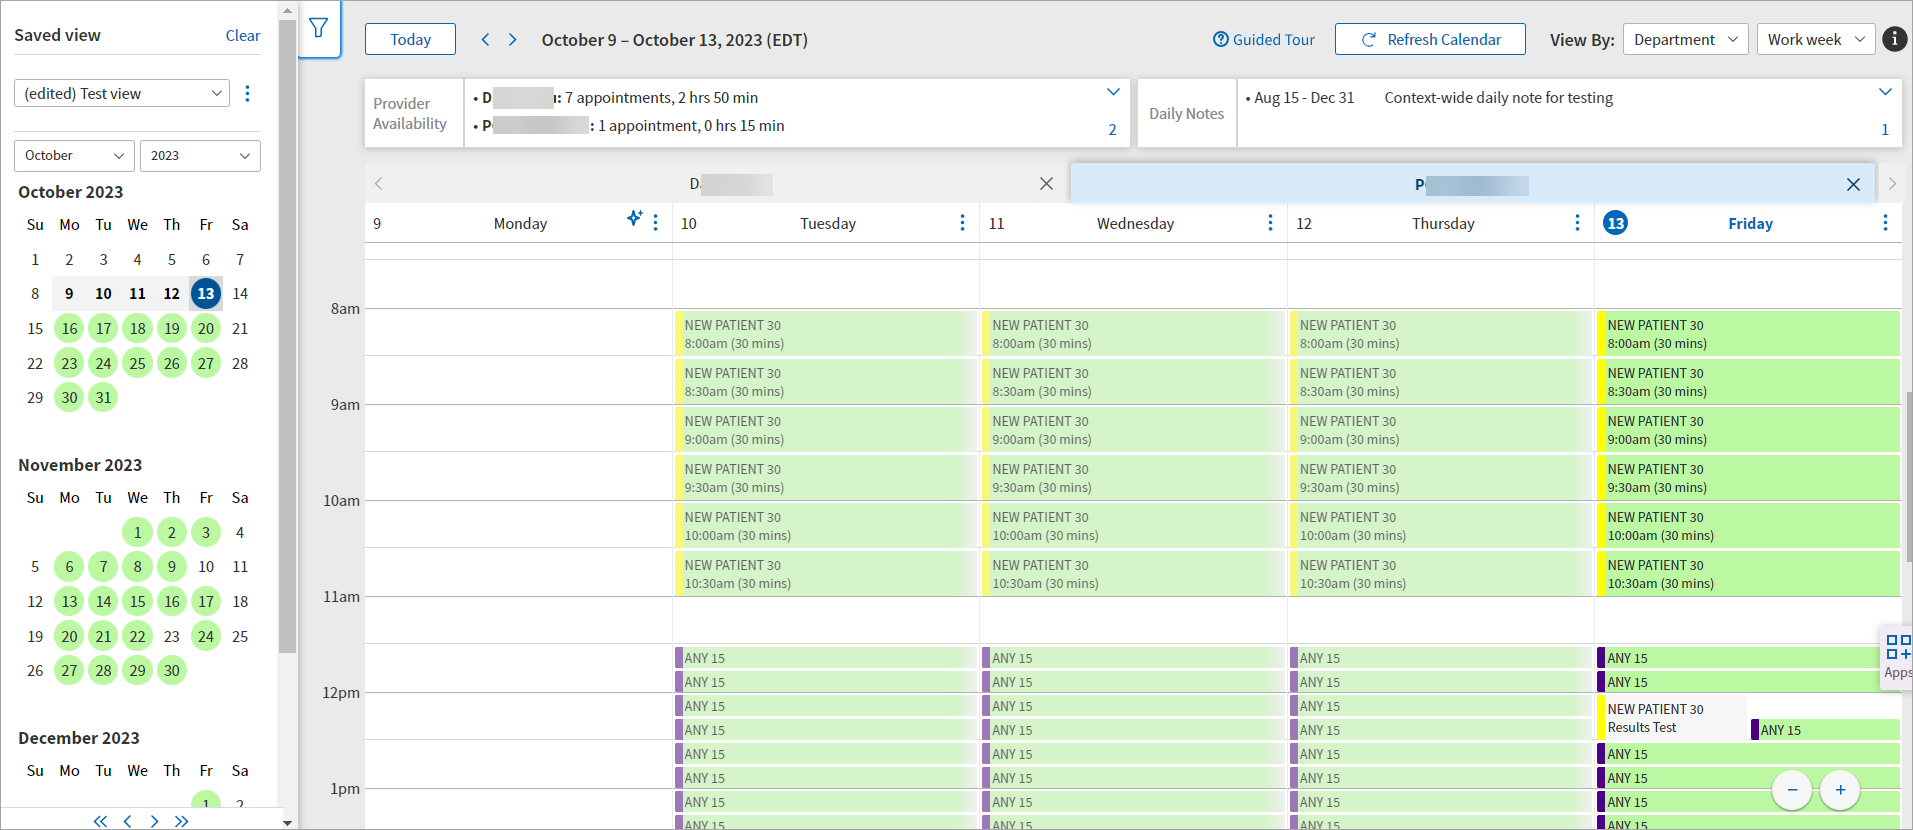
Example of Appointment Schedule Calendar with collapsed Filters panel.
-
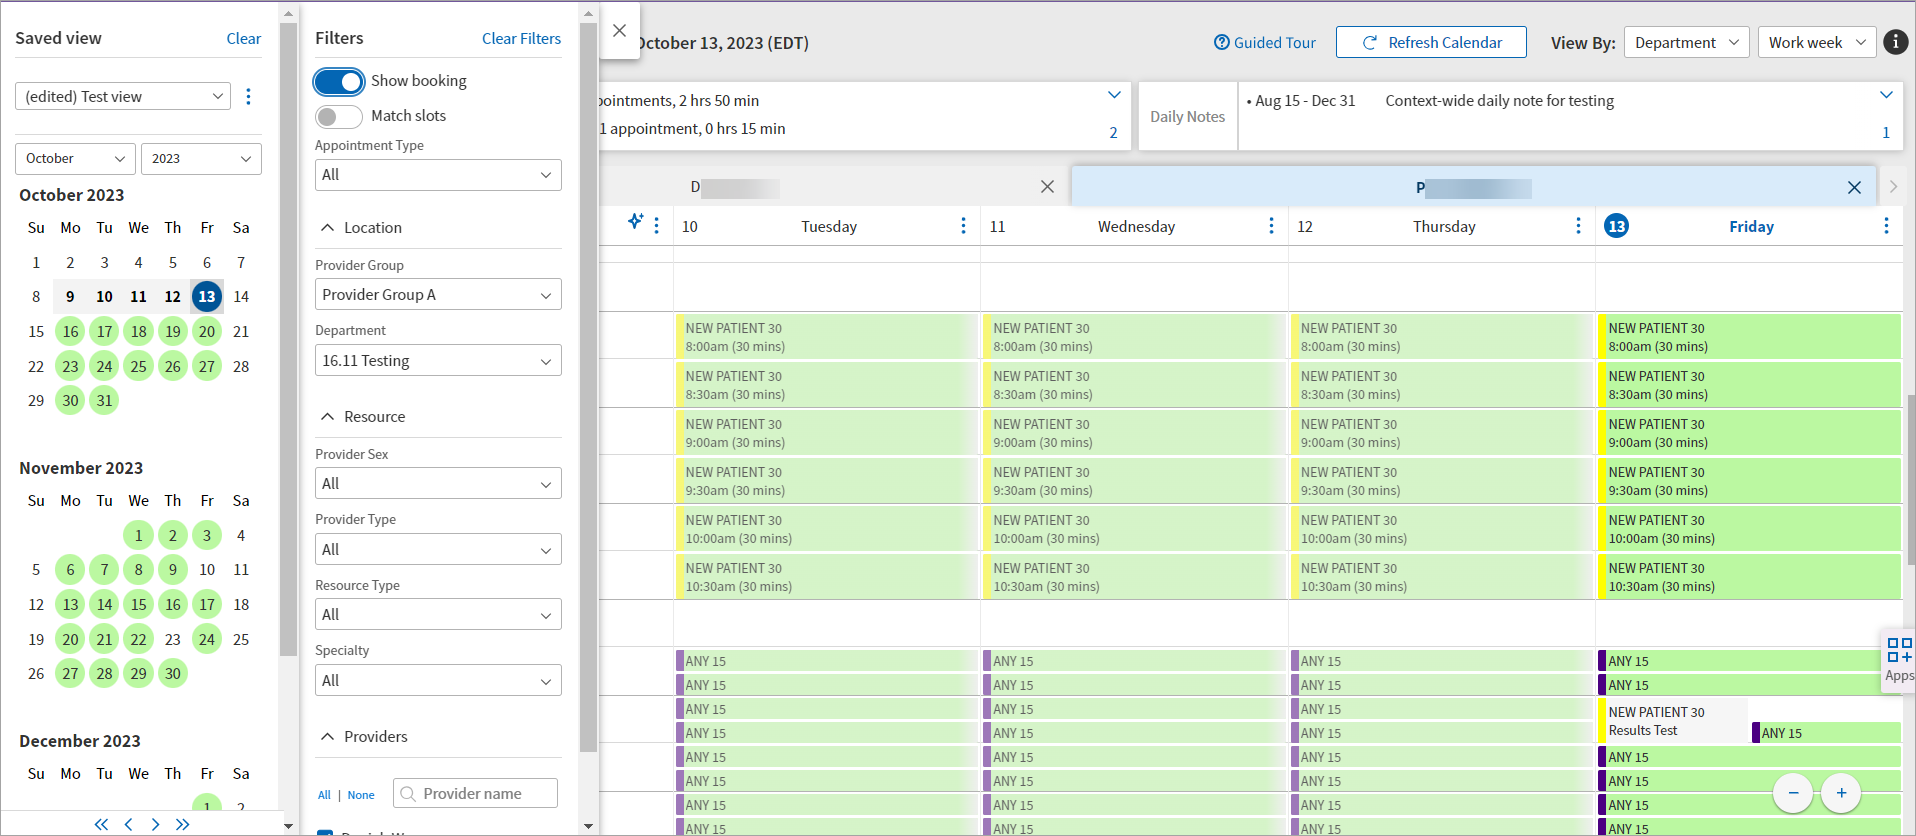
Example of Appointment Schedule Calendar with expanded Filters panel.
We're ensuring the Appointment Schedule calendar adheres to existing, legacy scheduling roles and permissions.
This means:
- You must have the Find Patient permission plus Schedule Patient, Cancel Appointment, OR Appointment Schedule: View Calendar to see the View Calendar option or the toggle that allows you to go back and forth between Appointment Schedule and legacy scheduling.
- This means, you must have the following combinations of permissions to access Appointment Schedule:
Find Patient + Schedule Patient
Find Patient + Cancel Appointment
Find Patient + Appointment Schedule: View Calendar
- This means, you must have the following combinations of permissions to access Appointment Schedule:
-
To book an appointment, you must have Find Patient AND Schedule Patient permissions
-
To cancel an appointment, you must have Find Patient and Cancel Appointment permissions
-
To reschedule an appointment, you must have Find Patient, Schedule Patient, and Cancel Appointment permissions
-
To create a new slot, you must have Force Appointment permission
-
To double book a slot, you must have Double-Book Slots permission
- To freeze a slot, you must have either:
Freeze Appointment Slot
Note: This role is separate from the Schedule Admin: Manage Appointments role. Your practice administer can manage this role, it is not added to any users automatically. Practice administrators give new and existing users the ability to freeze and unfreeze slots without allowing them access to the Manage Appointments page.- Schedule Admin: Manage Appointments permission
- Schedule Admin: Appointment Cancel Reasons/Types permission
The Appointment Schedule calendar
- Adheres to a user's access to the Quickview. For more information, see Quickview in O-help.
- Supports the Appointment Type Drop Downs feature. To set appointment type drop down options, you must have the Schedule Admin: Appointment Type Drop Downs user permission. For more information, see Appointment Type Drop Downs in O-help.
Based on user access to a department, athenaNet displays
- Schedules for providers in that specific department, including booked appointment information for a patient on that schedule.
-
Registered patients in the associated provider group.
- All available and booked appointments in all departments if they have the role and related permission: "User Access to all Departments"
If your common patient index (CPI) look-up setting is
- Unrestricted, our search returns all patients regardless of registered provider group, but you cannot schedule appointments or see more detailed patient demographics for patients not registered in the provider group of the department you’re scheduling an appointment in.
- Restricted, our search only returns patients registered in the provider group of the department you’re scheduling appointment in.
If your practice has the
- “Provider-Group-Based Data Permissions” setting ON, and you have user access to department set up, then we adhere to those settings in the Appointment Schedule calendar.
- “Provider-Based Data Permissions” setting ON, and you have users set up for provider access, we do not adhere to it in the Appointment Schedule calendar.
-
Multi-Resource setting enabled, and has existing scheduling resource types or sets up new ones, then we adhere to those settings in the Appointment Schedule calendar.
Note: For more information on setting up scheduling resources types, see Schedule Resource Types in O-help.
If a practice user has
- The "Privacy: Access Blocked Patients" permission, they can see blocked patient information in the Appointment Schedule calendar. They can also schedule, reschedule, and edit appointments for blocked patients. If a practice user does not have this permission, they can still view a blocked patient's booked appointment in the Appointment Schedule calendar. However, the slot displays "blocked patient" without a patient name or any identifying information. If you block a patient using your existing workflow and don't see that reflected on Appointment Schedule, click Refresh Calendar until you see that patient show the blocked status on the calendar.
- The "Double-Book Slots" permission they can double book a slot.
Important: By only honoring the Provider and Department Drop Down configurations for non-Enterprise clients, our provider and department drop downs and filters better align with legacy scheduling. However any differences in behavior are intended and expected behavior.
If you have the role or permission "Access to All Departments", you can access all departments in Appointment Schedule regardless of Department Login configuration
Important: Appointment Schedule DOES NOT adhere to the Access to All Providers role or permission.
Specific setup for Provider-Group-Based Data Permissions setting
If the Provider-Group-Based Data Permissions setting is enabled and Department Login Permissions setting is enabled too (Enterprise client):
-
Department access is determined by Department Login Permissions
-
Provider Group is determined by Department Login Permissions
-
Provider access is determined by the provider group, which is determined from Department Login Permissions
If the Provider-Group-Based Data Permissions setting is disabled but the Department Login Permissions setting is enabled, you have access to all providers and department access is determined by Department Login Permissions and no Provider Group fields appear.
If the Provider-Group-Based Data Permissions setting is enabled and the Department Login Permissions is disabled or set to ADMINONLY, the Appointment Schedule calendar does not load because this is an invalid configuration.
Specific setup for Department Login Permissions setting
If the Department Login Permissions setting is disabled, you have access to all providers and departments and no Provider Group fields appear.
If the Department Login Permissions setting is set to ADMINONLY, Appointment Schedule calendar does not load
Note: The ADMINONLY setting is meant to be temporary while your admin is setting up your access, but then would ideally be switched to ON
User access to drop downs in Appointment Schedule
If the Provider-Group-Based Data Permissions setting is enabled and Department Login Permissions setting is enabled too (Enterprise client):
-
Providers drop down/filter are NOT filtered by Provider Drop Down configurations
-
Department drop down/filter are NOT filtered by Department Drop Down configurations
Important: By not honoring the Provider and Department Drop Down configurations for Enterprise clients, our provider and department drop downs and filters better align with legacy scheduling. However any differences in behavior are intended and expected behavior.
If the Provider-Group-Based Data Permissions setting is disabled (non-Enterprise Client):
-
Providers drop down/filter are filtered by Provider Drop Down configurations
-
Department drop down/filter are filtered by Department Drop Down configurations
Important: By only honoring the Provider and Department Drop Down configurations for non-Enterprise clients, our provider and department drop downs and filters better align with legacy scheduling. However any differences in behavior are intended and expected behavior.
How the Appointment Schedule calendar handles Department drop downs
-
First, we identify all schedulable departments in the practice (Scheduling Department = Yes)
-
If the department is not a schedulable department, it will not appear in the department filter
-
-
Second, we look to see which of those departments has availability in the next 180 days
-
If there is no availability for any provider associated with the department in the next 180 days, the department will not appear in the department filter
-
-
Third, we honor the department to department mappings configured on the Department Dropdown admin page only if the Provider-Group-Based Data Permissions setting is disabled.
-
If the non-Enterprise practice has the Department Drop Downs practice setting enabled, we honor all the mappings configured on the Department Drop Downs admin page
-
To access the Department drop-down page and set up your own configurations, your practice must have the Department Drop-Downs feature enabled and you must have the Practice Set-Up: Department Drop-Downs role or permission.
A message at the top of the page tells you whether Department Drop-Down Restrictions are currently enabled or disabled for your practice. You can use this feature only if the message says enabled. Contact the CSC if you need to enable or disable this function. On the Main Menu, click Support > Success Community > Contact Client Support Center.
Note: For more information on configuring your own Department drop-downs, see Department Drop-Downs in O-help.
You can see which users at your practice viewed Protected Health Information (PHI) while using the Appointment Schedule calendar.
We’re updating the PHI Modification report so this information is included in the filtered results. You can select new Calendar event type, with the action of View.
Note: You can run a PHI Modification report from the Report Builder page. See Report Builder in O-help for more information.
You can display an Appointment Schedule calendar without searching for a patient:
-
On the Main Menu, click Calendar. Under APPOINTMENTS, click View Calendar.
Tip: If the Try NEW Appointment Schedule option is enabled, all of the existing entry points to the legacy scheduling experience lead to the Appointment Schedule calendar.
- On the left, select the dates and appointments to include.
- Select a view for the calendar:
Saved Views
Week, Work week, Day, or Availability
Note: You can leave and return to the Appointment Schedule calendar and see your filters and views retained where you left off in your workflow. If you have a preferred view set, the calendar brings up that view until you cancel it.
The Appointment Schedule experience is the recommended appointment scheduling destination. With this feature, you can solely rely on the Appointment Schedule calendar to complete your scheduling workflows. In addition, this means that all existing entry points to the legacy scheduling experience lead to the Appointment Schedule calendar by default if you have the Try New Appointment Schedule option enabled. You can disable the Try New Appointment Schedule option to return to the legacy appointment scheduling experience.
This section is meant to describe the several entry points to the Appointment Schedule calendar.
Note:
-
You can select the Try NEW Appointment Schedule option to switch between the legacy scheduling experience and the Appointment Schedule experience.

-
athenaNet remembers your previously selected option. This means that, once selected, athenaNet will default to displaying the Appointment Schedule calendar when you choose to schedule an appointment directly from patient search results.
If the Try NEW Appointment Schedule option is enabled, all of the existing entry points to the legacy scheduling experience lead to the Appointment Schedule calendar.
You can easily get to the Appointment Schedule calendar from:
- A patient Quickview
- Patient search results
- The Patient Registration page
- The Checkout page
- View Patient Appointments
- Appointment Wait List
- Appointment Ticklers
You can click separate Cancel Appointment and Reschedule Appointment links on the Appointment page when the Appointment Schedule calendar is set as your preferred scheduling experience and the appointment is for today.
Note: For legacy scheduling, the combined Cancel or Reschedule Appointment link remains unchanged.
When you go to the appointment page via the appointment link in the Quickview or from the View Patient Appointments page for an appointment that is for today:
-
With the Try New Appointment Schedule option enabled, meaning your preferred scheduling experience is set to Appointment Schedule, the Cancel or Reschedule Appointment link is split into two separate links: Cancel Appointment and Reschedule Appointment.
-
When you DO NOT have the Try New Appointment Schedule option enabled, meaning your preferred scheduling experience is set to legacy scheduling, the Cancel or Reschedule Appointment link remains as it is today (one link for the old cancel or reschedule legacy workflow)
Display the Quickview:
With athenaCollector
- In the text box at the top right of the Main Menu, enter the first three letters of the patient's last name, followed by a comma, followed by the first three letters of the patient's first name. Click the search icon. On the Find a Patient page, click Quickview for the patient you need.
- On the Patient Actions Bar, click Registration, and then click Quickview.
With athenaClinicals
- In the patient chart, click the Menu icon and select Quickview
To display the Appointment Schedule calendar, you can go to the:
Patient actions bar
-
Under Scheduling, click Schedule appointment
Appointments section
- Click Schedule directly to the left of the Appointments heading.
Appointments section (with specific criteria)
For today's appointment:
-
Click the appointment itself (indicated by the location, provider name, appointment type, and duration).
Note: If the patient has missing insurance information, a window appears where you can enter that information or click Cancel or Reschedule to proceed to the Appointment Schedule Calendar.
- Click Cancel
- Click Reschedule
- Click Reschedule using multi-resource
For upcoming appointments:
-
Click the appointment itself (indicated by the location, provider name, appointment type, and duration).
Note: An alert appears when the patient has a case policy. You can select the case policy when setting an insurance for the patient. If the patient has missing insurance information, a window appears where you can enter that information or click Cancel or Reschedule to proceed to the Appointment Schedule Calendar.
For an appointment tickler:
- Click Schedule next to the appointment tickler.
For a wait listed appointment:
- Click find appt next to a wait listed appointment.
- Display the Find a Patient page: In the text box at the top right of the Main Menu, enter the first three letters of the patient's last name, followed by a comma, followed by the first three letters of the patient's first name. Click the search icon.
- On the Find a Patient page, click Schedule for the patient you need.
The Appointment Schedule page appears.
Display Patient Registration:
-
On the Patient Actions Bar, click Registration, and then click Full Registration
-
On the Patient Actions Bar, click Registration, and select Register Family Member
After performing your existing workflows on this page:
-
Click Save and Schedule.
-
Notice the Appointment Schedule page appear.
The patient's information appears in the Appointment Schedule page for easy appointment scheduling.
To display the Checkout page you must go through the 5-stage patient encounter. The Checkout stage is the fifth and final stage.
Once you reach the Checkout stage, you can choose to schedule a new appointment. You can click Calendar or choose the number of weeks out to schedule the appointment (i.e. 1 wk for an appointment in one week from the current date).
After you make your selection, the Appointment Schedule page appears with the patient's information displayed at the top of the calendar for easy appointment scheduling.
After you click Calendar or one of the related scheduling links on Checkout, and then book an appointment on the Appointment Schedule calendar, you are automatically returned to your Checkout workflow.
This saves you time and clicks when scheduling an appointment from Checkout because you are no longer left on the Appointment Schedule calendar and forced to navigate back to Checkout for the patient.
You can display the View Patient Appointments page:
-
In the Patient Actions bar
-
Click Scheduling.
-
Click View Patient Appointments.
-
-
On the Quickview
-
Click View patient appointments in the Appointments heading.
The View Patient Appointments page appears.
-
You can either:
-
Click Cancel to cancel an appointment.
-
Click Reschedule to reschedule an appointment.
The Appointment Schedule page appears.
You can display the View Appointment Wait List page:
-
From the Main Menu
-
Click Appointment Wait List under the APPOINTMENTS heading.
-
-
From the Patient Actions bar
-
Click Scheduling.
-
Click Add to Appointment Wait List.
-
You can then click find appt in one of the rows of the table.
The Appointment Schedule page appears.
You can display the Appointment Ticklers page:
-
From the Main Menu
-
Click Calendar.
-
Under APPOINTMENTS, click Appointment Ticklers.
- From here you can:
- Click schedule.
The Appointment Schedule page appears. - In the Task Bar, click VIEW ALL.
- Click schedule in a patient row of the table.
The Appointment Schedule page appears.
- Click schedule.
-
The following information appears when scheduling appointments in the patient integrated search experience:
-
Name
-
Age
-
DOB
-
Patient ID
-
Contact Phone number (using their Contact Preference selection)
-
Appointment Details
-
Usual Provider
-
Primary Insurance
Note: Of the these fields from the improved patient banner, two that are helpful for your scheduling workflows: Usual Provider and Appointment Details (including upcoming appointments).
The following options are available when scheduling appointments in the patient integrated search experience:
- The patient appears in a banner at the top of the page.
- A Quickview link takes you to the patient's Quickview.
- A Clear Patient link removes the patient banner and reverts the Appointment Schedule calendar to the standard scheduling experience.
- The Try NEW Appointment Schedule option appears in the patient banner to easily take you back to the legacy scheduling experience.
After choosing to schedule an appointment from either a patient's Quickview or from patient search results:
- Notice the Appointment Schedule calendar appear.
- Notice the patient you selected appear automatically in a banner at the top of the page.
- While viewing the Appointment Schedule calendar by Department or Provider, select an empty slot.
The Book Appointment window expands from the left side of the screen. - Notice the patient automatically appear in the Patient Details section.
- Enter information as needed in the fields of the Book Appointment window.
- Click Review.
The Review Appointment Details window appears. - Review the appointment information and then click Book.
- Notice a message appear in the bottom left corner of the screen indicating the successful appointment booking.
- A provider's calendar without searching for a patient.
- A provider’s booked and open patient appointments.
- A provider's calendar for a:
- Day,
- Week, or
- Work week
- Available slot to book
- Specific slot ordered by time of day:
- morning,
- noon, and
- afternoon
- A provider's capacity table near the top of the calendar itself (the same one from legacy scheduling).
- Multiple provider calendars one day at a time.
- Multiple departments calendars one day at a time.
- Multiple calendars by specialty.
- Color coded slots that indicate the appointment type.
- The full name of appointment types display in time slots.
- Any custom appointment type notes that your practice entered for the specific appointment type appear in the Review Appointment Details window below the heading.
- Additional provider search filters for a more granular refinement of the provider search results.
In this page you can
- Set a preferred view that appears when you go to the Appointment Schedule calendar.
- Find open appointments for a patient quickly.
- Drag provider tabs to arrange them in the order you choose.
-
Display provider calendars by selecting from a streamlined list of providers.
Note: Improved logic associates providers with a department if a provider has open or booked appointments in that department.
- Click Refresh calendar at the top of the page to reload the calendar.
- Use the custom fields feature you're used to from legacy scheduling.
- Easily navigate to the Appointment Ticklers page to create new ticklers during the appointment cancel workflow (and then automatically return to Appointment Schedule when you finish your workflow).
- Easily navigate to the Patient Registration page to register a new patient and then quickly return to the Appointment Schedule calendar.
-
Enter up to four patient insurances.
-
Reschedule or cancel checked in Appointments
-
Click the Calendar focus button to hide sections of the calendar for a larger view of the calendar itself.
See accessibility improvements that make what you're currently viewing clearer
You can view accessibility improvements that make it clearer what day you're viewing and what provider you're viewing in the tabs of the calendar itself.
The following updates improve accessibility of the Appointment Schedule experience.
-
To make the selected date on the availability calendar more prominent in the main calendar: today's date will always be shown as a blue circle. When selecting a date other than today's date, it will be highlighted with a grey circle.
-
To make the selected provider on the main calendar more prominent in the main calendar:
-
The selected provider's tab is white with bold blue text. The unselected providers' tabs are grey with black text.
-
The hover state of the selected provider is dark blue with white text. The hover state of the unselected providers are light blue with black text.
-
Until the moment that the Check-In stage is complete, meaning that patient check-in is marked as done, you can take the following actions on the appointment:
- Reschedule
- Edit
- Cancel
After patient check-in is complete, you can take the following actions on the appointment:
- Reschedule
- Edit
-
Cancel
Note: Regardless of patient check-in status, you can edit appointment notes.
If the patient is already Checked-In but needs to cancel or reschedule, you can retain the appointment details and simply move to another day or slot.
You can also just cancel outright if that is the patient's preference.
Note: Once the appointment is in the Check out stage, it can no longer be canceled or rescheduled in Appointment Schedule. If you already clicked Done with Check-in but need to cancel the appointment, proceed to the Checkout stage Charge Entry tab and mark the appointment as not requiring charge entry with the reason as No Services Performed.
Important: If an appointment was prepped (see Encounter Preparation (Intake and Exam Prep in O-help), the prepped information does not move with the appointment if it is rescheduled after its checked-in.
This is the same functionality as legacy scheduling.
- We updated the calendar panel so that three months appear at the same time.
- You can select specific months and years to jump to in month and year drop-down lists that appear right above the first calendar.
- You can click the left-facing and right-facing arrows at the bottom of the section to go backward to the previous month or advance to the next month.
- The single arrow icons move one month forward or backward.
- The double arrow icons move three months forward or backward.
- Saved views are at the top of the calendar panel.
- All filters appear in their own Filter panel that is collapsed by default at the top of the calendar, just below the tool bar.

- Click the arrow icon to open the filter panel.
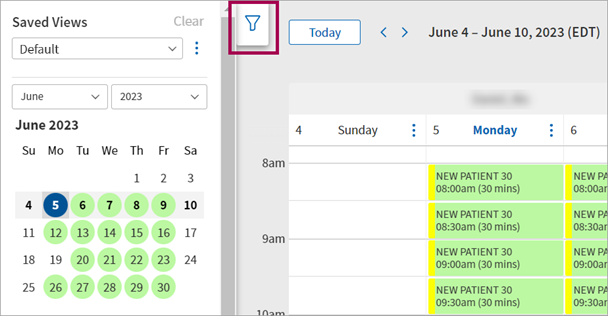
- All filters appear for you to configure as needed once you expand the filters panel.

You can see the Filters section of the Appointment Schedule calendar appear at the top of the page for easier access and clearer visibility.
Filters are all multi-select, allowing for more customization in how you view the calendar. If you prefer to always start the scheduling process with no filters applied, as in legacy, you can now use the Preload calendar option to set your preference.
You can:
-
More easily access the calendar filters. All filters are now multi-select lists.
-
Better control your calendar preferences.
-
Select providers who work in different departments.
-
Set the:
-
Preload calendar option to start with either a blank calendar or a pre-filtered calendar.
-
Preload department option to load your log-in department automatically.
-
-
A Clear all button appears next to Apply Filters so you can easily clear all filters.
-
Filter headings appear above the field and the number of selected filters appears in the field.
-
Text you enter remains in the search bar until you clear it, even when you select multiple options.
-
When you select an option, it moves to the right side of the field to indicate that you selected it.
All filters are available in the Filters panel at the top of the Appointment Schedule calendar.
Once you set your desired filters, click Apply Filters to update the calendar based on the options you selected.
Note: The three availability calendars on the left-side of the page remain the same. You can continue to access your Saved Views and save new views per your usual workflows.
We're making this change because you requested it. Keep those suggestions coming!
This update ensures that the features and workflows you're familiar with from legacy scheduling are available in the Appointment Schedule calendar.
This feature makes it easier to see all available filters while viewing the calendar:
-
More easily access the calendar filters. All filters are now multi-select lists.
-
Better control your calendar preferences.
With this update, we're removing the options to view by Department, Provider, and Specialty. These options are now supported by the multi-select filters in the new Filter box.
You can choose to view any combination of providers, departments, and provider groups because you requested it! Keep those suggestions coming.
The new Filters box contains the same filters as before. These filters all appear in the collapsed view of the Filters box:
| Filter | Note |
|---|---|
| Provider Group | This filter option will only be available if your practice has Provider Groups enabled and more than one Provider Group is configured. |
| Resource Type | This filter option will only be available if your practice has at least one Resource Type configured and associated with an active provider on the Providers page (Settings > Billing > Providers). |
| Appointment Type | Filter selections of provider(s) or department(s) will affect the appointment types listed in the Appointment Type filter based on your Appointment Type drop-down option configurations (if applicable). Appointment type filter selections will not affect Provider or Department filter options. |
| Department | This filter functions the same as it did before. It includes all departments with availability in the next 180 days. |
| Providers | This filter functions the same as it did before. It includes all providers with availability in the next 180 days. |
When you click the blue downward arrow icon next to Filters, it becomes the All Filters box and expands to reveal more filter options:
- Specialty
- Provider Type
- Provider Sex
Note:
-
We added new Undefined options for the Provider Sex and Resource Type fields to match how those are optional fields on the Providers page.
-
You can select any combination of filters: one, all, none, or a chosen selection.
-
Once you've selected your filters, click Apply Filters for them to take effect.
There are two ways to select from a list of filters:
-
One at a time
-
In bulk
Check the box to select only that specific entry.
Click the name of the option itself to highlight the entire row. Click the name of any other option you want to include to highlight those rows as well for selecting in bulk.
Click Clear in the collapsed Filters panel to clear all filters. In the expanded Filters panel, click Clear all to clear all filters or Clear next to each filter to clear the selections of the individual filters.
The Provider filter options are affected by the options selected in the following filters:
-
Provider Group
-
Resource Type
-
Specialty
-
Provider Type
-
Provider Sex
-
Department
For example, your selections in the Provider Group and Specialty filters will narrow down the options available in the Provider filter to the providers in the provider group(s) and specialties you selected.
The Department filter options are affected by the options selected in the Provider Group filter. For example: Your selection in the Provider Group filter will narrow down the options available in the Department filter to the departments of the provider group(s) you selected. Your selections in the Department filter only affect the options available in the Provider filter - only providers with templates applied for the selected departments will show as an option in the Provider filter.
The undefined options in the Resource Type and Provider Sex filters will filter to show the providers without a Resource Type or Provider Sex defined.
A settings icon replaces the info icon and has the following options.
| Option | Description |
|---|---|
| Preload calendar | Continues to pre-filter the Appointment Schedule calendar with the settings you used in your last session when you return. |
| Preload department | Updates the calendar Default view to load only your log-in department (rather than all departments) and provider group (if applicable). |
|
Match Slots |
Displays only slots that exactly match the appointment type(s) selected in the filter |
|
Show Booking |
Hides or displays booked appointments |
|
Learn More
|
Takes you to a Success Community page to view all Appointment Schedule learning materials. |
This update includes a new Preload calendar setting. This setting is set at the user level and enabled by default. When enabled, the calendar continues to pre-filter with the settings you used in your last session when you return to the Appointment Schedule calendar.
Note: The Preload calendar setting cannot be saved as part of a Saved View since it overrides the Saved Views functionality.
If you choose to turn the Preload calendar off:
-
Schedules do not load automatically. The Appointment Schedule calendar loads without any filters selected and you must choose at least one filter to view schedules.
-
If your practice has Provider Groups configured, the provider group filter will be pre-set to the provider group of your login department. You will be prompted to select one additional filter before the Apply Filters button is enabled.
-
If your practice does not have Provider Groups configured, you will be prompted to selected at least one filter before the Apply Filters button is enabled.
-
The "Preferred view on load" feature, which is associated with Saved Views, is turned off. This means that when you load the Appointment Schedule calendar, it no longer automatically displays your preferred view configured in the Saved Views section.

This update also includes a new Preload department setting. This setting is set at the user level and enabled by default.
When enabled, the Preload department setting updates the calendar Default view to load your log-in department (rather than all departments) and provider group(s) (if applicable). This means that the calendar loads all the providers with availability in your log-in department and provider group(s) (if applicable).
You will see the Default view the first time you load the calendar or when selecting Clear in the Saved Views panel.
If you choose to turn the Preload department off, the Default view will only load the provider group based on your log-in department (if applicable). This means you will see schedules for all departments and providers in the provider group based your login department.
Note: If your practice does not have provider groups configured, the Default view loads with all providers and departments
- From the Appointment Schedule calendar, click the info icon
 next to the View by fields:
 -
Select Learn more.
A Success Community article displays in a new tab with tutorial videos for an overview on related user roles, finding an appointment slot, booking an appointment, as well as canceling, editing, and rescheduling booked appointments.
Note: Watch the demo video on the Success Community, which is also included at the top of this topic.
You can click the Calendar focus button to hide sections and see more of the calendar:
-
Expands the calendar window for easier viewing
-
Reduces scrolling when searching for an appointment slot
When the Calendar focus view is off the following sections appear:
-
Filters
-
Notes
-
Provider availability
If you entered the calendar from a patient, the patient banner appears.
The calendar is below all of those sections and you may have to scroll to see available slots.

Click Calendar focus to turn on the Calendar focus view.
When the Calendar focus view is on, the following sections are hidden so you can see more of the calendar:
-
Filters
-
Notes
-
Provider availability
If you entered the calendar from a patient, the patient banner is hidden.
The calendar is directly below the Calendar focus option. Now the calendar and available slots appear higher on the page.

Click Calendar focus again to turn off the Calendar focus view.
You can save specific calendar views, select between these views, and edit or delete any of your saved views. These saved views are available to you from the Appointment Schedule calendar whenever you log in to athenaNet.
You can save up to 50 unique views.
From the Appointment Schedule calendar, go to the Saved Views section on the left panel of the page:
A saved view takes into account the following areas of your calendar view:
-
Anything set in the View by, Filters, and/or Providers sections.
-
The tabs featured along the top of the calendar.
-
If you are viewing the calendar by day, week, work week, or availability.
-
Whether or not you are viewing bookings.
-
Whether or not you have match slots turned on.
- After you set your desired view or filters, click the more options icon
 .
. - Click Create a new view.
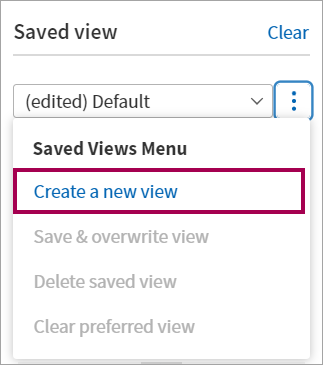
-
Enter a view name in the Saved view Name field.
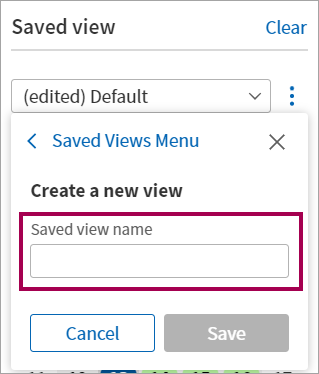
Note: You can click:
-
< Saved Views Menu to return to the list of options in the Saved Views menu
-
The X icon to close the window
-
Cancel to back out of creating a new view
-
-
Click Save.
-
Notice a success message appear in the lower left corner of the page.
Note: Additionally, you can:
- Toggle among any of your saved views from the Saved Views drop-down menu.
- Adjust the calendar view while using one of your saved views, you can overwrite the existing saved view. Click the more options icon
 and select Save & overwrite view.
 - Delete any of your saved views, click the more options icon
 and select Delete view.
- Once you've created a new view, click the more options icon
 .
. - Click the Preferred view on load option.
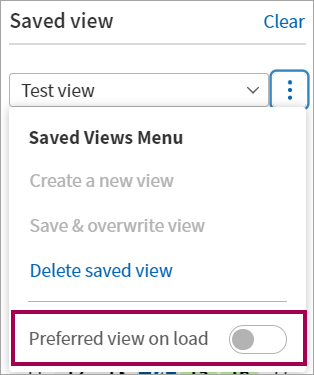
The Preferred view on load option is enabled.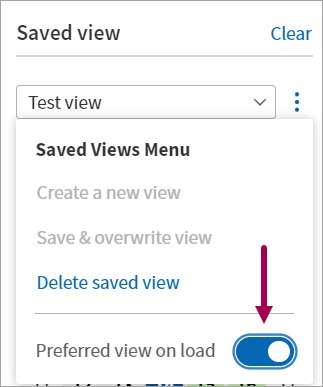
- Notice a success message appear in the lower left corner of the page.
To remove the preferred view
Click the more options icon ![]() and then:
and then:
-
Disable the Preferred view on load option in the Saved Views menu.
-
Click Clear preferred view in the Saved Views menu of the Default view.
The mini calendar that appears at the top left corner of the page is expanded to be the Calendar panel.
The calendar panel show three months of availability at the same time.
You can click the left-facing and right-facing arrows at the bottom of the section to go backward to the previous month or advance to the next month.
- The single arrow icons move one month forward or backward.
- The double arrow icons move three months forward or backward.
All filters appear in their own Filter panel that is collapsed by default at the top of the calendar
You can click the arrow icon to open the filter panel. We made this change to ensure all available filters are consolidated in one place that can be collapsed or opened at any time.
Once expanded, click the arrow again to collapse the filter section.
We improved the Provider field to update the provider and department filters based on provider availability.
Important: We adhere to Provider drop-down lists, if your practice has them established. However, the Appointment Schedule calendar doesn’t adhere to Department options — We adhere to the Department drop-down settings in the Appointment Schedule calendar.
For more information on configuring your own Department drop-downs, see Department Drop-Downs in O-help.
Searching for a patient to schedule an appointment for in the Appointment Schedule calendar is easier and faster. You no longer need to select the search filter when entering text or numbers in the search bar. Based on specific criteria, the search filter option automatically sets to the following options when you enter:
- Patient name —Text. Entering text automatically sets the search filter option to Patient name.
- Patient ID — Up to three numbers. Entering either one, two, or three numbers automatically sets the search filter option to Patient ID.
- Patient DOB — Eight numbers. Entering eight numbers automatically sets the search filter option to Patient DOB.
- Phone number — Ten. Entering ten numbers automatically sets the search filter option to Phone number.
- Patient SSN — Four or nine numbers. Entering either four numbers (like the last four) or nine numbers (like the entire SSN) automatically sets the search filter option to Patient SSN.
You can book appointments from the Appointment Schedule calendar without searching for a patient.
You can see appointment types list in an order that respects any existing or new configurations your practice sets up.
Note: The default order is alphabetical. After respecting your practice's existing configurations, any remaining appointment types are ordered alphabetically.
From the Appointment Schedule calendar:
- Select a date from the calendar panel.
-
Click the arrow icon to expand the filter panel. Once expanded, you can filter the calendar as needed. Some of the following fields are optional:
-
Department — Select one department for the appointment.
-
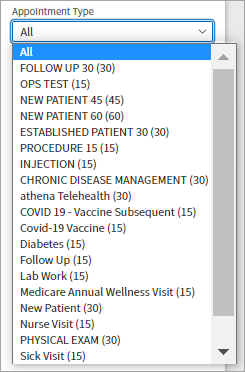
Select an appointment type (optional). The default option is all appointment types.
-
Set the Show Bookings field option to either On or Off to see only open appointment time slots, or both booked and open time slots (optional).
-
Toggle the Slot Matching option on to only display slots that match the appointment type selected in the filter.
- Providers — Select one provider for the appointment (optional). The default option is all providers.
- (Optional) Further refine the search results by selecting from the following options in the Resource section.
Provider Sex — Indicates whether the sex of the provider is Male, Female, or Unknown.
Provider Type — Indicates the field of medicine that the provider practices.
Resource Type — Indicates the scheduling resource type for the appointment.
Note: A scheduling resource type is a set of providers or resources that, for scheduling purposes, are interchangeable. Scheduling resource types are used for multi-resource scheduling and this field only appears if your practice has the Multi-Resource setting enabled. For more information, see Schedule Resource Type in O-help.
Specialty — Indicates the branch of medicine or surgery that the provider specializes in.
Tip: Leave the options as All if you do not want to refine the results via these filters.
-
Non-Providers — Non-person providers (optional). The default option is all resources.
-
- Click any time slot that is highlighted green.
The Slot Details window appears. - Review the following:
- The Appointment type is at the top left of the Slot Details window.
- The time slot is at the top-right of the Slot Details window with the time zone.
- Department — The department associated with the time slot.
- Provider — The provider associated with the time slot.
- Click Book Appointment.
The left-pane expands into the Book Appointment window. The right-pane zooms into the selected time slot and displays the name of the provider name and date above the time slot. - Enter patient details.
Patient Search — Select a search type option and enter the information in the text box. For example, select Patient DOB and enter your patient's date of birth.
Note: When you search by Patient ID, the patient details appear automatically without the need to select from a list of patients.
Click Find.
Note: You can only select existing patients. To add new patients, you can either:Add them via your usual workflows and then the newly-added patient appears among the search results.
Copy a patient to the provider group when displaying patient search results without leaving the page. The Appointment Schedule calendar is integrated with the CPI View workflow (which is available while displaying patient search results in the legacy experience).
Select the patient for whom you’d like to book an appointment.
Note: If you have the "Privacy: Access Blocked Patients" permission, you can search for and schedule appointments for blocked patients. If you block a patient using your existing workflow and don't see that reflected on Appointment Schedule, click Refresh Calendar until you see that patient show the blocked status on the calendar.
- Enter the appointment details:
-
Notice that certain fields are filled in based on the time slot you selected:
- Date — Select a date for the appointment from the calendar. The time slot you select determines this field.
- Time — Select a start time for the appointment. The time slot you select determines this field.
-
Department — Defaults to the selected department for the appointment associated with the time slot. Select which department practice you want to book an appointment with. The time slot you select determines this field.
Note: Editing the field changes the calendar you see on the right of the screen.
-
Provider — Defaults to the selected provider for the appointment associated with the time slot. The time slot you select determines this field.
Note: Editing the field changes the calendar you see on the right of the screen.
-
Appointment type — Select a reason for the visit.
Note: If any Provider-Appointment Type Notes are configured for the provider in regard to the specific appointment type, they appear underneath this field. See Provider-Appointment Type Notes in O-help for more information.
- Remove slots from calendar — Select any additional slots you may want reserve at the time of appointment booking.
- Use alternate insurance - Toggle On to select alternative insurances than what is automatically selected in the patient's banner.
Note: You can:- Enter up to four patient insurances.
- See the following patient insurance information appear in the Insurance field drop-down options: Insurance name, ID number, Member number. An alert appears when the patient has a case policy.
- Select the case policy when setting an insurance for the patient.
-
Patient's condition related to — This an optional field. Enter information related to the patient condition if applicable.
Important: The Appointment Schedule calendar respects the setting "Require Work-related question on patient schedule". If set to Hide, these options are not displayed, they're hidden. If set to Required or Not Required, by default the options set to No, and you can change them at the time of booking, editing, or rescheduling an appointment. -
Notes — Add any information you’d like your provider to see prior to the visit.
- Click Review.
The Review Appointment Details page appears with a preview of how the schedule appears with the selected time slot filled. -
Click Book appointment.
Note: A note may appear under Review Appointment Details heading, it can be:- The custom appointment type note your practice added for the appointment type on the Appointment Types page. For more information on entering a custom note to appear for an appointment type, see Appointment Types in O-help.
- The custom provider-appointment type note your practice added for the provider in regard to the specific appointment type. For more information on entering a custom note to appear for a provider in regard to specific appointment types, see Provider-Appointment Type Notes in O-help.
- Both an appointment type note and a provider-appointment type note if your practice has these note types configured. An appointment type note appears above a provider-appointment type note.
- The custom appointment type note your practice added for the appointment type on the Appointment Types page. For more information on entering a custom note to appear for an appointment type, see Appointment Types in O-help.
-
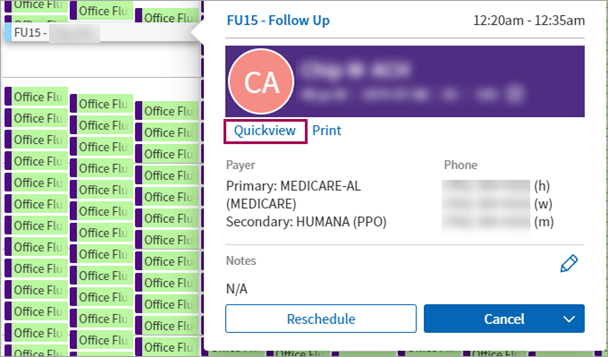
(Optional) Click the booked appointment to see the patient details.
Note: The Quickview link also appears in the patient details when you select a scheduled appointment from the Appointment Schedule calendar. The Appointment Schedule calendar adheres to a user's access to the Quickview.
Important: Depending on the success of the appointment scheduling, you’ll see a message appear:
- If an error occurs and you’re unable to schedule the appointment
- If you successfully booked the appointment
You can edit existing scheduled appointments. When you click an existing appointment, click Reschedule to revise the appointment details.
In the Edit Appointment window, you can:
- Edit existing notes and add new notes.
- Change the appointment type.
- Add and edit patient insurance information.
Note: You can see the following patient insurance information appear in the Insurance field drop-down options: Insurance name, ID number, Member number. An alert appears when the patient has a case policy. You can select the case policy when setting an insurance for the patient. -
Add and edit patient condition information.
-
Add and edit any field other than Date, Department, Resource, or Time.
Note: Click Re-load patient to refresh the Patient Details section if the patient did not load.
Click Save when you’re finished editing the appointment.
A message appears in the bottom left corner of the screen indicating the successful appointment update.
Important:
-
When editing a booked appointment, you will only see insurance fields in the Appointment Details section. This ensures that insurance changes apply to the appointment.
-
The insurance fields in the Patient Details section will continue to be accessible in the Book Appointment workflow. Updates to the patient's insurance will apply to all appointments booked in the session unless indicated with the Use alternative insurance option within the appointment card.
-
We are making this change because the insurance fields in Patient Details section of the Edit Appointment workflow didn't change the insurance of the associated appointment.
-
This update ensures that the patient insurance for the booked appointment is edited successfully because editing patient insurance in the Patient Details section did not update the insurance for the appointment(s) in the Appointment Details.
To reschedule appointments from the Edit appointment window:
- From the Appointment Schedule calendar, click the appointment you’d like to reschedule.
- Click Reschedule. The Edit appointment window appears.
-
Select a different time slot, provider, or department to reschedule the appointment on the preview calendar on the right. Changing the Date, Time, Department, or Provider will require a reason for reschedule.
Note: After you select a different time slot, click Use this slot instead.
- Click Review to e.nter the reschedule reason.
- In the Reschedule Appointment window:
- Select a reason for reschedule.
- Add any applicable notes (optional).
- Click Next: Review
- Review the details of the appointment reschedule.
- Click Confirm updates
- Notice a message appears in the bottom left corner of the screen indicating the successful appointment update.
To cancel scheduled appointments:
- From the Appointment Schedule calendar, click the appointment you’d like to cancel.
- Click Cancel.
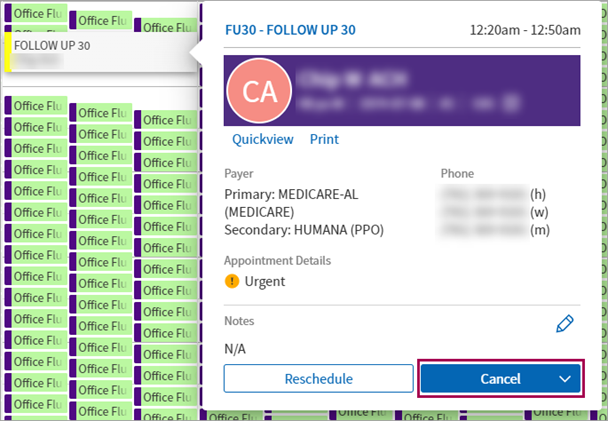
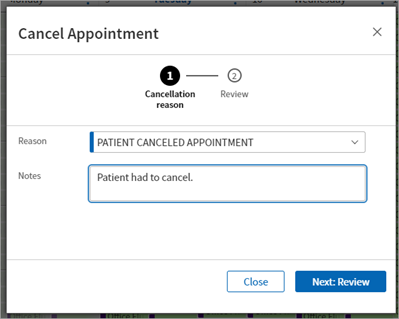
The Cancel Appointment window appears. - In the Cancel Appointment window:
- Select a reason for the appointment cancellation.
- Add any applicable notes (optional).
- Click Next: Review.
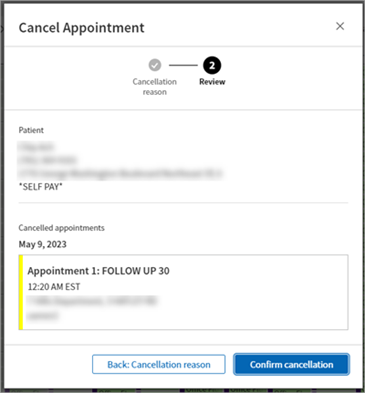
- Review the details of the appointment cancellation.
- Click Confirm cancellation.
From a booked slot on the Appointment schedule calendar, click the appointment heading in the pop-up window that appears when you click into a booked slot. This will take you to the Appointment Information page where you can check-in the patient on the day of the appointment.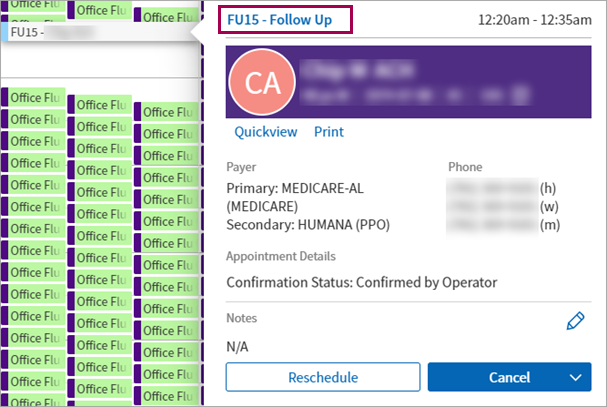
Select the booked appointment from the Appointment Schedule calendar to see a message in the Appointment Details section that the patient confirmed their appointment.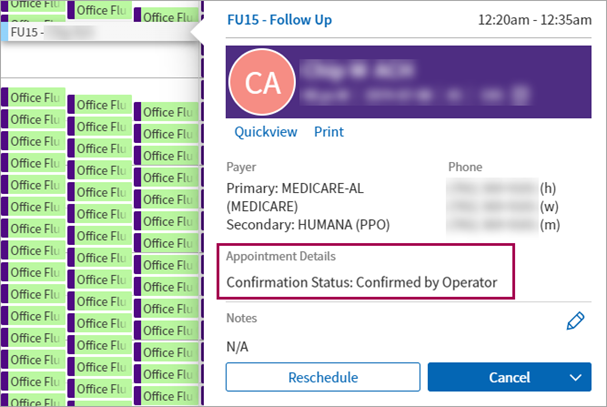
We improved the Patient Details section with more comprehensive information about your patient that is easily understood at a glance.
You can select options for primary, secondary, tertiary, and quaternary insurance that apply to the booked appointment.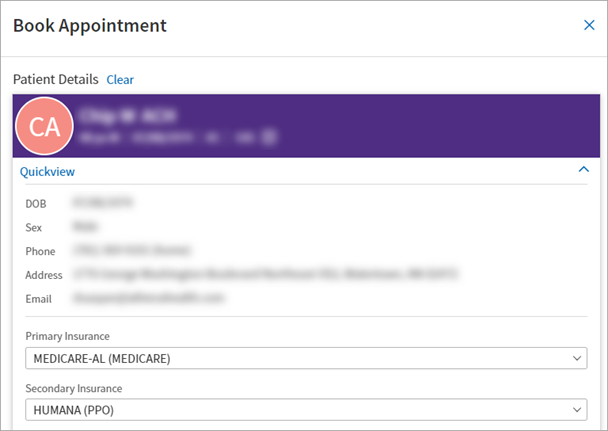
Note: If your practice added a chart alert to the patient banner, it appears in the Patient Details section of the Book Appointment window. The chart alert is read-only; edit the chart alert via your usual workflows. Click Audit history to see previous updates to the chart alert.
When you search for a patient from the Appointment Schedule calendar, the following patient information appears in the search results:
- Last name — The patient’s last name.
- First name — The patient’s first name.
- DOB — The patient’s date of birth.
- Last 4 SSN – The last four digits of the patient’s social security number.
The following patient information, patient contact information, and patient insurance information appears in an individual search result when expanded to the Patient Details window:
- First name and last name — The patient’s first name and last name appear at the top of the expanded window.
- Patient ID — The patient unique identifying number appears below their first and last name.
- DOB — The patient’s date of birth.
- Sex — The patient’s sex.
- Phone — The patient’s primary phone number.
- Address — The patient’s mailing or resource address.
- Email — The patient’s email address.
- Primary Insurance — The patient’s primary insurance vendor.
- Secondary Insurance — The patient’s secondary insurance vendor.
-
Tertiary Insurance — The patient’s tertiary insurance vendor.
-
Quaternary Insurance — The patient’s quaternary insurance vendor.
Note:
-
You can see the following patient insurance information appear in the Insurance field drop-down options:
-
Insurance name
-
ID number
-
Member number
-
-
An alert appears when the patient has a case policy. You can select the case policy when setting an insurance for the patient. The following information appears for case policy options in the insurance drop-downs:
-
Policy name
-
ID number
-
Insurance type
-
Injury date
-
Injury location
-
An alert appears while booking or rescheduling an appointment from Appointment Schedule that informs you when the patient already has an appointment on the day and time you selected.
The alert appears even when the other appointment is:
-
In a different provider group or department
-
With a another provider
The alert says:
Warning — The patient already has an appointment scheduled for this date and time.
Setup instructions
There is no setup for this feature.
With this update, Appointment Schedule now adheres to the setting Appointment Conflict Warning, which is defaulted to on.
If you would like to turn this setting off, contact athenahealth support or your Onboarding project team. On the Main Menu, click Support > Success Community > Contact Client Support Center.
You can double book slots on the Appointment Schedule calendar:
-
Click a booked appointment to double book the slot.
-
When you cancel or reschedule the double-booked slot, it is completely removed from the calendar, regardless of the Cancellation reason.
-
You must have the "Double-Book Slots" permission to use this feature.
You can click the Double book slot option under the downward arrow icon in the Cancel button.
The following slots can't be double booked:
-
Available
-
Frozen
When you click Double book slot, the Book Appointment workflow appears with the following fields filled in based on the booked appointment you're double booking:
-
Provider Group (if applicable)
-
Date
-
Department
-
Resource
-
Appointment type
-
Time
Note: The Time field only displays available slots that match the selected Date, Department, Resource, and Appointment type.
-
From the Appointment Schedule calendar, click a previously booked slot.
-
Click the downward arrow in the Cancel button to reveal a list of options.
-
Click Double book slot. The Book Appointment window appears with certain fields filled in based on the booked slot you selected for double booking.
-
Book the appointment per your usual workflows.
Note: A message appears under the Appointment Type field informing you that you are double booking the slot.
-
Click Review.
-
Review the appointment details.
-
Click Book appointment. Notice the new slot appear next to the previous slot.
During the Book Appointment and Reschedule workflows you can click on a booked appointment in the right-side preview calendar to reveal the Double book slot option.
When you click Double book slot in the Book Appointment or Reschedule workflow, all applicable fields in the left panel update.
When you finish booking the appointment, the double-booked slot appears next to the previous slot you selected for double booking.
When a double-book slot is canceled or rescheduled, the slot is completely removed from the calendar regardless of the Cancellation reason.
Tip: You can manage double-booked slots as usual. They can be canceled, rescheduled, frozen, and unfrozen per your usual workflows.
When you double book a slot, it consolidates (it is no longer individual) with the rest of the matching slots if it has the same:
-
Start time
-
Appointment type
-
Provider
-
Department
If those fields do not match, the double-booked slot does not consolidate with the other appointments.
-
In a future update we're ensuring that when the Try the NEW Appointment Schedule option is enabled, you are sent to the Appointment Schedule Calendar when you open the recurring appointments.
-
For now, this means that all the recurring appointment entry points from the Quickview take you to the legacy recurring appointment workflow. This will be updated in an upcoming bi-weekly release.
You can book recurring appointments from the Appointment Schedule calendar.
Note: While booking or rescheduling a multi-resource or reoccurring appointment from Appointment Schedule, you can see the preview panel focus on one single appointment. This lets you focus on a single appointment and not be distracted by extraneous appointments that do not apply to what you are currently booking.
The intervals of time max out at every:
-
31 days
-
15 weeks
-
6 months
The setting to end after a certain number of occurrences maxes out at 50.
The selection of end date disables dates prior to the initial appointment date and maxes out at the end of 18 months.
When you're booking an appointment and have filled in all relevant fields, you can make the appointment a recurring series.
From the Book Appointment window, with all relevant fields for the specific appointment filled in:
-
Click Create recurring series.
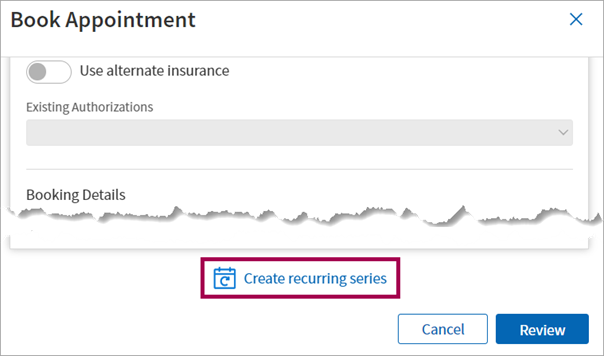
The Recurrence Settings section appearsNote: Click Cancel Recurrence to back out of creating a recurring series.
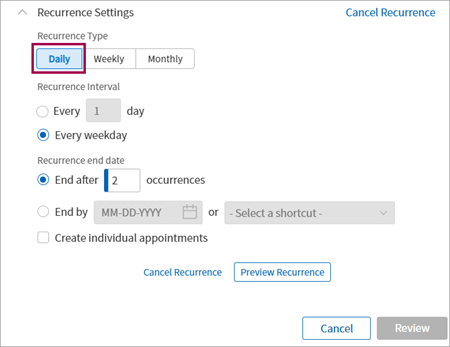
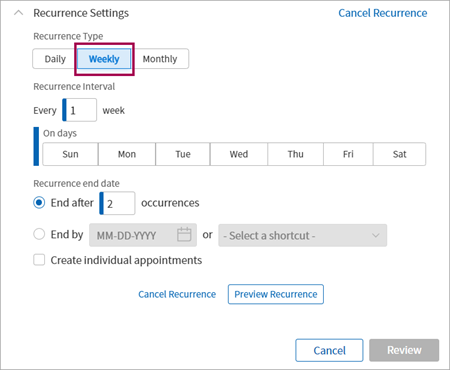
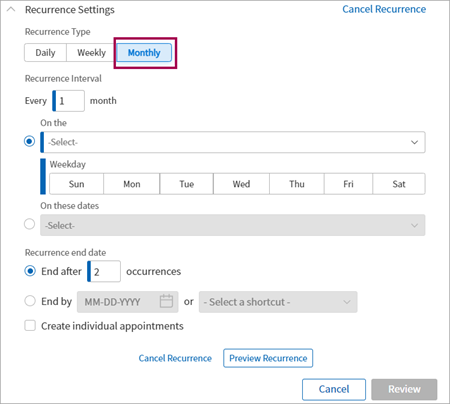
- Recurrence Type — Select either:
- Daily
- Weekly
- Monthly
- Daily
- Recurrence Interval — What appears in this field depends on the Recurrence Type.
- Daily — Select either:
- Every {Number} day — Enter the amount of days between each occurrence, for example every two days.
- Every weekday — Select this option to have an occurrence everyday of the week.
- Every {Number} day — Enter the amount of days between each occurrence, for example every two days.
- Weekly — Enter the:
- Every {Number} week — Number of weeks between occurrences.
- On days — Which day of the week the appointments are on.
- On days — Which day of the week the appointments are on.
- Every {Number} week — Number of weeks between occurrences.
- Monthly — Select either:
- Every {Number} month — Select a:
- On the — Numbered week of the month from "1st — 5th". Select "Last" for the series to fall on the last week of the month.
- On days — Which day of the week the appointments are on.
- On days — Which day of the week the appointments are on.
- On the — Numbered week of the month from "1st — 5th". Select "Last" for the series to fall on the last week of the month.
- On these dates — Numbered day of the month from "1st — 31st". Select "Last" for the series to fall on the last day of the month.
- Every {Number} month — Select a:
- Daily — Select either:
-
Recurrence end date — Select whether this recurring series ends after a certain number of occurrences or a specific date.
Note: Check the Create individual appointments box to book individual appointments for the recurring series.
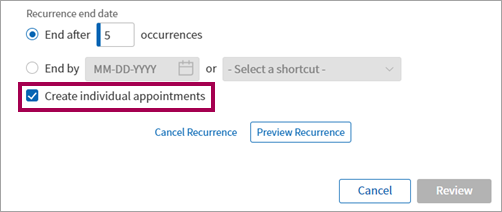
- End after — Set an amount of occurrences, for example after 5 appointments the series ends.
-
End by — Enter a date for the series to end.
Note: Instead of entering an actual date, you choose from the list of shortcuts.
- End after — Set an amount of occurrences, for example after 5 appointments the series ends.
-
Preview Recurrence — Click this button to make a preview of the appointments appear with the original appointment in the right side calendar preview panel for the selected provider. This is a required step for the Review button to turn on.
All of the occurrences in the series appear in the Recurrence Settings section.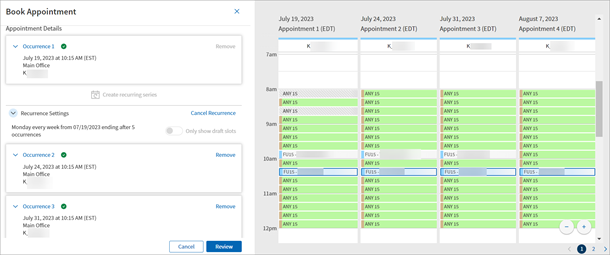
Note: The recurrence setting message appears above the first occurrence right next to the Only show draft slots option.
You can expand any occurrence to review and directly edit the appointment details or change the date of any appointment in the series.
Click Remove to delete an occurrence.
A page count appears in the bottom right corner of the calendar preview panel where you can preview the other appointments in the series. - Click Review.
The Review Recurrence Series Details window appears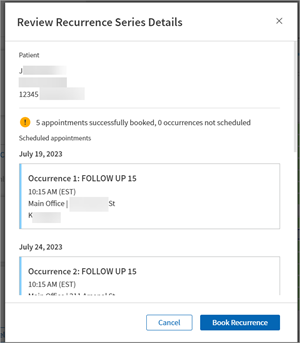
- Notice all of the occurrence listed with the date of each appointment.
- Click Book Recurrence.
A message appears indicating that the appointment series was successfully booked.
After you click Preview recurrence, the athenaOne System creates draft appointments for any appointments in the series that it cannot find matches for.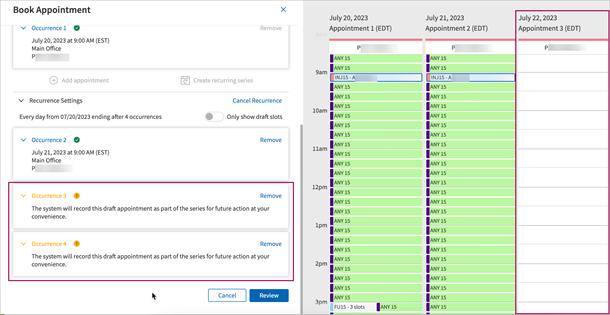
Note: Draft appointments are labeled yellow and a message appears in the collapsed details stating that it is a draft appointment. In the calendar preview panel, no slot will be selected because there were no matches based on the criteria set for the recurrence and nothing will be booked when the recurring series is created.
You can still book the series with these draft appointments and then come back to the series at a later time to complete the booking of the draft appointments.
When you're ready to return to the drafts to complete the booking workflow, you can find these draft appointments by:
-
Finding a booked appointment in the series on the Appointment Schedule calendar, and entering the edit appointment workflow where you can find the draft appointments in the series.
-
Navigating to the patient's Quickview, clicking on the series in the Appointment section, or on the View Patient Appointments page, and entering into the edit appointment workflow where you can find the draft appointments in the series.
Note: The functionality aligns the Appointment Schedule calendar with expected legacy athenaOne scheduling behavior.
Note: Before you book the recurring series, you have the option to change the date of any occurrence in the series after you click Preview Recurrence.
Once the appointment is booked, you can reschedule it or edit the appointment details:
-
Click the booked slot.
-
Click Reschedule.
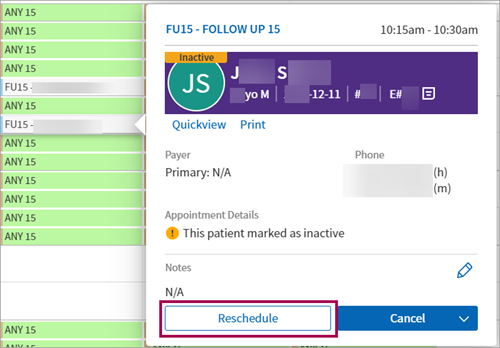
The Edit appointment window appears with the occurrence you selected automatically expanded -
Change the date of the selected occurrence.
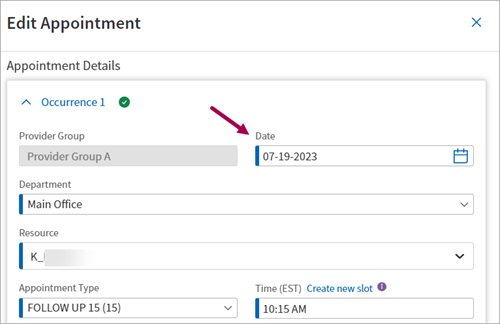
Note: You can edit the date for any of the appointments in the series.
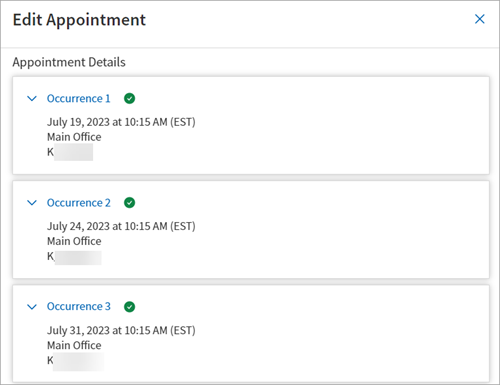
-
(Optional) Edit the appointment details as needed.
-
Click Review.
The Edit/Reschedule Recurrence Series Details window appears -
Reason — Select a reason for rescheduling the appointment series. A reason is only required when rescheduling an appointment, not when editing one.
-
(Optional) Notes — Enter any relevant notes for the reschedule.
-
Click Next: Review.
-
Review the updated appointment details.
-
Click Confirm Updates.
A message appears indicating that the appointment series was successfully booked.
Once the appointment is booked, you can cancel the original appointment, any occurrence in the series, or the whole series all together:
-
Click the booked slot.
-
Click the downward arrow icon in the Cancel button.
-
Select Cancel Series from the list of options. The Cancel Appointment window opens
-
Notice that the boxes next to each occurrence are checked meaning they are getting canceled.
Note: If you clicked Cancel, you have the option to only cancel the selected appointment, keeping the appointments in the series, or check boxes next to the other occurrences to cancel those appointments as well. - Click Next: Cancellation reason
- Reason — Select a cancellation reason.
-
(Optional) Notes — Enter any applicable notes.
-
Click Next: Review.
-
Review the appointment details.
-
Click Confirm cancellation.
A message appears stating that the appointment series was successfully canceled.
If your practice or resource has the Multi-Resource setting enabled, you can book multiple providers in the following ways:
- Booking appointments for multiple providers on the same day and same time
- Booking appointments for multiple providers on the same day with different times
- Booking appointments for multiple providers on different days
Note: While booking or rescheduling a multi-resource or reoccurring appointment from Appointment Schedule, you can see the preview panel focus on one single appointment. This lets you focus on a single appointment and not be distracted by extraneous appointments that do not apply to what you are currently booking.
A tooltip appears when you hover over the information icon next to the Resources drop-down menu:
"Please select up to a maximum of four resources."
You can select and deselect up to four providers from the drop-down list, or remove your selections by clicking the x next to each provider name displayed in the Resource field:
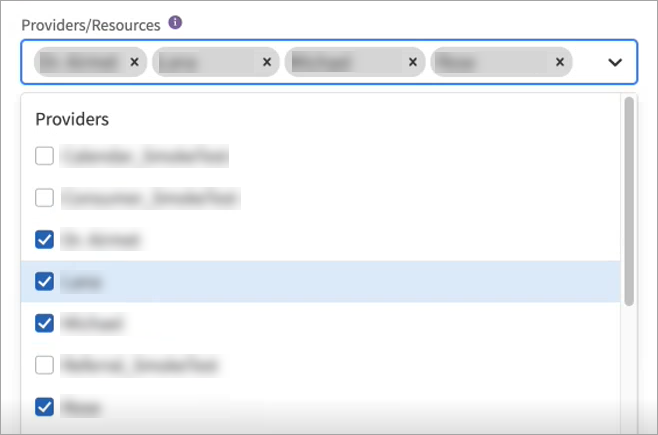
Note: The Remove slots for [provider name] field shown below is not available when you have multiple providers selected in the Resource field. You can update the Remove slots for field in the Edit appointment workflow for an appointment without needing to enter a reschedule reason or notifying the patient.
The calendar date picker highlights dates for which one or more of the providers has availability.
Note: These highlighted dates indicate that all selected providers have availability on that day — not that they have availability at the same time.
If you select a date for which no mutual availability exists for your selected providers, a warning message appears:
-
After selecting a valid date, the Time drop-down menu shows applicable times for the selected appointment type. You also have the option to Create new slot when selecting a time:
-
After selecting a time, the preview pane shows how this slot will be populated for each selected provider.
Before booking the appointment, a pop-up displays the appointment type and the selected provider names.
You can add additional appointments to a series by clicking Add appointment in the left corner of the booking window.
Additional appointments are added directly below the current appointment.
You must define the Department, Resource, Appointment Type, and Time of the new appointment to continue booking multiple appointments.
After the Department and Resource are defined for the second appointment , the preview pane shows different views for each appointment.
You can add up to four resources per appointment—that’s how many columns can comfortably fit in the preview pane. Each appointment and its resources are contained on one page.
The Time drop-down menu for each appointment only contains start times that are mutually available among all the appointment's selected resources.
If one appointment in session is unsuccessful, you are taken back to the booking page. It is indicated which appointment(s) were unsuccessful so that you can pick different date(s)/time(s) for the appointment(s).
You can add another appointment on a different day by clicking Add Appointment and then adjusting the Date field accordingly (highlighted below): We hold all slots in a booking session for up to five minutes, even if you add multiple visits.
The calendar preview pane is specific to the appointment card selected. As you add Resources, the preview pane populates. You can add up to four resources.
You can use the Date field to select a common date for the resources selected. If there is no common available time between the resources selected, you see an error instructing you to select a different date.
-
After you select a day with common availability, you can select a time from the Time drop-down.
-
The appropriate slots are highlighted in the preview pane after a time is selected.
Note: This cancellation functionality currently works for appointments booked for multiple providers on the same time and same day. As with all multi-resource scheduling functionality, this only works if your practice has the Multi-Resource setting enabled.
To cancel an appointment booked for multiple providers on the same day at the same time, click the appointment slot from the preview pane. Then, click Cancel:
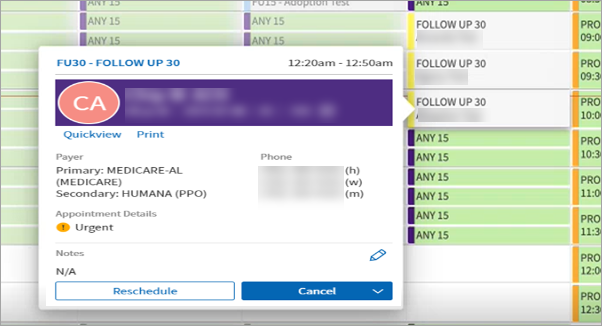
The Cancel Appointment pop-up opens. You must select a reason for the cancellation to continue.
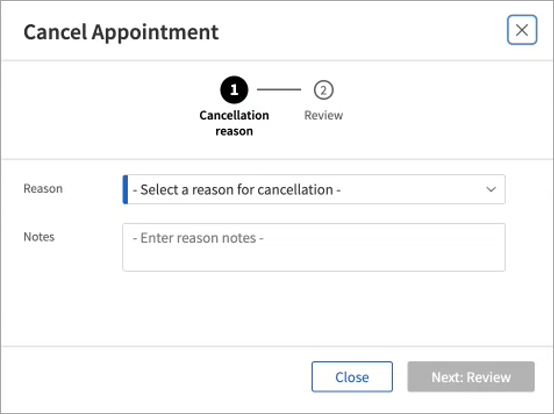
Click the Reason field to expand an options menu.
After selecting a reason, click Next: Review.
You can see the provider names on the review page (highlighted below). Even though this appointment is booked for multiple providers, it is treated as a single appointment and is canceled for all applicable providers.
From here, you can either go back (Back: Cancellation reason) or you can click Confirm cancellation:
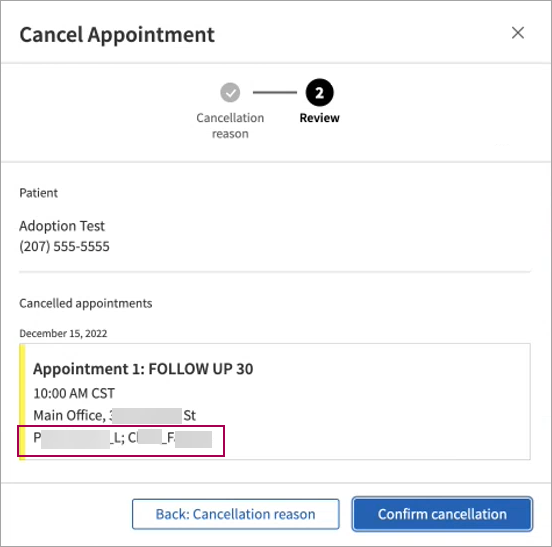
After confirming, the appointment is no longer shown in the preview pane.
You can see all appointments in the series while rescheduling or editing multi-resource appointments.
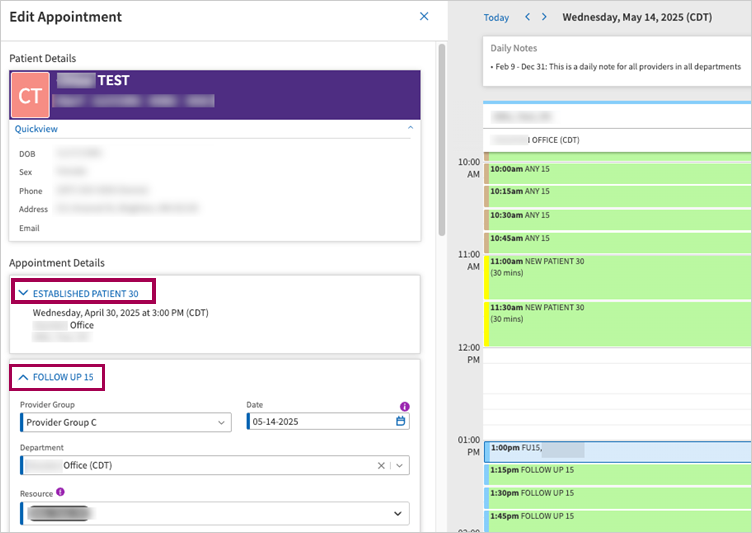
You can add additional appointments or resources to existing appointments in the Edit Appointment workflow. Click Review to proceed to the save window where you can complete your workflow.
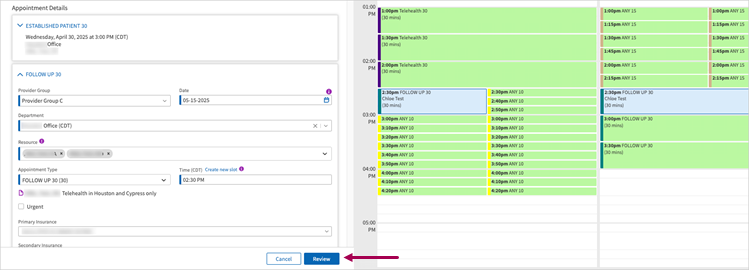
The Review button is inaccessible if there are no edits to the series.
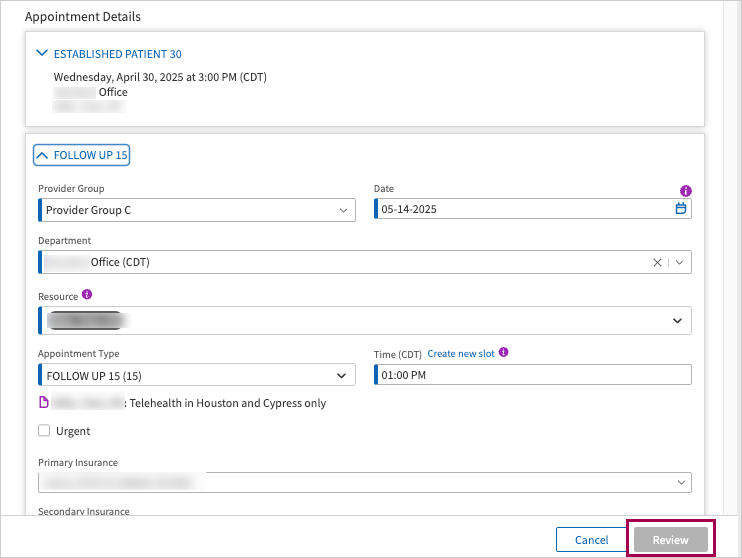
Multi-resource appointments have a series identification number on the patient's Quickview so you can easily identify which appointments are part of the same series.

We moved patient insurance fields from the patient banner into the appointment card in the booking and edit workflows to allow for more flexibility when selecting an insurance policy for an appointment in the multi-resource workflow.

The main Edit workflow is still accessed via the Reschedule button. The difference between the main Edit workflow and editing slots is that you aren't changing the:
-
Date
-
Time
-
Department
-
Provider
-
Provider Group
This means you aren't asked for a reschedule reason, nor is the patient notified. Edits to the slot could include:
-
Appointment Type (most applicable in this scenario)
-
Insurance
-
Linking to a tickler
-
Adding a referral
-
Booking Details
-
Notes
-
Click on a booked appointment (ex: 15 minute duration)
-
Select Reschedule.
-
Confirm the Remove Slots for [provider name] field is visible.
-
Change the Appointment Type to a longer duration type (ex: 30 min).
-
Confirm athenaOne selects additional open slot(s) (if available) to match the duration of the newly selected Appointment Type.
-
Either:
-
Remove an additional slot
-
Clear a slot automatically selected to be removed.
-
Leave the field as is.
-
-
Click Review. You are not asked to enter a Reschedule Reason.
-
Click Save.
You can access the Provider Group field while booking or rescheduling on the Appointment Schedule calendar.
Before this update the Provider Group field was grayed-out and inaccessible. Your practice needed to have the Provider-Group-Based Data Permissions setting enabled to see the Provider Group option in the Department and Provider views of the Appointment Schedule calendar. However, whether you have the setting enabled or not, you can see the Provider Group option.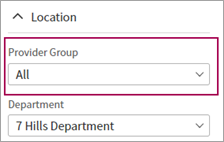
Note: When you select a different Provider Group from the drop down, the Department and Resource fields will reset and you will need to select a department and provider from the new provider group you selected.
Benefits of this feature:
-
Editing Provider Group was previously unavailable.
-
If the patient is booked for an appointment in a provider group they are not in, a copy of the patient is made into the new provider group.
-
All appointments in a series can have different provider groups (meaning all appointments in a series do not need to be in the same provider group).
-
Department and provider options update depending on which provider group you choose.
Tip: You can select the following options:
- ALL — the calendar of provider groups
- [Provider Group Name] — A specific provider group
The selection appears in the Provider Group field
Important: A patient must be registered in a provider group associated with the department to schedule an appointment in the Appointment Schedule calendar. Register the patient in the provider group per your usual workflows to schedule their appointment in the Appointment Schedule calendar.
Important: Any patients created from the Appointment Schedule calendar via the CPI View workflow are recorded in the PHI Modification report. Run the PHI Modification report from the Report Builder via your usual workflow. For more information, see the Report Builder article in O-help.
If your practice has the Provider-Group-Based Data Permissions setting enabled, you can have the Appointment Schedule calendar copy a patient to your current provider group. This automated workflow adheres to the CPI View workflow (which is available while displaying patient search results in the legacy experience).
To copy a patient to your current provider group:
- Search for a patient in the Patient Details section of the Book Appointment window.
- Click Find.
-
In a grayed-out row, click the add icon
 .
.Note: Hover over the add icon
 to reveal a description of what action the icon will complete.
 - Click Copy.
- Notice a success message appear in the bottom left of the screen.
When there are existing authorizations related to the patient insurance, you can select them from the Authorizations field. You can also create a new authorization by clicking Add new Authorization option from the Authorizations drop down.
Any existing authorizations appear in the list of options.
Once selected, the existing authorization appears in the Authorizations field.
Note: The payer related to the authorization should match either the primary, secondary, tertiary, or quaternary insurance of the patient you're scheduling an appointment for from the Appointment Schedule calendar. You may still book the appointment, but athenahealth recommends that the authorization matches either the primary, secondary, tertiary, or quaternary insurance of the patient.
You can add a new authorization while booking an appointment from the Appointment Schedule calendar:
-
An "Action: Add new authorization" window appears directly over the Appointment Schedule calendar.
-
The Authorizations field appears for all patients.
-
The new authorization is set to In progress status.
After you successfully book the appointment, the authorization appears on the patient's Quickview and on Charge Entry.
-
Once you're on the Appointment Schedule calendar:
-
Select a slot for the appointment using your preferred views or workflow.
The Book Appointment window appears -
Complete the required fields and any additional ones per your usual workflow in the following sections:
-
Patient Details
-
Appointment Details
-
-
Authorizations — Select the drop-down. Click Add new authorization. The Action: Add Authorization window appears
Note: You can select existing authorizations from this field as well.
-
Complete at least one field (the rest are optional):
-
Type
-
Authorization number
-
Effective dates
-
Authorized visits/units
-
Referred to provider
-
Change authorization status for primary insurance
-
Diagnosis code
-
Procedure code
-
Notes
-
Specialty
-
-
Click Create. The Action: Add Authorization window disappears and the Book Appointment window appears
- Click Review. The Review Appointment Details window appears
-
Review the appointment details.
-
Click Book Appointment. A success message appears indicating a successful appointment booking
Note: When you add an authorization it is available in the referral authorization table, which is displayed in the Quickview, Charge Entry, and future appointments if relevant.
You can see the patient's appointment ticklers in the Booking and Edit Appointment workflows.
Select an appointment tickler to associate it with the new appointment you're scheduling for the patient. The selected tickler(s) will be consumed when the appointment is booked.
You can add an appointment tickler while canceling an appointment from the Appointment Schedule calendar.
When canceling an appointment, you can click Confirm and create tickler.
After you click the Confirm and create tickler button, a message appears letting you know you're going to the Add Appointment Tickler page.
When creating a tickler after canceling an appointment, the following additional information from the cancelled appointment automatically appears on the tickler:
-
Patient
-
Department
-
Provider
-
Appointment Type
-
Notes
Note: You can edit any of the automatically pulled in information as needed for the tickler. If you cancel more than one appointment, only the patient information appears on the tickler.
You can create the appointment tickler via your usual workflows. You are returned to the Appointment Schedule calendar upon completing the workflow.
If you have the user permissions Force Appointment, you can create time slots for appointments.
From the Appointment Schedule calendar, click the more options button and then click Create a Slot.
The Create new slot link appears in the day headers of the week and work week views and in the provider/department headers of the Day view. You cannot create a new slot in the Availability view.
When the Create New Appointment Slot window appears, click the info icon ![]() to view a message about the Create a slot option.
to view a message about the Create a slot option.
Set the time of appointment slot as the current time
- From the Create New Appointment slot window, enter the letter "T" in the Time field.
-
Notice the current time appears in the Time field.
Note: Entering the letter "T" is not case-sensitive.
You must have the user permission Share Saved Views (your practice administrator can assign it, see Users for more information.)
This feature is intended for practice administrators with the new Share Saved Views permission.
You can now share and manage saved views on the Appointment Schedule calendar:
-
Share saved views
-
Update existing shared saved views
-
Delete shared saved views
Important: Before you can use this feature, you must create a saved view.
Before you can use this feature, you must
-
Have the user permission Share Saved Views (your practice administrator can assign it, see Users for more information.)
-
Create a saved view
To create a new view
- After you set your desired view or filters, click the more options icon
 .
. - Click Create a new view.

-
Enter a view name in the Saved view Name field.

-
Click Save.
From the Appointment Schedule calendar:
-
Click the downward arrow in the Saved view field.
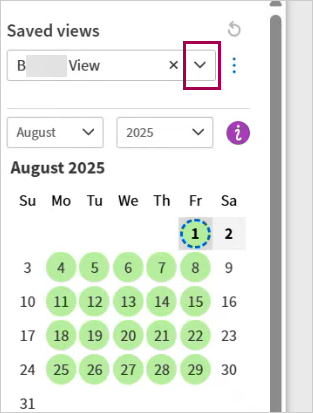
-
Click the Saved view you want to share.
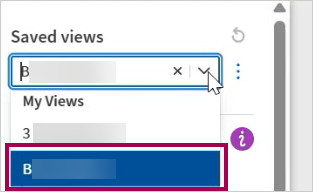
-
Click the More options icon.
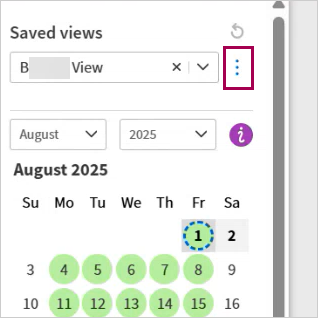
-
Click Share view.
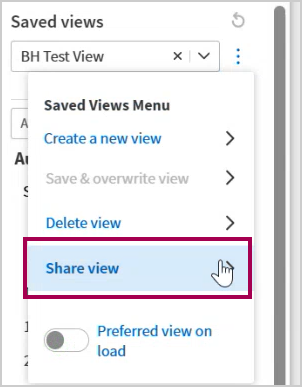
-
Click the Type or Select field.
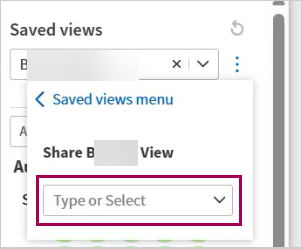
-
Either:
-
Type a practice user's name or username.
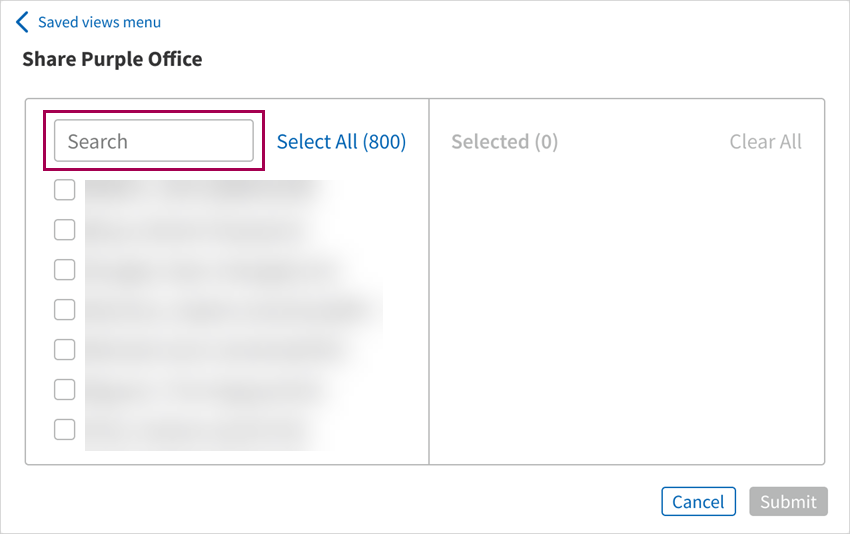
-
Choose from the list practice user's name or username.
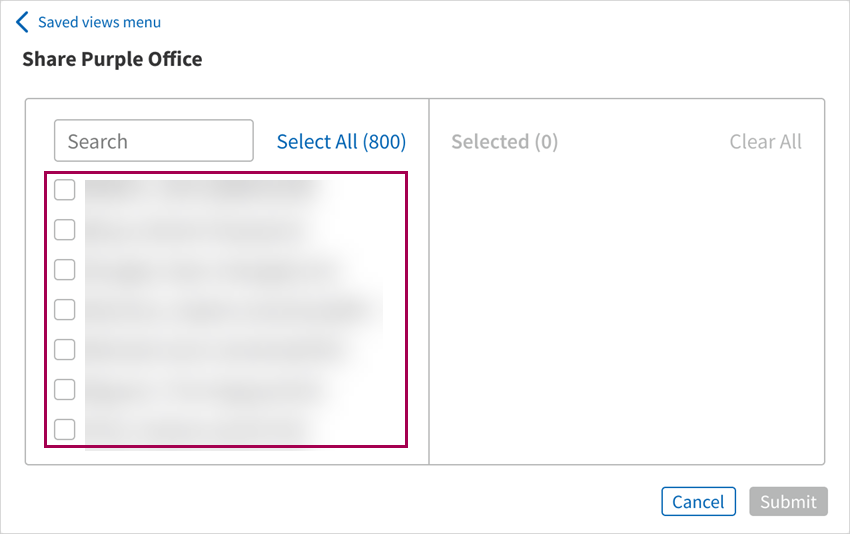
-
-
Check the box next to name of the practice user(s) you want to share the view with.
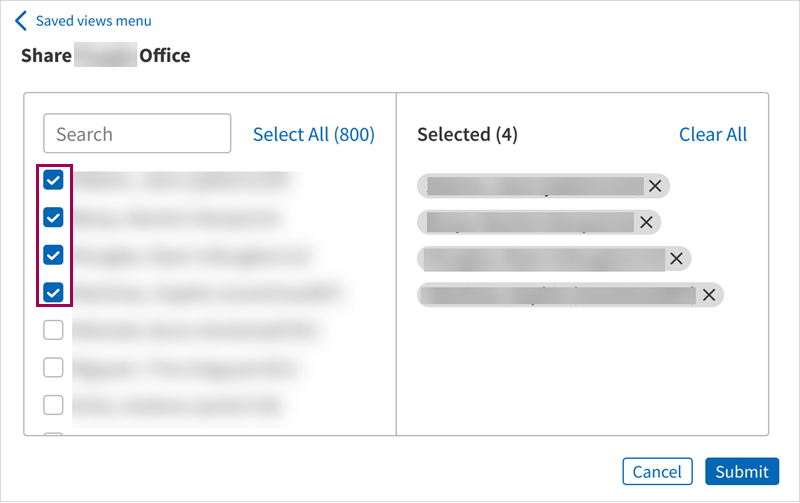
-
Click Submit.
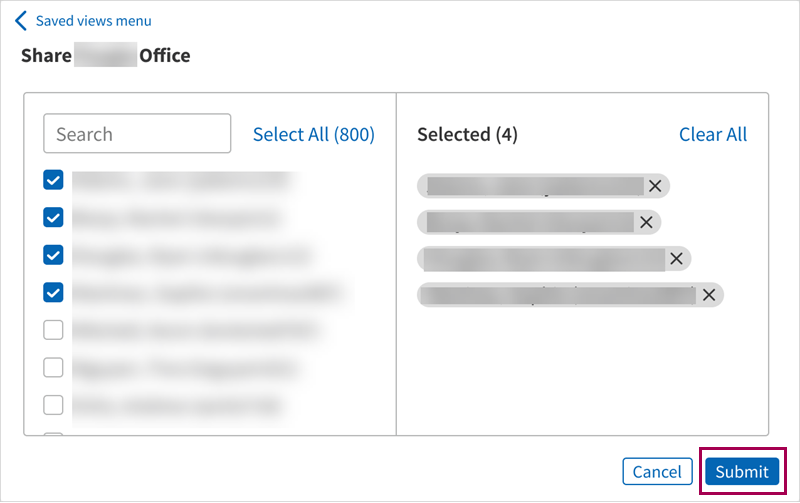
-
View the success message indicating the saved view was shared successfully.

Note
Changes to a Shared Saved View will apply to everyone that has that shared view.
From the Appointment Schedule calendar:
-
Open your saved view.
-
Make any edits as needed to the filters or other settings.
-
Click the More options button.

-
Click Save & overwrite view. A confirmation window appears.

-
Click Update.

-
View the success message indicating that the saved view was updated successfully.
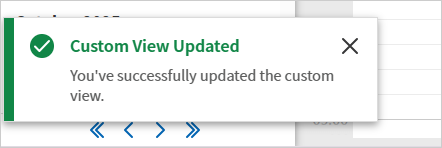
The Save & overwrite view view option is inaccessible until you edit the saved view.
Note
When you delete a shared saved view, athenaOne deletes it for all users you shared it with.
From the Appointment Schedule calendar:
-
Open your saved view.
-
Click the More options button.

-
Click Delete view. A confirmation window appears.

-
Click Submit.

-
View the success message indicating that the saved view was deleted successfully.

When you share a view with a user at your practice, they will see two sections when they expand the Saved Views field:
-
My Views — These are the user's own saved views. There is a 50 view limit for My Views.
-
Shared Views — These are the views you shared with them. There is no limit for the number of views that can be shared with a user.
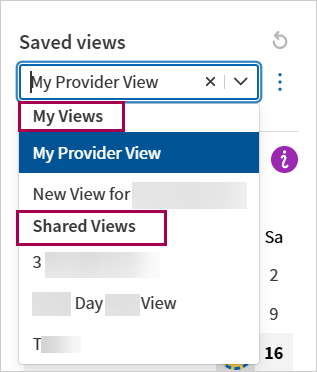
Note
Shared Views cannot be edited or deleted by the user. If they want to save a copy, they can click Save a copy and save a version of it. The original shared view will not change.
From the Appointment Schedule calendar:
-
Open your saved view.
-
Click the More options button.
- Click Save a copy. A confirmation window appears.

- Name the copy.
-
Click Submit.
-
View the success message indicating that the saved view was copied successfully.

You can more easily distinguish which days are available, fully booked, or have no template days in the availability calendar in Appointment Schedule:
You can now see the following colored circles appear in the detailed availability calendar:
-
Green — Day has an available slot that matches filter criteria
-
Yellow — Day has an available slot, but doesn't match filter criteria
-
Red — Fully booked day with no available slots
-
White (blank with no color) — No template applied
-
Blue — Today's date
-
Gray — Selected date
Note: It may take up to five minutes for the detailed availability calendar to reflect changes in availability.
On Appointment Schedule, you can now more efficiently see what days are available, fully booked, or have no template days in the detailed availability calendar.
Click the info icon next to the date selection fields to reveal more information about what the various colored circles mean.
The legend appears when you click the info icon.
In the booking and reschedule workflows, click the Date field to see the availability calendar appear with these updates.

This feature:
-
Differentiates the slots to let you know if a day is fully booked (but has a template) or has no template applied.
-
Shows available slots in different colors according to their availability status so you can easily know what days are available for booking.
On the left side availability calendar, you can see when days are:
-
Available

-
Fully booked

-
Non-matching Days with availability

Note: When you hover over the specific colored circle, a message appears that indicates the day's availability.
You can now see the following colored circles appear in the detailed availability calendar:
| Color | Description |
|---|---|
|
Green |
Day has an available slot that matches filter criteria. |
|
Yellow |
Day has an available slot, but doesn't match filter criteria |
|
Red |
Fully booked day with no available slots |
|
White |
No template applied. Appears blank with no color. |
|
Blue |
Today's date. |
|
Gray |
Selected date |
How availability appears on the availability calendar:
-
Based on the filters selected in the main calendar.
-
Adjusts when filters change and when you select a Saved View.
-
Adheres to the selections in the fields of the booking and reschedule workflows.
-
Updates when you edit fields.
You can select the time zone to view the Calendar in. Appointments and slots will be reflected in the selected time zone:
-
If your practice has multiple departments in various time zones, you can specify the time zone when you view the Appointment Schedule calendar and see the schedules displayed in the time zone you selected.
-
The time zone on Appointment Schedule will default to the time zone of the login department, so practices that only have departments in one time zone will not see any change.
You can select alternative time zones to view the calendar. A new downward arrow icon appears next to the time zone. The schedules displayed on the calendar will adjust based on the time zone selected. For example: If a provider had telehealth appointments in departments located in Eastern, Central, and Mountain time and the scheduler selected to view the calendar in Central time, the slots displayed on the calendar will adjust to show in Central Time.
Click the downward arrow next to the time zone in parenthesis to reveal a list of time zones.
The provider and department of the appointment appear for booked and available slots across the different calendar views. We're making this change so you can clearly identify the provider and department of the slot.
New provider and department fields appear in both:
-
Available slots
-
Booked slots
Note:
-
The time zone is set at the department level. The address of the department defines the time zone.
-
Providers do not have time zones. Providers can work in multiple departments and those departments can be in different time zones.
-
The time zone appears for all practices. The time zone defaults to the time zone of the login department.
-
The selected time zone will be saved with Saved Views.
You can view the Appointment Schedule calendar in additional timezones intended for practices in:
-
Puerto Rico and the US Virgin Islands — Atlantic Standard Time (AST)
-
Guam — Chamorro Standard Time (ChST)
Practices that support Puerto Rico, the US Virgin Islands, and Guam can view the Appointment Schedule calendar in the AST and ChST time zones, which helps them more easily and accurately schedule appointments.
The patient is in the Pacific time zone, but the department's time zone is Central.
Change the time zone to Pacific time to view the Appointment Schedule calendar in the patient's time zone when scheduling the appointment.
Scheduling staff can view the provider's adjusted schedule across departments for the specified time zone.
In general, providers use the Clinician View of the athenaOne homepage. However, that calendar does not adjust for time zones.
The Appointment Schedule calendar is the only location in athenOne that allows you and your scheduling staff to view schedules in a specified time zone while the schedules adjust to each time zone you view.
You booked an appointment in the Los Angeles department. Then you go to the New York department to check a provider's schedule. Once there you think you may have booked in the Pacific time zone.
While still viewing the Eastern time zone, you view the slot details of the appointment you booked previously and the slot tells you the department is in Los Angeles.
The calendar has Department columns when viewing by the week, work week, or day views. Slots are divided into columns associated with the department of the slot, this means that each department schedule has its own column on the calendar.
The Department columns help you easily see what department you're scheduling the provider without having to click on the slot.
You can see department columns and headers below the day headers on the calendar while viewing by
-
Week,
-
Work week
-
Day
Benefits of Department columns include:
-
Easily see the department associated with the slot in the calendar without having to click into the slot (since each department is its own column in the day, week, and work week views).
-
Reduce errors and avoid confusion when booking appointments in the week, work week, and day views. Since that departments are always identified and divided into individual columns you can ensure you are always aware of the department you're booking in, which makes for a better scheduling experience.
-
Improved visibility of availability across departments for providers in the Book and Edit Appointment workflows by clearing the department field. This allows you to see the schedules for provider(s) across all departments in the Book or Edit workflow rather than only in the main calendar view.
You can see up to 5 department columns in the week and work week views. If the provider has schedules across more than 5 departments, on the last column header, you'll see +[Number] to indicate there are additional departments not displayed.
You can see those additional departments by clicking on the Day header. This will take you into the day view where you will see columns for all the departments the provider has schedules for.
On the Appointment Schedule Calendar the default view is the Day view.
To focus on a specific day, you can click on a day in the week and work week views and be taken to the day view. Once there, you can see the provider's schedules across all departments. Each department has its own column.
You can go back to the week or work week view by clicking Back to week.
You can clear the Department field so you can see availability across multiple departments for a provider in the Book or Edit Appointment workflows rather than only in the main calendar view.
Click the X icon on the Department field to see the provider's schedules across all departments in the preview calendar.
Note: If your practice has Multi-Resource Scheduling, you can clear the Department field to see availability across multiple providers at once.
To set the Department field, either:
-
Select a Department from the drop down.
-
Click on a slot on the preview calendar to set the Department field.
Note: If you have more than one provider selected, the Department field shows the department(s) the providers have in common and you then cannot select a slot from the preview calendar. To continue, you must make new selections in the Department and Time fields.
You can navigate between different days in the preview panel while booking or rescheduling an appointment:
-
Click the left and right arrow icons <> to see the schedule for different days or weeks.
-
Click the Today link to return to the current day
-
View the preview panel by Day, Week, or Work week
For example, you selected a slot for the patient but before confirming it, the patient realized they needed to schedule for another day. While the preview panel is in the Day view, use the right arrow icon > to review the next day's schedule. Alternatively, you can set the View By field to Week or Work week to see the entire week. While viewing an entire week, the left and right arrow icons <> move you ahead or backward by one week.
Note: The Date field in the booking workflow updates when you select a new slot in the preview panel. When viewing by Week or Work week the arrow icons go ahead or backward an entire week.
For multi-resource scheduling, all selected resources for each appointment display their schedule together in the preview panel.
Note: You can only set View By field to Day for multi-resource appointments. The options for the View By field are grayed-out and inaccessible.
You can use custom fields when scheduling and rescheduling appointments in the Appointment Schedule experience.
-
Custom fields work in the new Appointment Schedule experience as they did in the legacy scheduling experience.
-
There is no change to how custom fields are set on the Custom Fields page.
We're making this change to ensure that the features available in legacy scheduling are available in the new the Appointment Schedule experience.
Note: Required fields are configured on a separate page than Custom fields. Appointment Schedule does not yet support Required fields, so any Custom fields that were configured to be required will not show as required within Appointment Schedule at this time.
The custom fields feature works in the appointment schedule calendar exactly as it does in legacy scheduling.
All your appointment-related custom fields configured on the Custom Fields page appear in the scheduling and rescheduling workflows.
There is no change to how custom fields are set on the Custom Fields page and you can continue to set them via your usual workflows.
See Custom Fields in O-help for more information on the Custom Fields feature.
You can click the Register New Patient button while searching for a patient.
The Register New Patient button appears at the bottom of Find patient search results in the appointment booking workflow.
The new button appears directly below the list of search results AND when there are no search results.
When you click Register New Patient, you're taken to the Patient Registration page. Once there, complete your usual new patient registration workflows.
Clicking Save and Schedule on the Patient Registration page brings you back to the Appointment Schedule calendar with the patient automatically appearing in the patient banner at the top of the page.
Note: When the Appointment Schedule calendar appears you're placed on the calendar view not within the appointment booking workflow.
You can access the Referring Provider Selector using Appointment Schedule:
-
Access the new Referring Provider field in the Booking Details section of the Book Appointment window.
-
Select a referring provider during initial booking and when rescheduling.
Before you can use this feature, your practice must have the "Show referring provider on appointments" setting enabled.
Note: If you previously had the setting enabled, no action is needed to see the Referring Provider field.
To enable it for your organization, contact the CSC or your onboarding project team. On the Main Menu, click Support > Success Community > Contact Client Support Center.
When booking a new appointment or rescheduling one from the book appointment window:
-
Click Choose/View next to the Referring Provider field.
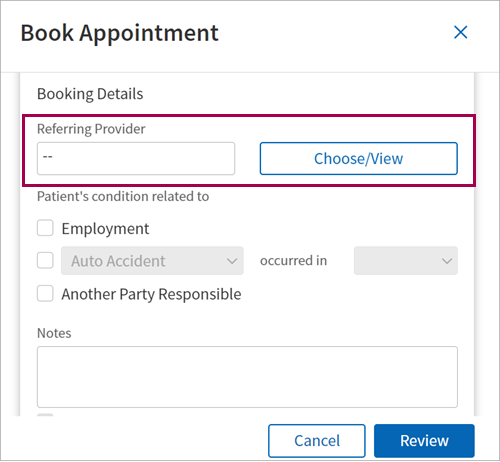
The Referring Provider Lookup window appears.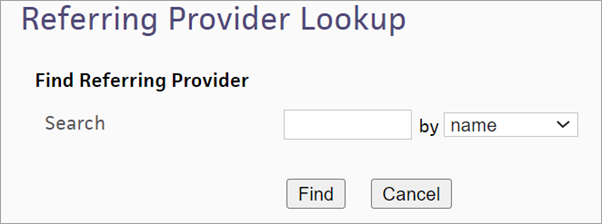
-
Search for a referring provider by:
-
Provider number
-
Name
-
Specialty
-
NPI number
-
-
Click select next to your intended referring provider.
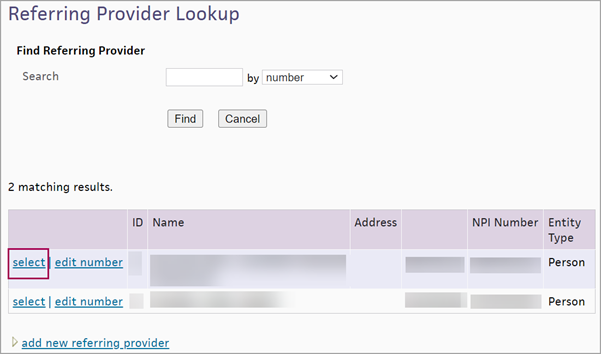
-
Notice the referring provider appear in the Referring Provider field.

-
Complete your usual workflow for booking a new appointment, rescheduling an appointment, or editing an appointment.
Note: From the Referring Provider Lookup window you can:
-
Edit a referring provider's number
-
Update the selected provider's information
-
Add a provider number (for a provider that does not have one in the system)
-
Add a new referring provider to the list of referring providers
When there are more than 10 providers in the week or work week views, the previous and next arrow icons appear.
When the screen is too small to fit the whole calendar, the next and previous arrow icons appear by default.
When you:
-
Click the next or previous arrow icons, the list of providers slides right or left by one provider.
-
Close one provider and there are more than 10 providers left in the list, the next provider displays.
-
Reach the first or last provider, the previous or next arrow icons do not appear.
The arrow icons do not appear when you are in the Day view. You can scroll horizontally to view all selected providers.
If your practice has daily notes configured on the Daily Notes page for either (or a combination of):
-
Provider
-
Department
-
Context
Daily notes appear below the date information and the calendar views.
The number of daily notes appears to on the top right next to the arrow icon (which expands or collapses) of the Daily Notes section. The arrow icon only appears if there are multiple Daily Notes that requires the box to be expanded.
Daily notes appear in the following order:
-
Provider and department combination specific
-
Provider specific
-
Department specific
-
Entire practice
When a provider has scheduling notes configured on the Providers page, they appear on the Appointment Schedule calendar in the following locations:
-
Right-side calendar panel — Above the calendar, a new Scheduling Notes box appears in between the Provider Availability and Daily Notes boxes.
-
Booking workflow — Under the Appointment Type field.
-
Rescheduling workflow — Under the Appointment Type field.
You can print appointments from the Appointment Schedule calendar.
To print an appointment, select a previously booked appointment and click Print in the appointment details.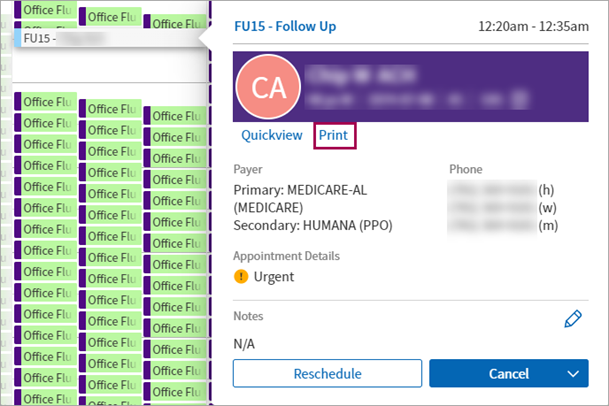
You can also print immediately after booking a new appointment, editing an appointment, and rescheduling an appointment. Click Print in the success message that appears in the bottom left corner of your screen.
The following inclusive patient information appears in two places of the Appointment Schedule calendar if it is present for the patient:
- First name used
- Pronouns
- Legal first name
- Legal last name
- Middle name
- Suffix
- Date of birth
- Age
- Patient ID
-
Enterprise ID
Note: A photo of the patient and the COVID-19 watch flag also appear if present for the patient.
You can see this information appear in the following two locations of the Appointment Schedule calendar:
-
During patient search while booking a new appointment, rescheduling an appointment, or editing appointment.
Tip: Click the drop-down arrow to show or hide additional information for the patient.
- In the patient details that appear when you select a previously booked appointment, or a new one, from the schedule.
Your practice may have existing configurations that limit you from booking certain slots for an appointment. The Appointment Schedule calendar respects any frozen slots that your practice has setup.
If you have the user permissions Schedule Admin: Manage Appointments, you can freeze and unfreeze slots in the Appointment Schedule calendar.
Tip: You can cancel and reschedule appointments in frozen slots or slots you intend to freeze via the same workflows for unfrozen slots.
You can freeze booked slots and empty slots via the same workflow:
- From the Appointment Schedule calendar, select the slot you intend to freeze.
- Click the downward arrow icon within the Cancel Appointment or Book appointment button.
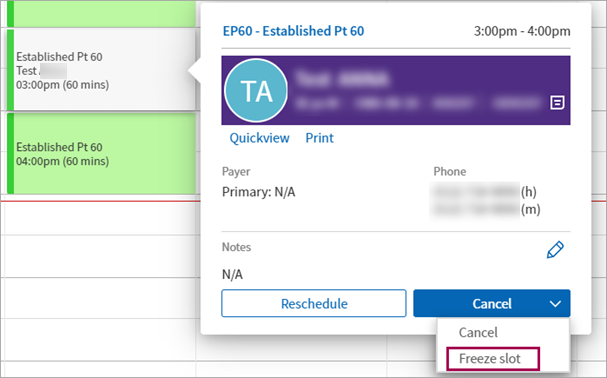
- Select Freeze Slot from the list of options.
- Select a Freeze Reason. The slot freezes.
You can unfreeze empty slots and booked slots; the workflows differ slightly:
Empty slot
- From the Appointment Schedule calendar, select the slot you intend to freeze.
- Click the Unfreeze Slot button. The slot unfreezes
Booked slot
- From the Appointment Schedule calendar, select the slot you intend to freeze.
- Click the downward arrow icon within the Cancel Appointment button.
- Select Unfreeze Slot from the list of options.
The slot unfreezes
You can change the freeze reason of a frozen slot without unfreezing it.
From the Appointment Schedule calendar:
-
On a frozen slot, click the downward arrow icon in the Unfreeze Slot button.
-
Click Change freeze reason. The Freeze slot window appears.
-
Reason — Select a freeze reason from the list of options.
-
Click Change freeze reason.
Note: To mark appointments as urgent, you must contact the CSC to enable the associated practice setting: walk-in encounter management
To submit a case to the CSC via the Success Community:
On the Success Community main page > Support Cases section >Contact Client Support Center.
You can mark appointments as urgent from the Appointment Schedule calendar during the workflows for:
- Scheduling a new appointment
- Rescheduling an existing appointment
- Editing an existing appointment
In the appointment card , , you can check the Urgent box.
Note: When you select the appointment from the Appointment Schedule calendar, a note that the appointment is urgent appears in the Appointment Details section.
In the appointment card, , uncheck the Urgent box.
Note: When you select the appointment from the Appointment Schedule calendar, the note that the appointment is urgent is removed .
When you click a slot from the calendar that is not configured in the Appointment Type dropdown options for the selected provider or department, the Appointment Type field appears empty and an alert displays below the field that explains why there are no options.
-
The alert informs you to select a different appointment type for the provider.
-
The appointment type that's unconfigured will not be available in the Appointment Type field until it is configured for the selected provider or department.

This feature only applies to practices with the Appointment Type Drop Downs setting enabled.
If you would like to turn this setting on, contact athenahealth Support or your Onboarding project team. On the Main Menu, click Support > Success Community > Contact Client Support Center.
When there are multiple appointments on the same day, at the same time, and have the same appointment type, provider, and department, you see one consolidated slot with a count of how many appointments are included.
The Appointment Schedule calendar only consolidates appointments into one slot when there are more than four. When there are less than four appointments in a slot, they appear individually in the slot unless you add another appointment.
Note: When there are multiple appointments booked in one slot, the booked appointments appear on the left and an open appointments appear on the right where you can book additional appointments.
You can click:
-
Book appointment in the open slot to schedule an appointment per the usual workflow.
-
Into the booked slot and then into any listed appointment to see the same details you would for other slots.
-
The backward arrow icon in the appointment details window to return to the list of appointments in the slot.
-
Cancel to cancel the appointment.
-
Reschedule to reschedule the appointment.
You can quickly and easily see the availability based on the selected filters in the Availability calendar. There are 3 months of availability shown to the left of the main calendar.
- Green circle — Indicates availability on this day for at least one appointment.
-
Gray square — Indicates the selected day/week.
-
Blue circle - Indicates today
-
Note: When the calendar availability icons are loading, you'll notice a moving gray circle background that changes between a lighter and darker shade of gray.
You can quickly see if a patient is checked-in. Click a scheduled appointment to see the patient check-in status.
- From the Appointment Schedule calendar, click an already scheduled appointment.
An appointment window appears with additional information. - View the Appointment Details section to see the patient check-in status.
You can easily see if an appointment is for an athenaTelehealth online visit:
For quick reference, a telehealth icon appears on the booked slot for any telehealth appointment types.
You can also:
- Click an already scheduled appointment. An appointment window appears with additional information.
- View the Appointment Details section to see the athenaTelehealth icon
 next to text that says. "Telehealth".
When an appointment is booked via an alternative method other than your practice, you can see a "This appointment was scheduled externally" note for the appointment.
This note appears when the appointment is booked via the following methods:
- An MDP partner (for example, Zocdoc)
- The Patient Portal
-
A practice marketing channel
Note: A practice marketing channel includes: a practice website, email, social media, search engines, and other collateral (for example, other portals).
- From the Appointment Schedule calendar, click the arrow icon in the collapsed filter panel.
- From the Filter panel, you can togglethe Show bookings option.
The Show bookings option is toggled On, all bookings and the related information will show on the calendar. When this option is toggled Off, all scheduled appointments will be hidden.
Toggle the Slot Matching option on to only display slots that match the appointment type selected in the filter.
- From the Appointment Schedule calendar, click the arrow icon in the collapsed filter panel.
- From the Filter panel, you can toggle the Match slots option On or Off.
You can zoom the view of the Appointment Schedule calendar in or out. Click the minus icon or plus icon, in the bottom right corner of the screen, to decrease or increase the size of the Appointment Schedule calendar.
Note: As you zoom in and out, the size of the time slots will increase or decrease. When the time slot decreases in size, the text is hidden; you can hover over the time slot to reveal the text.
You can use the zoom in and out buttons on the bottom right of the calendar to change the zoom-level of the calendar to 15, 10, or 5-minute increments. As well as, more easily see the start and end times of the slots.
Benefits of the zooming in by these intervals:
-
More easily see slot start and end times for slot durations 5 minutes or greater. The slots are vertically aligned, which improves visibility of slot start and end times. Previously these slots were presented as 15 minutes long and were staggered on the calendar, which could lead to confusion.
-
The start time of the slot is displayed on all slot durations when at the 5-minute zoom increment which reduces clicks and makes the start time of the slot more easily accessible
Depending on the increment selected and the duration of the slot, the calendar shows more information as the you decrease the increment size.
This update gives you more control over the level of detail you see appear in appointment slots. Zooming in or out based on 5-, 10-, and 15-minute increments helps present a better layout of the calendar.
Note: Slots less than 5 minutes will appear with a 5 minute duration on the calendar.
Previously, 5- or 10-minute slots appeared to be 15 minutes in duration due to how they were presented on the calendar. These slots would overlap and may have looked "double booked" when in fact all the slots should be sequential.
At any zoom level, appointments are aligned vertically and with their actual start and end times.
Note: Your zoom settings save with your Saved Views and your user preference settings. The calendar loads at the default zoom level (10 min) and you can adjust as needed. Once updated, the calendar stays at that interval level until you change it.
You can more easily see the start and end times of slots on the calendar because the plus and minus buttons on the bottom right corner of the calendar control the new calendar zoom increments.
Note: The zoom in increment will appear next to the -/+ buttons as you zoom in and out on the calendar.
Using your existing workflow, you can zoom the calendar by 15-, 10-, and 5-minute intervals. As you zoom in, slots with durations less than 15 minutes will start to display the start time, appointment type name, and patient name (if applicable).
For example, A 5-minute slot at a 15- or 10-minute zoom level will be blank because the size of the slot cannot accommodate text, but at the 5-minute zoom level, the slot will contain the start time, appointment type name, and patient name (if the slot is booked).
To zoom the calendar in intervals:
From the Appointment Schedule calendar, click on the:
-
Plus icon ( + ) to increase the zoom increment.
-
Minus icon ( - ) to decrease the zoom increment.
You can zoom by the following increments:
-
15-minute zoom
-
10-minute zoom
-
5-minute zoom
You can select new calendar views from the drop-down list in the top right corner of the screen.
You can select the following calendar views:
- Day — This view organizes the appointment slots by the current day.
Note: On the Appointment Schedule Calendar the default view is the Day view. - Week — This view organizes the appointment slots by the current week (Sunday through Saturday). This is the default view.
- Work Week — This view organizes the appointment slots by the current work week (Monday through Friday).
- Availability — This view organizes the appointment slots by what is currently available to book.
Note: The calendar has Department columns when viewing by the week, work week, or day views. Slots are divided into columns associated with the department of the slot, this means that each department schedule has its own column on the calendar. The Department columns help you easily see what department you're scheduling the provider without having to click on the slot.
You can select the Availability option to select the Availability view of the Appointment Schedule calendar.
- From the Appointment Schedule calendar, select Availability from the list of view options.
A message appears telling you to select an Appointment type. - Select an Appointment type.
- Notice the Appointment Schedule calendar filter down to only available slots for the selected Department, Provider or Specialty.
- Hover over the time slot you want to book to see the short name of the appointment type you selected.
-
To schedule an appointment in the available slot, complete the usual workflow for booking appointments from the Appointment Schedule calendar.
Important: If there are no available slots within 30 days, a message appears informing you that no open slots were found.
- From the Appointment Schedule calendar, select Availability from the list of view options.
A message appears telling you to select an Appointment type. - Select an Appointment type.
- Select from the following options to set a specific time of day:
- Morning
The Appointment Schedule calendar defines Morning as the time period before 11:59AM. - Noon
The Appointment Schedule calendar defines Noon as the time period between 12:00PM to 1:00PM. - Afternoon
The Appointment Schedule calendar defines Afternoon as the time period after 12:00PM.
- Morning
- Notice the appointments filter to that specific time of day.
You can manually set a time of day by clicking the text boxes next to the From: and To: fields.
Manually enter a time or select one from the list of options.
In the Remove slots from calendar field, you can select multiple time slots to reserve them for a single appointment.
You can select as many time slots as you need to for the appointment in addition to the slot that indicates the start time.
When you:
- Enter an additional time slot, it becomes inaccessible when you hover over it in the preview panel.
- Click the info icon
 , a message about the Remove slots from calendar field appears.
When you click Review, the Review Appointment Details window appears where you can confirm the appointment information and confirm the booking.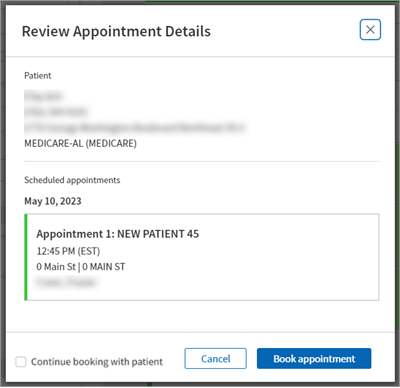
Note: The appointment type note that appears under the Review Appointment Details heading is controlled by the custom note your practice added for the appointment type on the Appointment Types page. For more information on entering a custom note to appear for an appointment type, see Appointment Types in O-help.
You can choose to keep the patient your scheduling with prior to completing the booking, rescheduling, or canceling workflow. If retained, the patient banner will appear at the top of the calendar, allowing you to continue booking with the patient.
-
New Continue booking with patient box for keeping the patient appears on the existing completion window for booking, editing, and rescheduling appointments.
-
Kept patient will appear in the patient banner at the top of the calendar.
-
Use "Clear Patient" if you no longer need to book the patient.
This means you can retain the patient when:
-
Exiting the workflows upon successfully booking, rescheduling, or canceling the appointment for that patient
-
Backing out of the booking workflow before completing it for that patient.
-
If you don't want to continue booking with the patient after canceling out of the booking workflow, click Clear Patient in the patient banner.
The Continue booking with patient box appears in the left of the Cancel button:
-
Booking workflow's Review Appointment Details window — The box is checked, the patient will be retained for further scheduling.
-
Rescheduling workflow's Reschedule Appointment window — The box is unchecked, the patient will not be retained for further scheduling.
-
After indicating you'd like to continue booking with the patient, you will be taken back to the main calendar with the patient banner of the patient you just booked, rescheduled, cancelled, etc.
-
Note: You can click Clear Patient in the Patient Banner if you no longer want to book with the patient.
Note: If you start booking with the kept patient, but need to change to a different patient, changing the patient in the booking workflow automatically clears patient information from all the other fields so you can safely schedule the newly selected patient.
This feature provides the following benefits:
-
Retain the patient your scheduling with for further scheduling upon completion of your prior scheduling workflow.
-
The patient is automatically kept when canceling out of the booking workflow so you don't have to search for the patient again if you need a different slot than you originally selected on the calendar.
Anytime after you select an open time slot, you can select a different one and click Use this slot instead.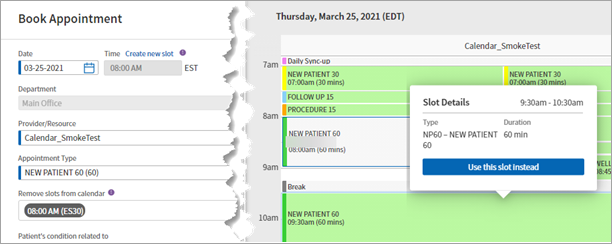
You can add appointments notes directly to the athenaNet home page from the Appointment Schedule calendar.
Important: Appointment notes are automatically added to the athenaNet home page by default. Please deselect the Add note to homepage option to NOT have the appointment note appear on the athenaNet home page.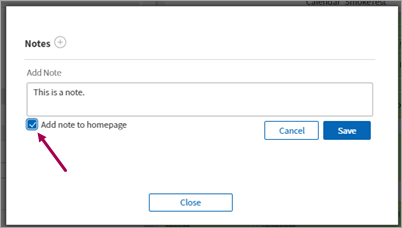
Note: You can select or deselect the Add note to homepage option whenever you add or edit appointment notes while scheduling and rescheduling patient appointments.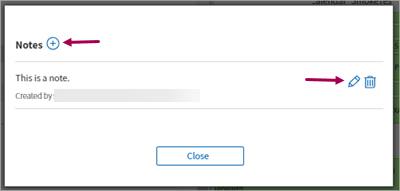
You can select which appointment types appear in a particular department's appointment types drop-down menu for a particular provider.
The Appointment Schedule calendar supports the Appointment Type Drop Downs feature. To set appointment type drop down options, you must have the Schedule Admin: Appointment Type Drop Downs user permission.
Follow your usual workflow for setting up specific configurations per provider. For more information, see Appointment Type Drop Downs in O-help.
Any existing appointment type drop down settings that your practice has configured appear for those providers in the Appointment Schedule calendar.
For example, only three appointment types appear for Provider A, but many appear for Provider B. The images below are of the same Appointment Type field of the Appointment Schedule calendar's Filter section:
- Provider A example
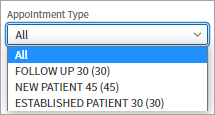
- Provider B example
