 User Guide — Nursing Flowsheets
athenaOne for Hospitals & Health Systems
You can use nursing flowsheets to track a patient's condition over time and spot trends at a glance.
ED nurses, ICU nurses, and medical and surgical nurses can use the Lines, Tubes, Drains, and Airways flowsheets to quickly assess any worrisome developments related to complex, life-sustaining machinery and provide the rest of the care team with enough data to intervene if necessary.
In the patient chart, click the Flowsheets chart tab at the left side of the page
You must be logged in to a department that uses athenaOne for Hospitals & Health Systems
To access nursing flowsheets, you must have these user permissions:
- Inpatient Clinicals: Edit Chart
- Inpatient Clinicals: Administer Chart
To use chart export for nursing flowsheets, you must have one of these user roles:
- Clinicals Admin
- Supervising Provider - Clinicals
- Non-Supervising Provider - Clinicals
- View Only Clinicals
- View Only Clinicals with Printing
See also: User Roles and Permissions.
Licensed clinicians at athenahealth review clinical content in nursing flowsheets to ensure compliance with best practices. Nursing flowsheets in athenaOne are:
- Verified using best practices and evidence-based research
- Compliant with current TJC, CMS, and DNV guidelines for adult acute care
- Evaluated by a team of clinicians familiar with your needs
- Reviewed by the athenahealth Patient Safety team
You can also submit feedback to your athenahealth implementation partner and Customer Success Manager.
Before users at your hospital can use the Screening flowsheet, an administrator must use the Screening Questionnaires admin page to select which screening and assessment tools are available to your users. athenahealth recommends making all screening and assessment tools available to users at your hospital.
Note: You must enable at least one screening and assessment tool for the Screening flowsheet to work.
- Display the Screening Questionnaires page: On the Main Menu, click Settings
 > Clinicals. In the left menu,under Practice Links — Exam, click Screening Questionnaires.
 - Scroll down to the Existing Global Screening Questionnaires table.
- Click copy next to each item to enable for your hospital.
Note: athenahealth recommends that you copy these screening and assessment tools to enable useful content in the Screening flowsheet.- AUDIT-C
- Braden Scale
- CAGE
- CAGE-AID
- Caprini Risk Assessment
- CIWA-Ar
- GAD-7
- Geriatric Depression Scale
- Glasgow Coma Scale
- HARK
- Hendrich II Fall Risk
- Katz ADL
- Modified Padua Risk Assessment
- Montreal Cognitive Assessment
- Morse Fall Scale
- Oswestry Disability Index
- PHQ-2/PHQ-9
- SLUMS
- Social Connection and Isolation Panel
- SOFA
- qSOFA
Gather a team of experts and superusers to prepare and support your staff through the transition. These trusted experts will:
- Master the functionality
- Train coworkers
- Answer questions during the transition
Consult with workflow experts to understand how adopting nursing flowsheets might affect their workflows, and then update your policies and workflows as necessary. You might consider consulting with:
- Nursing administrators
- Health information management (HIM) staff
- Coding staff
Questions might include:
- Will HIM staff incorporate flowsheets into the chart review process?
- Will HIM staff incorporate flowsheets into the chart export process?
- Will flowsheets affect coding or billing workflows?
Get the word out across your organization, making sure to include anyone affected by the updated policies and workflows. Here are some ways to make sure everyone is on the same page:
- Announce policy and workflow changes
- Ask nursing administrators to educate the nursing staff on workflow changes
- Post the release note in the nurses' station
- Leave a summary of the functionality next to each nursing workstation and computer
Include the following in announcements and notices:
- Who they can contact in your hospital with questions
- Where they can find additional resources and information
- When they can participate in group training and Q&A sessions
You can use resources on the Success Community, including:
- Release notes
- Demo videos
- Training materials
Organize a time to review training materials on the Success Community as a group, followed by a Q&A session. Ask your superusers to educate their coworkers and hold flowsheet demo sessions with your staff.
You can ensure that nurses have one consistent place to document assessments by removing duplicate documentation tools, including:
- Local assessment templates
- Global assessment templates (see the list of global templates to review)
Gather a team of athenaOne experts and nursing administrators in your hospital. Ask them to identify and remove duplicate sections and questions from assessment templates. This might mean:
- Removing an entire template
- Removing a few sections or questions from a template
- Creating a new template for a section not covered by nursing flowsheets
athenahealth recommends that you review assessment templates and remove duplicate sections and questions within two weeks of receiving nursing flowsheets.
This process may take time and, ideally, should be completed after staff are trained on and comfortable using flowsheets.
Please review this list of suggested templates that you may be using that might be candidates for modification after you start using nursing flowsheets:
- [Global] Central Line Assessment
- [Global] Foley Catheter Assessment
- [Global] Foley Catheter Insertion
- [Global] Foley Catheter Removal
- [Global] NG/NJ Tube Assessment
- [Global] NG/NJ Tube Insertion
- [Global] NG/NJ Tube Removal
- [Global] PIV Assessment
- [Global] PIV Insertion
- [Global] PIV Removal
- [Global] Activities of Daily Living
- [Global] Alcohol and Drug Screening - CAGE-AID
- [Global] Alcohol Screening - Alcohol Use Disorders Identification Test (AUDIT-C)
- [Global] Anxiety Screening - Generalized Anxiety Disorder 7 (GAD7)
- [Global] Dementia Screening - Saint Louis University Mental Status (SLUMS)
- [Global] Depression Screening - Geriatric Depression Scale (GDS)
- [Global] Depression Screening - Patient Health Questionnaire 2 (PHQ 2)
- [Global] Depression Screening - Patient Health Questionnaire 9 (PHQ 9)
- [Global] Functional Screening - Katz Index of Independence in Activities of Daily Living (Katz ADL)
- [Global] LOC Assessment - Glasgow Coma Scale (GCS)
- [Global] Morse Fall Scale
- [Global] Skin Screening - Braden Scale for Predicting Pressure Sore Risk
- [Global] Withdrawal Assessment - ARF Clinical Institute Withdrawal Assessment for Alcohol (CIWA-Ar)
- [Global] Pain Assessment
- [Global] Shift Assessment – male
- [Global] Shift Assessment – female
- [Global] Wound Assessment
- [Global] Handoff Tool - I Pass the Baton
- [Global] Report Tool - SBAR Report
The Flowsheets chart tab  in the patient chart includes these groups:
- ADL (activities of daily living) — Tracks information about the patient's activity, hygiene, and nutrition, as well as any safety measures and precautions in effect.
- Airways — Tracks assessments of artificial breathing devices, including endotracheal and tracheostomies.
- Assessments — Tracks head-to-toe assessments, including pain, neurological, EENT, respiratory, cardiovascular, gastrointestinal, GU, musculoskeletal, integumentary, and psychosocial assessments.
- Drains — Tracks assessments of catheters, ostomies, bulb drains, and other liquid and solid waste management drains.
- Lines — Tracks IV site assessments and manages the status of peripheral, central, arterial, and other lines.
- Measurements — Tracks point of care test results, including blood glucose.
- Restraints — Tracks the compliant use of restraints to manage behavior that poses a risk to the patient's health.
- Screenings — Tracks the results of screening tools that assist in clinical decision making, including the Glasgow, Morse, Braden, and CAGE screening tools.
- Tubes — Tracks assessments of gastrostomy, jejunostomy, nasogastric, and other gastric- and feeding-related tubes.
- Vitals — Tracks a patient's vital signs in table or graph view.
- Wounds — Tracks the characteristics of burns, tears, ulcers, and other wounds, and the interventions used to treat and manage them.
Note: You can add vitals data only for open hospital stays.
- Display the Flowsheets tab of the patient chart: In the patient chart, click the Flowsheets chart tab at the left side of the page
- In the Flowsheets tab, click Vitals to open the flowsheet.

- Click Add assessment.
- Enter the patient data.
- Click Sign to save the assessment.
A new column appears in the flowsheet, displaying the information you entered.
- Display the Flowsheets tab of the patient chart: In the patient chart, click the Flowsheets chart tab at the left side of the page, and then click Measurements.
- Click the plus icon
 , located at the top of the table near the most recent date and time column, to add data for multiple items, or click a cell under the plus icon
  to enter data for just that cell.
Note: You can add measurements data only for open stays.
The Add Flowsheet Values window appears, displaying the current date and time.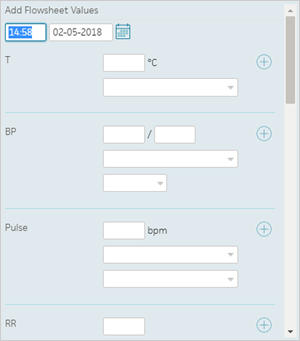
Tip: If necessary, you can change the time and date, and then click outside the field. To switch the value back to the current time and date automatically, enter n (for now) in the time field. - Enter the patient data.
- Click outside the window to save.
- Display the Flowsheets tab of the patient chart: In the patient chart, click the Flowsheets chart tab at the left side of the page, and then click ADLs or Assessments.
- Click Add Assessment.
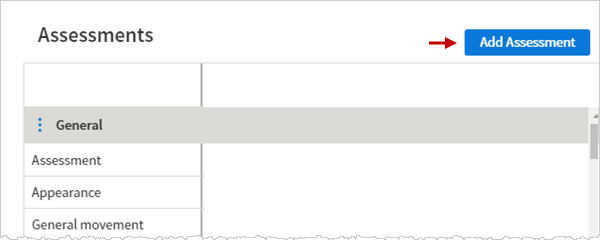
- Click the section in the navigation menu on the left.
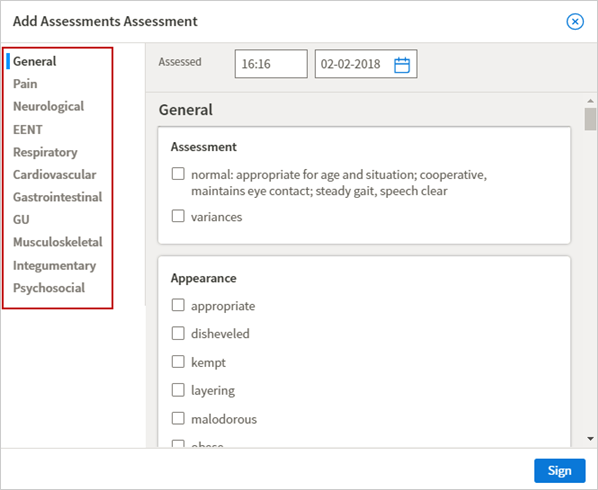
- Answer all relevant questions.
- Click Sign.
A new column appears in the flowsheet, displaying the information you entered.
The Lines, Tubes, Drains, and Airways flowsheets consist of a three-step workflow: add a section, add assessments, remove a section.
- Add a section for each airway, drain, line, or tube that's actively being used to manage the patient's health.
- Document line, tube, drain, and airway assessments in the flowsheet columns.
- Document when the airway, drain, line, or tube is removed. After a section is marked as removed, it turns gray and moves to the bottom of the flowsheet to indicate that the intervention is no longer being used to manage the patient's health.
To add a section
- Display the Flowsheets tab of the patient chart: In the patient chart, click the Flowsheets chart tab at the left side of the page, and then click the Lines, Tubes, Drains, or Airways flowsheet.
- Click one of the following:
- Add Airway
- Add Drain
- Add Line
- Add Tube
- Select a type of line, tube, drain, or airway in the list.
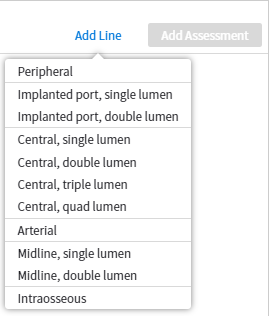
- Enter all required data.
- Click Sign.
A new section appears in the flowsheet, displaying relevant details.
Note: You can now add an assessment of this line, tube, drain, or airway.
To add an assessment
- Display the Flowsheets tab of the patient chart: In the patient chart, click the Flowsheets chart tab at the left side of the page.
- In the Flowsheets tab, click the flowsheet that includes a section for this line, tube, drain, or airway.
- Click Add Assessment.
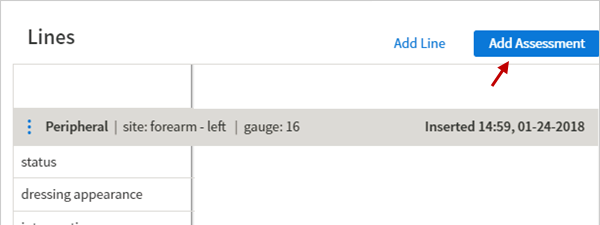
Tip: You can also click the ellipsis icon to the left of the section name and select Add Assessment.
 - Scroll to the relevant section, or click the desired line, tube, drain, or airway in the navigation menu on the left.
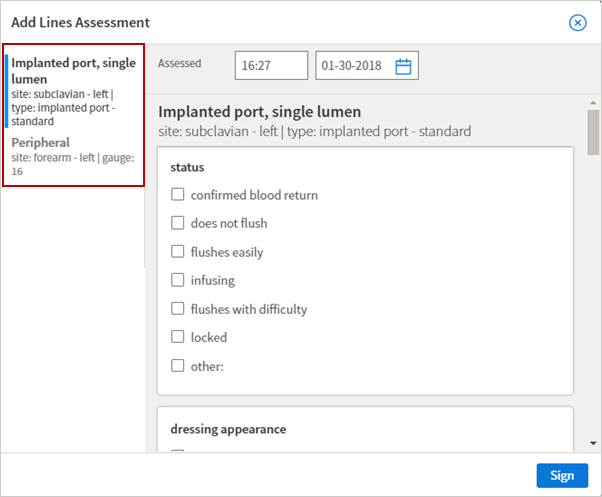
- Answer all relevant questions.
- Click Sign.
A new column appears in the flowsheet, displaying the information you entered.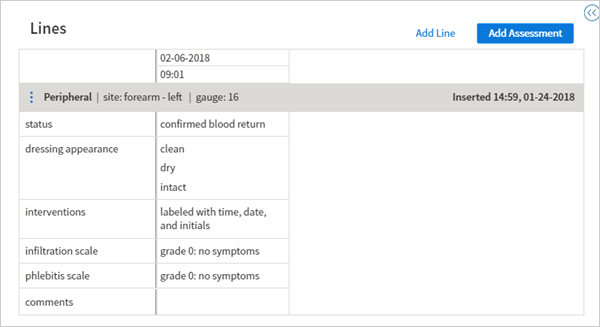
To mark a section as removed
Mark sections as removed to indicate that the line, tube, drain, or airway is no longer being used to manage the patient's health.
- Display the Flowsheets tab of the patient chart: In the patient chart, click the Flowsheets chart tab at the left side of the page.
- In the Flowsheets tab, click the name of a flowsheet that includes a section for this line, tube, drain, or airway.
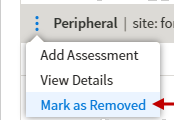
- Click the ellipsis icon
 to the left of the section name.
 - Select Mark as Removed.
- Answer all relevant questions.
- Click Sign.
The status of the section changes to Removed, followed by the time and date of removal. The section turns light gray and moves to the bottom of the flowsheet.
To add a section
Prerequisite: Use the Screening Questionnaires page to make at least one screening and assessment tool available to users at your hospital (see Setup for step-by-step instructions).
- Display the Flowsheets tab of the patient chart: In the patient chart, click the Flowsheets chart tab at the left side of the page, and then click Screening.
- Select a screening questionnaire: Click Screening
 to search for and add a section for the screening questionnaire.
A new section and an empty table appear in the flowsheet.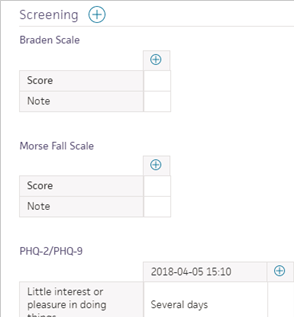
Note: Sections are listed in alphabetical order in the Screening flowsheet.
To add an assessment
- Click the plus icon
 in the header of the section table to start a new assessment.
A window appears with questions and answer options for that screening tool. - Answer all questions. You can click the information icon
 next to Guidelines at the end of the questionnaire for guidance.
Note: For licensing and copyright reasons, certain screening tools are available as score-only assessments. These screening tools allow you to record only the final assessment score in flowsheet format. After administering the screening tool, you can enter the final score if you want to keep track of it in a flowsheet. - Click Score.
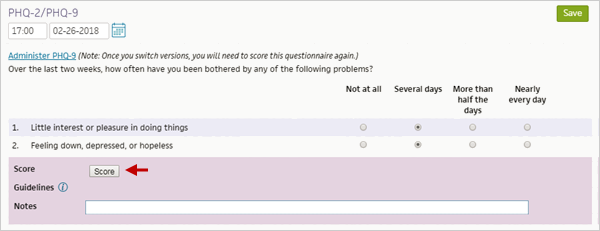
Note: If you change an answer, make sure to click Score Again to recalculate the score.
Tip: After you answer and score the screening questionnaire, you can click the information icon to see where the patient falls within a risk range.
 - Note — Enter additional details (optional).
- Click Save.
- Click outside the window. The questions and answers now appear in the Screening flowsheet.
- Display the Flowsheets tab of the patient chart: In the patient chart, click the Flowsheets chart tab at the left side of the page.
- In the Flowsheets tab, click Vitals or Measurements.
- Locate the data to edit.
- Click any cell where you had entered data or a note.
Tip: You can also click the column heading to edit multiple data cells.
The Edit Flowsheet Values window appears and, near the bottom, displays who created and last modified the data.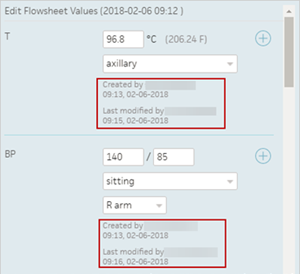
- Update the patient data as necessary.
Note: You can't edit data or notes entered by another user. - Click outside the window to save.
- Display the Flowsheets tab of the patient chart: In the patient chart, click the Flowsheets chart tab at the left side of the page.
- In the Flowsheets tab, click the ADL or Assessment flowsheet.
- Click the plus icon
 in the header of the section table to start a new assessment.
A window appears with questions and answer options for that screening tool. - Answer all questions. You can click the information icon
 next to Guidelines at the end of the questionnaire for guidance.
Note: For licensing and copyright reasons, certain screening tools are available as score-only assessments. These screening tools allow you to record only the final assessment score in flowsheet format. After administering the screening tool, you can enter the final score if you want to keep track of it in a flowsheet.
To edit a section
- Display the Flowsheets tab of the patient chart: In the patient chart, click the Flowsheets chart tab at the left side of the page.
- In the Flowsheets tab, click the name of a flowsheet.
- Scroll to the section to edit.
- Click the ellipsis icon
 to the left of the section name.
 - Select View Details.
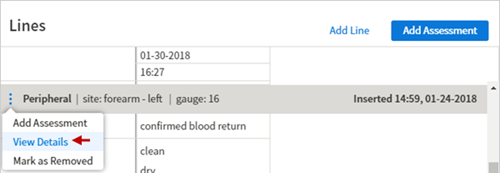
- Review and update the data as necessary.
- Click Sign.
The section header in the flowsheet displays the updated details.
To edit an assessment
- Display the Flowsheets tab of the patient chart: In the patient chart, click the Flowsheets chart tab at the left side of the page.
- In the Flowsheets tab, click the name of a flowsheet.
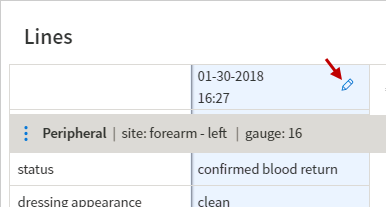
- Hover your cursor over the date and time of the assessment to edit.
The column turns blue and the edit icon appears.
 - Click the edit icon
 .
.
- Review and update the assessment details as necessary.
- Click Sign.
athenaOne refreshes the data in the column to display the updated assessment information.
You can use chart export to share (i.e., export, print, or fax) current data stored in the Vitals, Measurements, Assessments, and ADLs flowsheets with patients, providers at other practices, and chart auditors.
- In the patient chart, click the Menu icon
 and select Chart export.
The Chart Export window appears, with the number of flowsheet sections available for chart export listed in parentheses next to Flowsheets. - Under Available Attachments, expand a flowsheet group.
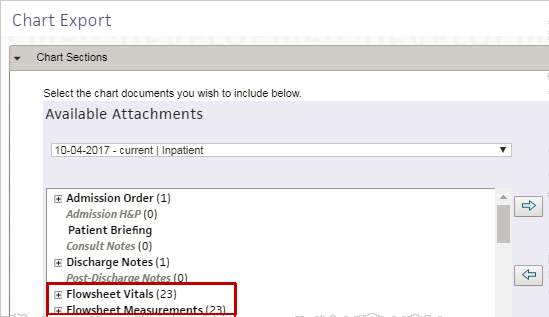
- Select the data to export and click the select icon
 .
.
athenaOne lists the selected data under Selected Attachments. - To include details about who entered flowsheet values and when, check the Include Document History box. This is useful when you need to provide information to lawyers and chart auditors. It is not usually needed when you provide information for patients and other providers.
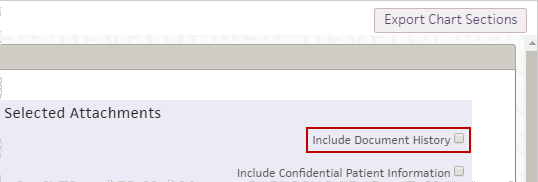
- Click Export Chart Sections.
athenaOne assembles the chart export document, which is ready to print or fax.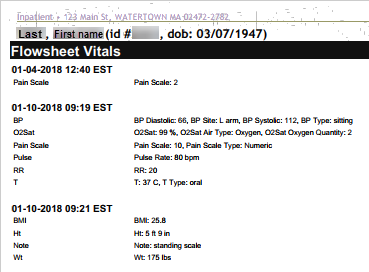
- Display the Report Builder page: On the Main Menu, click Reports. Under General, click Report Builder.
- Select Inpatient Clinicals on the Choose Report Type tab.
- Click Next at the bottom of the page to display the Choose Display Columns tab.
- Select the columns (data elements) to display in the report.
- Click Next to move to the Choose & Set Filters tab.
- Select the filters for columns in the report.
- Click Run Report.
