 Quick Reference — To create and run a report
When you create a report using the Report
Builder, we recommend that you include an ID (such as a patient ID or claim ID) as a reference point wherever possible.
Tip: Use the minimum necessary patient identifying information in your reports.
- Display the Report Builder page: On the Main Menu, click Reports. Under General, click Report Builder.
Select the report type
- Select the type of report that you want to create on the Choose Report Type tab.
For more information about these options, see Report types on the Choose Report Type tab. - Click Next
at the top of the page to display the Choose Display Columns tab.
Select the report columns
Note:
-
For a list of Report Builder columns and filters, see this Excel document on the Success Community: Report Builder Columns and Filters by Report Type.
- The available display columns may be different, depending on whether you're creating a single practice report or cross-practice report.
- Select the columns (data elements) to display in the report using either of these methods:
- Search for keywords or a specific column name in the search bar.
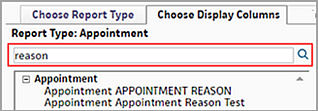
- Click the plus sign
 next to a category to display a list of the available columns in that category.
 - To select a
column, click the column name and then click the right-facing arrow to move the column to the Selected
Display Columns box.
Tip: To display a short description of a column, pause your cursor over the column name in the list. - To remove a column from your report, click the column name in the Selected Display Columns box and then click the left-facing arrow.
- To rearrange the order of the selected columns, use the up and down arrows to reorder the list in the Selected Display Columns box.
- To rename a selected display column, double-click the column name in the Selected Display Columns box, and then enter the new column name.
- When you are satisfied with the columns, click Next to move to the Choose & Set Filters tab, or click one of these buttons:
- Preview
Report to display the Preview Report tab.
Note: If you added a column to the report that does not relate to other columns in the report, you may see multiple rows of data in the report instead of one row, as intended. - Save Report to save the report. If you are editing an existing report, you can also save the report as a new report.
- Save & Schedule to display the Schedule Report tab, where you can save the report and specify when it should be run.
- Run Report to specify the report format, run the report, and display the View Results tab.
Tip: Select only the columns you need for your report.
Specify the filter criteria for the report rows
- Select the filters for columns in the report using either of these methods:
- Search for keywords or a specific filter name in the search bar.
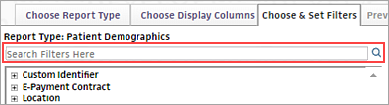
- Click the plus sign next to a category to display a list of the available filters in that category.
- To select a filter, click the filter name and then click the right-facing arrow to move the filter to the Filter Criteria box. The filter fields expand to reveal the
data options.
Tip: To display a short description of the data in that field, pause your cursor over a filter field in the list. - For each row filter in the Filter Criteria box,
specify the data that you want to appear in the report rows. (To remove a row filter from your report, click the filter
name in the Filter Criteria box and then click the left-facing arrow.)
Note: To select multiple filters at the same time, press the Ctrl key and click each filter.
For ICD-10 codes, enter four numbers without the period. For example, enter the code G47.3 in the filter box as G4730.
For date ranges: - Select the Fixed Date Range option to use the same, fixed date range every time the report is run. For example, a report saved with the fixed date range "1/1/16 to 12/31/16" will always return results for that time frame.
Note: When you select the Fixed Date Range option, the report dates will not change dynamically based on the date that the report is run. - Select the Relative Date Range option to use a date range relative to the
date on which the report is run, such as Yesterday or Previous Week. If you select the Relative Date Range option,
you can select Custom from the menu; additional fields
appear that you can use to create a custom relative date, such as "Beginning
7 days ago" and "Ending 2 days ago."
Note: If your fiscal year does not align with the calendar year, you can select date ranges for the fiscal year or the calendar year, for example, Fiscal Quarter-to-Date, Previous Fiscal Year, Previous Calendar Quarter, or Calendar Year thru Previous Month. - When you are satisfied with the filters, click one of these buttons:
- Back to return to the Choose Display Columns tab.
- Preview Report to display the Preview Report tab.
- Save Report to save the report. If you are editing an existing report, you can also save the report as a new report.
- Save & Schedule to display the Schedule Report tab, where you can save the report and specify when it should be run.
- Run Report to specify the report format, run the report, and display the View Results tab.
These filters appear as rows in your report.
Tip: To make your report more manageable, make your filters as specific as possible. For example, specify the date range you need or the demographic characteristics of the patients that you want to report on.
Preview your report
- You can click Preview Report to display the Preview Report tab and view up to 30 rows of your new report. The following buttons appear at the bottom of the Preview Report tab:
- Modify Display Columns — Return to the Choose Display Columns tab.
- Modify Filters — Return to the Choose & Set Filters tab.
- Save Report — Save the report. If you are editing an existing report, you can also save the report as a new report.
- Save & Schedule — Display the Schedule Report tab, where you can save the report and specify when it should be run.
- Run Report — Prompts you to choose the report format, runs the full report, and displays the View Results tab.
Save and schedule the report
- Click Save & Schedule to display the Schedule Report tab.
- Report Name — Enter a short, descriptive name for the new report.
- Report Description — Enter a description of the report.
- Report Inbox Description — Enter a short description of the report (up to 500 characters). This description appears in your Report Inbox when the report appears. You can modify existing scheduled reports to add a description in this field.
- Report Category — Select a general report category. This category determines the Report Library tab where the saved report can be accessed.
- Report
Section — Select the location in the Report Library where you want to store this report.
- My Report — Save the report on the My Reports tab of the Report Library.
- Practice Report — Save the report in the Practice Reports section of the Report Library tab specified in the Report Category field.
- Portable Report — Save the report in the Portable Reports section of the Report Library tab specified in the Report Category field. Portable reports can be run in
more than one practice; they are available only to the user who created them.
Note: The Portable Report option is available only if you have the Portable Reports permission (this permission is included in the Practice Switcher role).
- Set Recurrence — Specify a recurring schedule for running the report:
- Once — Specify the date.
- Weekly — Specify the start date and the end date (optional), and select the day of the week.
- Monthly — Specify the start date and the end date (optional), and select the day of the month.
- GroupCall Campaign — athenaCommunicator only. Select a GroupCall campaign to send the report results as a patient recipient list. The menu displays campaigns in alphabetical order, and all the campaign types appear.
- Recipients — Select the recipients of this report. You can start typing a name to filter the list. Select the name of a recipient to move it to the Selected list.
Note: Only users with access to the Report Inbox appear in the list of possible recipients. All recipients that you select appear in the Selected list. - Report Format — Select the report format.
- Report Options — Select the desired options.
- Click Save
& Schedule to save the report.
Tip: You can create multiple schedules for all reports in your report library, including standard reports, custom reports, and Report Builder reports. A report's list of schedules appears directly below the report name in the Report Library, and each schedule has its own modify and delete links.
Run the report
- Click Run Report.
- In the Choose Report Format window, select one of these options:
- XML — Display the report in athenaOne.
- Comma Delimited Text (CSV) — Download the report to Excel.
Note: If you select Comma Delimited Text (CSV), the line-feed (LF) record separator is used. - Custom — Download the report using a custom delimiter.
- If you select Custom as the report format, these fields appear:
- Delimiter — Enter a delimiter, such as a comma or pipe ("|"). Delimiters can be up to three characters long.
- Record Separator — Select a record separator from the menu (CR, LF, or CR+LF).
- Select report options as needed.
- Show Totals — Display column totals.
- Deidentify Patient Data — Hide patient data to protect PHI, especially for any report that may be shared.
- Show Reporting Restricted Patients — Patients with a reporting restriction are excluded from the report results unless you select this option. For more information, see Privacy Protection Notes.
- Show in Small Print — This option appears if you select XML as the report format. You may want to use this option for reports with a large number of columns.
- Hide Line Numbers — This option appears if you select XML as the report format. Select this option if you do not want the line numbers to appear (line numbers appear by default).
- Show Filter Criteria — This option appears if you select Comma Delimited Text (CSV) or Custom as the report format. Select this option to display the filter criteria at the top of your report output.
- Hide Column Headings — This option appears if you select Comma Delimited Text (CSV) or Custom as the report format. Select this option to hide the column headings in your report output.
- Hide Report Name — This option appears if you select Comma Delimited Text (CSV) or Custom as the report format. Select this option to hide the report name in your report output.
- Click OK.
View the report results
- You can click the Show Filter Criteria link to show a summarized view of the filters used for this report.
- The following buttons appear at the top and bottom of the View Results tab:
- Modify Display Columns — Return to the Choose Display Columns tab.
- Modify Filters — Return to the Choose & Set Filters tab.
- Save Report — Save the report. If you are editing an existing report, you can also save the report as a new report.
- Save & Schedule — Display the Schedule Report tab, where you can save the report and specify when it should be run.