Configure Patient Locations
This page allows you to administer the patient locations listed in the Patient location menu in the Intake stage and at the top of each section in the Exam stage.
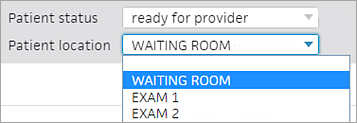
You can create patient locations for individual departments. Only the locations for the selected department appear in the Patient location menu in the Intake and Exam stages of the encounter.
On the Main Menu, click Settings ![]() > Clinicals. In the left menu,under Practice Links — Other, click Patient
Locations
> Clinicals. In the left menu,under Practice Links — Other, click Patient
Locations
- Display the Configure
Patient Locations page: On the Main Menu, click Settings
 > Clinicals. In the left menu,under Practice Links — Other, click Patient
Locations.
> Clinicals. In the left menu,under Practice Links — Other, click Patient
Locations. - Click Add new.
Additional fields appear. - Location Name — Enter a very short name for the room location. This name will appear in the Clinical Inbox list of encounters under the Provider/Location column.
- Ordering — Enter a digit to indicate the order in which this location should appear in the Patient location menu in the Intake and Exam stages of the encounter.
- Default Location on Check-in — Select Yes to set this location as the default location upon patient check-in; otherwise, select No.
- Departments — To restrict this location to specific departments, click Selected and then select the departments that use this location.
- Click Save to save the new location (or click Save and Add Another to continue adding patient locations).
- Display the Configure
Patient Locations page: On the Main Menu, click Settings > Clinicals. In the left menu,under Practice Links — Other, click Patient
Locations.
- Click the edit link next to the patient location that you want to update. The location details appear in the fields at the top of the page.
- Edit the fields as desired.
- Click Save. The updates appear in the list below.
- Display the Configure
Patient Locations page: On the Main Menu, click Settings > Clinicals. In the left menu,under Practice Links — Other, click Patient
Locations.
- Click the delete link next to the patient location that you want to delete. The location disappears from the list.
- Display the Configure
Patient Locations page: On the Main Menu, click Settings > Clinicals. In the left menu,under Practice Links — Other, click Patient
Locations.
- Click the Show deleted (n) link. Deleted patient locations appear disabled in the list.
- Click the undelete link for the location that you want to reenable. The item is restored to your list, and the audit history of the item is preserved.
- Display the Configure
Patient Locations page: On the Main Menu, click Settings > Clinicals. In the left menu,under Practice Links — Other, click Patient
Locations.
- Click the edit link next to the patient location for which you want to view the audit history. The location details appear at the top of the page.
- Click Audit history (above the Save and Cancel buttons).
The audit history appears and displays the changes made to the fields, the username of the practice user who made a change, and the date and time.
| Location Name |
Enter a very short name for the room location. |
|---|---|
| Ordering |
Enter a digit to indicate the order of this location in the Patient location menu in the Intake and Exam stages of the encounter. |
| Default Location on Check-in |
Select Yes to set this location as the default location upon patient check-in; otherwise, select No. |
| Departments |
To restrict this location to specific departments, click Selected and then select the departments that use this location. |
| Column Headings | |
| Location Name |
Name of the patient location. |
| Ordering |
Digit indicating the order of this location in the Patient location menu in the Intake and Exam stages of the encounter. |
| Default |
Yes indicates that this location is the default patient location at check-in. |
| Departments |
Departments that use this location. |