 User Guide — Eye Care Encounter Workflow
You can use eye care-specific workflows during a patient encounter to document eye-specific measurements, track measurements over time, and document an end-to-end vision correction exam.
On the Assign Appointment Types to Layouts page, you can select one of these layouts for eye care visits: Eye Care Visit or Exam-Only Eye Care Visit.
In the Intake stage of the encounter, you can use the Intake checklist to document:
- Visual acuity
- Vision correction
- Intraocular pressure
In the Exam stage - Review step of the encounter, you can update these eye care items:
- Visual acuity
- Intraocular pressure
- Display the Visual Acuity item:
- In the Intake stage, click the Visual Acuity item in the Intake checklist.
- In the Exam stage, click Review in the Exam navigation bar at the top of the page, and then click the Visual Acuity section to expand it.
- To change the format for any visual acuity (VA) reading, use the format menu, which defaults to Snellen (e.g., 20/20) for documenting distance VA and Jaeger (e.g., J1) for documenting near VA.
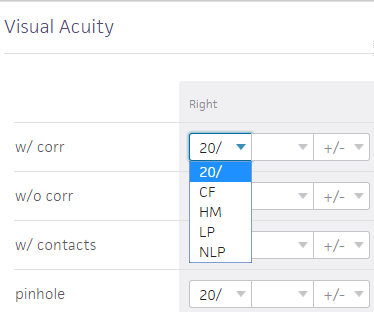
- In the w/ corr, w/o corr, w/ contacts, and pinhole fields, you can select the following options from the menu:
- Snellen (20/) — Select the Snellen denominator between 10 and 400. If necessary, use the +/- menu to document the line modifier.
- Count Fingers (CF) — Select CF @ between 6 in. and 10 ft.
- Hand Motion (HM) — Select HM @ between 6 in. and 10 ft.
- Light Perception (LP) — Designate whether LP is with or without projection.
- No Light Perception (NLP).
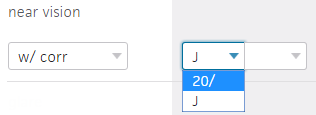
- In the near vision field, you can select the following options from the menu:
- Snellen (20/) — Select the Snellen denominator between 10 and 400. If necessary, use the +/- menu to document the line modifier.
- Jaeger (J) — For near vision, document Jaeger between 1+ and 16.
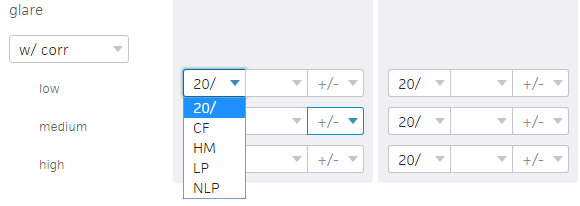
- In the glare field, you can select the following options from the menu:
Snellen (20/) — Select the Snellen denominator between 10 and 400. If necessary, use the +/- menu to document the line modifier.
- Count Fingers (CF) — Select CF @ between 6 in. and 10 ft.
- Hand Motion (HM) — Select HM @ between 6 in. and 10 ft.
- Light Perception (LP) — Designate whether LP is with or without projection.
- No Light Perception (NLP)
- Click the plus icon
 to document multiple readings.
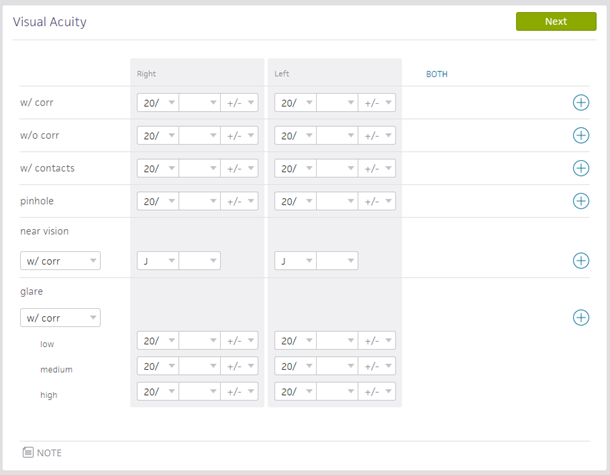
Note: To document binocular VA, click Both to display this column. This column appears for encounters with at least one binocular reading.
- Display the Intraocular Pressure item:
- In the Intake stage, click the Intraocular Pressure item in the Intake checklist.
- In the Exam stage, click Review in the Exam navigation bar at the top of the page, and then click the Intraocular Pressure item to expand it.
- Select a Method:
- Goldmann
- TonoPen
- ICare
- Non-contact
- Palpation
- Enter Right and Left intraocular pressure readings for the patient.
athenaOne remembers the IOP method you select and selects it by default for your next reading.

- Click the plus icon
 to add multiple readings.
- Display the Vision Correction exam item:
- In the Intake stage, click the Vision Correction item in the Intake checklist.
- In the Exam stage, click PE in the Exam navigation bar at the top of the page.
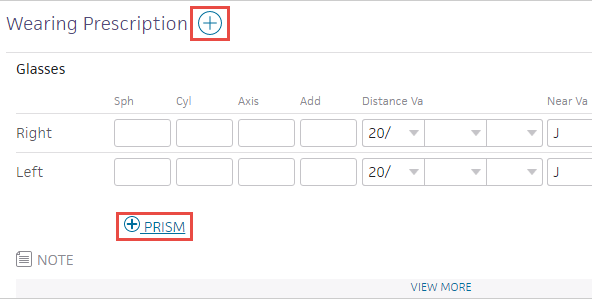
- Click the plus icon
 next to Wearing Prescription to select a template.
 - Select a template.
- Document the glasses or contact lens details.
- To document prism details for glasses, click the plus icon
 next to Prism.
Additional fields appear: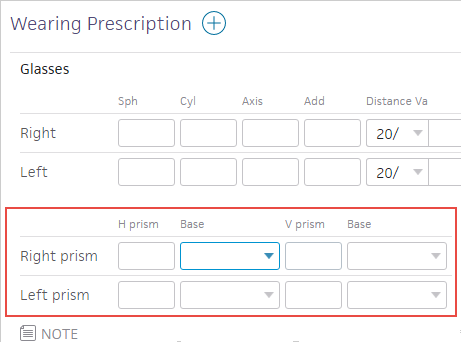
- To document the patient's pupillary distances or lens type for glasses, click View More below the glasses template.
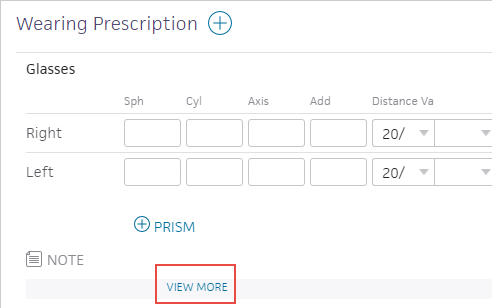
- Click the plus icon
 to add additional wearing prescriptions.
- To view the refraction fields:
- In the Intake stage, click the Vision Correction item in the Intake checklist.
- In the Exam stage, click PE in the Exam navigation bar at the top of the page.
- Click the plus icon
 next to Vision Correction Exam to select a template.
 - Enter the refraction details.
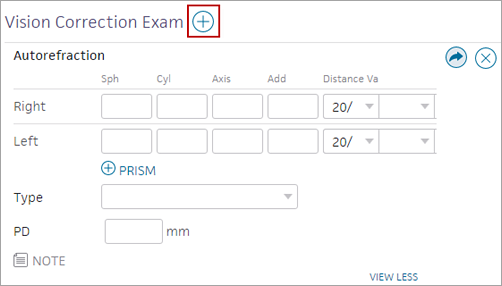
- To document prism details for glasses, click the plus icon
 next to Prism.
 - To document the patient's pupillary distance (PD) or lens type for glasses, click View More below the refraction template.
- To view the contact lens fields:
- In the Intake stage, click the Vision Correction item in the Intake checklist.
- In the Exam stage, click PE in the Exam navigation bar at the top of the page.
- Click the plus icon
 next to Vision Correction Exam to select a template.
 - Select either the rigid or soft contact lens fitting template.
- Document the contact lens details.

- To document an overrefraction, click the plus icon
 next to Overrefraction.
Note: The sphere (SPH) for the overrefraction result automatically sums the fit and overrefraction sphere values.
- Click the send to icon
 next to a result to add it to the order.
- In Orders and Results during the Intake stage or in Assessment & Plan during the Exam stage, verify the prescription details, lens type for glasses, brand for contact lenses, and enter the expiration date.
Note: athenaOne remembers the Expires in option you select for this lens type, so that the next time you accelerate an order of this lens type, the expiration date will populate automatically.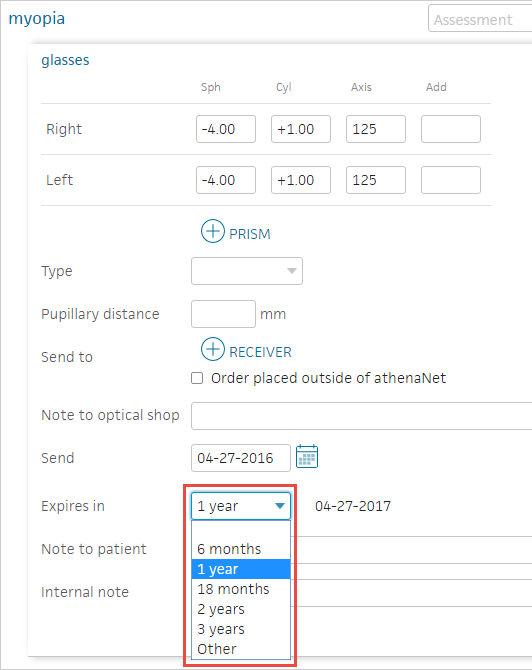
- After you sign the order, click Print to print the vision correction prescription for the patient.

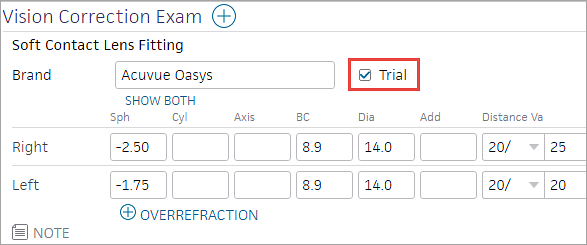
- If a fitting for contact lenses results in a trial lens instead of a final prescription, check the Trial box before adding the order.
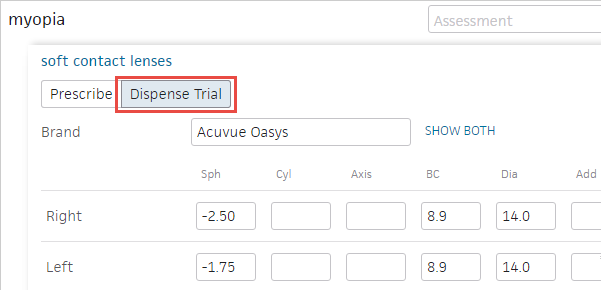
- The ordering mode defaults to Dispense Trial in the Assessment & Plan.
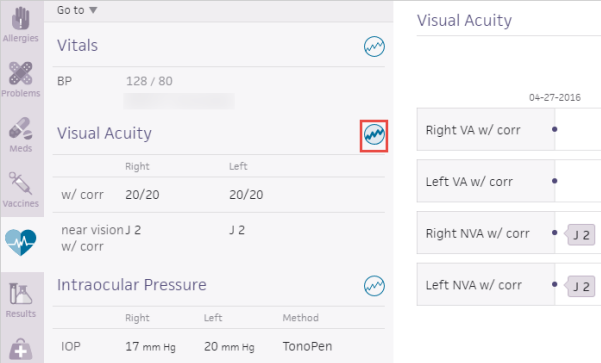
- On the patient chart, click the Vitals chart tab.
- In the Visual Acuity or Intraocular Pressure sections, review the last recorded visual acuity or intraocular pressure readings.
- To review additional historical readings, click the flowsheet icon
 to view a graph or table of the patient's historical readings.
To see the last issued prescription:
- In the patient chart, the Vision Prescription area displays the last issued prescription for each corrective lens type.

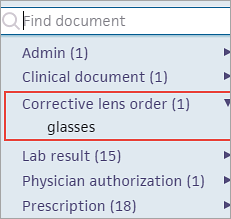
- In the patient chart, click the Find tab
 at the top of the list of chart tabs on the left side of the screen.
 - In the list of document categories, click Corrective lens order.
- On the patient chart, click the Visits chart tab.
- Click an encounter to expand the view and see whether any vision prescriptions were previously issued.
- Click the view more icon
 to review the Summary.
- Display the Order Type & Procedure Template Mapping page: On the Main Menu, click Settings
 > Clinicals. In the left menu,under Practice Links — Charge Integration, click Order
Type & Procedure Template Mapping.
 - Order/Procedure — Search for and select the refraction or contact lens fitting that you would like to map a procedure code to.
- Click Add.
Using magic words, you can include eye care sections in letters, Patient Care Summaries, and other clinical paper forms.
- Display the Clinical Paper Forms
page: On the Main Menu, click Settings
 > Clinicals. In the left menu,under Practice Links — Forms and Letters, click Clinical
Paper Forms.
 - Locate the form or letter that you want to edit in the list, and click the update
link to the left of it.
The HTML for the form appears in the Paper form body text box. - In the Paper form body text box, enter any or all of these magic words:
- {{CLINICALSECTION_VISUALACUITY}} — Displays all visual acuity measurements from the full encounter summary.
- {{CLINICALSECTION_INTRAOCULARPRESSURE}} — Displays all intraocular pressure measurements from the full encounter summary.
- {{CLINICALSECTION_VISIONCORRECTION}} — Displays all documentation of the patient's wearing prescription and vision correction exam from the full encounter summary.
- Click Update to save your changes.
- To see the result of the HTML code, click the update link again for the form that you just edited. You can edit the HTML as needed, and click the Update button to save the changes.