 User Guide — Walk-In Encounter Management
This feature helps your practice manage a high volume of unscheduled (walk-in) patient encounters, particularly in the Urgent Care specialty. For clinicians, the walk-in encounter feature provides a Status view of the clinician home page schedule that displays the status, urgency, wait time, encounter reason, and in-office order status of each patient encounter. Within the encounter, the Status view provides additional documentation opportunities to record patient urgency and appointment reason. Non-clinician staff can view patient wait times and record the patient's reason for the visit before Intake begins.
To use this feature, your department must have the Walk-In Encounter Management feature enabled. For the clinician and non-clinician home pages, the available functionality is based on your login department. Within the encounter, features are available based on the encounter department. To enable this feature, please contact the CSC from athenaOne > Support > Success Community > Contact Client Support Center.
Urgent Care centers have a specialized workflow to treat a wide range of outpatient medical problems in walk-in centers where patients are seen on a first-come, first-served basis. Because patients are seen as exam rooms, clinical staff, and providers become available, practices need to quickly coordinate the different resources.
- Front desk staff can view patient wait times and record the patient's reason for the visit during Check-in.
- Clinical staff can manage the wait room and identify which patients should be seen next by a provider.
- Providers can view the status of their patients and make a more informed decision about which patient to visit next.
An Urgency field is available when you create a walk-in appointment and when you check in a walk-in appointment.

When you mark an encounter as urgent, a red vertical bar with the word "Urgent" appears next to the encounter on the clinician and non-clinician home pages, and the Appointment type/Encounter reason text is red when you view the calendar in the Status view.
When the Walk-In Encounter Management feature is enabled for your department, the schedule on the Clinician view of the home page shows additional information to help you manage walk-in and urgent care patients.
The Status view groups patients according to encounter workflow status:
- Scheduled — Patients with scheduled appointments who have not yet arrived, in the order of their appointment time.
- Waiting room — Patients who have arrived in the waiting room. This status displays patients who are Ready for staff at the top for quick visibility for Intake.
- Ready for provider — Patients who are ready to start the Exam stage with a provider.
- With staff/provider — Patients in the With staff or With provider status who are already with a staff member or provider.
- Done with exam — Patients who have finished the exam and are either in the Checkout stage or have left the office.
You can collapse and expand statuses. Within each status, patients are sorted by wait time and by urgency, if you selected the Urgency option during Check-in or in the Encounter Reason/Chief Complaint section of the Intake or Exam stage.
Note: The patient's photo does not appear in the Status view.
The Status view displays the following information.
- Wait time — Wait time displays how long each patient has been in the office and is calculated based on when Check-in began. Wait time stops when the patient is checked out, representing the total time in the office. Wait time switches from minutes to hours after 120 minutes, and then switches to days after 24 hours.
- Appointment type/Encounter reason — Before a patient starts Check-in, each patient encounter displays the appointment type. After you enter a note in the Notes/Reason field (and then select the Add appointment note to homepage schedule option), the appointment note/reason replaces the appointment type on the home page. After you document an encounter reason during Intake or Exam, the reason replaces the appointment note on the home page to clarify the patient reason for visit.
- Urgency — A red bar appears next to the encounter row and the Encounter Reason/Chief Complaint appears in red if the patient appointment has been marked as urgent.
- Room — When the Intake stage begins, the encounter displays the patient's current room.
- Room Status — Click this link to see which rooms are available in the current department. A number appears in parentheses if multiple patients are assigned to a room. (This list does not include the room that is automatically assigned to patients at Check-In — typically the waiting room.)
Mini-Schedule: The Status view appears in the mini-schedule when you open an item from the Inbox. This view includes the same collapsing status sections, urgent indicator, and the Appointment Type/Encounter Reason.
The Provider, Department, and Time views include updated information for each patient encounter. Wait time appears below the appointment time, the urgent indicator bar appears if the appointment is marked as urgent, and the Appointment type/Encounter reason is updated based on the clinician home page.
In the Provider view, filters and groupings are based on the encounter's referring provider, rather than scheduling provider, because walk-in patients are often initially assigned to a generic, non-person provider and assigned a rendering provider later.
The number of pending orders and order results of any in-office lab and imaging orders for each encounter appear in the Status view. Point-of-care orders that are configured as office order types appear as "Pending" in each encounter row. Click PENDING or RESULT to see details.
When you enter a result, the number of results appears. When you click PENDING or RESULT, a new window appears with the order name, result status, and the user and time when the order was submitted. Click on the order name to view details and to take actions on the document as you normally would.
The non-clinician home page includes the wait time beneath the appointment time; a red urgent indicator bar appears if the appointment is marked as urgent.
If you use the Walk-In Encounter Management feature, you can also request that the Encounter Status Timestamp feature be enabled. The Encounter Status Timestamp feature allows you to see how long patients have been in each status and provides a high-level view of wait times and volume. This feature is most useful for managing high volumes of walk-in appointments and for urgent care facilities.
When this feature is enabled, the schedule on the clinician home page:
-
Organizes appointments by patient status
-
Lists patients from those waiting the longest to least amount of time within each status
-
Shows how long each patient has been in the status
-
Shows how long each patient has been in the encounter (that is, from the time Check-in begins until Checkout is complete)
-
Provides a Collapse Statuses option so, with one click, you can see a high-level view of timing and volume
In addition, if your organization uses Data View, you can run a report to gain additional insights about wait times.
Requirement: To use the Encounter Status Timestamp feature, you must have both the Walk-In Encounter Management feature and the Encounter Status Timestamp feature enabled. To enable these features, please contact the CSC from athenaOne > Support > Success Community > Contact Client Support Center.
Tip: To better manage your urgent care and walk-in appointment workflow with athenaClinicals, refer to Walk-in Encounter Management Feature.
- Display the Schedule Appointment page: On the Patient Actions Bar, click Scheduling, and then click Create Walk-in Appointment.
- Select a current slot or click Create new slot at the top of the page.
If you need to create a new slot
- Department — Select the department.
- Provider — Select the provider.
- Appointment type — Select the appointment type.
- Date — Enter or select the date for the slot.
- Start time — Enter the appointment's start time in the form: hh:mm AM (for example, 8:30AM or 4:00PM).
Tip: To set the current time as the start time for the walk-in appointment, type t (or T) in the Start time field. - Duration — The duration defaults to the configured duration of the Appointment type you selected. For example, if you selected "SAME DAY 15 (15 min)" as the Appointment type, the Duration field displays 15. You can edit the Duration field if needed.
- Notes — Enter any notes about this appointment, and select the Add appointment note to homepage schedule option to the right of the note.
- Urgency — Select this option to mark this appointment as urgent. (This field appears if your department has the Walk-in Encounter Management feature enabled.)
- Primary insurance — Select the primary insurance, if applicable.
- Secondary insurance — Select the secondary insurance, if applicable.
- Patient's condition related to — Select an option, if appropriate.
- Click Add Appointment.
If you schedule the appointment in an existing slot
- Select a time slot.
- Appointment type(s) — Select the appointment type.
- Primary insurance — Select the primary insurance, if applicable.
- Secondary insurance — Select the secondary insurance, if applicable.
- Notes/Reason — Enter any notes about this appointment, and select the Add appointment note to homepage schedule option to the right of the note.
- Urgency — Select this option to mark this appointment as urgent. (This field appears if your department has the Walk-in Encounter Management feature enabled.)
- Patient's condition related to — Select an option, if appropriate.
- Click Schedule Appointment.
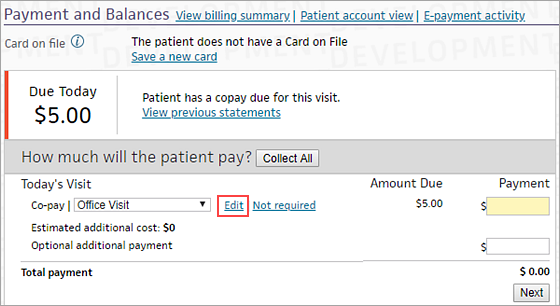
When you check in a patient for an urgent care appointment, the urgent care copay type should appear in the Payment and Balances section of the Check-in page. (The appointment must be scheduled in a department configured on the Departments page with a Place of service type set to Urgent Care Facility.)
Note: The insurance policy used for the appointment must include an urgent care copay type and at least one other copay type (usually for an office visit) at the time of check-in. You can see the copay types and amounts for the insurance package under the Insurances heading of the Check-in page.
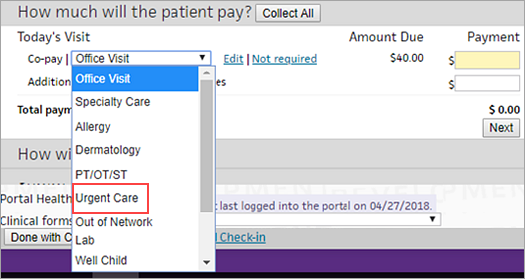
If you are checking in a patient in an urgent care facility and the copay type is not Urgent Care:
- Click Edit next to the copay type to update the copay for today's visit.

- Click the Co-pay menu and select Urgent Care.

The copay amount for an Urgent Care appointment is displayed. - To make sure that the urgent care copay type appears the next time that the patient checks in for an urgent care appointment, update the patient's insurance policy on the Update Policy Details page.
Note: athenahealth recommends that you update patient insurance policies to include up-to-date insurance copay types and amounts.