 User Guide — Schedule Builder
athenaCollector, athenaClinicals
Schedule Builder gives your staff visibility into how schedule templates interact, and makes the process of creating new templates easy and intuitive. You can also preview how templates will be applied before you finalize any template changes.
A template indicates to your staff which type of appointment they can expect to see in a given schedule period.
You must have the Schedule admin user permission.
To access the Schedule Builder page, click the Settings icon  from the Main Menu. Under ADMIN, click Schedule. In the Task Bar, under PRACTICE LINKS — Scheduling, click Schedule Builder.
The Schedule Builder Dashboard is shown here:

You can perform a variety of functions from the Schedule Builder dashboard.
See the Accessing the legacy workflow section for information on accessing these legacy admin pages from the Schedule Builder dashboard.
When making changes to Schedule or Billing Admin pages, there can be a delay of up to 5 minutes before you see these updates load on the Schedule Builder page. This is functioning as intended. Examples of pages where this delay may occur are:
-
Appointment Types
-
Providers
-
Provider Drop-Downs
-
Departments
-
Holiday
Basic functions
You can add a new template from scratch, or by copying an existing template. Jump to the Creating a schedule template from scratch section for a workflow example.
Schedule Builder respects configurations made to Provider Drop-Downs and Department Drop-Downs.
When creating a new template, the provider group and department drop-downs (highlighted below) default to match a user's log-in department.
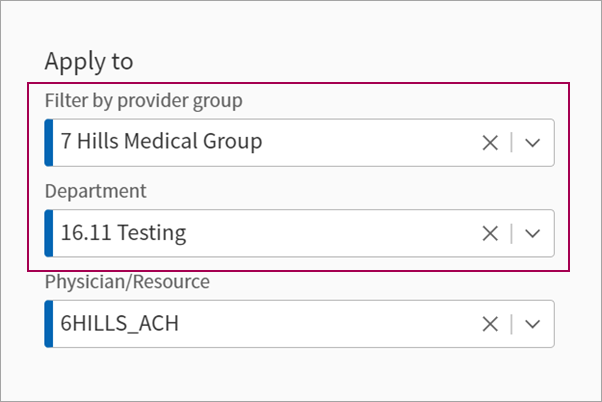
Note: If the provider group and department fields are cleared from their default values, you must first select a provider group before you're able to select a department.
If you select a physician/resource that is not available for the provider group and/or department selection(s) already made, those selections are cleared.
You can search for templates and group them by:
- No Group
- Department
- Provider/Resource
- Provider Group
- Specialty
- Applied by
- Status
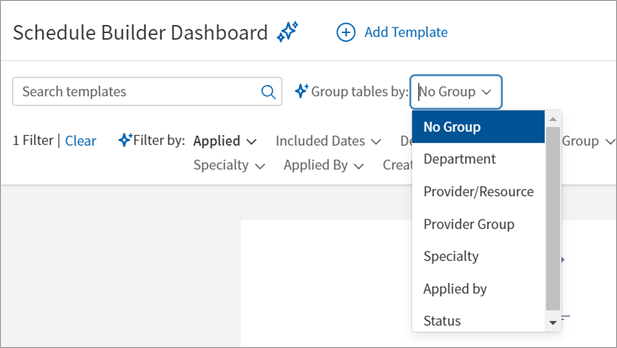
You can filter templates in the Schedule Builder Dashboard by
- A status of "Applied," "Draft," or "Expired"
- Included Dates
- Department
- Provider Group
- Provider (including active providers and deleted providers)
- Specialty
- Applied By. This option reflects the athenaOne user who applied the template.
- Created On
Note: When you land on the main Schedule Builder page, the Included Dates filter is applied by default. This filter brings in a 1-month time period—reflecting one month's time into the future, including today's date.
You can change the dates of the default Included Dates filter by clicking the filter name, adjusting the Start and End dates, and clicking Submit.
Clear all applied filters by clicking Clear.
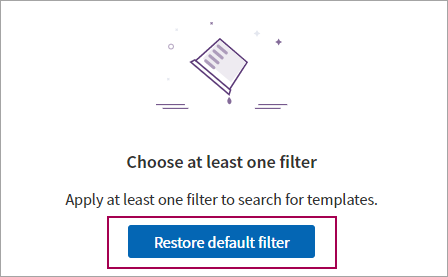
If you clear all filters, you are presented with the option to restore the default Included Dates filter. Click Restore default filter. You must select at least one filter to search templates.
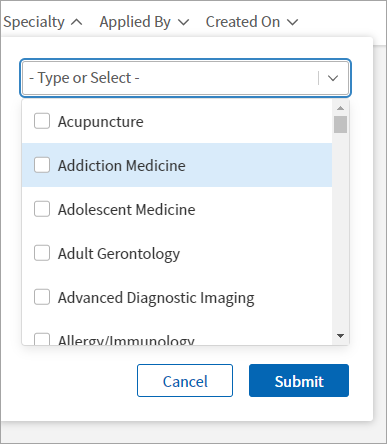
Each filter features a drop-down menu with a variety of options. Here is an example of the Specialty filter without any options selected:
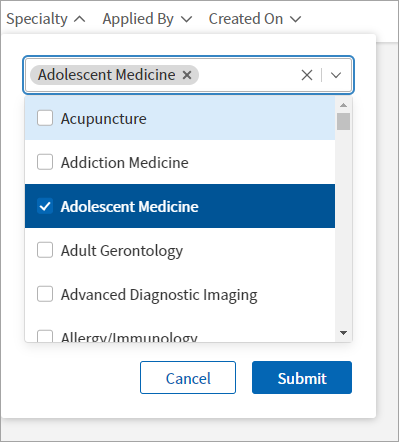
Select one or more options, then click Submit to apply these filter options. You can uncheck the option from the drop-down list to deselect, or you can click the x in the filter search bar to remove your selection.
Note: When applying multiple filter types, you will be able to select options based on a hierarchical logic. For example, a provider group consists of multiple departments, but may not consist of all departments in your practice. Therefore, if you filter by Provider Group first and then by Department, you will only be able to select the departments available in the Provider Group you've already selected as a filter. You will still see departments outside of your selected Provider Group, but these departments will appear in gray and will not be clickable.
After the dashboard is filtered, you can choose to group template tables by
- Department
- Provider/ Resource
-
Provider Group
-
Specialty
-
Applied by
You can view the schedule for a particular provider from the main Schedule Builder page.
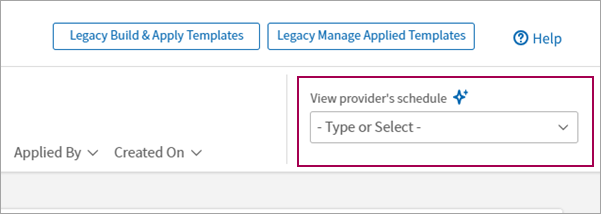
If you pull down the View provider's schedule menu, you will see a list of providers for which you have access.
You can also begin typing a name in this field to search:
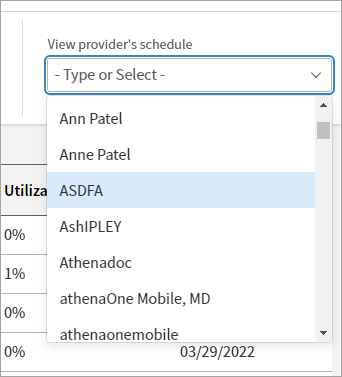
After selecting a provider, you see a calendar preview of the provider's schedule. Go to the Workflow examples section for more information on the specific actions you can take on this page.
This calendar preview is shown below, with the Back to Schedule Builder Dashboard button highlighted. This button takes you back to the main Schedule Builder page.
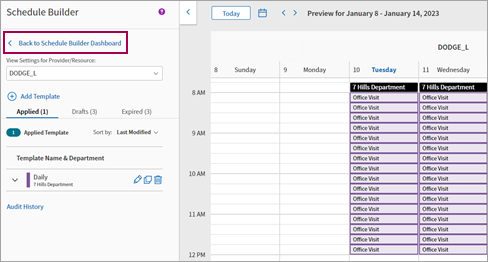
Clicking the Refresh Calendar button at the top of the preview pane ensures you're viewing the latest template attributes:

Toggling Show slots at the top of the preview pane either displays all individual appointment slots, or a consolidated "block" view of appointments belonging to the same type.
Here is an example of Show slots turned on:
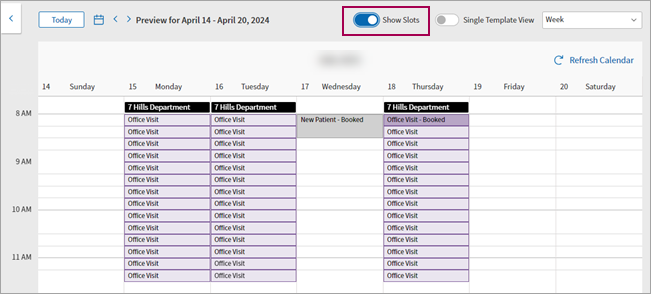
In this example, each 15 minute slot for the appointment type "Office Visit" is shown.
Here is an example of Show slots turned off:
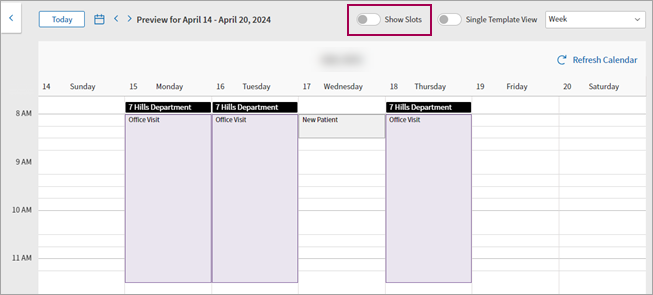
In this example, the 15 minute slots for the appointment type "Office Visit" are consolidated into a block view.
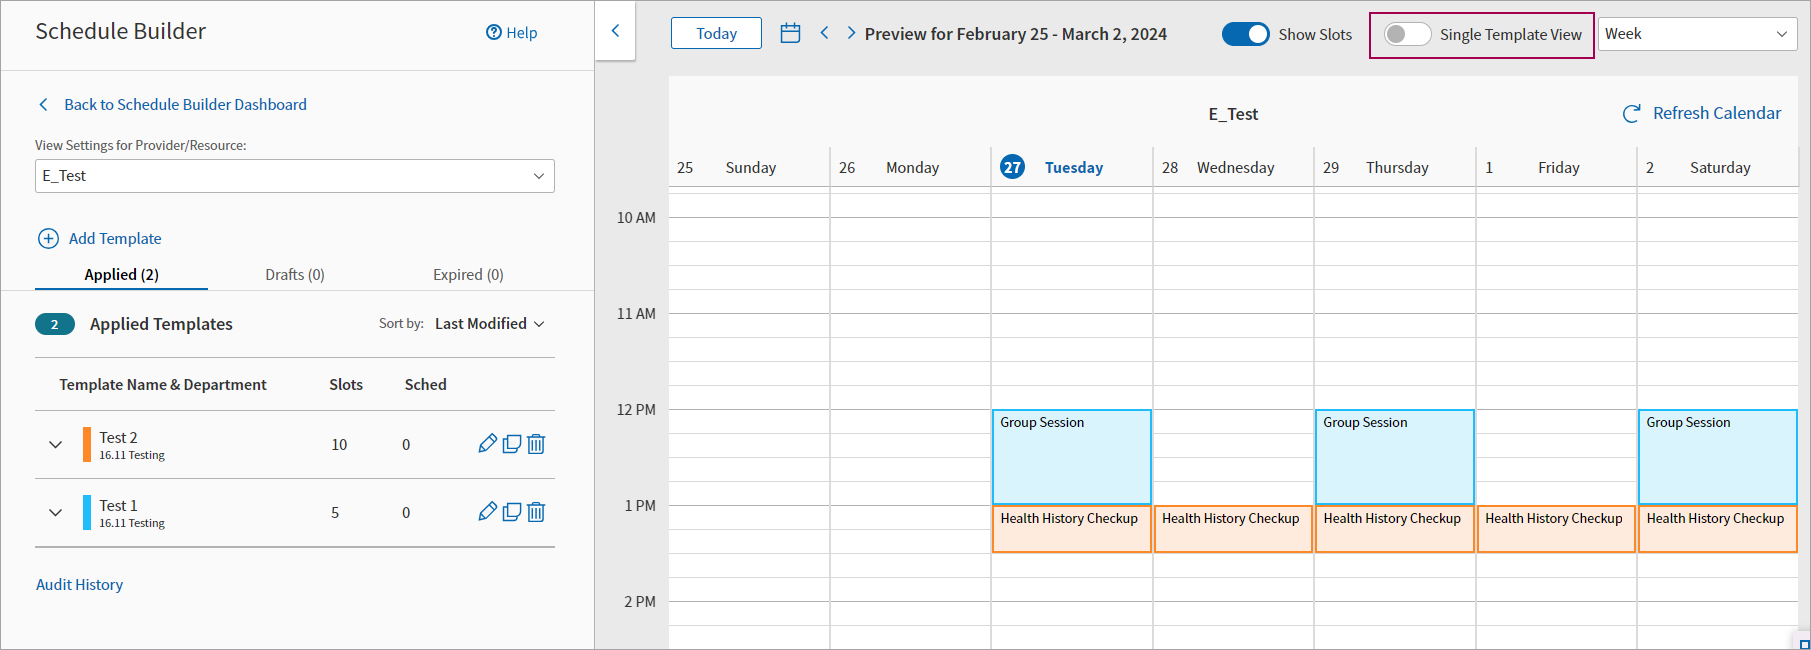
Here is the Single template toggle in the off position when viewing a particular provider's schedule:
Tip: Hover over the image for an expanded view.
The preview pane displays all the provider's applied templates.
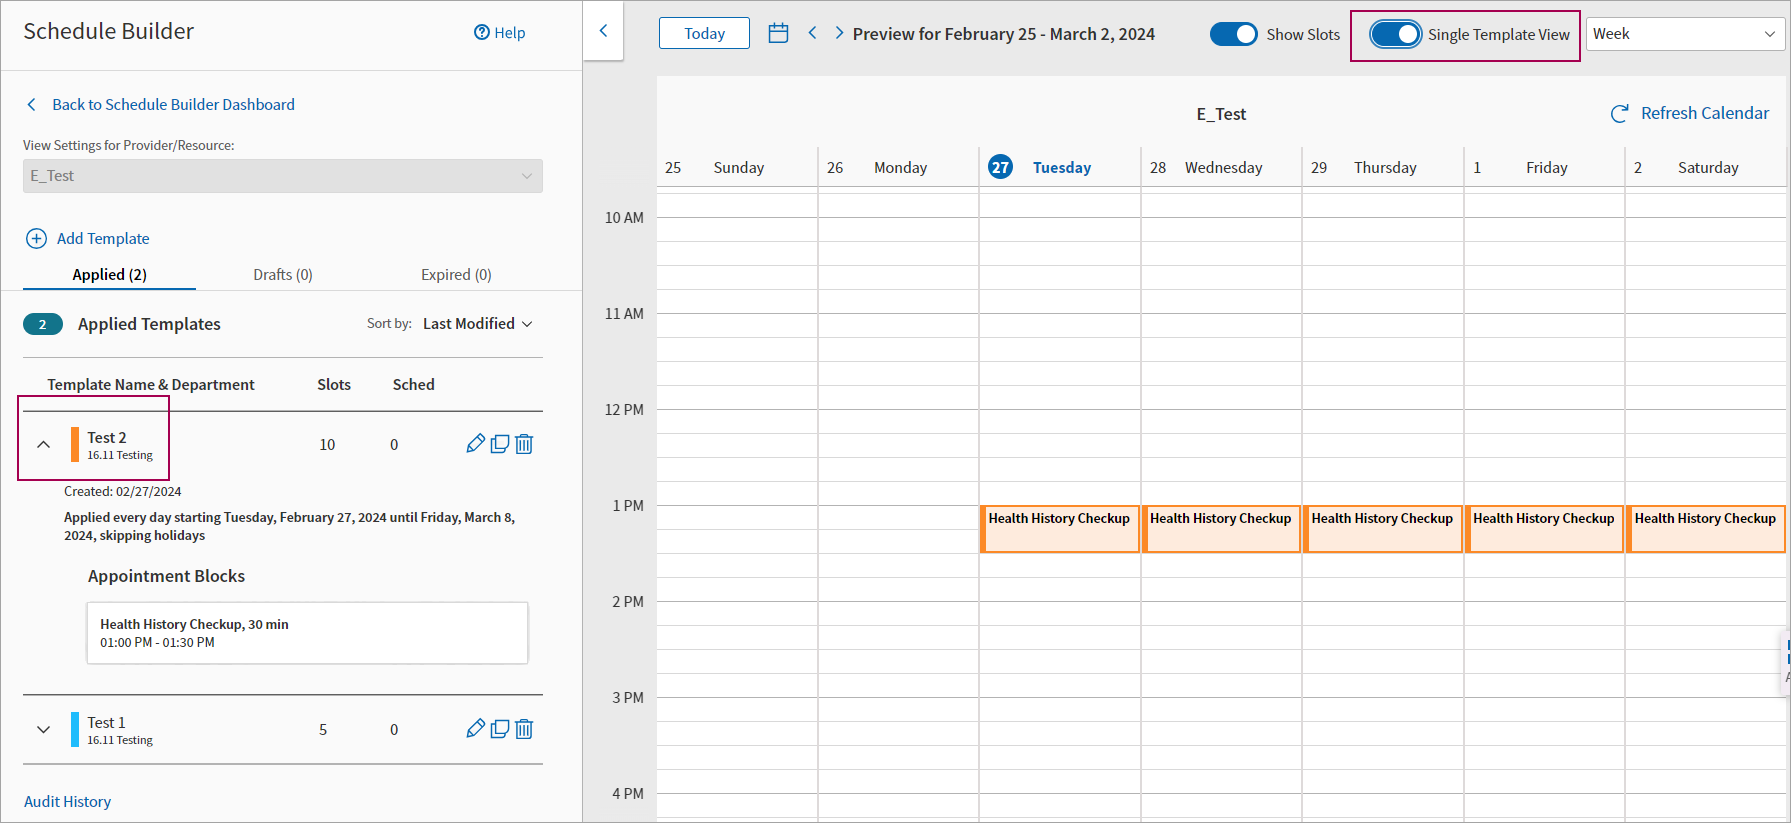
Here is the Single template toggle in the on position when viewing a particular provider's schedule:
Tip: Hover over the image for an expanded view.
The preview pane only shows one template and defaults to showing the first template in the providers list. That template's detail view expands on the left side of the page (highlighted in the image above). If you use Sort by, the first template in the sorted list is shown.
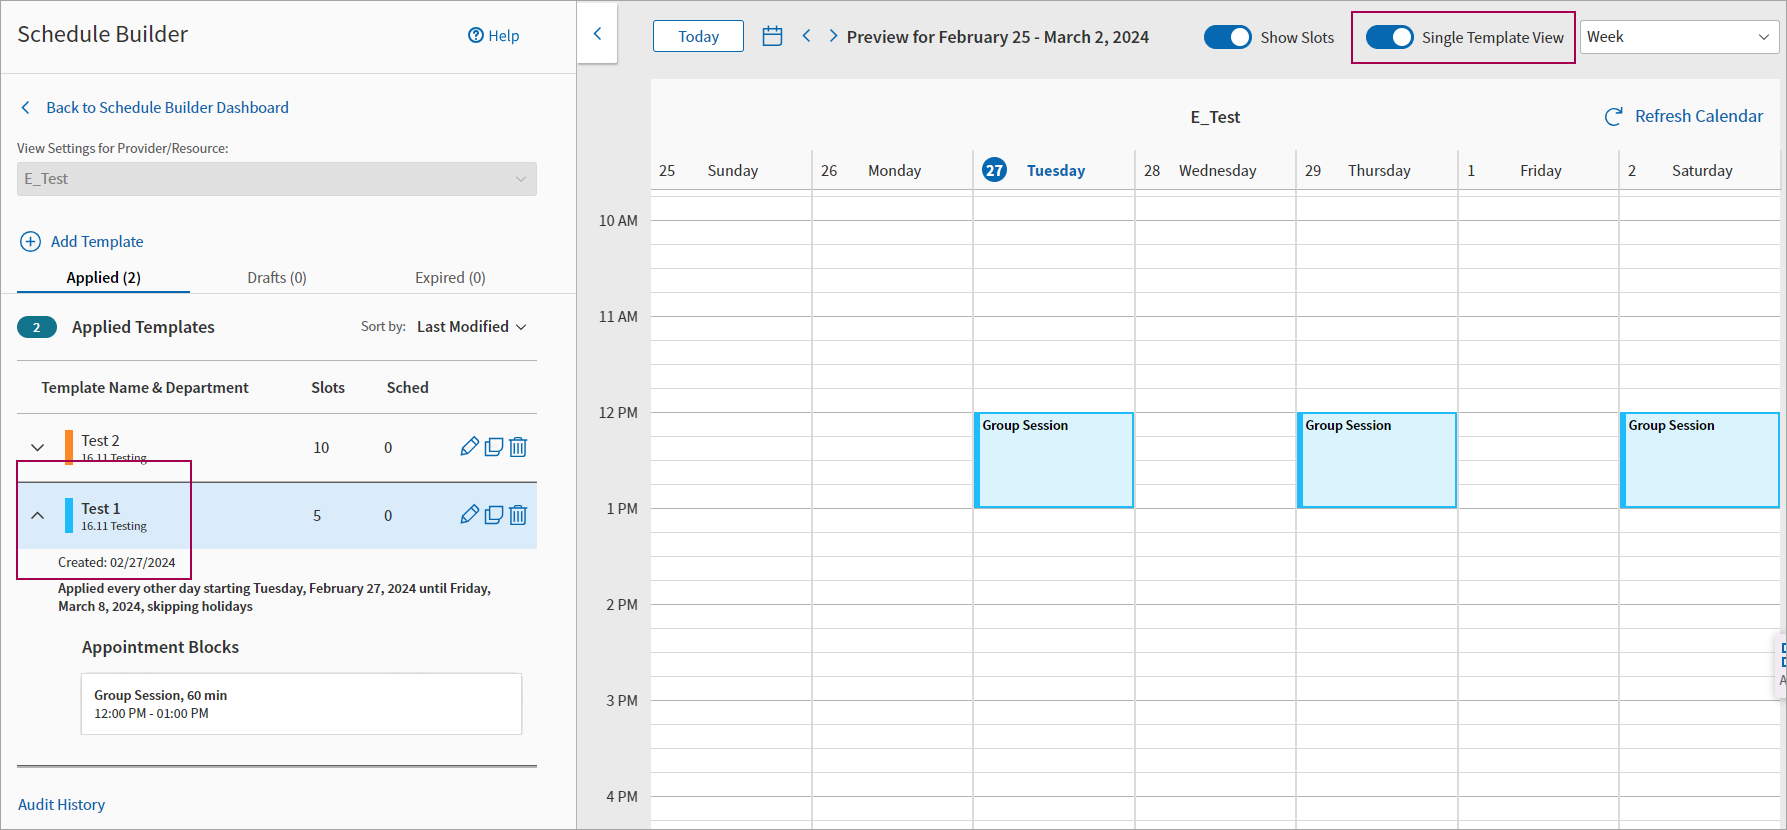
You can keep Single Template view on and click a different template from the list on the left. That template displays in the preview pane, and the details on the left side expand:
Tip: Hover over the image for an expanded view.
Note that the is greyed out. If you want to switch providers,
Single Template View remains on until you navigate back to the Schedule Builder Dashboard, at which point it defaults back to view all templates.
Single template view is also available when you create a new template, edit a template, or copy a template.
Here is the Single template toggle in the off position when creating a new template:
Tip: Hover over the image for an expanded view.
Here is the Single template toggle in the on position when creating a new template:
Tip: Hover over the image for an expanded view.
Note that, when the toggle is on, the only template shown in the preview pane is the one being created. The Physician/Resource field is also greyed out:
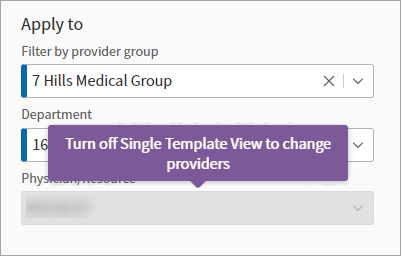
You must turn off single template view to change providers while creating, editing, or copying a template.
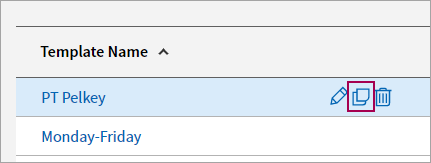
When you hover over an existing template, a few action icons appear:
- Edit
- Copy
- Delete
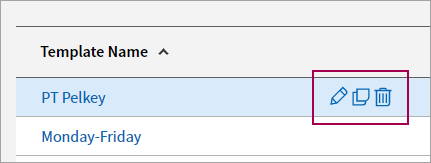
Note: Your ability to edit or delete an existing template depends on your user access status. You can always copy an existing template, regardless of your user access. If you do not have the ability to edit or delete templates, the corresponding icons will appear in gray.
Clicking the edit icon brings you to the Edit Template page:
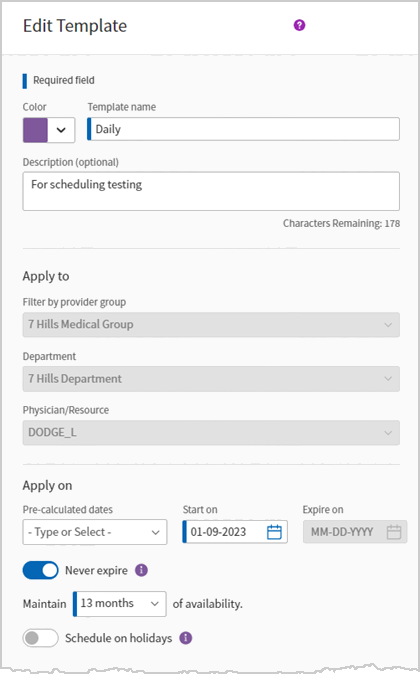
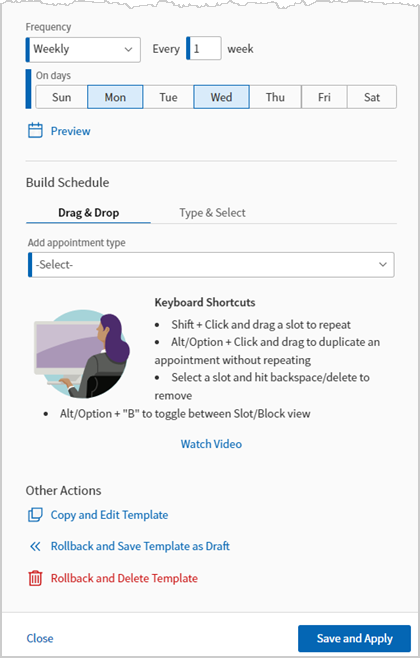
You can make changes to the template and click Save and Apply to save your changes. Click Close to cancel your edits without making changes. Clicking Close brings you back to the Schedule Builder landing page.
Many of the functions and fields on this Edit Template page are the same as those available when you create a new template from scratch. Go to the Creating a schedule template from scratch section for a detailed workflow example, as well as descriptions of these fields.
On the main Schedule Builder page, you can hover over the following areas of existing templates for additional information:
-
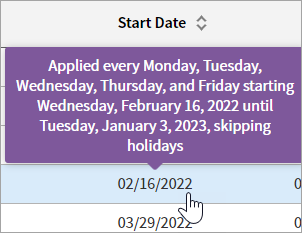
Start Date. Hover for a tooltip that describes the days on which the template is applied, as well as the date range for the application (start date and end date).
-
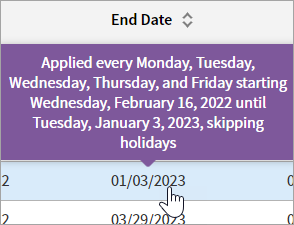
End Date. Hovering here shows the same information as the Start Date tooltip.
-
Utilization. The utilization percentage shows what percentage of available slots have been scheduled.
In this example, eight slots out of an available 829 slots have been scheduled. This results in a utilization rate of 1%. The Utilization tooltip shows you the exact number of available slots versus the slots that have been scheduled.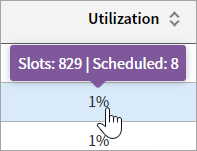
You can view the audit history for a particular template. This history shows when a template was added, applied, edited, or rolled back. The audit history is found on the View Settings for Provider/Resource page.
Click Audit History under a particular template.
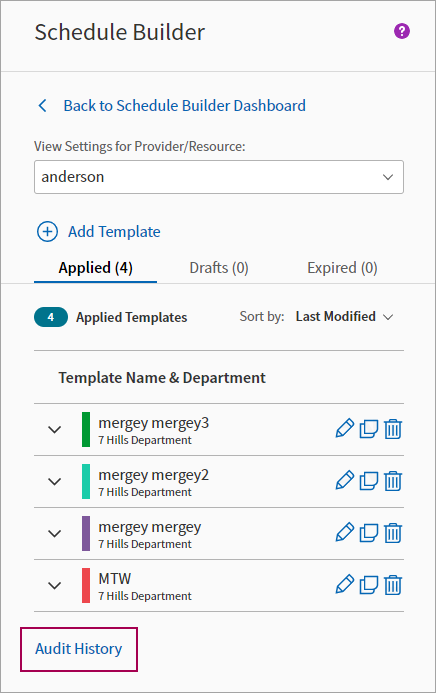
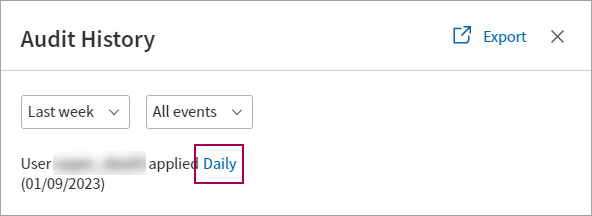
The Audit History displays. For the default filters in this example ("Last week" and "All events"), one event is shown. The username, relevant template, and date are included.
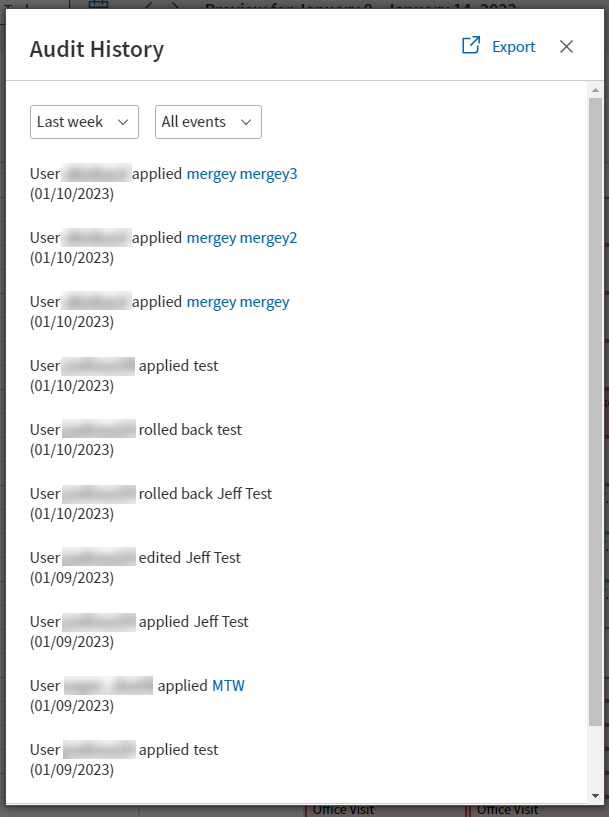
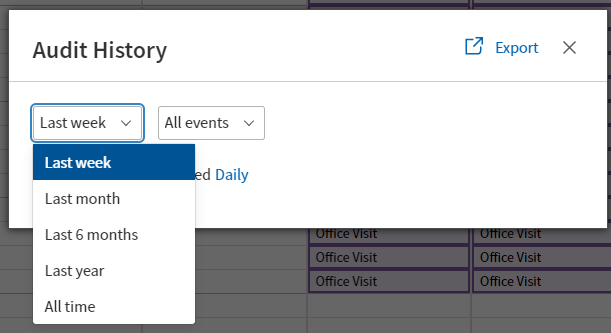
The timeframe sorting options are:
- Last week
- Last month
- Last 6 months
- Last year
- All time
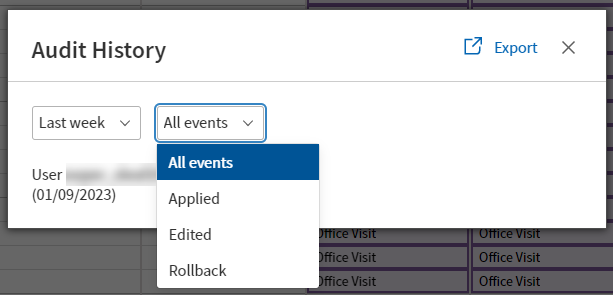
The event type sorting options are:
- All events
- Applied
- Edited
- Rollback
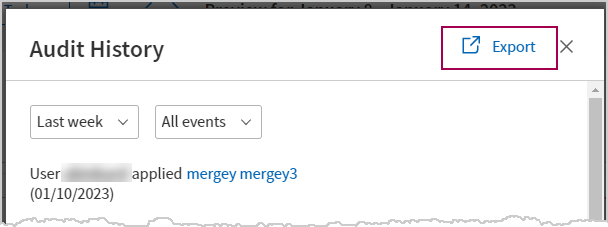
Click Export to save the audit history results as a .csv file.
Clicking the template name ("Daily," as shown below) takes you to the Edit template workflow, where you can make and save changes to this template.
If the application, rollback, or edit of a template involves a large number of slots and takes more than 10 seconds to apply, you are taken back to the dashboard and see a message with the pending job name.
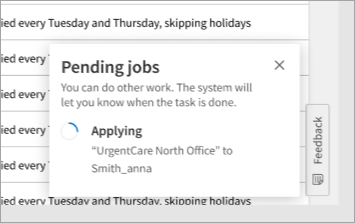
There should only be one window with all pending jobs listed (including those for other providers).
A template that is in the pending jobs list has a dark grey highlight to indicate that the template is not available yet.

The templates of a provider with a pending job feature light grey text and all template actions from the dashboard are disabled.

There can be only four pending jobs at once. Users are prevented from taking any more actions if there are four pending jobs in the queue.

If you click on a provider with a pending job from the dashboard, you see the provider's schedules and the pending status message where the calendar preview usually appears.
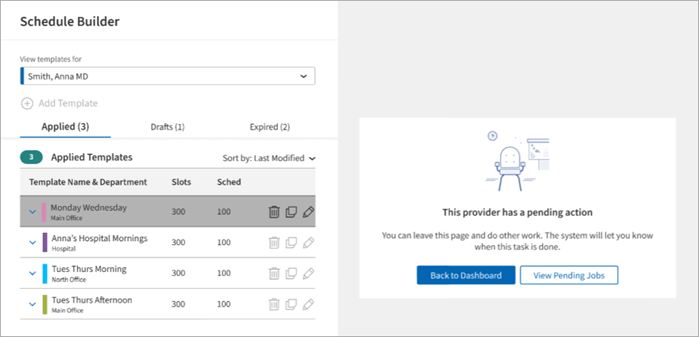
You can't take action on that provider's templates until the pending job is complete.
If a pending job fails, a Retry link appears under the pending job in the pop-up message.
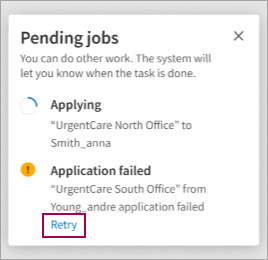
If you click x to close the window instead of Retry after the failure, that option is cleared from the pending queue and you can navigate back to the provider's schedules.
Workflow examples
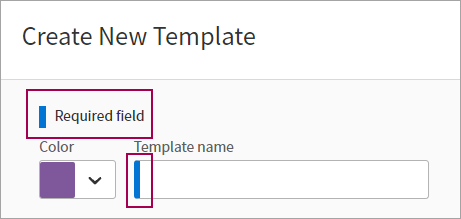
Note: Throughout the Schedule Builder, a heavy blue border along the left side of a field indicates that the field is mandatory.
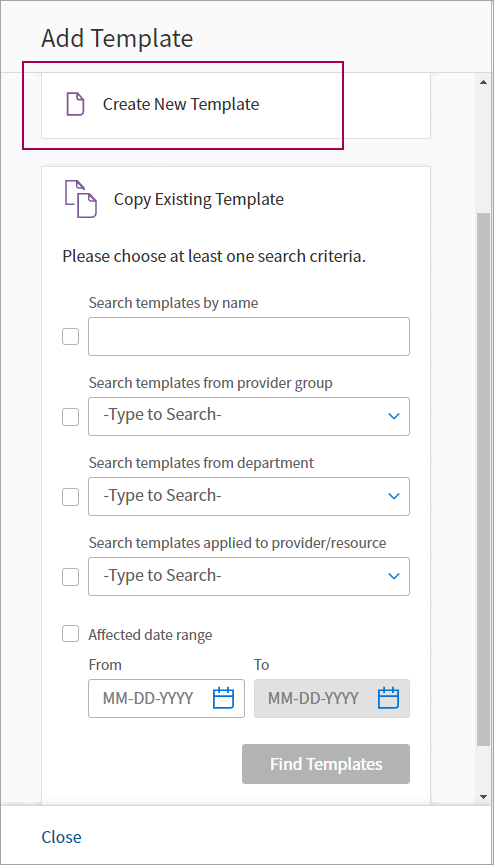
In this example, we’re creating a schedule template from scratch. From the main Schedule Builder page, click Add Template.

The Add Template page appears. Click Create New Template.
Working from the top of the page to the bottom, there are required fields, optional fields, and toggles.
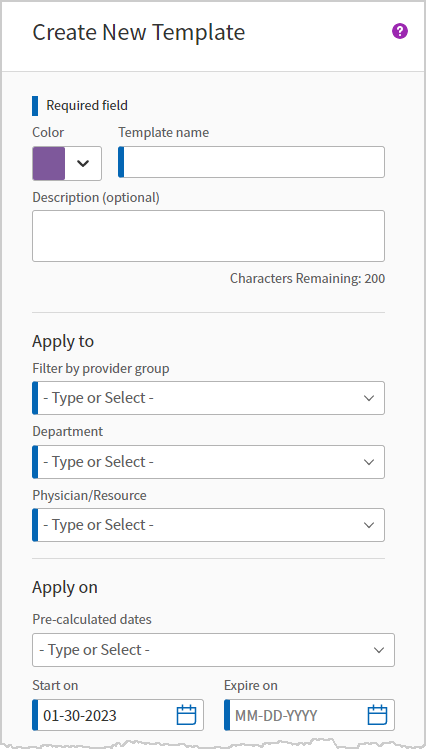
First, you can select a color for your new template. This helps differentiate templates that show in the same provider’s calendar. The template color only appears in the Schedule Builder preview.
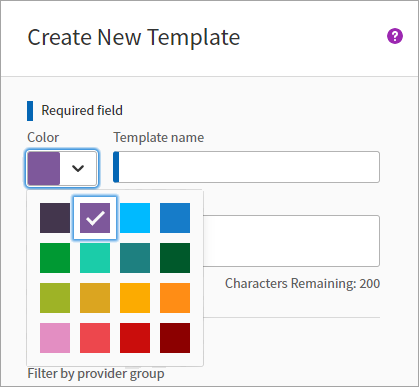
Template name is a required field. In this example, we named the template “Test Appointment.”
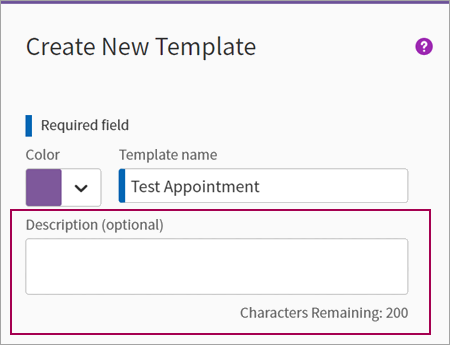
You can also add an optional description. This description appears when searching for the template (after said template is saved and/or applied).
Next, there are several required fields under Apply to. Provider groups and departments menu options are limited to user access. This means that you will only see the providers and departments for which your user profile has been granted access:
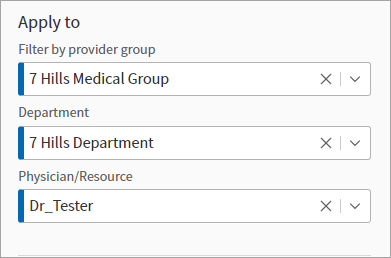
Note: You can clear a selection by clicking X in any of these fields. Clicking X on the Filter by provider group field also clears any selections in the Department and Physician/Resource fields. Clicking X in either the Department field or the Physician/Resource field does not affect any other selections.
Note: The provider group field only appears if your practice has the provider group practice setting enabled.
Apply on includes several customizable options.
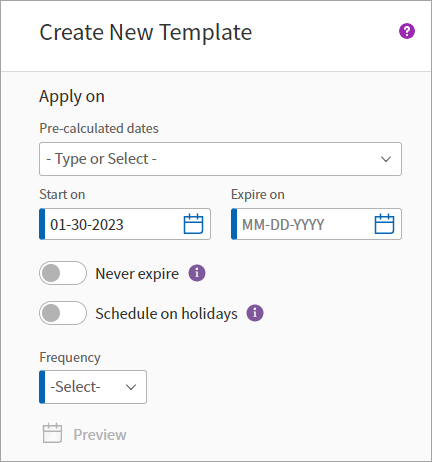
Pre-calculated dates is an optional setting that provides a number of preset options.
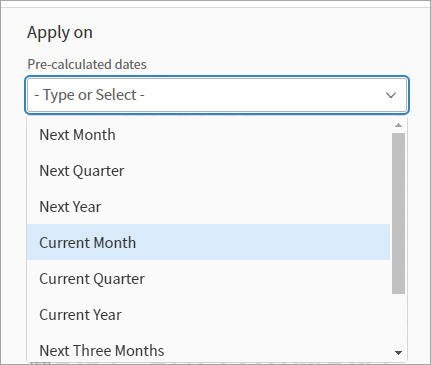
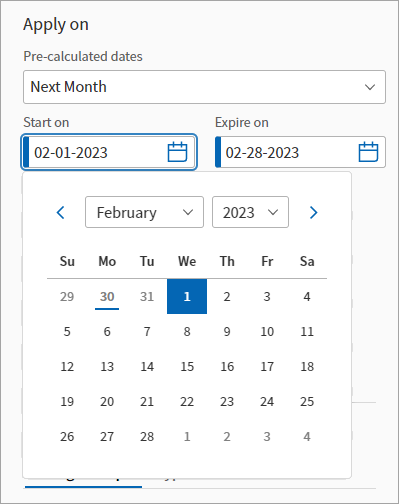
You can also use a calendar picker to set a start date and end (or "expire on") date.
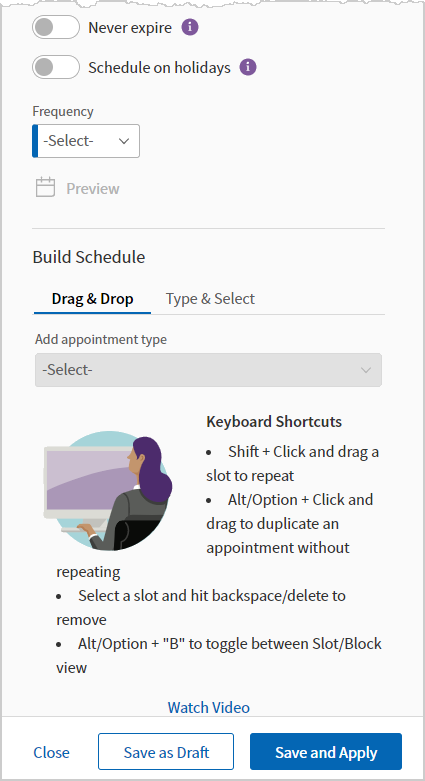
Hover near Never expire for an explanation of what the Never expire toggle does:
"Never expire extends your template on a rolling basis, maintaining slot availability for the chosen time frame."
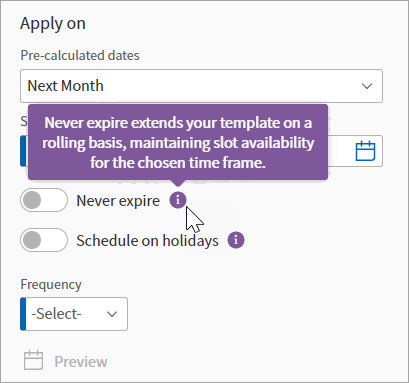
When you set a template to never expire, you select how many days/months ahead you want it rolled out for. This amount of time will be the slot's availability. Every night, the availability is extended by a day, so that the slot maintains its set amount of availability.
A template cannot be applied or have edits saved if it exceeds 80,000 slots. After an applied template reaches the 80,000 slot limit, we remove a day of unbooked slots in the past while simultaneously adding a new day of availability in the future. This prevents an applied, never expire template from reaching the 80,000 slot limit.
Note: Web scheduling may be set to show 90 days of availability, but the schedule template is set to never expire with 30 days of availability. In this case, the availability online is limited to 30 days. The template creates the slots and is only creating the next 30 days worth.
Hover near Schedule on holidays for an explanation of what the Schedule on holidays toggle does:
"Schedule on holidays when the office is closed."
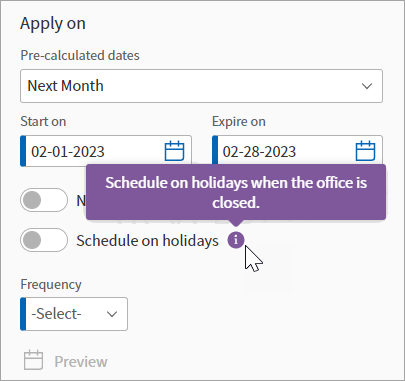
Note: Holidays are set at the time of application based on the holiday admin page under schedule admin. If changes are made to that admin page, the template must be reapplied for the template to respect the new holiday settings. There is no auto-refresh.
The Frequency list offers options for setting the slot frequency, including Daily, Weekly, Monthly, and Yearly.
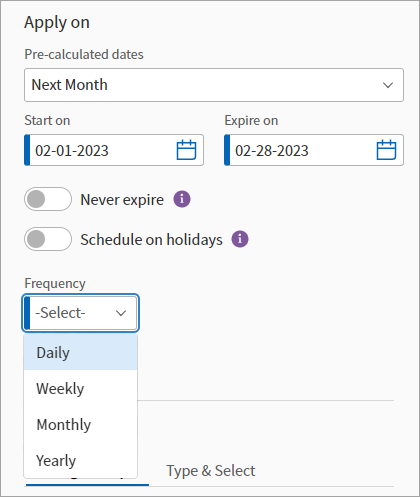
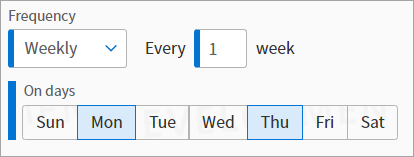
Selecting Weekly from the Frequency drop-down menu displays the Every field. In this example, “Every 1 week” is selected, meaning that the template being created will display each week for the specified date range.
If “2” was input in this field, the template would display every other week for the specified date range.
On days selections are also available under the Repeat options. You can select multiple days. In the example shown here, Monday and Thursday are selected:
Selecting Monthly from the Frequency drop-down menu presents two options: specifying on what occurrence of a weekday (the On the field), and the ability to select specific dates (the On these dates menu).
For example, this example shows that the template will appear on the first, third, and fifth Monday and Wednesday of each month:
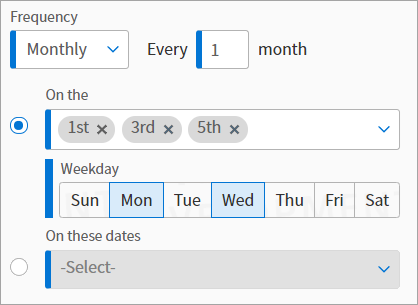
You’re able to select multiple days of the week.
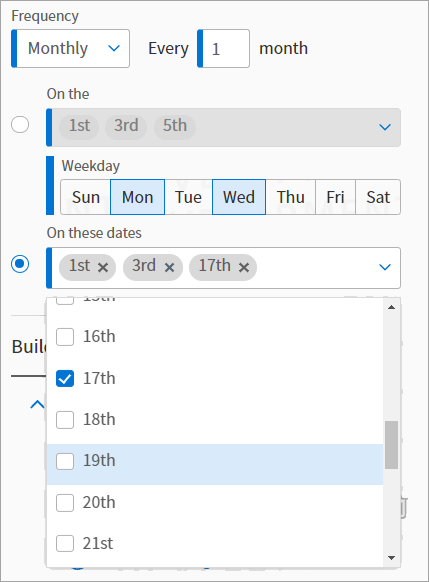
The On these dates field allows you to select specific dates on which the template occurs. You can select as many days as needed. In the example shown here, the 1st, 3rd, and 17th are selected:
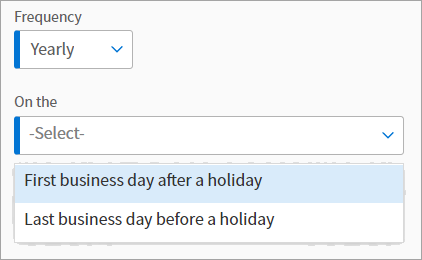
Selecting Yearly from the Frequency drop-down menu presents two options in the On the field: First business day after a holiday and Last business day before a holiday:
After completing any required Frequency fields, you can select the appointment type under Build Schedule.
The Build Schedule section includes two options:
-
Drag & Drop:
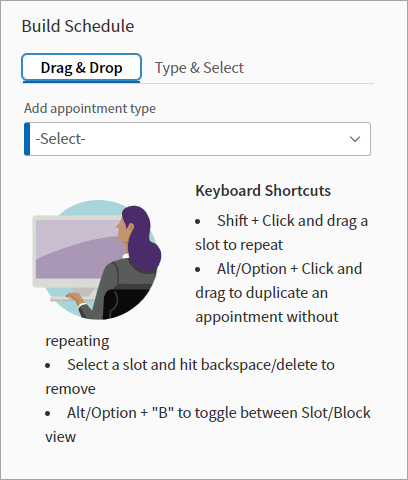
A few keyboard shortcuts are included in Drag & Drop:- Shift + Click allows you drag a slot and repeat it on the schedule.
- Alt or option + click allows you to drag and duplicate and appointment without repeating.
- Selecting a slot and typing backspace or delete allows you to remove the slot from the preview pane.
- Alt or option + click toggles between slot.
The Drag & Drop option allows you to drag the appointment (in the example shown below, Follow Up 30) over to the calendar preview pane. You can see where the appointment will appear before you drop the appointment in the schedule:

Note that the preview pane reacts to the frequency of the slot. In the example above, the user is dragging the template to Monday, but the preview pane shows a dotted box on Wednesday and Friday as well. This reflects the frequency set for the slot being previewed.Drag & drop reacts to whether or not Show slots is enabled in the preview pane.
In this example, Show slots is enabled. Dragging an appointment of the same type to the preview pane will retain this slot view:
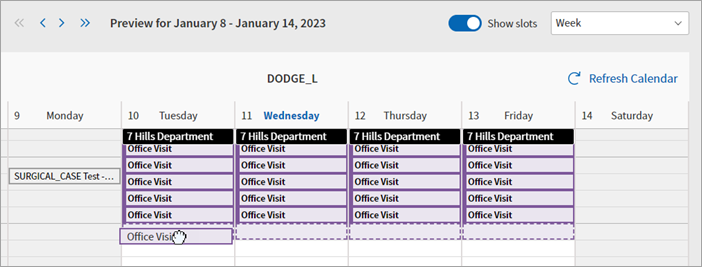
In this example, Show slots is disabled and an appointment is being dragged below existing appointments of the same type:
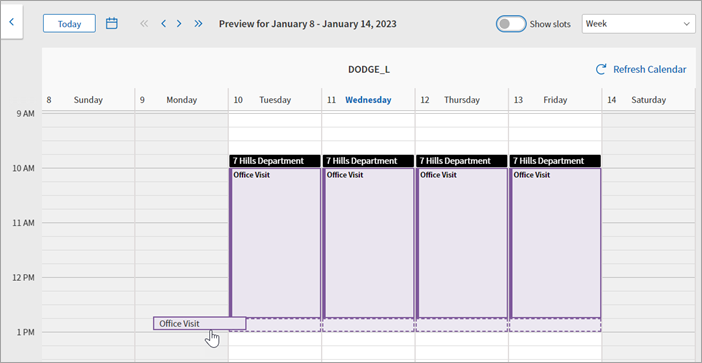
As shown here, the dragged appointment joins the block of existing appointments because Show slots is disabled:
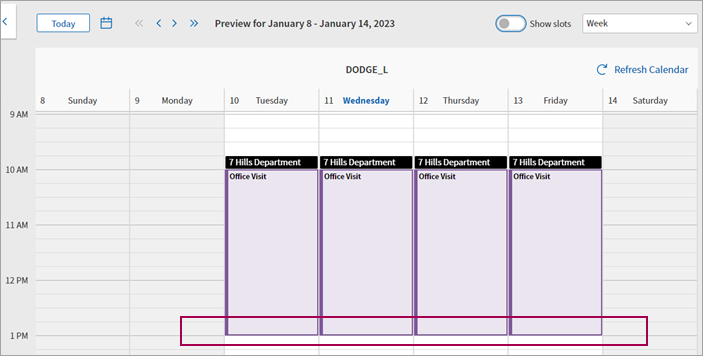
When deleting appointments, enable Show slots to delete individual slots. Disable Show slots to delete entire blocks of time.
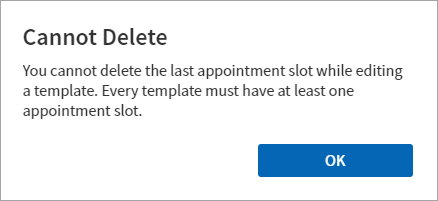
If you attempt to delete the only remaining appointment slot, a pop-up message appears:
You can select multiple appointment types for drag and drop, as shown here:
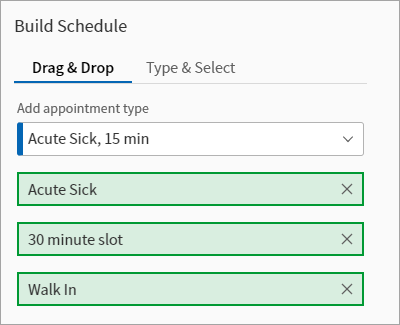
To remove a selected appointment type, click the x on the right side of the appointment name box.
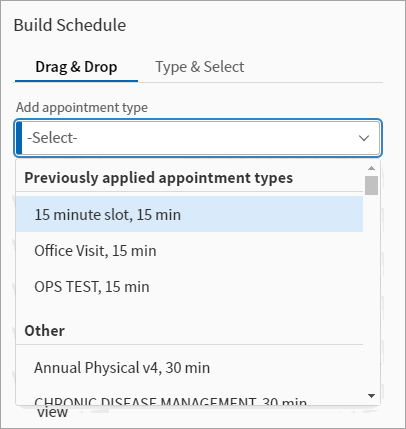
Click the Add appointment type field to display a drop-down menu showing all available appointment types.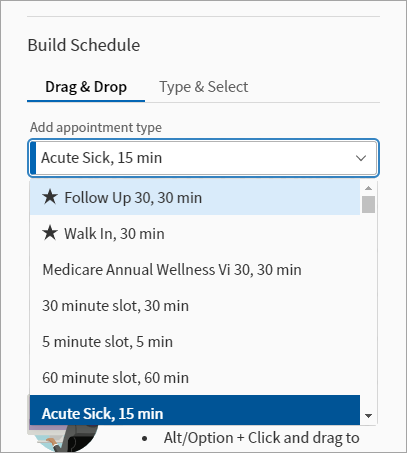
The appointment types at the top of the list with a star icon represent the user’s most frequently used appointment types. You can also begin typing in the Add appointment type field to bring up a series of appointment types with matching names.
- Shift + Click allows you drag a slot and repeat it on the schedule.
-
Type & Select:
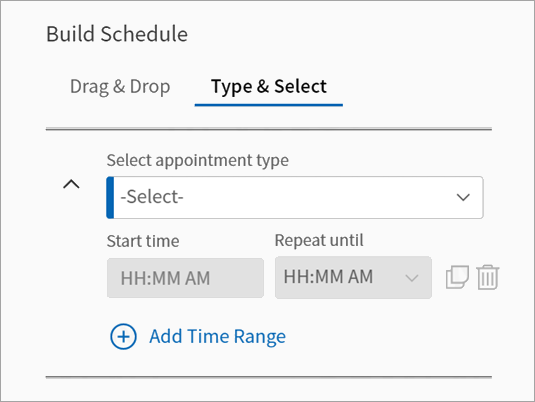
This option allows you to manually select and appointment type, and then adjust the start time and repetition as needed. Anything you type in these fields is then reflected in the schedule preview pane.
Click in the Select appointment type field to display a drop-down menu showing all available appointment types.
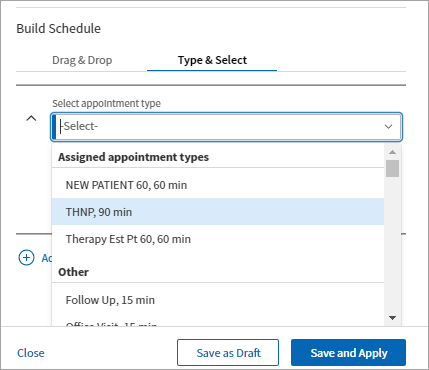
The appointment types at the top of the list (under "Assigned appointment types") respect the configurations made on the Appointment Type Drop-Downs page.
You can also begin typing in the Select appointment type field to bring up a series of appointment types with matching names
If appointment types are not configured for a particular department/provider, you are shown "Previously applied appointment types:"
To continue with this workflow example, note that the Type & Selection option is being used, and the Established Patient 15, 15 min appointment type is selected. The next required fields are Start time and Repeat until. The Repeat until field features a drop-down menu with a variety of times:
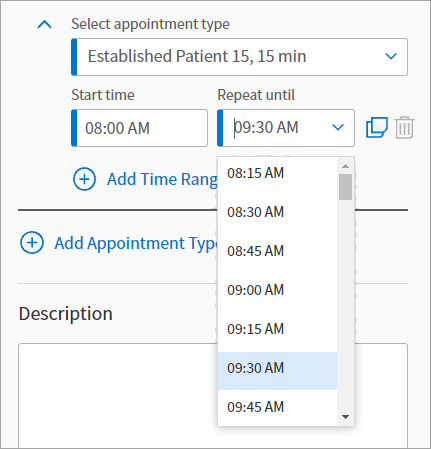
After choosing a start time and repeat option, you can then copy your newly created time range by clicking the copy button:
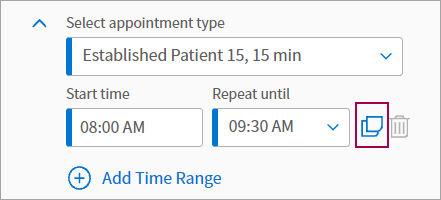
After copying a time range, you can edit the Start time and Repeat until fields accordingly.
When multiple time ranges are created, the option to delete a time range become available:
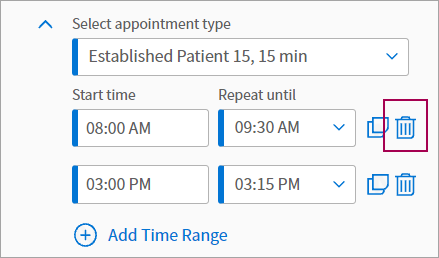
Click the delete icon to remove a time range.
Under the Build Schedule options is the Add Appointment Type button. Click this button to add an appointment type to be applied as part of this template:

After clicking Add Appointment Type, you must choose a start time and a repeat value, if applicable. You also have the option to delete this additional appointment type.
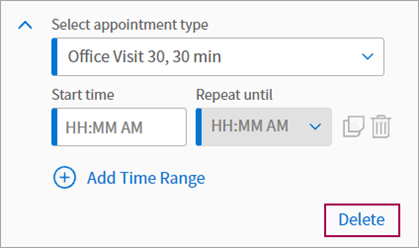
If you delete an additional appointment type, a message appears, describing what you’ve deleted. Click Undo to reopen the appointment type.

Here is an example of a new template with all required fields completed.
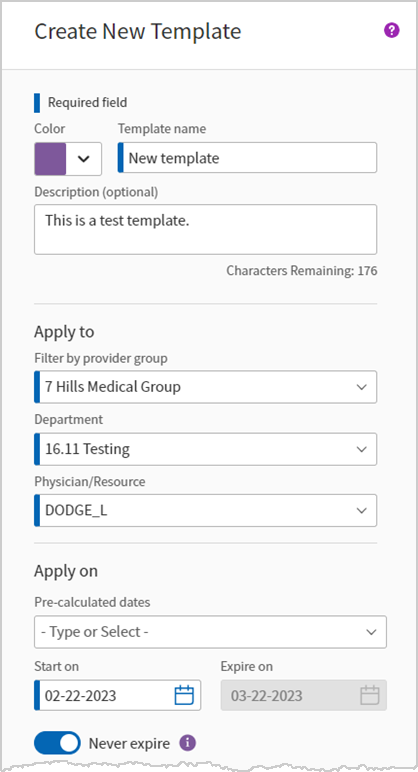
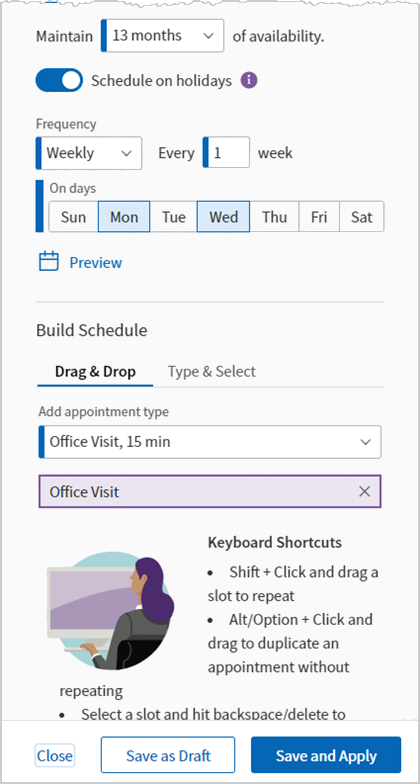
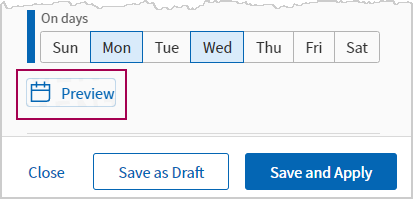
You can preview your new template in the provider’s calendar before applying. Click the Preview option to display a preview pop-up:
Here is an example of the preview pop-up for the completed template information shown above:
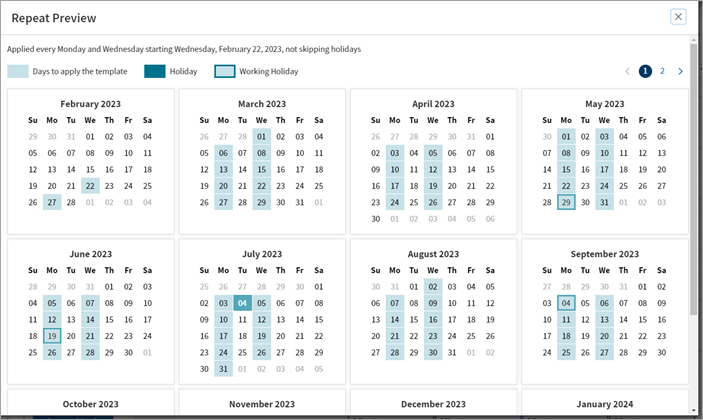
This preview window shows the days on which the template will be applied, any holidays, as well as working holidays.
At the bottom of the Create New Template page, you have three options – Close, Save as Draft, and Save and Apply.

If you click Close, a window appears, warning you that all changes will be lost if you click Continue.

Clicking Back takes you back to the Create New Template page. None of your changes are lost.
If you click Save as Draft, a window appears, letting you know that your template is saved as a draft.

To view all saved drafts, go back to the main Schedule Builder page and select a provider. Under Drafts, you can view a list of all template drafts for the departments you have access to.
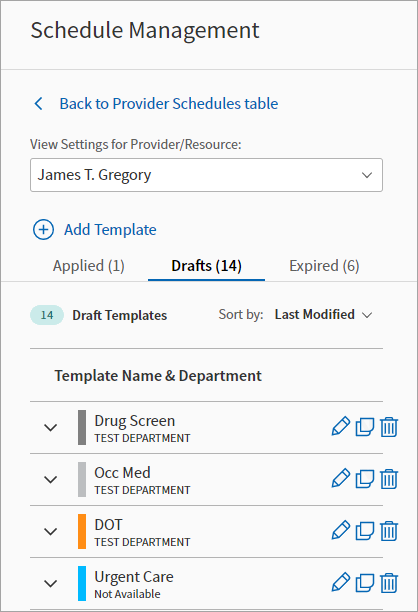
Use the Sort by drop-down menu to sort drafts by:
-
Last Modified
-
Created (new-old)
-
Created (old-new)
-
A-Z
-
Slots
-
Scheduled
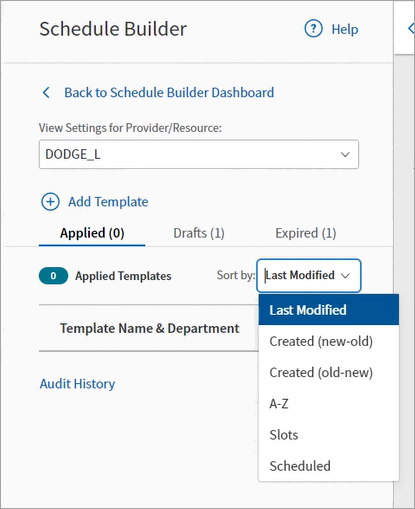
Note: The Sort by menu is available for all template tabs: Applied, Drafts, and Expired.
Three actions are available for each draft: delete, copy, and edit.
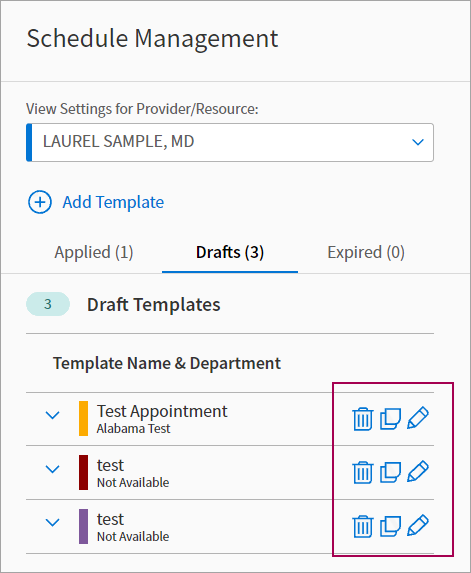
Clicking Edit opens the draft back up for editing. This view is very similar to what you see when creating a new template. Two additional options are also available: Copy and Edit Template and Delete Draft Template.
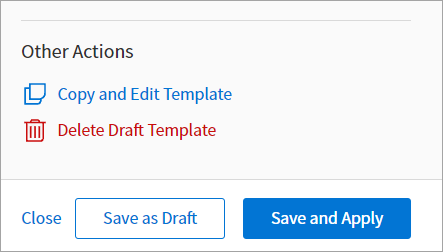
You can also close, save, or apply a draft template that has not been applied.
If you click Save and Apply, either after editing a draft or from the Create New Template page, a window appears asking you to confirm any template updates.
See the merge slots section for more information.
If the user tries to apply a template with more than 80,000 slots, they see a pop-up message with a Modify template button:
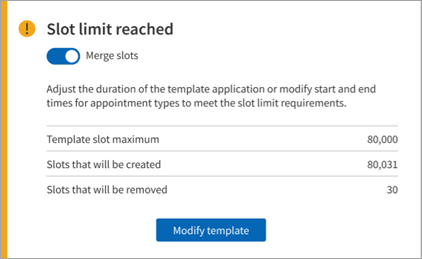
When the user clicks that button, it takes them back to the template to make edits. Users are not able to save the template until they are under the 80,000 slot limit.
Clicking Continue applies the template. A success message appears, notifying you that your template is now applied.

This message notes that you will not see appointment slots before the current time. For example, if you apply a template starting today at 8 am and it is 11 am, you will only see slots that begin on or after 11 am. You will not see slots applied before your current time.
To view all applied templates, go back to the main Schedule Management page and select a provider. You can view a list of applied templates under the Applied heading. Click a template to view details.
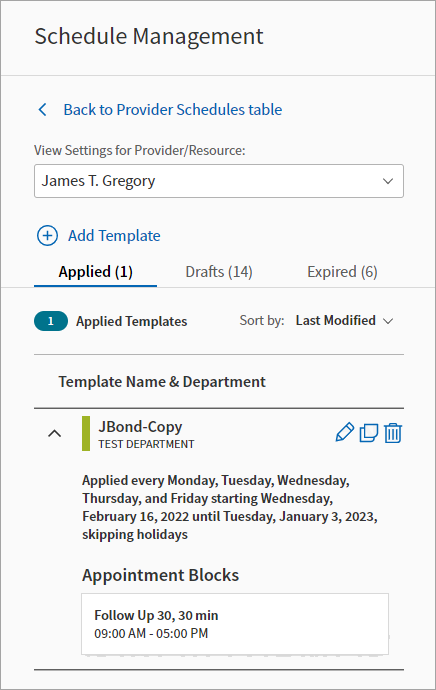
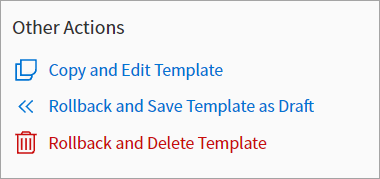
Clicking the edit icon from the applied templates view opens the selected template back up for changes. You also have some options to roll back a template: Rollback and Save Template as Draft and Rollback and Delete Template:
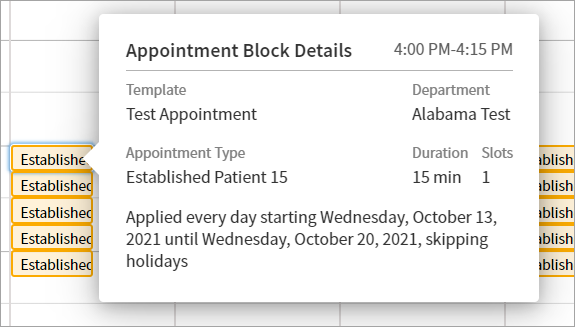
After a template is applied, you can click into an appointment on the provider’s calendar to view details.
You can also view appointments on a provider’s calendar while editing a template. Use the calendar icon to pick a specific date. Depending on if you are viewing by Week, Work Week, or Day, the calendar adjusts to feature this specific date.
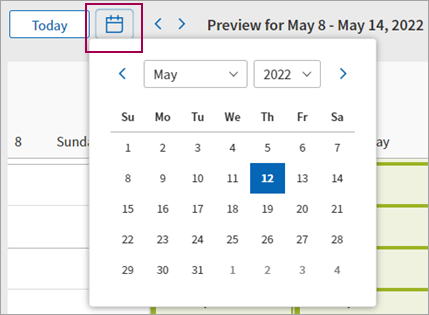
You can adjust the month and/or day by using the drop-down menus shown in this calendar picker.
Note: This same calendar picker is available if you are simply previewing a provider's calendar and are not currently editing a template.
Use the arrows on the calendar view to jump ahead in the schedule preview. Hovering over the arrows displays a tooltip describing the preview you are about to see. For example, here's the tooltip when viewing a calendar preview by week:

You can also use the Today button to jump back to the current date in this calendar view.
In this example, we’re copying an existing schedule template from the Add Template workflow.
Note: This workflow example details how to copy an existing template while in the Add Template workflow. You can also copy an existing template by clicking the copy icon next to a template.
From the main Schedule Management page, click Add Template. Then, scroll down to Copy Existing Template.
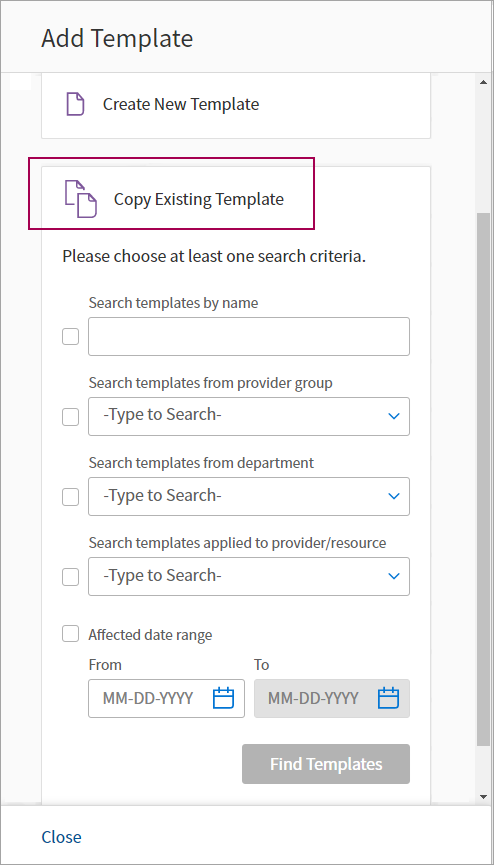
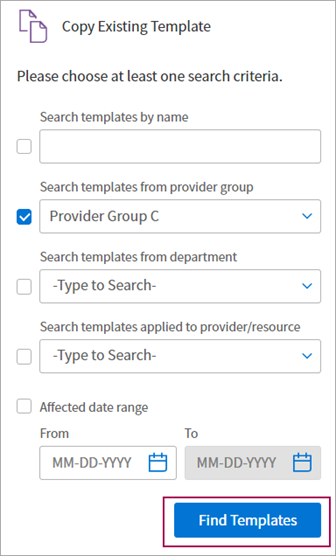
There are a number of search options available under Copy Existing Template. You can search templates by:
- Name
- Provider group
- Department
- The provider or resource to which the templates are applied
- The affected date range
You can search for any combination of these terms, that is, you can search by as many parameters as you need, or you can limit your search to one parameter. The search function takes all of your search terms into account, and does not exclude any of your search terms when providing results.
Note: The check boxes to the left of each search field dictate whether or not the item you’ve provided in the field will be included in your search. For example, typing something in the Search templates by name field automatically checks the corresponding box.
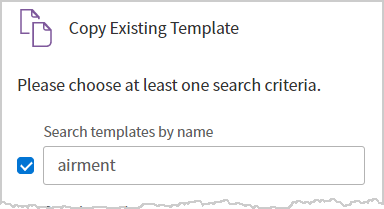
You can uncheck this box at any time to exclude the item from your search.
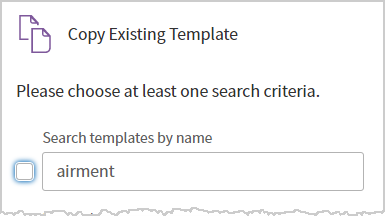
After providing information in any applicable fields, click Find Templates.
On the results page, you can designate the provider or resource to which you’re copying the templates, select (and deselect) multiple search results, preview the template details, and see a preview of the provider’s current schedule on the right pane.
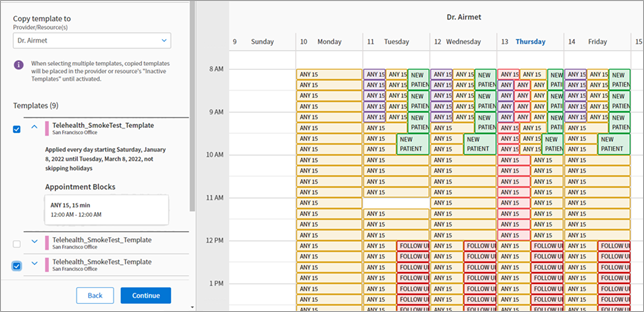
After clicking Find Templates, the system shows a list of matched templates. It is up to the user to select one or multiple templates from that search.
If you select one template and clicks Continue, the system takes you to the Edit page. Here, you can edit the template as needed and save it as final (applied) or draft. Also, when you select templates that show up as results, the application of the template is shown in the preview pane.
If you select multiple templates, you can preview the application of all selected templates in the preview pane. This pane helps you visualize how the new calendar template will look prior to application.
If you click Continue after selecting multiple templates, the system takes you to the draft templates page, where all the templates being considered for copy appear as drafts.
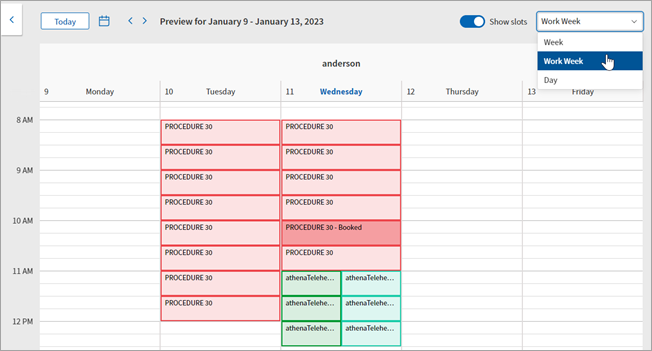
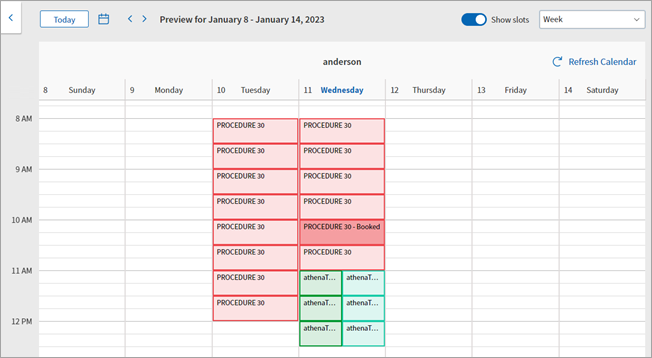
When viewing a provider’s schedule from the main Schedule Management page, there are three options for viewing:
- Week, meaning Sunday through Saturday
- Work Week, meaning Monday through Friday
- Day
Select a viewing option using the pull-down menu at the top left of the schedule preview. This menu is shown below, with Work Week selected (note that only Monday through Friday are being displayed in the preview).
Here is an example of the same provider’s schedule in Week view:
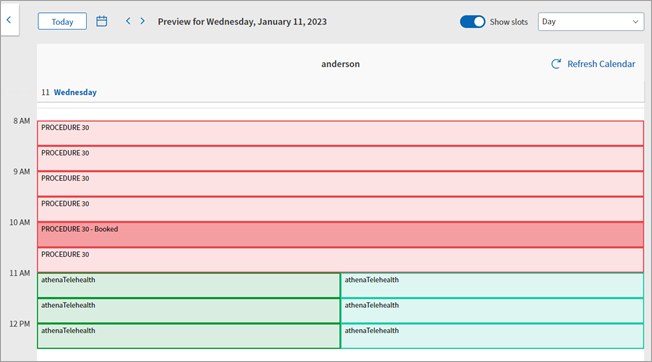
Here is an example of the same provider’s schedule in Day view.
Merge slots
athenaOne currently features the capability to merge slots when new templates are created or copied. This feature is being maintained as we redesign and update the calendar management workflow.
When merging slots, athenaOne compares the appointment slots being applied with appointment slots that already exist for the same provider, department, date, and start time.
As the user, you have the ability to allow or disallow merge slots when applying a template. In the confirmation pop-up that appears after hitting save and apply, click the Merge slots toggle if you want the merge slots to be activated.
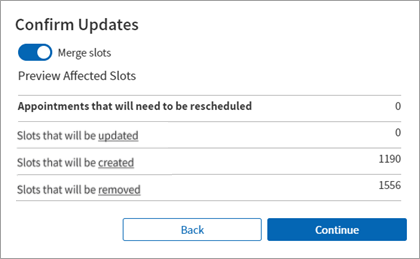
The total number of impacted slots is calculated and shown in the confirmation pop-up window in real time.
If there is a patient booked in an existing slot, the patient remains booked only if the slots share the same start time, department, and provider. In this case, the appointment slot attempting to be applied is not applied (and slots do not merge for times where appointments are scheduled).
If there is a patient booked in an existing slot and the slot being applied features a different start time than the existing slot, the existing slot is cancelled and the new slot is applied. You can access the existing slot/template information from the cancellation workflow and reapply if needed (after editing the provider, department, and/or start time information).
If a patient is not booked in the existing slot, the slot is replaced by the new template.
If the new slot duration covers the same time duration as multiple old open slots, the first slot with the matching start time will merge and the previously applied slots will remain. If multiple new slots cover the same time duration as the old open slot, replace the old slot with the new slots for that time duration.
This example demonstrates how the merge slots functionality works:
- You have an existing appointment that is one hour long. You want to include four new slots that are 15 minutes long. The old appointment matches the duration of all four 15 minute appointments (as well as the start time of the initial 15-minute appointment). In this case, the new 15 minute slots are inserted and replace the existing 60 minute appointment.
In another example, the situation described above is reversed:
- You have existing 15 minute slots from 1pm to 2pm. You want to include a new one hour appointment from 1pm to 2pm. In this scenario only, one of the 15 minute slots is affected and merged with the new slot.

If you do not select the merge slots toggle, athenaOne does not perform any comparisons and all appointment slots are added.
Merge slots with never expire – Slots will be merged for the defined time period. After that, slots will be merged one day at a time.
For “never expire” templates, you can indicate if you want to merge slots.
Here is an example of two applied appointments occupying the same slot – a one hour surgery appointment starting at 2 pm, and four follow-up appointments also starting at 2 pm. When the surgery appointment template was applied, merge slots was turned off:

Here are the exact same appointments and times, but when the surgery appointment template was applied, merge slots was turned on:

When merge slots is on, the system removes previously applied templates with a start time that matches that of the template being applied. Notice that the follow-up appointment slots starting at 2:15, 2:30, and 2:45 remain.
We are planning to improve this functionality in the future so that all previously applied templates that conflict with a newly applied template are removed when merge slots are on.
There is no option to toggle merge slots on or off when clicking Save and Apply after editing a template. This is to prevent frozen slots within a schedule template becoming unfrozen when that template is edited and reapplied.
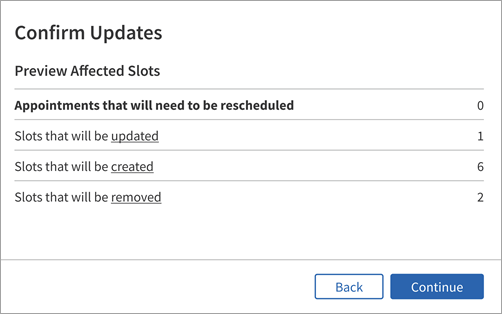
- When editing and reapplying an existing template, your changes are merged within the template being edited — not with any other existing templates.
-
This does not affect your ability to toggle merge slots on or off when creating and applying a new template.
We added a few accessibility features related to how your device’s screen reader interacts with the new schedule builder. The functionality and usability of these accessibility features depend on your device.
Voice accessibility
As an example, to enable voice accessibility for iOS, go to System Preferences, Accessibility, Voice Over. Then, check the Enable voice over box.
Screen reader accessibility
The following screen reader-related accessibility features are available in the schedule builder:
- Your screen reader recognizes the various fields, buttons, check boxes, and other interactive elements in the schedule builder and provides instructions on how to navigate and/or complete these elements.
For example, when searching for a template to copy, your screen reader will read out fields such as Search templates by name and Search templates from provider group, as well as provide audio instructions for selecting items from each drop-down menu. In addition, the screen reader detects if fields are checked or unchecked, helping you refine your template search. - In the calendar preview pane, pressing tab brings you to the various interactive elements, including the calendar picker button and the arrows next to the date range at the top of the pane. Tabbing over these arrows triggers your screen reader to provide an audio preview of the dates you will see after clicking the arrow.

In the example shown above, tabbing over to the left arrow alerts you that you are about to preview the schedule for January 9, 2022 to January 15, 2022. Tabbing over to the right arrow alerts you that you are about to preview the schedule for January 23, 2022 to January 29, 2022.
Similarly, if you are previewing by day, tabbing over to these arrows triggers your screen reader to note which day you are about to preview. - When previewing a provider’s schedule, you can click or tab to the calendar space of the preview pane. This triggers the screen reader to read each template in the provider’s schedule for the given time period being previewed.
User interface highlights and features
The View provider's schedule drop-down shows providers mapped to the user's log-in department in the provider drop-down configuration:
The Department drop-down shows options related to the provider groups for which the user has access.

It is important to note that the provider group generally takes precedence over provider and department mapping configurations. For example, if a department is mapped a provider group that a user does not have access to via the department drop-down mapping, the user does not see that department in the drop-down due to their provider group access.
Users can search for templates related to departments for which they do not have login access as long as they have access to the department's provider group. However, they cannot delete or edit templates unless they have login access or the department is mapped to a login access department via the department drop-down mapping. They can copy these templates and apply to a department they have access to, or use in their own provider groups and departments.
We’re making it clear which slots are frozen when you are working in the Schedule Builder.
You can see when a slot is frozen on the Schedule Builder Preview Calendar.
Here is an example of a provider’s schedule in the Schedule Builder. The highlighted slot – Friday, March 4 from 10A.M. to 10:30A.M – is not frozen.

After freezing the slot in the Practice Calendar, we can see that the slot displays as “frozen” in the Schedule Builder. The appearance of the slot changes to set it apart from similar slot types in the schedule. An example of a frozen slot in the Schedule Builder is shown below.

When you book a slot in the Practice Calendar, it’s obvious at a glance from the Schedule Builder.
In this example shown here, three 20-minute slots are showing as unbooked in the Schedule Builder.

After reviewing and booking the appointment for these three 20-minute slots in the Practice Calendar, the Schedule Builder shows these same slots as booked. The appearance of the booked slots is different than the appearance of similar slot types.

When you hover over a particular slot in the Schedule Builder, that slot expands and overlaps any adjacent slots. This makes it easier to view any slot details, such as the booked appointment type.
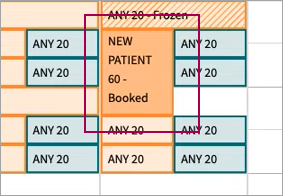
This example shows booked slots in the Schedule Builder without a hover.
Here are the same booked slots, showing a user hovering over the slots.
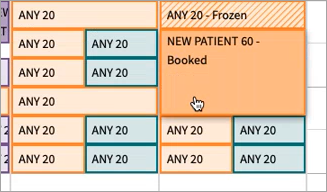
This interaction applies to any slots shown in the Schedule Builder, not just booked or frozen slots.
For booked appointments, an informational tooltip appears editing any templates. This alert is seen when hovering over the applicable slot.
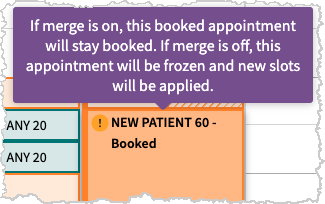
The tooltip provides the following message: “If merge is on, this booked appointment will stay booked. If merge is off, this appointment will be frozen and new slots will be applied.”
When a template is set up for a specific department, the department name appears at the top of the provider's schedule.

These labels stick to the top of the schedule as you scroll. If labels overlap, hovering over a label (as shown above) displays the entire department name.
Department labels appear before a new block of time, or if a provider's schedule switches departments within a day.
The preview calendar displays 15-minute increments until an appointment type in the Build Schedule section is selected. After you select a 1-, 5-, or 10- minute appointment type, the calendar view automatically zooms in to best view the shortest duration slot.
In the example below, the same 5-minute slot is being previewed. Notice that the calendar view changes to 5-minute increments on the calendar grid and displays 15-minute increments on the left side:
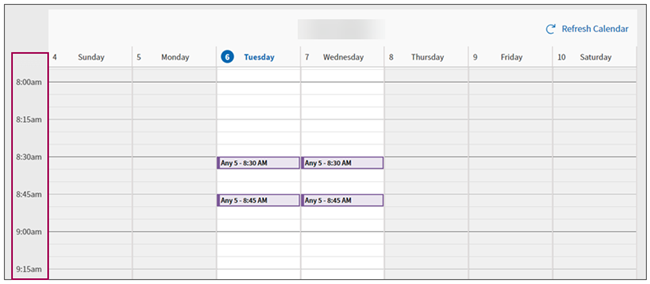
You can also manually zoom in or out by using the highlighted buttons. Note that, after you use the manual zoom buttons, the calendar does not auto zoom in until you reload the calendar. The zoom buttons also appear on the provider's preview calendar.
When you click on the provider's name in the dashboard, you can see their complete template list and preview calendar without entering the create/edit template flow. When on this page, you can use the manual zoom buttons to view the providers calendar at the desired zoom level. This page is manual zoom only.
