 User Guide — athenaPatient: Patient-Facing App for iOS and Android
athenaPatient is a patient-facing mobile app, available for iOS and Android users. This app aggregates all athenahealth practice-related information for patients. There is no need to switch practices in the app, or to log in with a different username. See the Functionality section for specific functionality that is available at this time.
The athenaPatient app is available for download from both the Google Play store and the Apple App Store.
Full registration for the Patient Portal is not required use this app. Jump to the Patient self registration section for more information.
If your practice has turned athenaPatient off or is otherwise ineligible for athenaPatient, your patients are still able to download and attempt to locate records in the app.
athenaPatient users can locate their records in the app without first registering for the Patient Portal. Even if a patient already has a log in with athena account set up, they are still be able to skip the Portal registration step. Account creation in the app is the only patient requirement before accessing records in athenaPatient.
As long as a patient has been invited by at least one practice across athenaOne, they are able to locate their records in athenaPatient without first completing Portal registration.
-
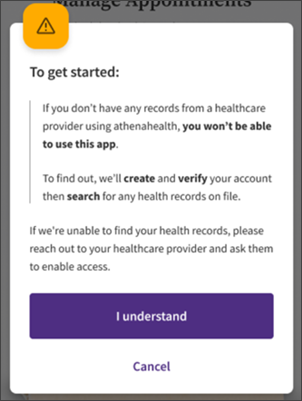
When the app launches, the patient taps Get Started. An alert appears:
-
When the patient taps I understand, they are taken to their browser to complete the existing athenahealth account creation workflow.
-
After entering their information and tapping Email Me, the patient taps the email link and is prompted to create a password.
-
After setting their password and tapping Save and Continue, in the background, the system identifies that the patient's associated email address has already been invited to the Patient Portal but registration has not been completed. The system scans across all of athenaOne for this information. Meaning, as long as at least one athenahealth practice has sent your patient a Portal registration invitation, they are able to access all of their associated records in athenaPatient.
-
After this information is verified, the patient can view their associated records and tap Continue to go back to the athenaPatient app.
This process has created a new athenahealth login account for the patient, and they can now view their information in athenaPatient.
If a patient has already fully registered for the Patient Portal, they are taken to the password reset workflow (as opposed to the create a new password workflow). However, this is not explicitly stated during account creation process.
Whether or not the patient has previously registered, the result is the same: they are prompted to create a new password and can then complete the account creation process.
If an email address existing in a patient's record but they have not been invited to register for the Portal, the following message appears:
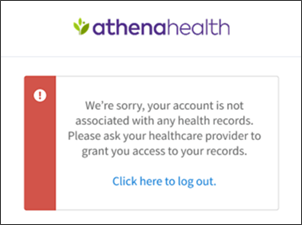
If the patient sees this message but has been invited to the Portal, ensure that the email address they're supplying during the account creation workflow matches the email address used for the Portal registration invite.
Some patients maintain different Patient Portal accounts for different athenahealth practices. If a patient is registered with different Patient Portal accounts using the same email address, they only need to remember the single login.
If a patient uses separate email addresses for different Patient Portal accounts, then and only then will the patient need to maintain separate logins.
When a user completes their current actions in the athenaPatient app, it's their choice to log out or to close the app when they see fit. These actions cause authentication to be required when reopening the app, either through biometrics or logging in with their Patient Portal credentials (depending on the user's settings). This recommendation aligns with best practices for the security of the user's health information.
The athenaPatient app is available for download from both the Google Play store and the Apple App Store.
Functionality and features
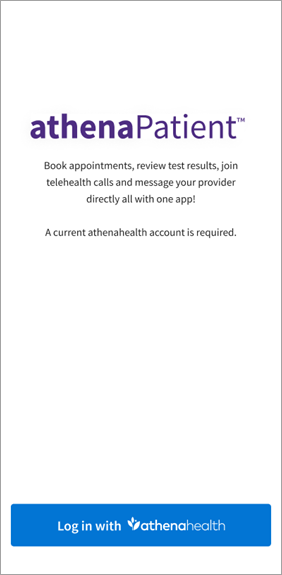
Patients log in with their athenahealth Patient Portal username and password.
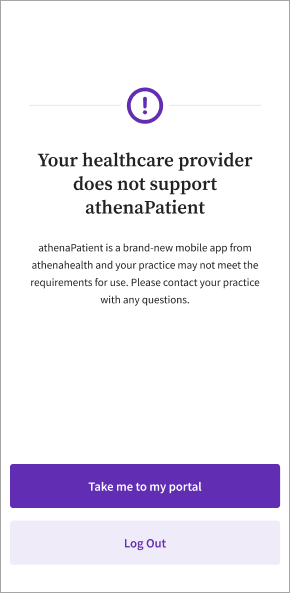
If a patient logs in to the athenaPatient app but your practice does not have app support enabled, they see the following message:
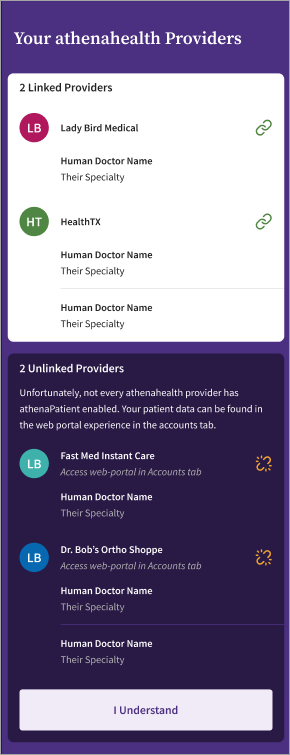
When a user is logging in to the app for the first time, they see which of their providers have opted in to sharing their patient data with the app. Providers who share patient data with the app appear with a link icon. If a provider is unlinked, it means that they have not opted in to sharing information with the athenaPatient app. Patients of unlinked providers are not able to use the app functionality for anything related to that provider, other than being able to access the web version of their Patient Portal account for that provider. After review, users must click I Understand.
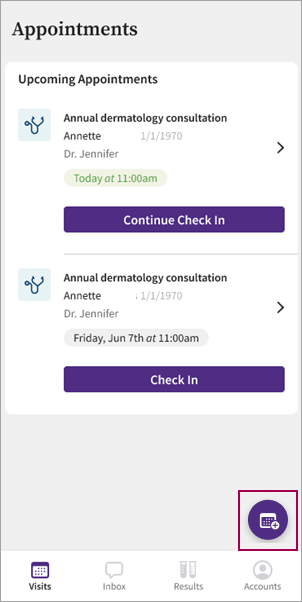
After logging in successfully, users are brought to the Appointments page, where they can view upcoming appointments and past appointments.

If your practice has self-scheduling enabled, patients can access the self-scheduling workflow from the athenaPatient app.
While on the Appointments page, users click the scheduling icon (highlighted below):
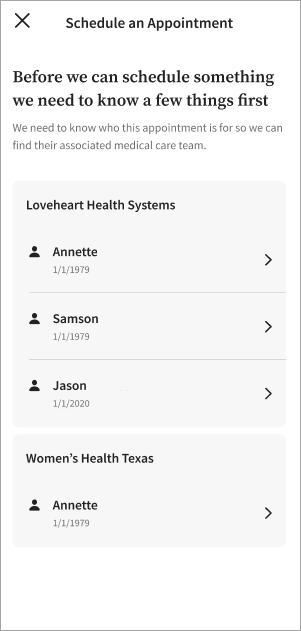
Users are then shown a selectable list of patients and providers:
Patients are then taken to the self-scheduling workflow. This workflow is the same as if the patients accessed self-scheduling from the Patient Portal.
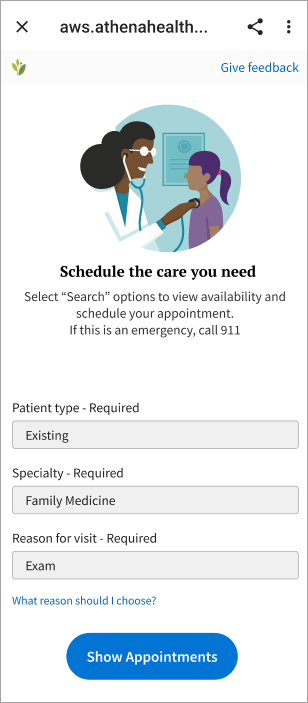
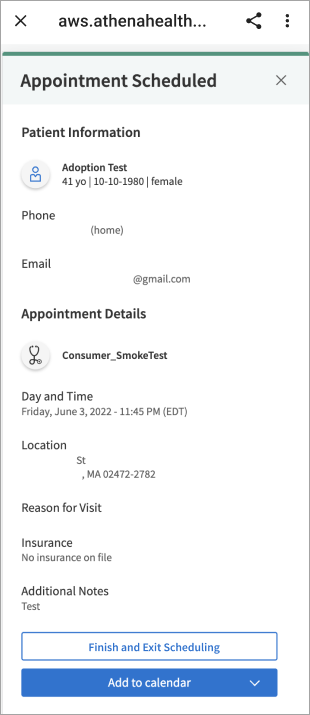
Patients can review appointment details before exiting the self-scheduling workflow:
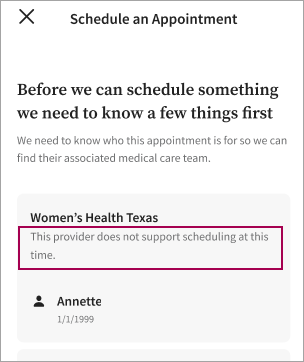
If your practice does not have self-scheduling enabled, patients see the following message when attempting to book at your practice:
"This provider does not support scheduling at this time."
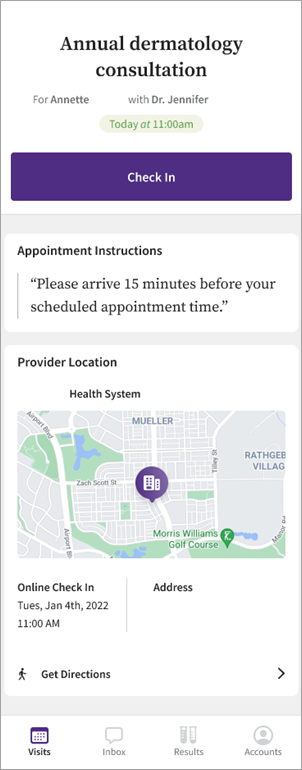
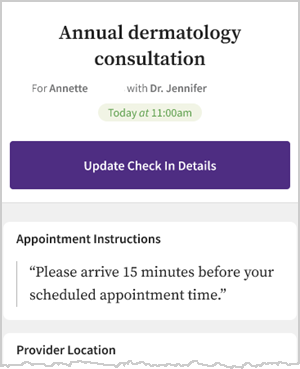
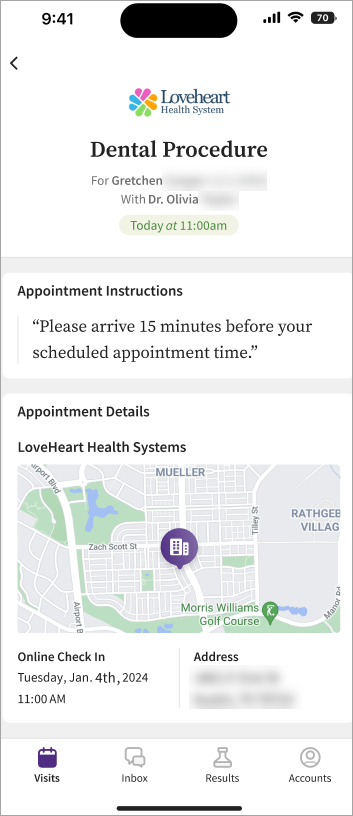
Users can click an upcoming appointment to view details. These details include the
-
Practice name
-
The appointment name (in this example, "Annual dermatology consultation")
-
The patient name
-
The provider name
-
The date and time of the appointment
-
An option to check in (see the Completing self check-in section for more information on self check-in)
-
Any appointment instructions
-
The provider location
-
The check-in time
-
The provider's specific address.
-
A Get Directions options that prompts users to open their mobile device's map application.
-
An Add to Calendar button. Users can quickly add reminders of upcoming medical appointments to their favorite calendar app they already use to manage their schedules. Note: For telehealth appointments, when the Launch Telehealth button appears (which occurs 15 minutes prior to appointment start time and for 45 minutes post appointment start time), the add to calendar button does not appear.
Users can click Appointments at the top left to return to the main Visits screen.
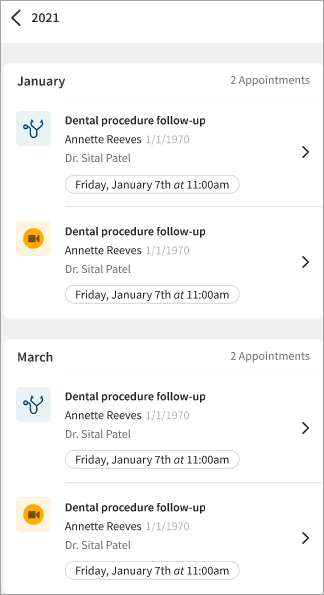
From the main Visits screen, users can also view past appointments. Patients can view past appointments for a given year, broken down by month:
Users can launch a telehealth call from the appointment details screen. The call can be launched on the day of the appointment 15 minutes before the appointment start time. Patients press the Launch Telehealth button to start the telehealth call.
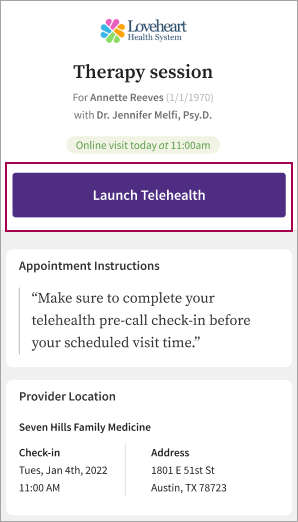
Note: The provider does not join until the appointment time.
After 45 minutes from the appointment start time, the button to launch the call no longer appears.
Users can access self check-in when viewing their upcoming appointments.
If a user has already started check-in for an appointment, the corresponding button displays Continue Check In (shown below)
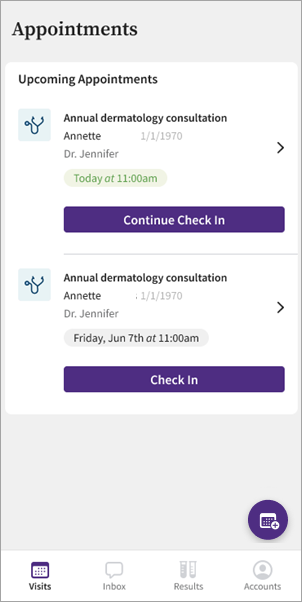
Users are then directed to the self check-in workflow.
The example below shows the landing page for athenahealth's Enhanced Self Check-In solution:
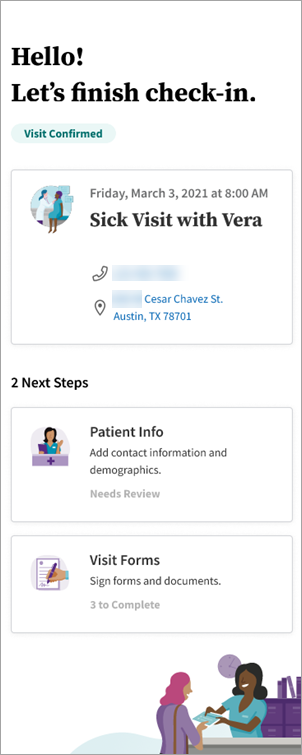
Notes:
- Your practice must have Enhanced Self Check-In enabled for this new workflow to appear for athenaPatient users. Refer to Enhanced Self Check-In O-help article for information on how to enable this workflow.
- If you have our legacy check-in solution enabled, that is the workflow that will be reflected in the athenaPatient app.
- If you do not have an athenahealth check-in solution enabled, the check-in button will not appear in the athenaPatient app.
Users can also check in when viewing an upcoming appointment by clicking the Check In button:
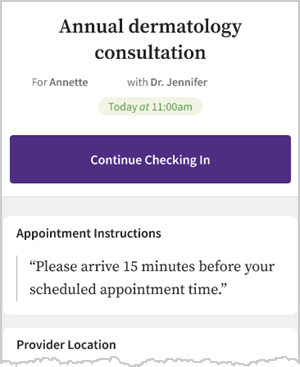
If check-in was started previously, the button prompts users to Continue Checking In:
If check-in was completed but there is still enough time for users to update check-in details, the button displays as Update Check In Details:
To access the Inbox, users click this icon at the bottom of their screen:

From the main Messaging page, users can toggle between their Inbox and any Sent messages.
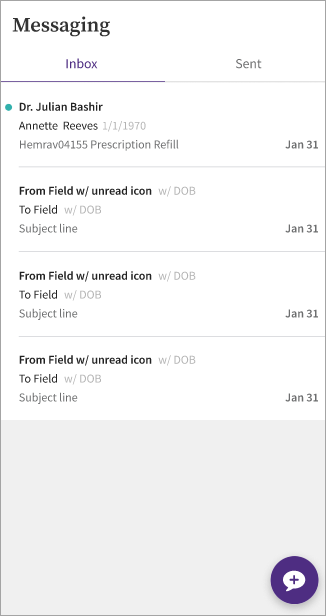
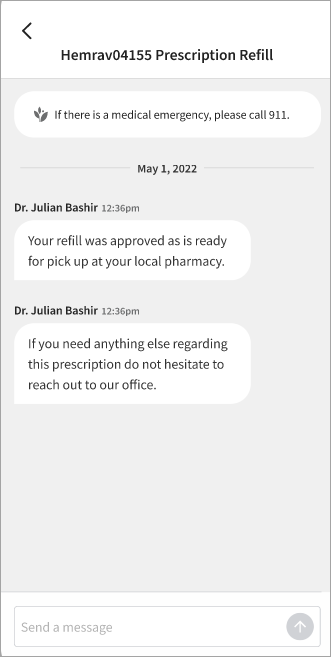
Users click on a message thread displayed in their Inbox to open it:
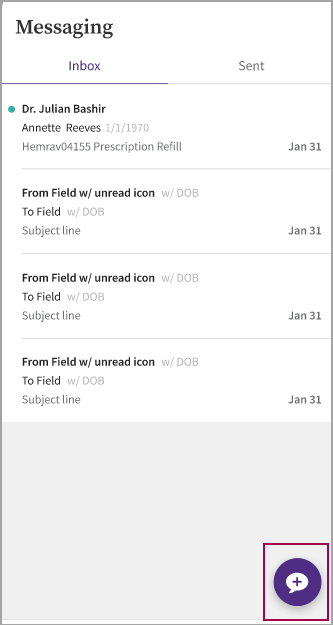
Back on the main Messaging screen, users can click this icon to compose a new message:
Before sending a message, users must provide some information.
Users confirm their identity from the menu shown below. Each patient name is organized by practice. In this example, Annette is a patient of both Loveheart Health Systems and Women's Health Texas.
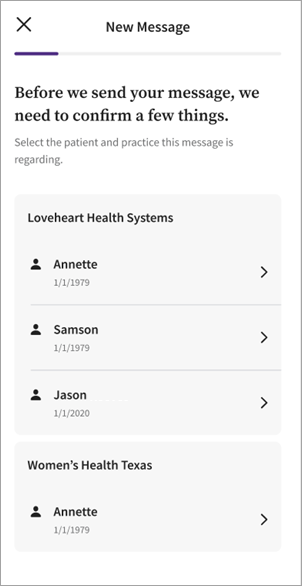
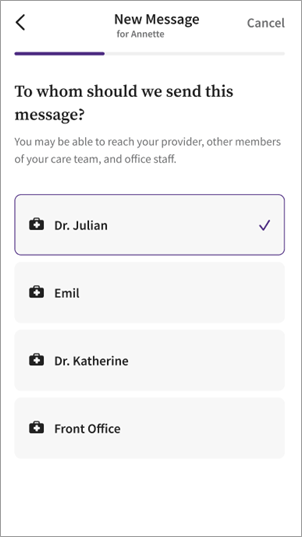
Then, users select a provider.
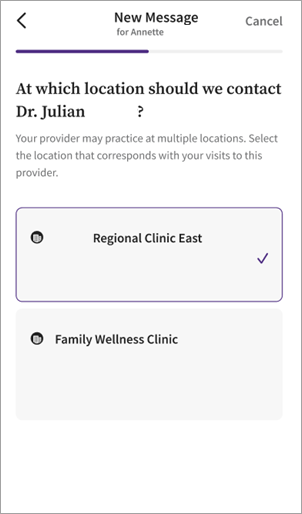
Users select a location for their intended recipient.
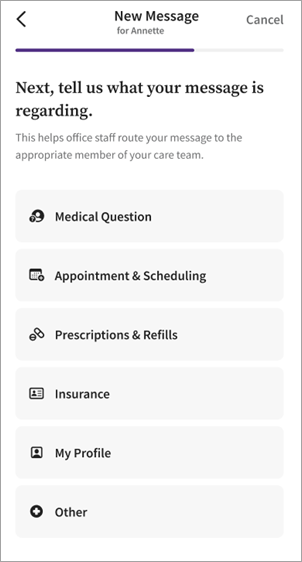
Users select a topic for their message. Several categories are shown in the menu below:
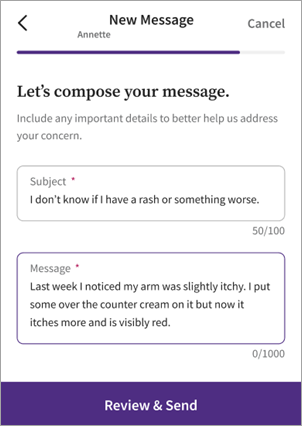
Users then complete the Subject and Message fields. Both fields are required before a user can click Review & Send.
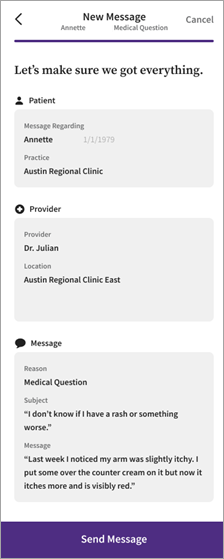
After clicking Review & Send, users can review their submitted information before sending the message.
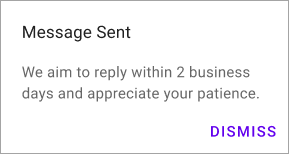
A pop-up confirmation message appears after clicking Send Message.
athenaPatient users can add a photo to an existing message thread in two ways:
- By selecting a photo from their device's photo library.
- By taking a photo from within the app.
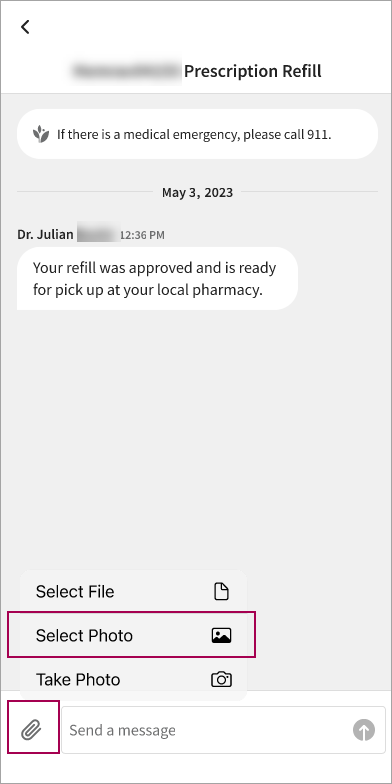
To select a photo in an existing message thread, the user taps the paperclip icon (highlighted below) and taps Select Photo (highlighted below):
The user selects a photo from their library.
If the user wants to take a photo, they tap Take Photo as shown here:
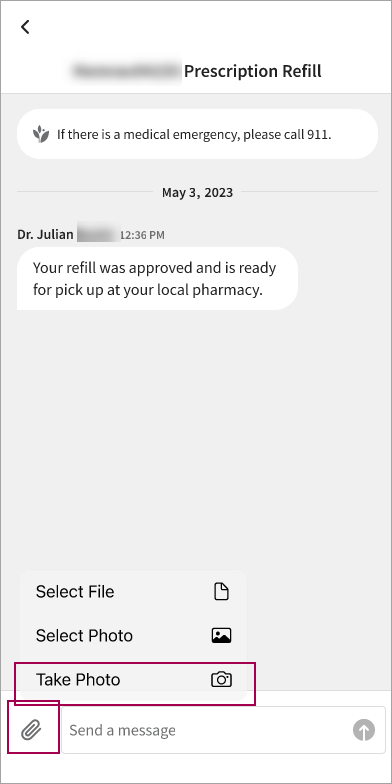
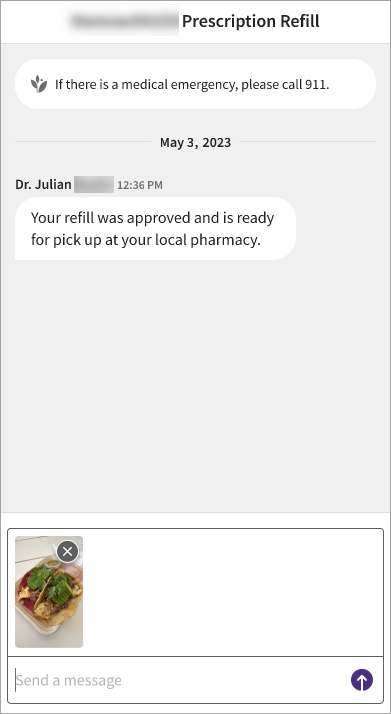
A thumbnail of the photo—whether selected from the user's library or taken by the user in-app—populates in the Send a message field. The image can be deleted prior to sending by tapping the x in the corner of the thumbnail:
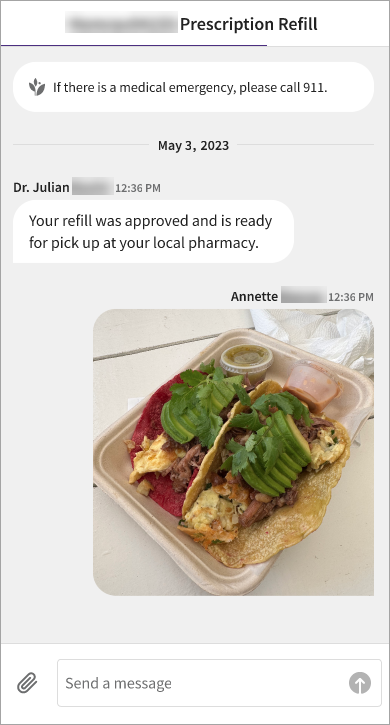
After tapping the send icon, the image displays in the message thread as shown here:
Note: All photo files not in JPEG format are converted to JPEGs automatically.
Important: PDF is the only file format that can be attached.
To attach a PDF file in an existing message thread, the user taps the paperclip icon (highlighted below) and taps Select File (highlighted below):
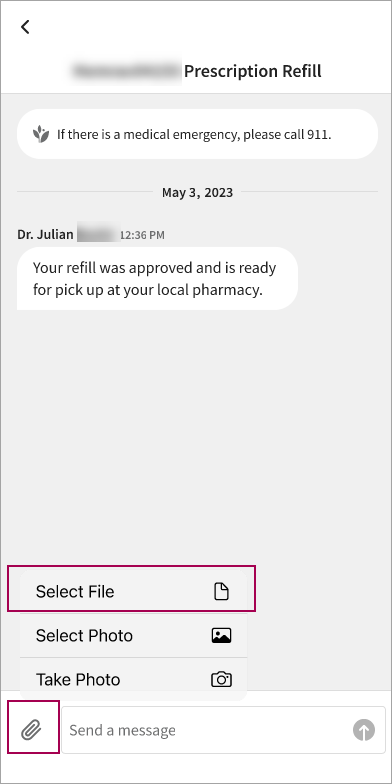
The PDF is scanned for issues:
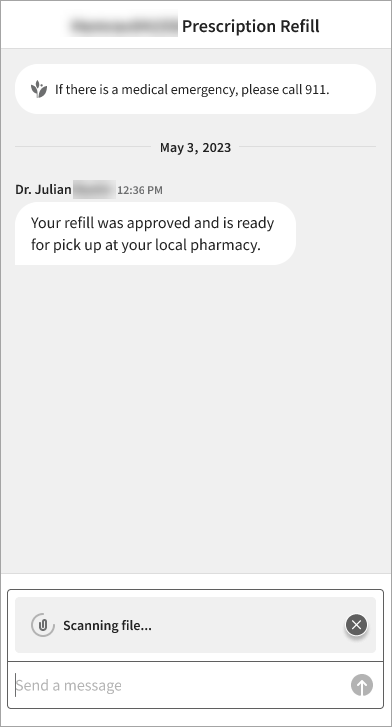
After the scan is complete, the PDF name populates in the Send a message field. The PDF can be deleted prior to sending by tapping the x in the corner:
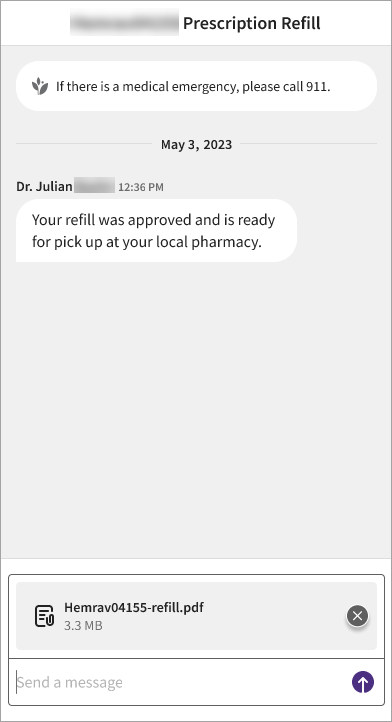
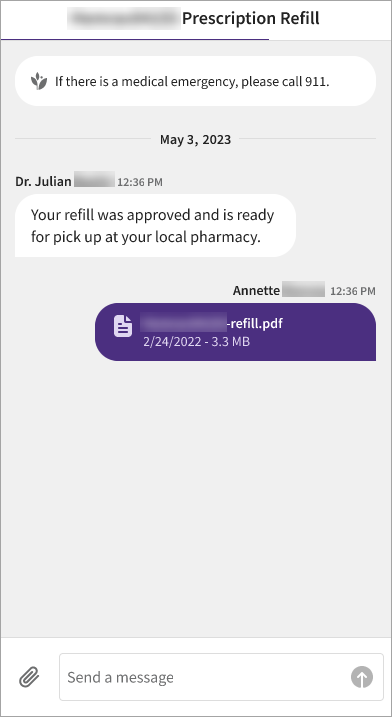
After tapping the send icon, the PDF name displays in the message thread as shown here:
An image or PDF file can also be added during message composition.
The user taps the paperclip icon in the Add an attachment field (highlighted below):
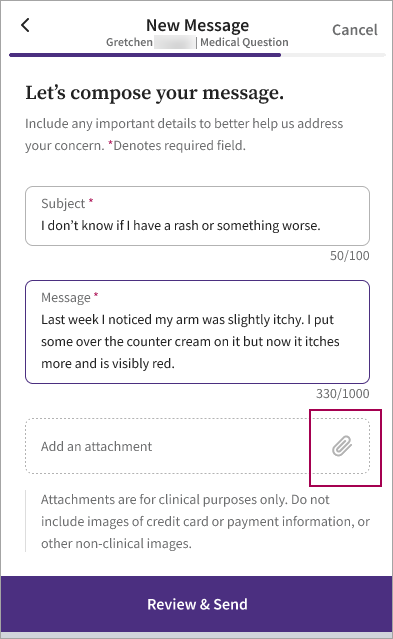
A selection menu appears:
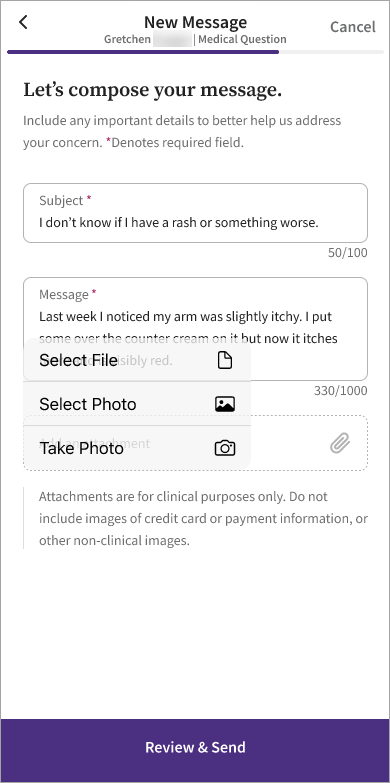
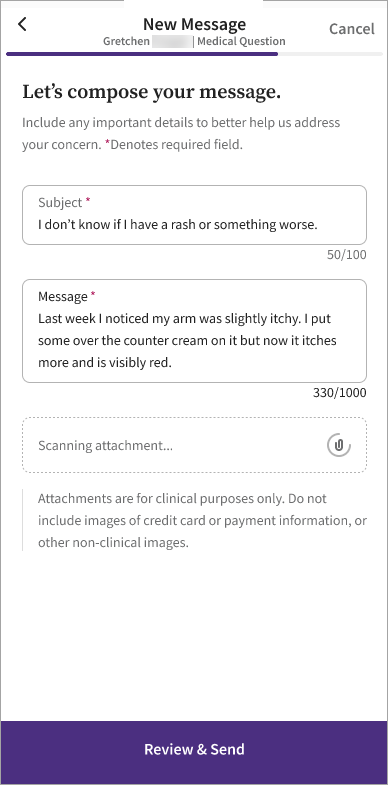
If a PDF is being attached, the file is scanned for problems:
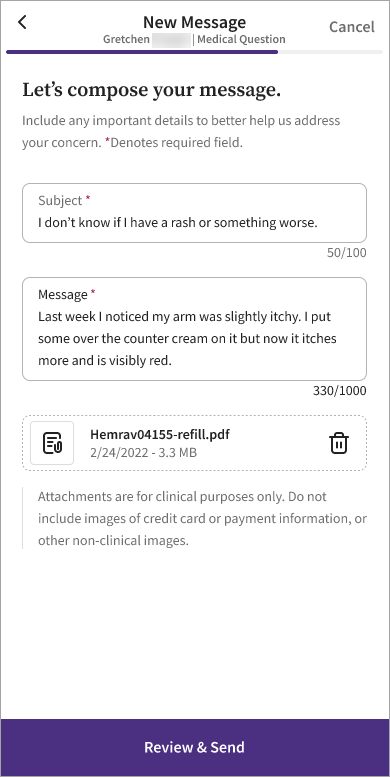
After the scan is complete, the file name appears. The user can tap the trash can icon to delete the file prior to tapping Review & Send:
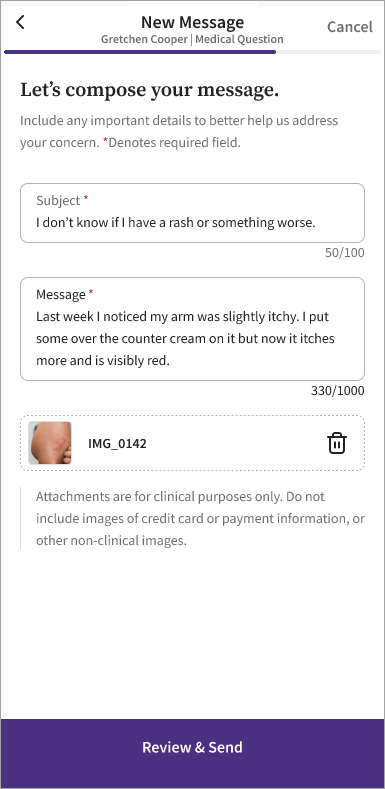
If the user adds an image, a thumbnail of the image appears. The user can tap the trash can icon to delete the image prior to tapping Review & Send:
Users click Results from the bottom navigation bar to view test results.
Test results are grouped by date. Unopened results are marked with a circle to the left of the test name.
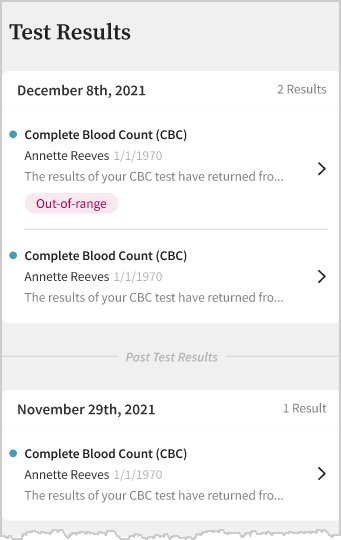
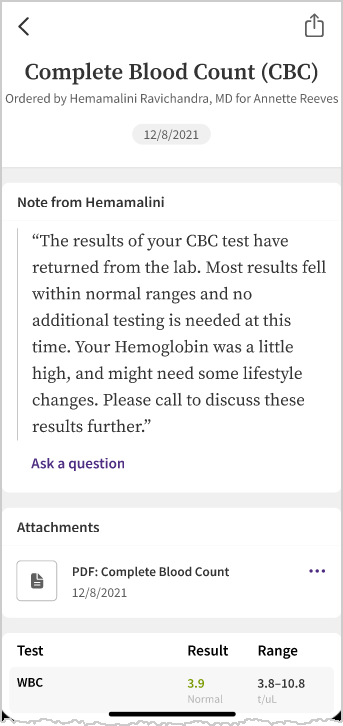
Click any test result for more details, including provider notes, attachments, and specific range information:
Users click Billing from the bottom navigation bar to access the Billing page.
From Billing, app users can perform two actions:
-
View all claims for which they have permission to see.
-
Navigate to our online (Patient Portal)-based payment experience.
The Billing page offers users an at-a-glance overview of the claims for which they have permission to see. This information may include their own claims, as well as claims for which they are the guarantor.
Some key features of the new Billing page include
- Name of the provider (making it clear which claim is coming from which provider).
- Patient name and birth date.
- The dunning level applied to each claim (such as Payment Overdue, Payment Scheduled, and so on).
- The bill type, such as bill, autopay plan, and payment plan.
- The dollar amount associated with the claim.
Note: athenaPatient's Billing Overview simply shows the total number of payment plans associated with a given patient. The Patient Portal billing dashboard highlights the payment plan with the highest Dunning status, meaning the plan with the most urgent payment requirement.
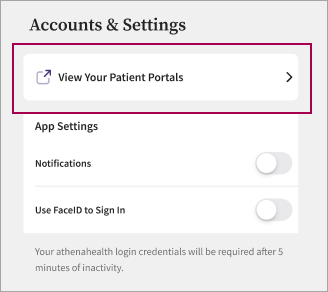
To access the Accounts & Settings page, users click the gear icon at the top of the screen.
Users can view their linked and unlinked providers from View Your Patient Portals on the Accounts & Settings screen:
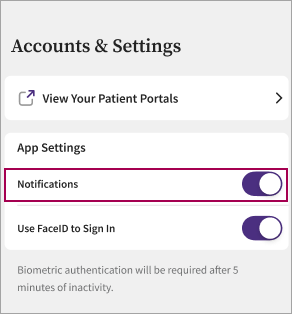
athenaPatient users must opt in to receiving push notifications to receive these alerts. As long as your practice is already leveraging athenaPatient and is set up to use the corresponding athenaCommunicator message types, your patients receive these push notifications. These notifications are in addition to any email or text reminders your practice already uses.
Push notifications are available for the following events:
-
When test results become available.
-
Check-in reminders. This includes reminders to check in to upcoming appointments and to complete partially completed check-in.
-
Upcoming appointment reminders. These reminders apply to in-person appointments and telehealth appointments (for both athenaTelehealth and non-athenaTelehealth practices).
athenaPatient users can enable push notifications from the Accounts & Settings screen:
Here is an example of a push notification for an appointment reminder:
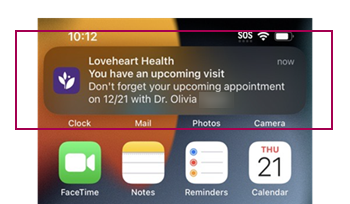
After pressing the notification, the user is taken directly to that appointment's details screen in the athenaPatient app:
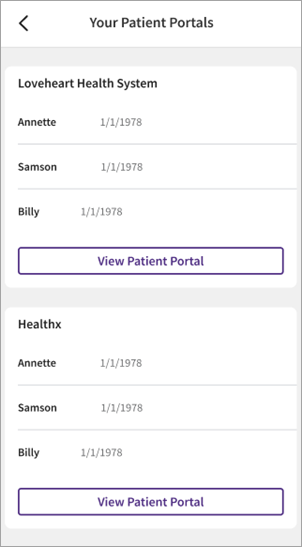
Users can access their Patient Portal accounts from the Accounts & Settings page.
After clicking View Your Patient Portals, users can confirm the specific account they'd like to view. Patient names and dates of birth are listed under each associated practice name.
Users click View Patient Portal to view the Portal account for which the displayed names are associated:
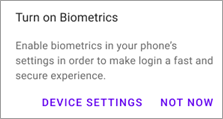
athenaPatient includes the ability to turn on biometric login. Users toggle Face Recognition or Fingerprint on or off from Accounts & Settings.
A pop-up message appears, prompting users to enable biometrics via their mobile device settings.
athenaPatient users can access their MFA settings from the Accounts & Settings screen by tapping a new option: Security Settings.
Users are directed to their default browser, at which point they are directed to log into their login with athenahealth account. Users can view their current MFA settings, and have the option to turn MFA off.
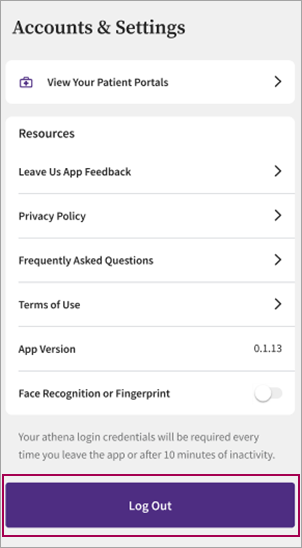
Users can log out from the Accounts and Settings page:
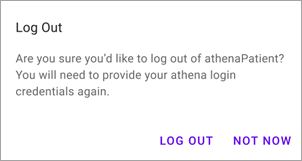
A pop-up appears, prompting users to confirm if they intent to log out of the app:
When users log in to the Patient Portal on a mobile device, they're shown a banner prompting them to download the athenaPatient app:
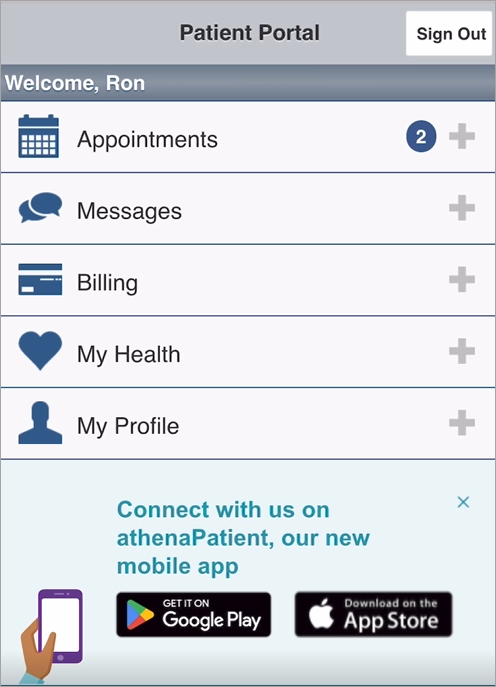
"Connect with us on athenaPatient, our new mobile app." From here, patients can click either the Google Play store icon or the Apple App Store icon to download the athenaPatient app.
Users are shown this banner upon logging in, and can choose to close the banner at any time.
We added the following content to a few email types sent to your patients:

This content appears above the standard email footer.
This content is available in the following email types:
-
Select emails related to the Patient Portal (also known as webportal messages):
-
Emails notifying users about new messages on the Patient Portal (WEBPORTAL-GENERALMESSAGE)
-
Emails sent when new department information becomes visible on the Patient Portal. These emails are triggered when an existing patient has Patient Portal access under one provider group and then is later registered under another provider group (WEBPORTAL-PORTALUSERSELFMAP)
-
Emails notifying new users that they can now access their health information on the Patient Portal. These emails are triggered when a patient has had access to a family member's portal, but not to their own portal, but then the patient is given access to their portal (WEBPORTAL-PORTALUSERNEWSELFMAP)
-
-
The athenaTelehealth appointment email that shares the link to join the appointment (REMINDERCALL-TELEHEALTH)
-
Standard GroupCall emails (excluded Patient Portal adoption emails):
-
Cancellation. Automated and Immediate for those appointments enabled for patient self-scheduling (app store links are available within the email message when the appointment related to the GroupCall campaign is re-schedulable via patient-self scheduling) (GROUPCALL-CANCELLATION)
-
Weather (app store links are available within the email message when the appointment related to the GroupCall campaign is re-schedulable via patient-self scheduling) (GROUPCALL-WEATHER)
-
No Show (app store links are available within the email message when the appointment related to the GroupCall campaign is re-schedulable via patient-self scheduling) (GROUPCALL-NOSHOW)
-
Recall campaign emails (GROUPCALL-RECALL)
-
-
ResultsCall emails (RESULTSCALL-STANDARD)
-
ReminderCall emails:
-
Standard confirmation (REMINDERCALL-CONFIRMATION)
-
Confirmation for non-athenaTelehealth clients (REMINDERCALL-CONFIRMATION-Non A1 Telehealth)
-
Early reminder email (REMINDERCALL-EARLY)
-
Early reminder email for non-athenaTelehealth clients (REMINDERCALL-EARLY-Non A1 Telehealth)
-
Check-in email (REMINDERCALL-CHECKIN)
-
Check-in email or non-athenaTelehealth clients (REMINDERCALL-CHECKIN-Non A1 Telehealth)
-
athenaPatient users can control if content appears in Spanish by adjusting their device settings. Some important notes on Spanish language support:
-
The patient self-scheduling workflow and push notification content are not available in Spanish. Expect communication from athenahealth when these areas of support become available.
-
Some Patient Portal links must be manually toggled when the mobile web portal is launched in a web browser — for example, the Test Results screen, which has a link to open the same results in the mobile Patient Portal.
-
All clinical content (for example, analyte data, provider and/or doctor notes, interpretation notes, etc.) is not translated to Spanish. This is due to patient safety concerns regarding an automatic translation from important health content.
Refer to the user's device manufacturer website for guidance on how to adjust language settings.
athenaPatient users can rate and review the app after successfully completing several workflows. After a user has had a total of four "successful actions," the next time they navigate to the Visits screen, they are shown the following prompt:
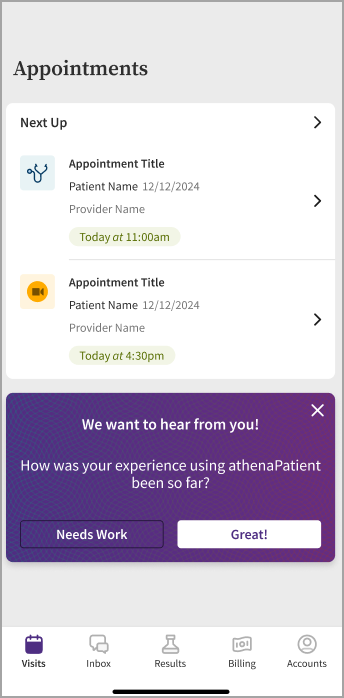
After tapping an answer—either Needs Work or Great!—the user is shown another message with the opportunity to leave feedback:
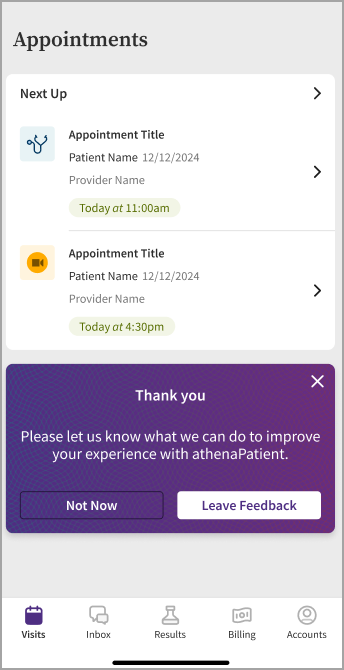
Successful actions using the athenaPatient app include:
-
Successful completion of message composition.
-
Successful completion of a message/attachment in thread view.
-
User navigates to a test result details screen and the details screen successfully loads.
-
User navigates to an appointment details screen and the details screen successfully loads.
-
User navigates to a message thread view and the thread successfully loads.
-
User logs in using biometrics.
When users see this message:
-
If the user closes the message, it appears again in 45 days.
-
If the user selects Great!, it won't appear again for 125 days.
-
If the user ignores the prompt, it continues to appear in the Visits list until they interact with it.
This workflow is distinct from the app stores' native review prompts, which displays only if the user indicates their experience with the app has been good.