 User Guide — Enhanced Self Check-In
athenaClinicals, athenaCollector, athenaCommunicator
This article refers to our latest self check-in experience, released in Fall 2022. For information on the legacy self check-in experience, refer to this user guide.
Patients can complete check-in for appointments at home before arriving at the office or in the office after they arrive. Patients whose preferred language is Spanish can display the self check-in information in Spanish. Two-factor authentication makes self check-in secure for your patients and their caretakers.
athenaCommunicator is required to use this functionality. To access all workflows, such as payment collection and medication review, athenaCollector and athenaClinicals is also needed. To enable enhanced patient self check-in for your practice, create a support case from athenaOne > Support > Success Community > Contact Client Support Center.
Important: The enhanced self check-in experience includes an out-of-office workflow only. Expect further communication from athenahealth in the near future when an in-office workflow becomes available for enhanced self check-in.
- This Getting Started guide on the Success Community describes how to prepare staff and patients to begin using our new self check-in experience.
- Refer to this article on the Success Community for frequently asked questions (FAQs) related to enhanced self check-in.
The enhanced self-check in experience provides patients with a landing page that shows required self check-in tasks. Patients can complete self check-in for the following:
- Patient Info
- Forms & Signatures
- Insurance
- Payments
- Screening Questionnaires
- Medications Review
The enhanced self check-in workflow includes features that improve your patients’ overall experience:
- Two-factor authentication keeps the self check-in experience secure.
- A main check-in menu allows patients to view required self check-in tasks at a glance.
- Patients can switch to Spanish at any point during the check-in process. This button appears on all pages in the self check-in experience:

Patients click on this button to toggle between English and Spanish. The button’s appearance changes based on the language being viewed:
- Personalized self check-in. Patients and caretakers are greeted with appointment information after verifying their identity.
- Patients receive a self check-in SMS message in the following range (if they haven't already completed self check-in): 7 days before an appointment and up to 6 hours after the appointment start time.
- We added the following inclusive fields to Personal info:
- First name used
- Assigned sex at birth
- Gender identity
- Sexual orientation
- Pronouns
These inclusive fields are only visible to your patients if the Gender Identity/Sexual Orientation Workflows (Transgender Patient) practice setting is ON.
Contact your CSM for more information about this setting. For general information on transgender and nonbinary patient care, refer to this user guide in O-help.
This Getting Started guide on the Success Community describes how to prepare staff and patients to begin using the enhanced self check-in experience.
Practice staff has the ability to send patients an SMS link to initiate self check-in 7 days before an appointment and up to 6 hours after the appointment start time. There's no need to provide patients with an authentication code; patients verify their identity right from the link provided via SMS. You can also save or update a patient's mobile number on record when sending the SMS link.
There is a one-hour grace period so that if patients click the self check-in links in their reminder messages shortly after the scheduled appointment start time, the links will still work.
Note: The self check-in SMS message is not configurable and is separate from the text message that can be configured via ReminderCall.
If your practice is using Enhanced Self Check-In, this feature is automatically turned on.
You can control the ability for staff to initiate self check-in—including whether it's enabled for all departments or for specific departments—from the Self Check-in Settings page under General Settings. This feature is set to on by default.
You can control whether check-in is enabled for practice devices from the Self Check-in Settings page under General Settings.
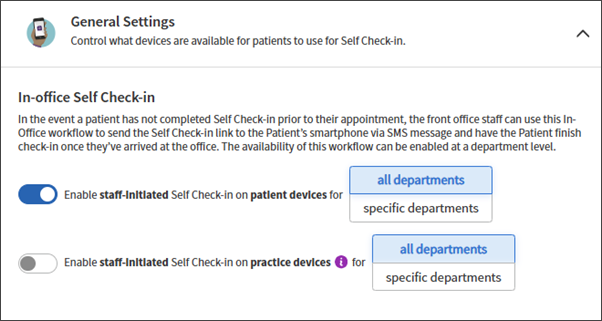
When this toggle is on, you can designate whether the feature is enabled for all departments (default setting) or for specific departments:

Important: For clients where Enhanced Self Check-in is turned ON only for specific departments, this feature is only available for those departments that are currently configured to Enhanced Self Check-in.
While admin has the ability to enable or disable Enhanced Self Check-in for all departments in the tablespace from the SCI Settings page, it will only take effect for the specific departments that are on Enhanced Self Check-in.
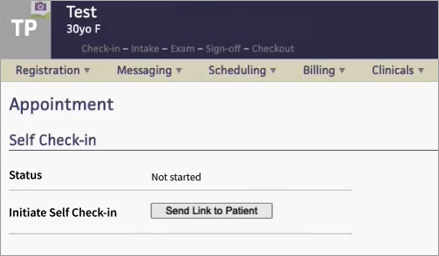
Front desk staff can confirm the status of a patient's self check-in from the Appointment page. In the example below, the status shows as "Not started." Your staff can then send the patient an SMS link to self check-in 7 days before an appointment and up to 6 hours after the appointment start time by clicking Send Link to Patient.
Note: The self check-in SMS message is not configurable and is separate from the text message that can be configured via ReminderCall.
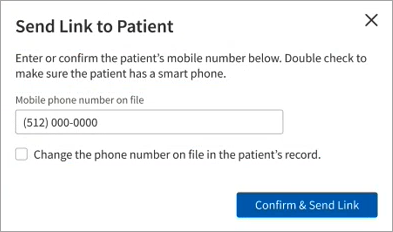
A pop-up opens, allowing staff to enter a mobile phone number. This field is prepopulated with the patient's mobile number on record. If the patient does not have a mobile number on record, this field is blank.
Your staff has the ability to save the mobile number to the patient's record. This is useful in cases where a patient does not yet have mobile number on file, but has provided a number for check-in purposes. In this case, your staff does not need to manually save this number in the patient's chart. They can simply check Change the phone number on file in the patient's record (shown below).
After the SMS link is sent, the Appointment page displays a message noting the expected delivery time of the SMS. Your staff has the option to send another link at this time by clicking Send Link to Patient.
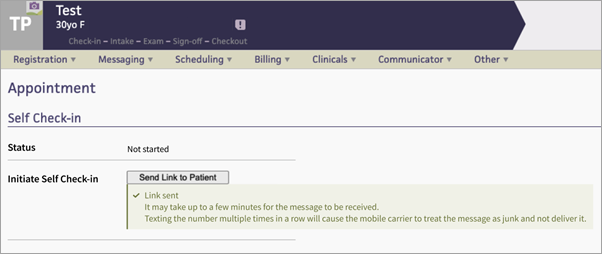
Note: Actual message delivery times are dependent on the patient's mobile carrier. The message above indicates a general delivery time.
The patient receives an SMS that includes a link to self check-in. After clicking the link, the patient is asked to verify their identity by providing their last name and date of birth:
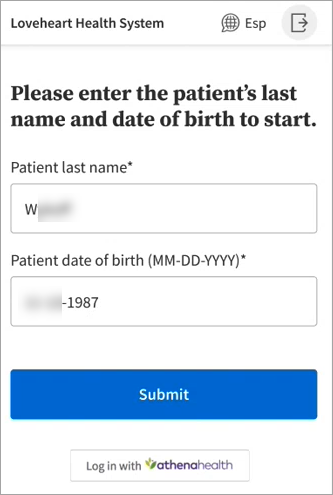
Note: If the patient opts to log in with athenahealth, they are taken to the same verification method used when logging in to their Patient Portal. After verifying, they are taken to the self check-in workflow.
Then, the patient is asked if they are checking in for themselves or for another person. The patient clicks Begin Check-in after making this designation:
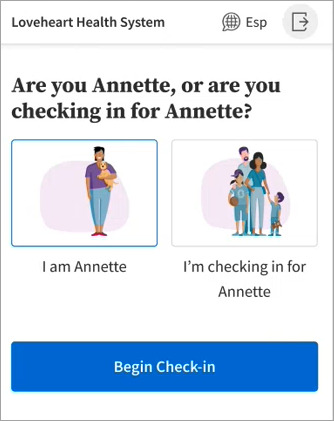
The patient is then taken to the self check-in landing page.
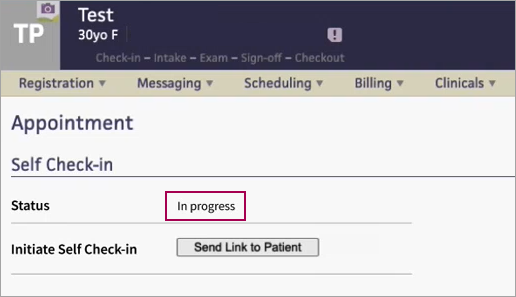
While the patient completes self check-in, the Appointment page shows a status of "In progress." While check-in is in progress, your staff can still send an SMS link if needed.
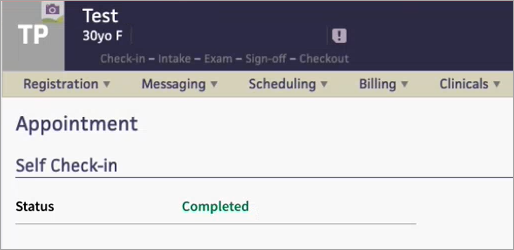
After self check-in is complete, the Appointment page shows a status of "Complete." The option to send an SMS link no longer exists.
The Self Check-in Settings page provides links to specific self check-in configuration pages.
Note: To access the Self Check-in Settings page, a practice user must have the "Communicator Admin" role.
To display the Self Check-in Settings page,
-
On the Main Menu, click the Settings icon.
-
Under ADMIN, click Communicator.
-
In the Task Bar, under PRACTICE LINKS — Patient Self Check-in, click Self Check-in Settings.
This page compiles information and, in some cases, helpful links to specific settings pages. All areas of enhanced patient self check-in functionality are included:
- Patient Info
- Forms & Signatures
- Insurance
- Payments
- Screening Questionnaires
- Medications Review
You can control the ability for staff to initiate self check-in—including whether it's enabled for all departments or for specific departments—from the Self Check-in Settings page under General Settings. This feature is set to on by default.
You can control whether check-in is enabled for practice devices from the Self Check-in Settings page under General Settings.

For more information about initiating patient self check-in, jump to this section.
Specific sections on the Self Check-in Settings page
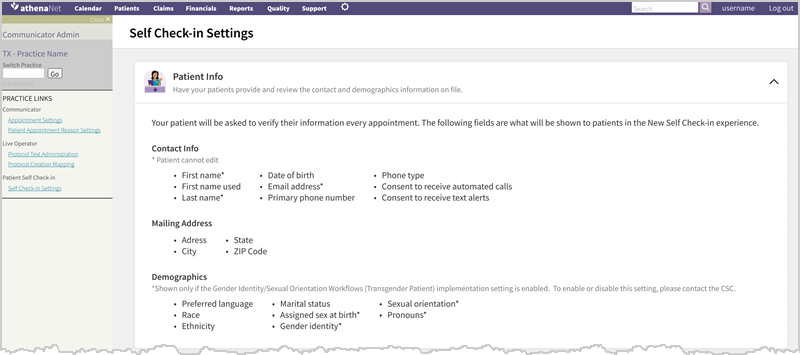
This section of the Self Check-in Settings page compiles information about what your patients are asked to verify during self check-in. This includes contact information, a mailing address, and demographic information.

This section of the Self Check-in Settings page describes how patients can submit insurance card images and/or confirm their current insurance.

This section of the Self Check-in Settings page describes how patients can pay a co-pay or outstanding balance during self check-in. This page also describes the requirements for enabling payments, and links out to the Portal Settings page.

This section of the Self Check-in Settings page links out to the following admin pages (click each link below for an O-help article describing the page):
An example of the Medications & Pharmacies section on the Self Check-in Settings page is shown here:

The above example shows the default settings: the Medications section and the Pharmacies section afre shown every time for all appointments, with the enablement toggles in the on position.
There are several options for how frequently the Medications section will be shown to patients during self check-in:
- every time
- after 1 week
- after 1 month
- after 6 months
- after 1 year
It's also possible to configure Medication Review for either all appointments, or for specific appointments. When specific appointments is selected (as shown below), filter options appear:

These filter options are as follows:
-
Departments
-
Providers
-
Specialties
-
Appointment Type
-
Age
-
Sex
Each filter offers the ability to either select all, or to select individual options. The example below shows the Departments filter with All selected:

Clicking Selected opens a menu showing a list of available departments:
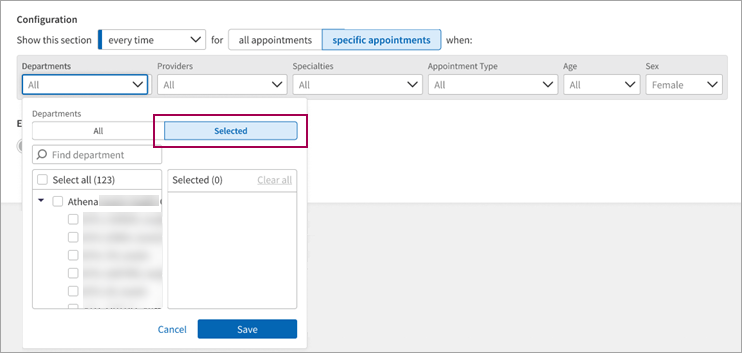
You can search departments using the Find department field, and you can manually select departments, which then appear in the selected pane on the right. This menu also features the option to Clear all, or to remove individual selections (x). You can also cancel to close this menu without saving changes, or you can click Save.
The other filter options feature similar menus. These filter options are as follows:
-
Providers
-
Specialties (Important: The Specialties filter only appears if you have the Clinicals – Multispecialty Filtering implementation setting enabled.)
-
Appointment Type
-
Age
-
Sex
The Pharmacies section is shown during self check-in on a department basis - either all departments, or specific departments. You can select specific departments from this page.
This workflow relies on configuring social history health forms on from the Social History Global Templates page. Refer to this O-help article for more information on that page. Some form templates are included by default.

The following sections appear under Health Histories
-
Family History
-
Medications History
-
Surgical History
-
Allergies
-
GYN history
You can toggle each section on or off:

You can enable each section for all appointments or specific appointments. Clicking specific appointments opens a menu with a few configuration options. You can configure for different
- Departments
- Providers
- Specialties
- Appointment Types
- Ages
- Sexes (except for GYN history)

You can access digital patient forms from the Self Check-in Settings page.
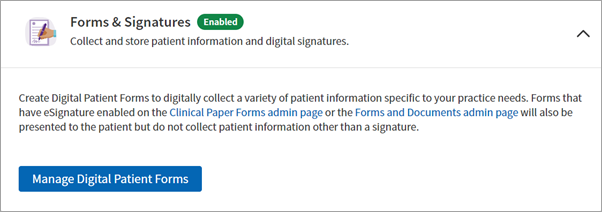
Explanatory text appears under Forms & Signatures as follows:
"Create Digital Patient Forms to digitally collect a variety of patient information specific to your practice needs. Forms that have eSignature enabled on the Clinical Paper Forms admins page or the Forms and Documents admin page will also be presented to the patient but do not collect patient information other than a signature."
Important: When you create a digital patient form to capture consents that were already being captured in Enhanced Self Check-in via Clinical Paper Form, make sure to unmap the older Clinical Paper Form version from Enhanced Self Check-in to prevent the patient from seeing redundant forms.
You can achieve this unmapping by navigating to the Clinical Paper Form admin page, opening the form you wish to unmap, and unchecking the Enable for Digital Signature checkbox.
The HIPAA Notice of Privacy is displayed to patients during enhanced self check-in if they have never provided an e-signature for it previously. You can verify if a patient has provided an e-signatiure by checking the portal e-signature history in athenaOne.
After a patient e-signs the privacy notice form once, it is never displayed again during enhanced self check-in.
Overview of patient workflows and associated practice user workflows
For a full patient workflow example, refer to the enhanced self check-in release note included in our Fall 2022 release.
Patients begin the self check-in process by clicking Begin Pre-Registration from a ReminderCall email or text message.
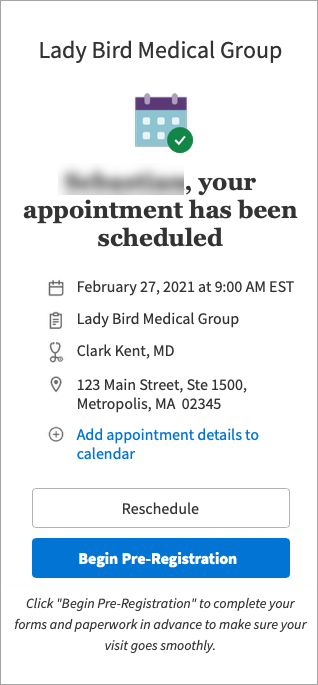
Patients are then prompted to complete two-factor authentication.
Caretakers can complete this portion of check-in on behalf of another patient.
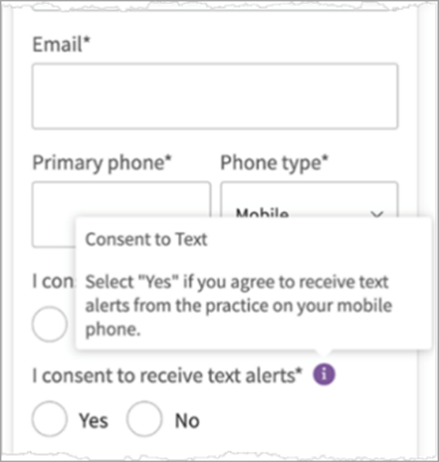
Patients can also opt in to receive text alerts while entering their personal information. The following information is provided regarding consent to text:
"Select 'Yes' if you agree to receive text alerts from the practice on your mobile phone."
Note: The button at the bottom of each task page is dynamic and matches each patient's (or caretaker's) next required check-in task.
- Ensure that your forms match the patient's preferred language.
- Check that the text is clear and readable.
- Do not include forms that require more than just one signature. In a future release, we will add the ability to include multi-field, customizable forms.
For a full patient workflow example, refer to the enhanced self check-in release note included in our Fall 2022 release.
Your practice can upload an image file for each form that needs to be signed. Patients click the + button to increase the size of the form. They can also click the download button to download the form in a new tab.
Both buttons are at the top right corner of the form, shown here. The white circles under Forms indicate the number of forms that need to be signed.
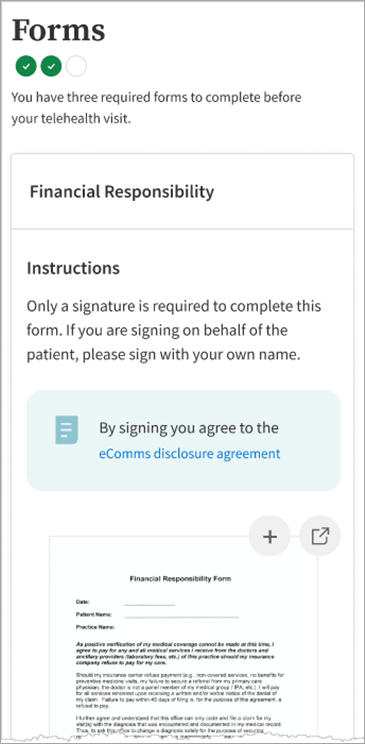
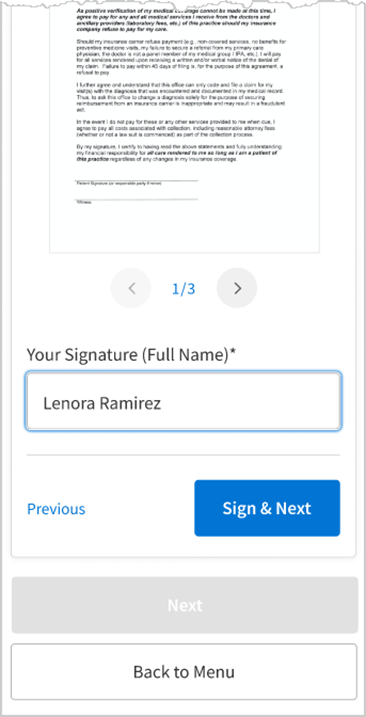
Patients or caretakers enter their first and last name in the Your Signature (Full Name)* field and click Sign & Next.
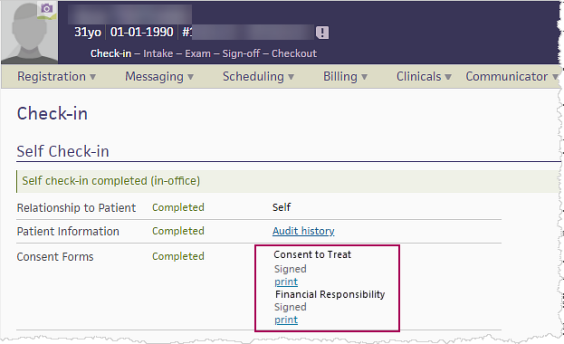
You can view a patient’s signed or unsigned forms within athenaOne from the check-in status page for the associated appointment. Unsigned forms can be printed for the patient to sign in office.
Printing isn’t helpful in a telehealth context, but you can still confirm whether or not required forms have been signed.
We added an optional piece of functionality to this experience – the ability for patients to pay outstanding balances, including copays and other bills. This functionality is turned on by default.
Note: All payment plan types available in other workflows are also available in Enhanced Self Check-In.
Refer to this quick reference guide in O-help for more information on determining the copay type for patient check-in.
For a full patient workflow example, refer to the enhanced self check-in release note included in our Fall 2022 release.
If a patient wants more information about a specific bill, they can click View breakdown from the main Payments page.
From this breakdown view, a patient can see what they owe, as well as any insurance coverage, past payments they made, and the total amount due. This view also shows the individual services included in this bill.
If a patient wants to see this same breakdown for a different bill, they can use the arrows at the bottom of the page to scroll through their bills.

If a patient wants some more information about a specific service in a bill breakdown, they click the Details drop-down menu.
This detail view shows the patient exactly what their insurance paid, as well as the dates of their last online payments.

To view a payment receipt, a patient clicks View receipt. This receipt shows the date and time of the payment, the card used to make the payment, the payment total, and some confirmation details.

When a patient chooses their payment method, they can also choose to delete a stored card. A patient may choose to delete a card if it is expired, which is noted next to their stored card as shown here:

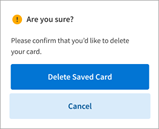
If a patient deletes a card, a pop-up message displays asking them to confirm the deletion.
A patient may see a variation of the Payments option, depending on a previous action they took when paying a bill.
Here are some examples of what patients might see for a few different scenarios:
- If a partial payment was made previously, patients see the following:

- If the outstanding balance was reviewed but not paid, patients see the following:

- If one or more bills are not payable online, patients see the following:

If a patient has a bill that is not payable online, this version of the Payments option will appear to the patient taking any action towards paying a bill. A bill may not be payable online if it is in collections, or if your practice does not have the epayments setting on. - If the outstanding balance is paid in full, patients see the following:

Patients can complete screening questionnaires when using enhanced self check-in.
Important Notes:
-
If enhanced self check-in is unable to create an encounter due to how the provider is configured (for example, as a non-person provider, or the provider is configured such that encounters are not auto-created on check-in), then the Screening Questionnaires and Family History sections are not presented in the patient workflow.
-
Screening questionnaires appear for authorized third parties completing self check-in on behalf of patients who are under 13 years of age. Screening questionnaires are hidden for authorized third parties completing self check-in on behalf of patients who are 13 years of age or older.
- Patients can complete screening questionnaires up to 10 days before their appointment, saving time when they arrive at your practice. By default, patients can use check-in seven days before their appointment. Contact the CSC to adjust this setting to anywhere from two to 10 days.
- As a practice user, you have access to our an extensive library of questionnaires for use in self check-in, allowing a high level of configurability and insight into the health status of your patients.
- You can easily identify if a screening questionnaire was completed by the patient during self check-in by viewing an attribution at the top of the screener. This makes it whether the questionnaire was completed by the patient during self check-in, or completed in-office by a clinician. You can also see if a questionnaire is incomplete.
For a full patient workflow example, refer to the enhanced self check-in release note included in our Fall 2022 release.
If a patient partially answers a questionnaire and then clicks Previous, their answers are “soft saved.” This means that, if a patient returns to the questionnaire within the same session (without first logging out and then re-authenticating to log back in), their answers are saved but not submitted to the provider. If a patient logs out before returning to the screening questionnaire, they must start the questionnaire over.
Clinicians are responsible for reviewing a patient’s screening questionnaires, historically completed by the patient during in-office check-in. Screeners are often reviewed during the intake stage of a patient encounter.
There is an attribution at the top of the questionnaires, making it apparent to clinicians when a screening questionnaire is completed via enhanced self check-in.
In this example, a clinician is reviewing screening questionnaires during the intake stage of a patient encounter. The highlighted part of the example shows the attribution language and location:

The attribution makes it clear that the screener was completed during self check-in, and when the questionnaire was received.
If, during an encounter, a clinician changes an answer in the screening questionnaire, this attribution moves to a different location in the screener.
This example shows a changed answer (highlighted) and the lack of attribution next to the screener name:
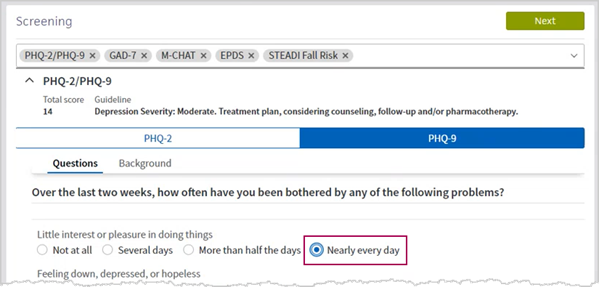
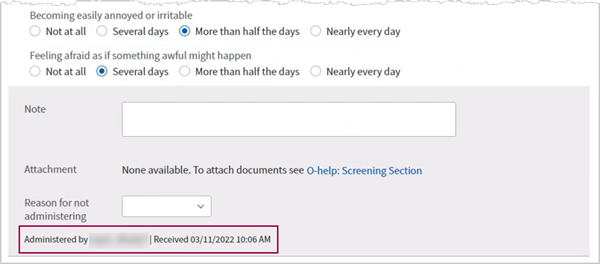
Because the completion information changed for this screener, the attribution moves to the bottom of the expanded view. The user name, date, and time information are also included.
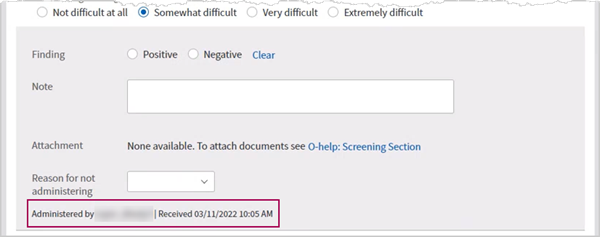
If a patient submits an incomplete screening questionnaire, this status is reflected in the new attribution (shown below):
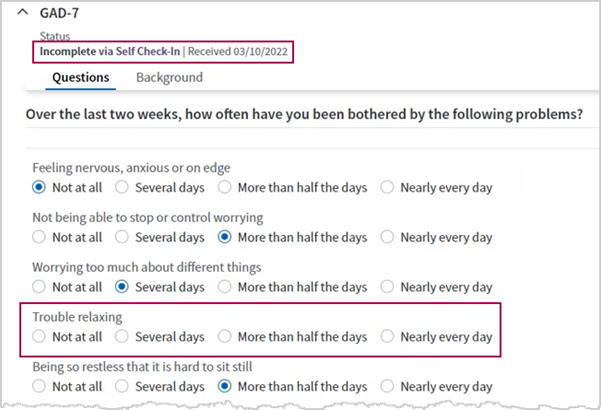
The incomplete answer (highlighted above) will likely be completed by the clinician while speaking with the patient during intake.
If a clinician changes an answer that is part of a screening questionnaire completed by the patient via enhanced self check-in, the self check-in attribution is not shown:
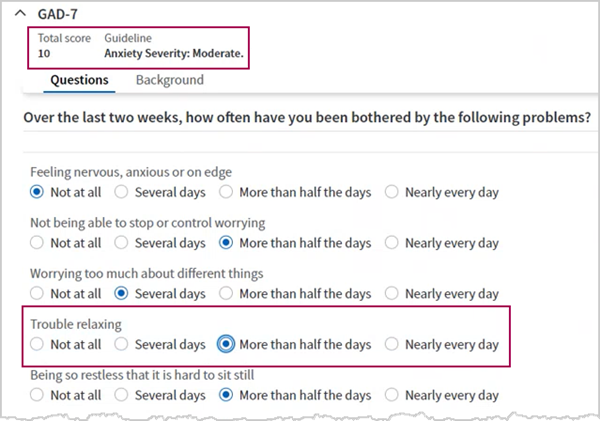
Because a clinician completed part of this questionnaire, the attribution at the bottom of the screener changes to include the user name, date, and time information reflective of the person making the change.
Patients can provide accurate medication details for their upcoming appointment using enhanced self check-in.
As with the other areas of self check-in, patients can toggle between English and Spanish while reviewing their medications. All instructional content is translated to Spanish. However, medication names are not translated.
To get started follow the steps outlined in the To configure patient health forms quick reference in O-help.
Important: Only the Medications section is available. You can see the other section types—such as Social History, Immunizations, and so on—from the older portal self check-in on the settings page. However, if you configure these other sections, they won’t appear in the enhanced self check-in workflow.
For a full patient workflow example, refer to the enhanced self check-in release note included in our Fall 2022 release.
Patients can perform the following medication-related tasks with enhanced self check-in:
-
Review current medications
-
Add medications
-
Delete medications
-
Edit existing medications
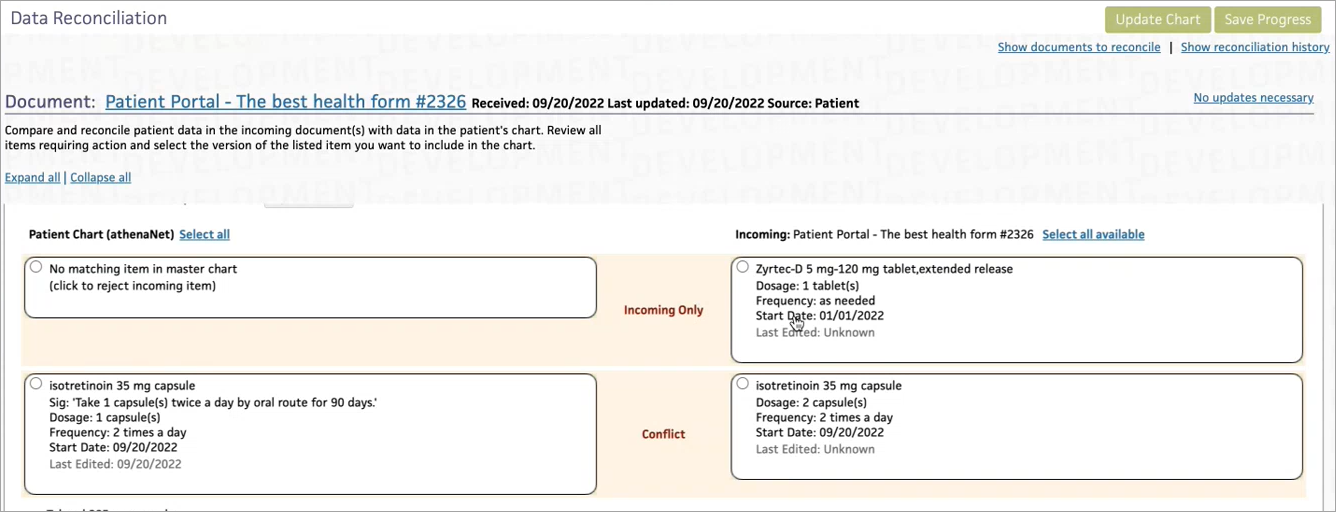
- When a patient makes changes to their medications from self check-in, this change enters Data Reconciliation.
In this example shown below, two medications changes are shown:- A patient added a medication (Zyrtec), shown as Incoming Only.
- A patient modified the frequency of another medication (isotretinoin), shown as a Conflict.
- Refer to the Patient Portal Health Forms O-help article for more information on configuring health forms (specifically the Medications section). Important: Currently, the medications form is the only health form supported by enhanced self check-in.
- When medication information is downloaded from Surescripts, the information becomes part of the chart and is treated the same as any other provider-inputted information is treated. The interface with Surescripts is uni-directional. Changes made to the medication history—whether by a practice user or by the patient via self check-in—are not communicated back to Surescripts.
- The medications that appear in the patient's chart from the Medication History Download feature are also shown in the medication review portion of the enhanced self check-in workflow.
Surescripts imports medication information into patient charts via our Medication History Download feature. This feature is on by default, but can be turned off for an entire practice by contacting the CSC. Alternatively, individual patients can deny consent to download their medication history. Review the Medication History Download article in O-help for additional information. - Prescribed medications cannot be modified by patients during self check-in.
-
Medications added to the chart by practice users can be updated by patients.Use of the medications accelerator function on reconciled medications adds the reconciled dosage to the D&O section of the exam. It is recommended that the provider verifies the dosage before placing the order.
Compound medications and unlisted medications are considered read-only. They cannot be updated or removed. An unlisted medication refers to a medication that cannot be found in our medication library.
For a full patient workflow example, refer to the preferred pharmacy release note from April 4, 2024..
Patients can upload their own insurance card images when using enhanced self check-in. Receiving and reviewing patient-submitted information allows front desk staff to review the payor on file, address any eligibility issues, and ultimately verify eligibility before the day of the appointment.
To ensure all users have access to view insurance card images uploaded by patients during self check-in, take the following actions:
- If your organization uses domain-based whitelisting, whitelist "patient-insurance.api.athena.io."
- If your organization uses IP-based whitelisting, whitelist the following IPs:
- 99.83.222.76
- 75.2.108.241
athenahealth strongly recommends using domain-based whitelisting because it is less likely to change and requires fewer future updates.
See the athenaOne Technical Requirements for more information on whitelisting for athenaOne.
For a full patient workflow example, refer to the enhanced self check-in release note included in our Fall 2022 release.
If a patient has not added any insurance information during self check-in, they are prompted to do so from the main self check-in page:
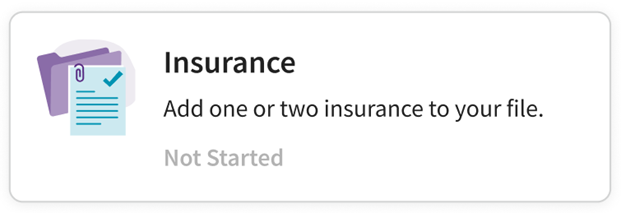
Patients can add information and card images for up to two difference insurances by taking pictures of the front and back of their insurance cards. They may also indicate if an existing insurance is no longer valid.
Once the patient has submitted their insurance card images, the information is ready for review by the front desk staff.
Your office staff can now review insurance card images sent by a patient before their appointment. You can access the insurance card images from a few different workflows where you might view a patient’s insurances:
- Eligibility and Phone List
- Quickview
- Check-in
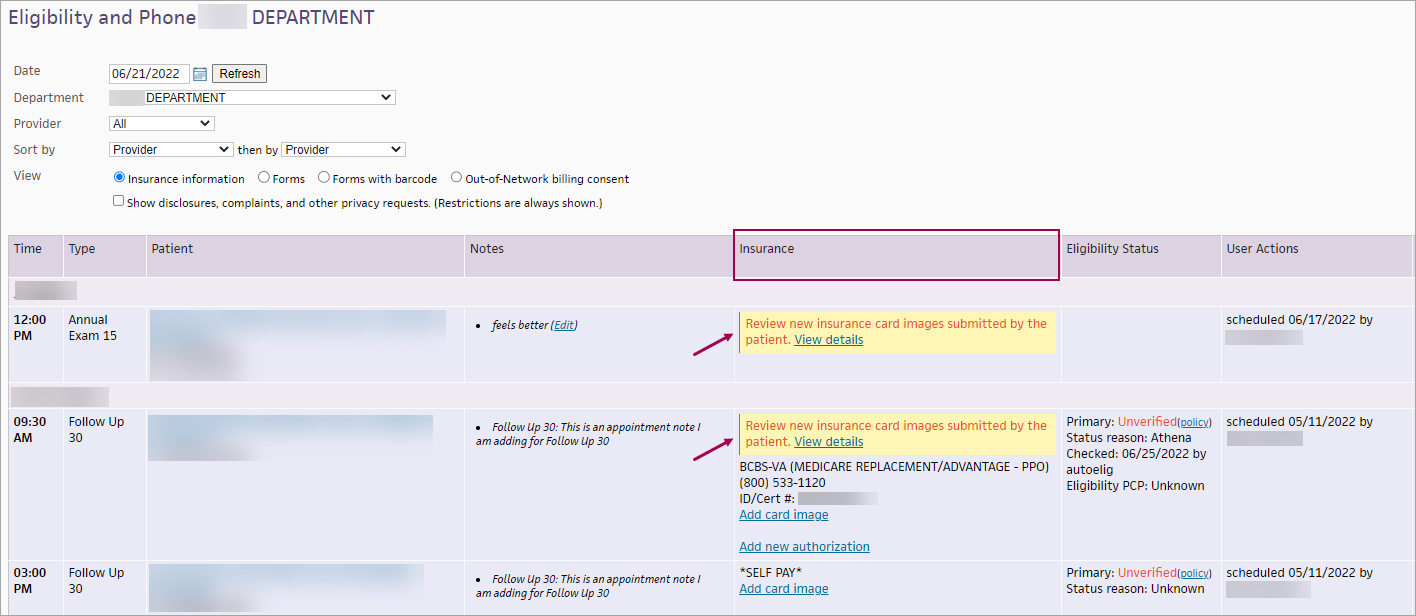
In the Eligibility and Phone List — As you review the list of patient appointments for the day, if you include Insurance information in your View, a new message with a yellow banner will notify you if an insurance card image was sent by the patient during self check-in. Clicking View Details brings you to the Quickview Insurances section where you can view the images.
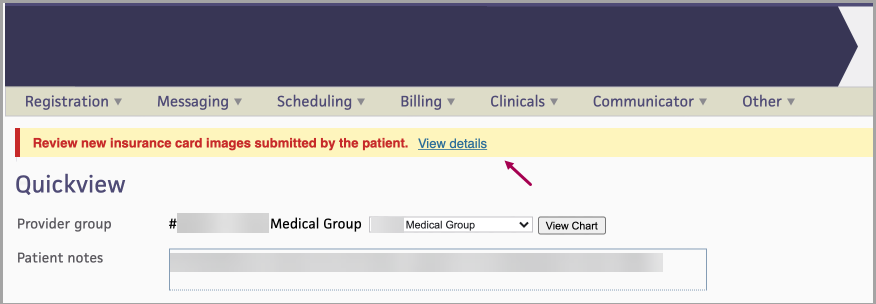
In Quickview — A yellow banner at the top of Quickview will notify you if an insurance card image was sent by the patient during self check-in.
- Clicking the View Details link brings you directly to the insurance section of Quickview where you can view the images.
- The banner message will display until you take action
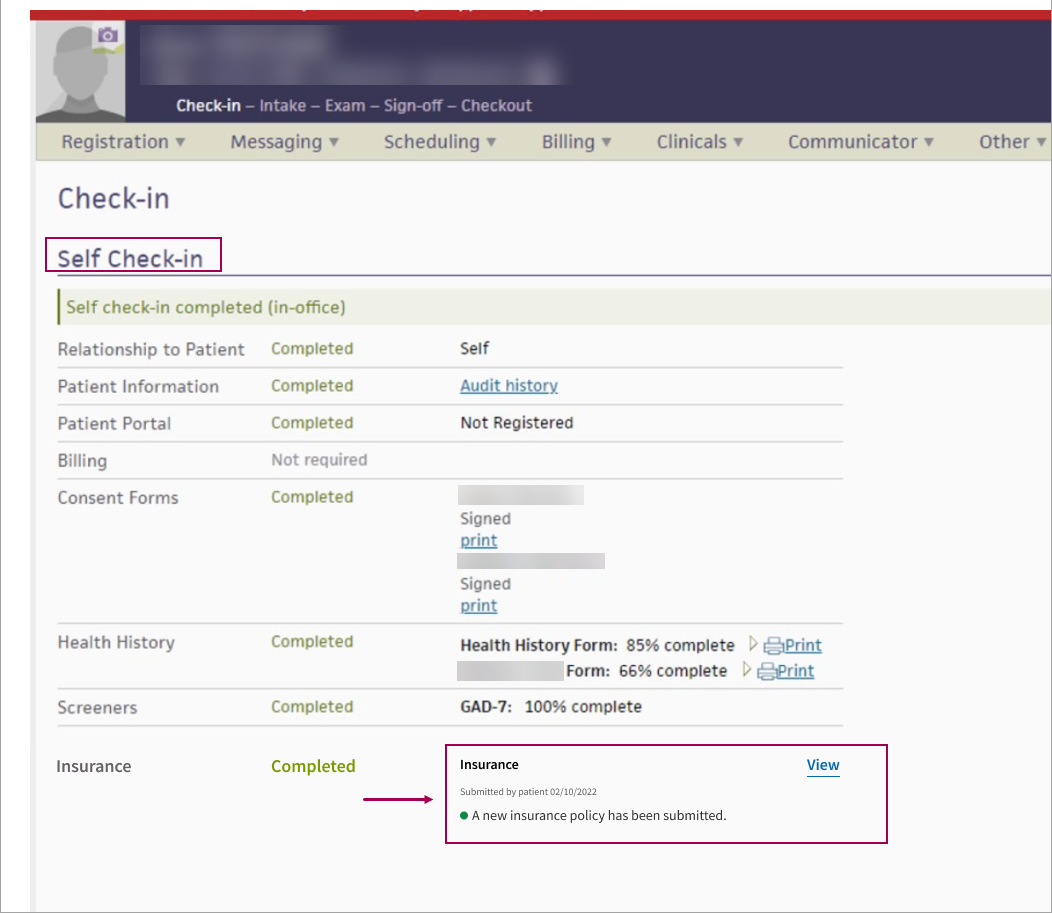
During Check-in — within the Self Check-in section of the Check-In Screen, a new color-coded status icon will notify you if an insurance card image was sent by the patient during self check-in but no action has been taken yet. Clicking the View link brings you to the Quickview Insurances section where you can view the images.
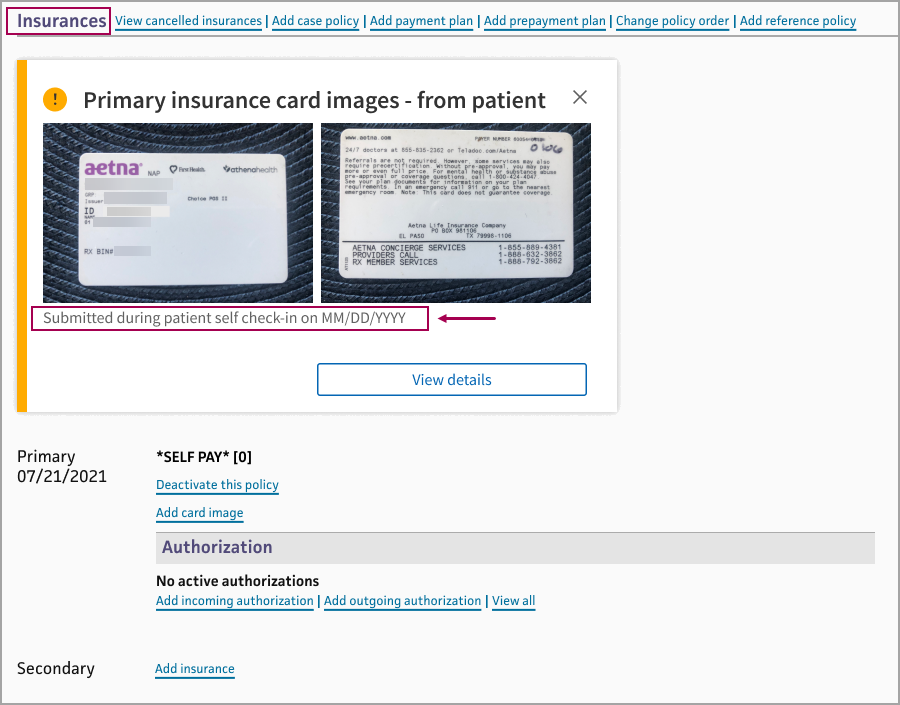
In the Quickview Insurances section, you can view new insurance card images sent by the patient.
- The attribution at the bottom of each image shows if it was submitted by a patient during self check-in, and includes the date when it was sent
- Click View details
The Insurance card images - from patient pop-up window appears on the side of the page.
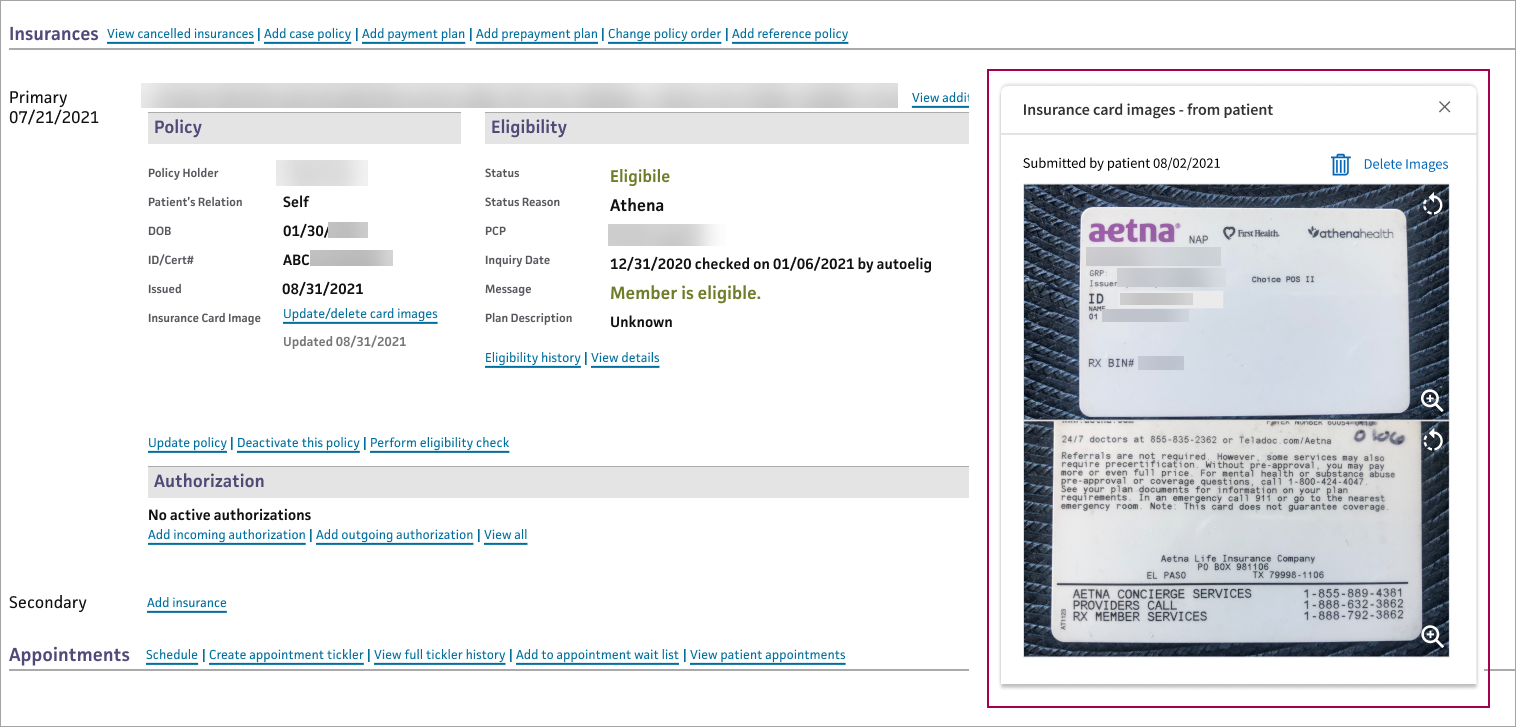
Tips:
-
Scroll down if needed to see more of the images
-
Click X to close the window
-
Click View details to reopen the window
- Click and drag to move the window if needed
If the images cannot be used (for example, duplicate of an existing image, low quality, or an incorrect image), click Delete Images.
A confirmation window appears: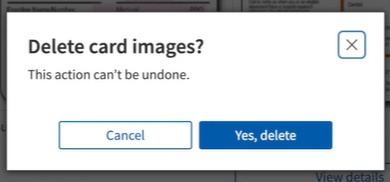
Note: The athenaOne system does note notify the patient if their insurance card images could not be used. You’ll need to get the patient’s insurance card image when they arrive for their appointment.
- Display the patient's Quickview page:
 In the text box at the top right of the Main Menu, enter the first three letters of the patient's last name, followed by a comma, followed by the first three letters of the patient's first name. Click the search icon. On the Find a Patient page, click Quickview for the patient you need.
 -
Scroll down to the Insurances area and click add new.
Note: For insurance categories (Primary, Secondary, etc.) that have no existing insurance packages, select from the options:
- Add with card image — You can use patient-submitted card images or upload an image.
- If patient-submitted insurance card images are available, the Use card images from patient to add new insurance window appears. You can use the images or choose to upload new images.
- If no patient-submitted insurance card images are available, the Add Insurance Card Image page appears and you can upload images.
- Add without card image — You can use the Policy Lookup page to manually search for an insurance policy.

- Add with card image — You can use patient-submitted card images or upload an image.
-
If your organization has Enhanced Patient Self Check-In with Insurance Card Capture enabled, and the patient submitted their insurance card images, the Use card images to add new insurance? pop-up window appears.
Otherwise the Add insurance by uploading card image? pop-up window appears.
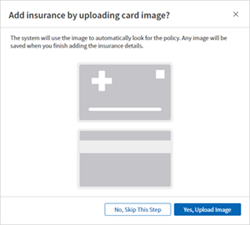
Note: You can also access the card images from the Eligibility and Phone List or the Check-in page.
-
Use the images provided by the patient or upload your own images.
-
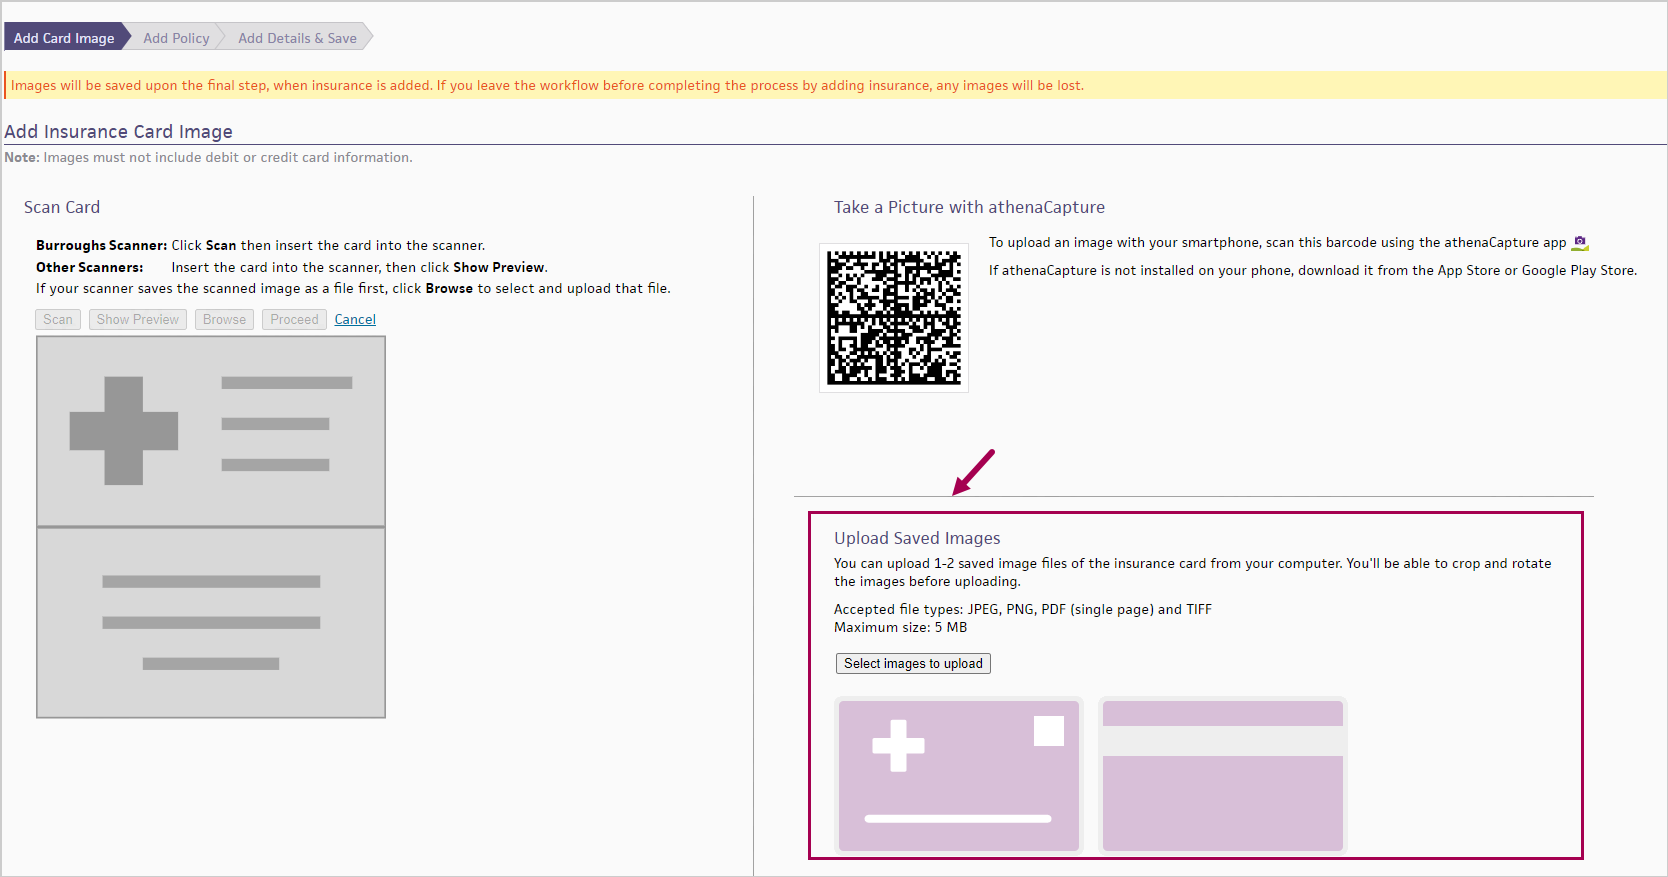
The Add Insurance Card Image page appears.
- Follow the instructions to Scan Card or Take a Picture with athenaCapture.
-
In the Upload Saved Images section, click Select images to upload.
Tip: Click the image to see an expanded view.
-
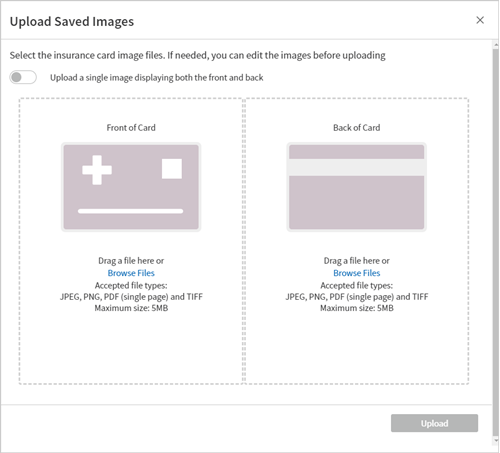
The Upload Saved Images window appears.
PDF technology powered by PDFTron SDK copyright © PDFTron™ Systems Inc., 2001-2020, and distributed by athenahealth, Inc. under license. All rights reserved.
- Select the card image file from your computer.
- You can upload 1-2 saved image files.
- Accepted file types: JPEG, PNG, PDF (single page) and TIFF
- Maximum size: 5 MB
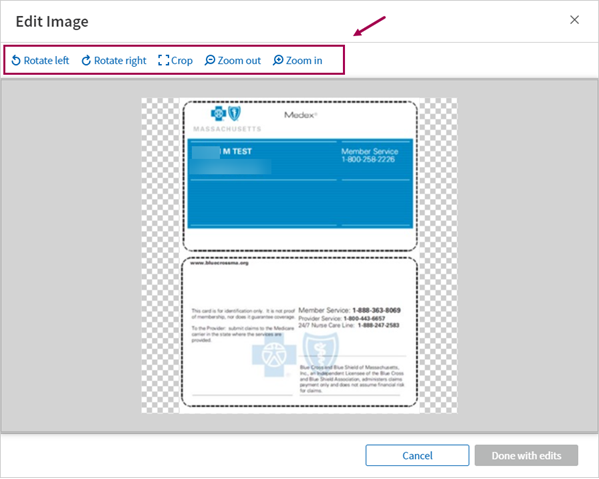
If needed, click the edit icon
 to edit the image before uploading. Use the options at the top to rotate, crop, zoom out, or zoom in as needed. Then click Done with edits and Upload.
Note: For now, the additional image file types and image editing are only available for Front Desk insurance card image uploads and for users adding a new insurance. In a future release, these enhancements will be also available for patient-submitted insurance card images and for users adding images to existing insurance policies. - Images will be saved upon the final step, when insurance is added. If you leave the workflow before completing the process by adding insurance, any images will be lost. (This alert appears at the top of page as a reminder.)
A progress indicator also appears at the top of the page to help you track where you are in the workflow.
- Click Proceed. athenaOne processes the card image and searches for matching insurance policies.
-
The Add Policy page appears.
-
If there's a best match, athenaOne automatically selects the best match insurance policy for you to review.
Make changes if needed, fill in required fields, then click Add Policy.
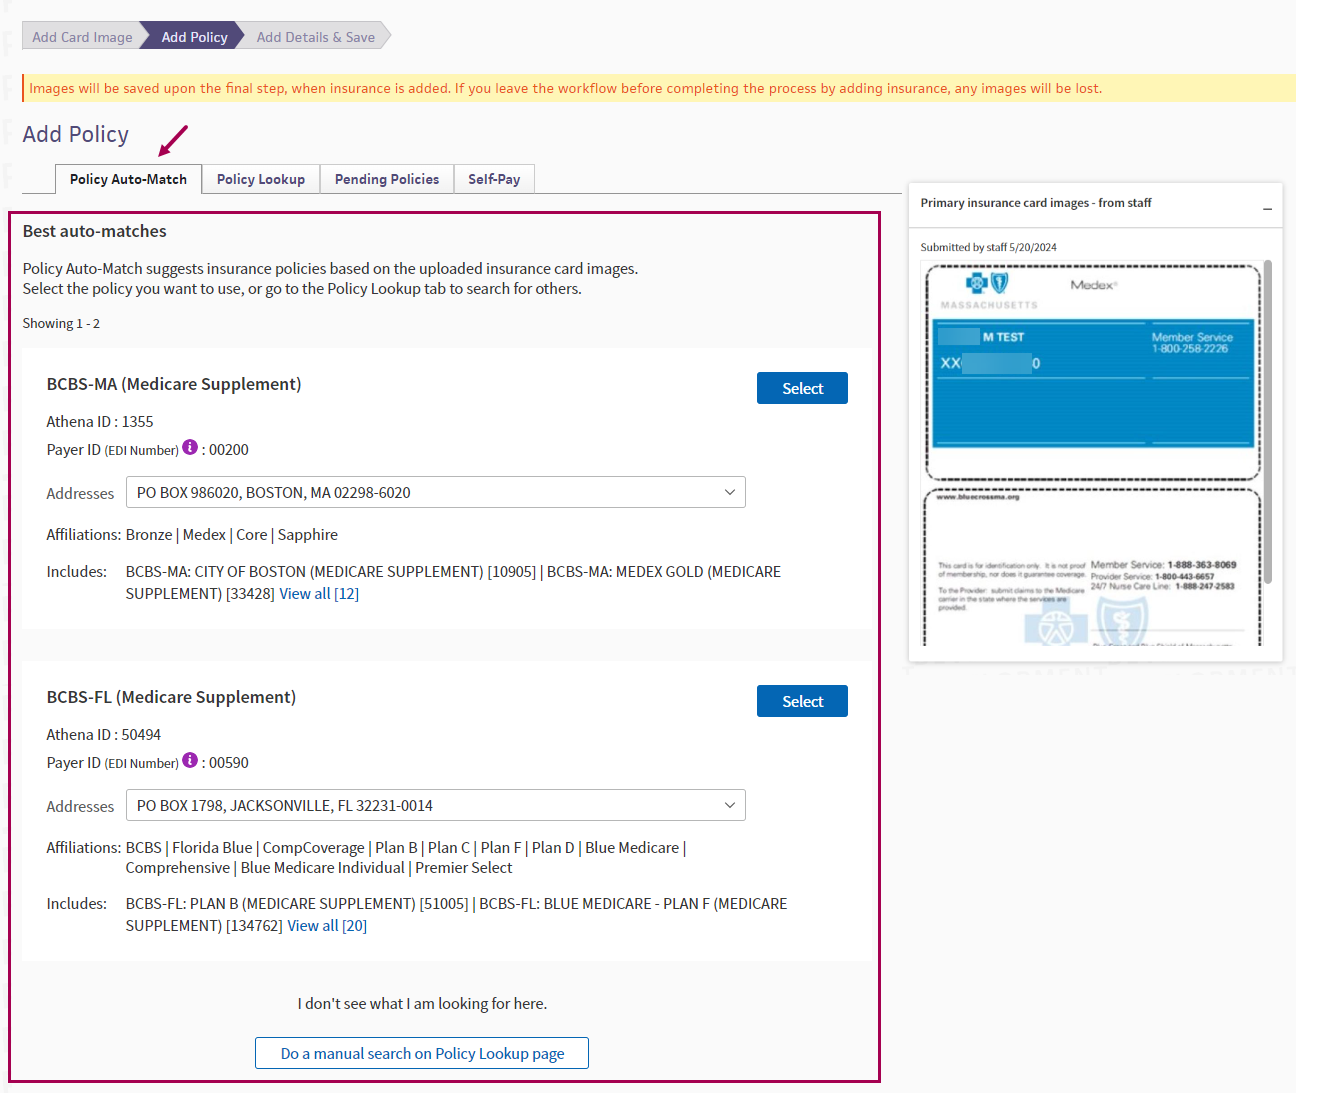
If you decide not to use the automatically selected policy, click Change Insurance Selection. The Policy Auto-Match page appears.
-
The Policy Auto-Match tab shows up to three suggested policies for selection, based on data from the insurance card images.
- Suggested policies will only include standard policies, not case policies.
- Suggested policies will only include policies that have an eligibility class that matches from the eligibility check.
-
The Payer ID (EDI Number) appears with insurance package details on the Add Policy page, for standard policies and case policies. The Payer ID is used for electronic claim submission. Some insurance cards include Payer ID, so this may help you identify the correct insurance package for a patient more easily.
Note: Payer ID is not included in a search filter because the Payer ID in athenaOne may not always match what's on the patient's insurance card. This can happen when third-party companies (for example, a clearinghouse) are involved in submitting claims to payers.
-
You'll see the same insurance policy information you would see if you were using Policy Lookup, including the ability to view the drop-down list of additional addresses, should you need to change from the default address.
-
The Insurance card images pop-up window remains on the side so you can reference the card details as needed. This same window will appear on subsequent athenaOne screens so you have continued access to the card image and the information on it as you add the insurance policy.
Tip: Click the image to see an expanded view.
-
Review the suggested policies and determine the best match. Click Select next to the policy you want to use.
- The Add Policy Details page appears.
- Member ID will be prefilled based on Optical Character Recognition (OCR) from the card images.
- Review and fill in required fields, then click Add Policy.
-
athenaOne saves the policy information and the card images to the patient's registration.
- When you return to the patient's Quickview page, the new policy appears in the Insurances section.
- Insurance name and Member ID will be prefilled based on Optical Character Recognition (OCR) from the card images.
If no auto-match policies were suggested, or if you decide not to select any of the suggested policies, you can always use the Policy Lookup page to manually search for an insurance policy.
Clicking Manage Social History Forms from the Self Check-in Settings page brings you to the following landing page:

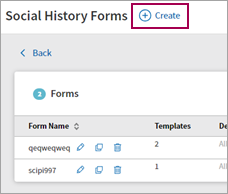
This page displays any forms that have been previously created, regardless of whether or not they are published to self check-in (meaning, that they're visible to patients).
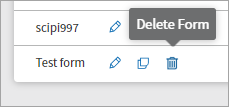
Some basic information is displayed, and each form has three action buttons:
-
Edit

-
Duplicate

-
Delete
Click Create at the top of the page to create a new form:
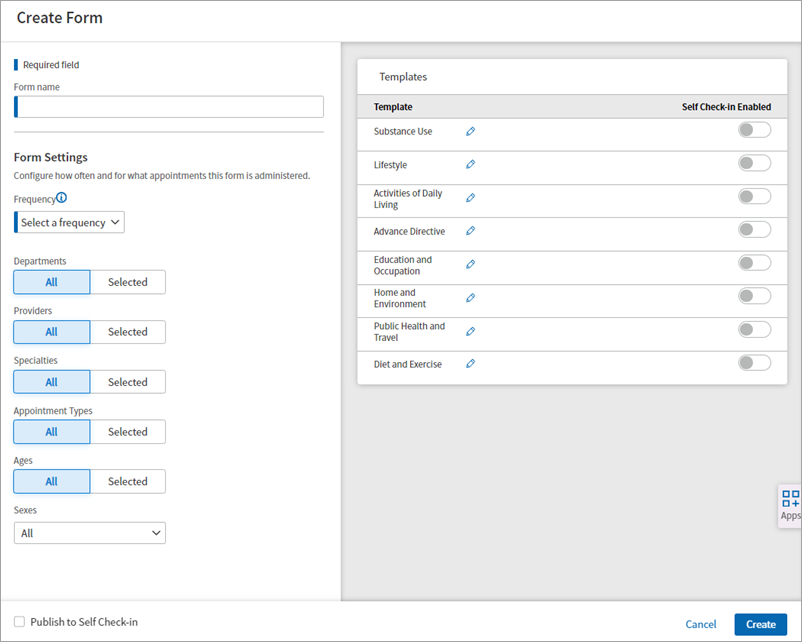
The following page displays:
Configuring form content
A number of default templates display on the right side of the page. From here, you can toggle certain form content on. This determines what appears for patients during self check-in.
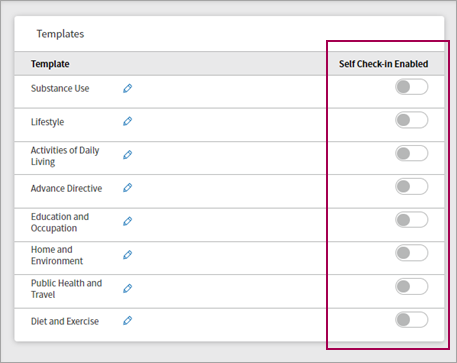
Note
Prior to turning a template ON, ensure that the appropriate and/or needed questions found within that template are also turned ON. If not, patients won't be presented with those questions during self check-in.
You can also configure what content from each template actually appears in your social history form. Click the pencil icon to edit:
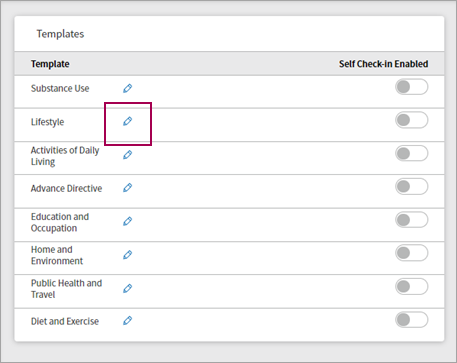
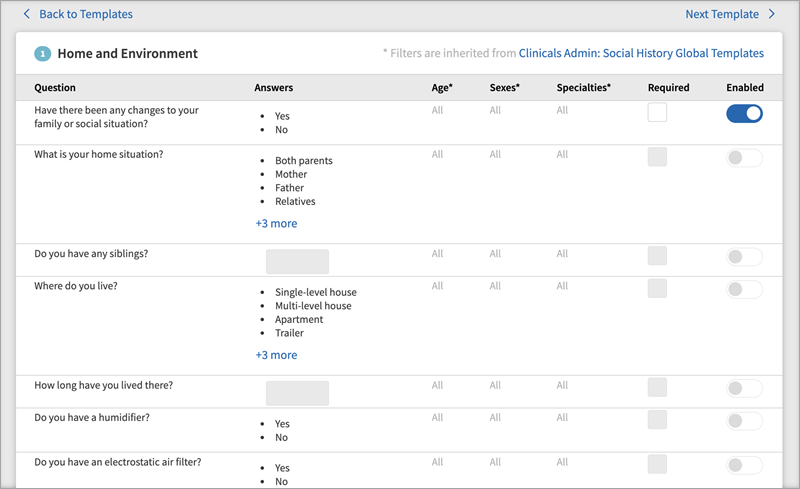
Here is an example of the edit page for the Home and Environment template:
A number of features are included when editing a default template:
-
You can click Back to Templates at any time to return to the full list of default templates.
-
You can click Clinicals Admin: Social History Global Templates to go directly to that page in athenaOne.
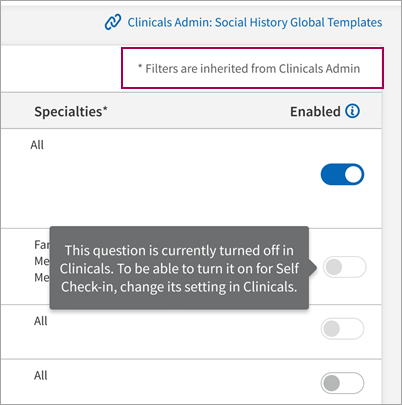
Note: It's important to remember that certain questions and filters within a template may be turned off on the Social History Global Templates page.
When editing a template, a note appears at the top of the page (highlighted below), and a tooltip appears when hovering over a disabled toggle or field:
-
A count of the currently enabled questions is kept at the top of the page:

-
You can designate if certain fields are required using the checkboxes under the Required column.
Any changes made on the edit page are saved when you click Back to Templates. Ensure that the template itself is enabled from the Create Form page, otherwise the configured content won't appear when your new form is published to self check-in.

Form Settings
You must determine a few settings categories to complete your new form:
-
Departments
-
Providers
-
Specialties
-
Appointment Types
-
Ages
-
Sexes (Male, Female, or All)
For all categories except Sexes, you can designate whether the setting applies to All or to Selected options.
Here is an example of the Departments settings after clicking Selected:
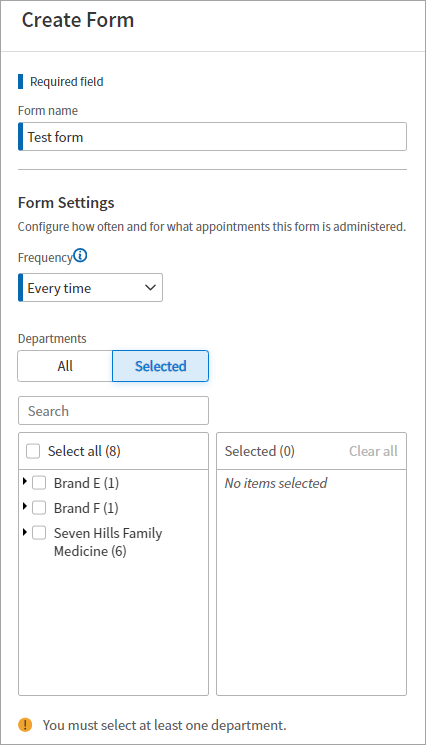
You can expand each brand to display specific practices, and then choose from the list. Any selections appear in the Selected menu to the right"
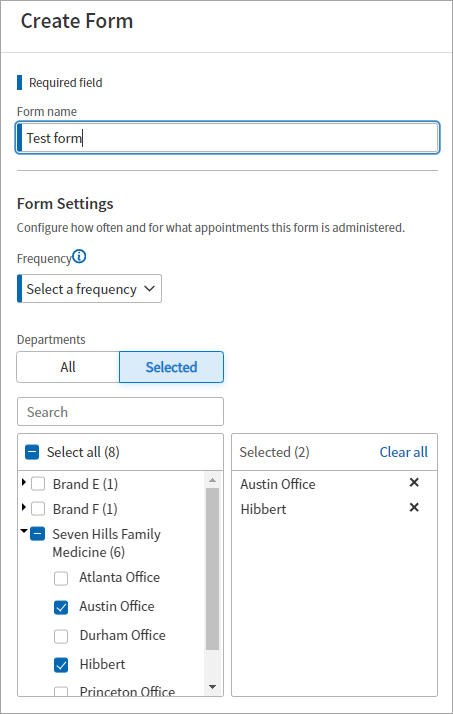
For the Ages setting, you must provide a minimum and maximum age, in either months or years:

After completing any required forms, you can click Create to save your form. There is no requirement to check Publish to Self Check-in; your completed form will still appear on the Social History Forms landing page, and you can edit and/or publish the form at any time. Clicking Publish to Self Check-in ensures the form appears in patient self check-in.

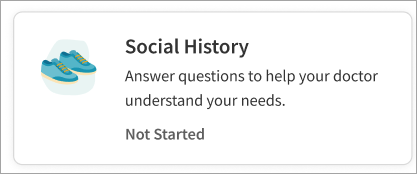
What the patient sees during self check-in depends on the configurations made on the Self Check-in Settings page. Here is an example of the Social History section requiring patient input:
Here is what the patient Quickview shows:
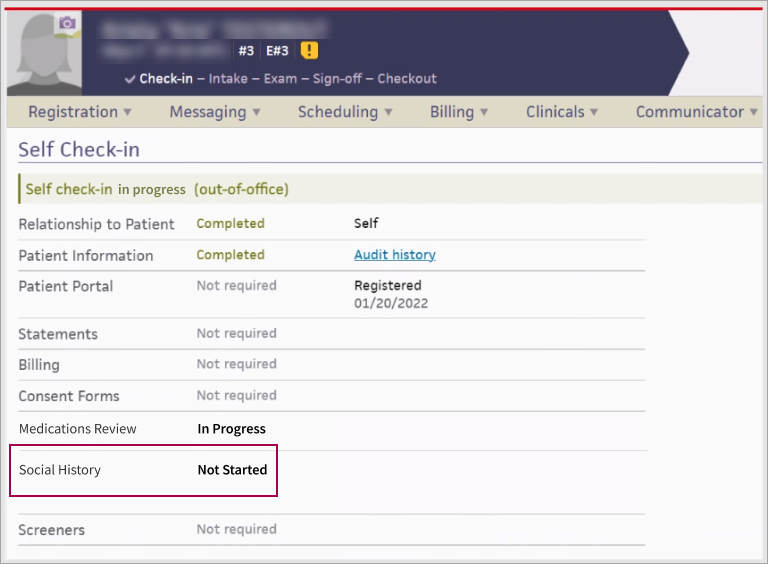
Patients can view and complete the forms you configure from the Self Check-in Settings page:

There is no change to our current data reconciliation feature.
After the patient submits their responses via self check-in, their responses get saved in the patient chart and the clinical team can review patient responses, especially if the responses are brand new and/or different from what's saved in their chart.
Important: If a template is toggled OFF in global template configuration after Social History for Enhanced Self Check-in has gone live, your practice runs the risk of patient captured information not being presented in Clinicals.
When you enable surgical history on the Enhanced Self Check-in Settings page, patients are shown the Surgical and Procedure History section.
Patients are simply asked to confirm their existing surgical history, whether or not they have any surgeries or procedures on file.
This example shows what patients see when they do not have any surgeries or procedures on file:

This example shows what patients see when they have surgeries and/or procedures on file:
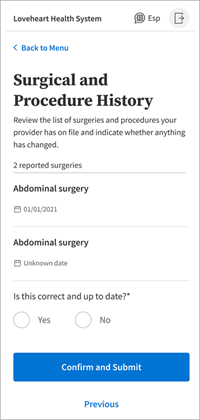
In both cases, the patient is asked if the information shown is correct and up to date. After providing an answer of Yes or No, they click Confirm and Submit to proceed with check-in.
At this time, there is no option for patients to provide further detail if they indicate that the information provided is incorrect.
Patient responses to surgical history provided during self check-in can be found in the following places:
- Intake prep section
- Exam prep section
- Prep Note section in the exam
These three locations are where users should check the surgical history information each time the patient comes in for a new appointment (after the patient reviews their surgical history in Enhanced Self Check-in).
To view either the intake prep or exam prep sections, you must be in Clinician view:
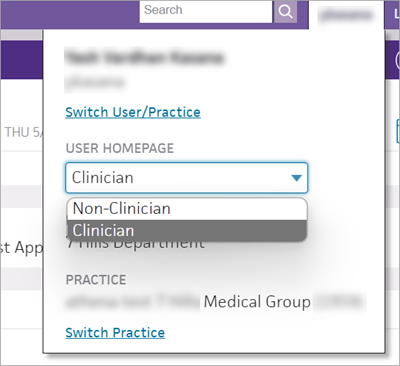
These sections do not appear for users in Non-Clinician view. These sections are not available if a given patient has already been checked in.
Clinical workflows are intended to be used by different users in different stages of documentation. For example, nursing staff typically looks at information in the intake prep or exam prep sections. These prep sections are designed to save the patient-facing provider time when interacting with the patient. Staff assigned to prep stages are able to provide additional information for the provider in the form of prep notes, which appear for the provider during the exam in read-only format.
Meanwhile, a provider typically only looks at information in the exam, rather than the prep sections, as the exam information is intended for use when interacting with the patient.
Patient responses are available during intake prep. You can view this information from the Prep Note section under Patient Self Check-in.
In this example, the patient indicated that the information shown during check-in is incorrect:

In this example, the patient indicated that the information shown during check-in is correct:

In general, the Prep Note provides an opportunity to preemptively tell providing staff about patient changes ahead of the exam. Your staff can use the Intake note field (shown above) to list any information for the provider, including if the patient's surgical history was discussed during intake.
Following intake prep, your staff has the opportunity to add information during the intake (as well as during exam prep). They can use the text box under Surgical History (shown below) to add further detail regarding the patient's surgical history, and to otherwise leave notes for the rendering provider. These notes are then available to the provider (in read-only format) during the exam.

Any updates made to surgical history (such as adding a new procedure using the add icon) during intake prep or during the intake results in the same items being reflected in the Surgical History section of the patient chart.
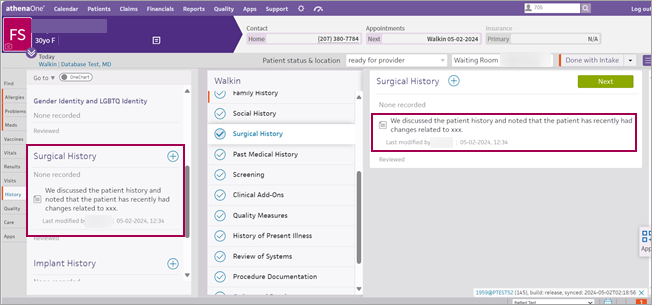
In either intake prep or in intake, you see corresponding updates in the patient chart, along with the user attribution and time stamp.
Patient responses are available during exam prep. You can view this information from the Prep Note section under Patient Self Check-in.
In this example, the patient indicated that the information shown during check-in is incorrect:

In this example, the patient indicated that the information shown during check-in is correct:
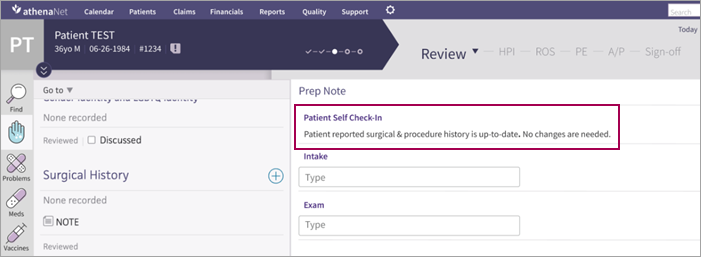
Patient responses are also available in the Prep Note section. The Prep Note is available during the Review step, which is the first step of an exam. This information is in read-only format. You can view this information from the Prep Note section under Patient Self Check-in.
In this example, the patient indicated that the information shown during check-in is incorrect:
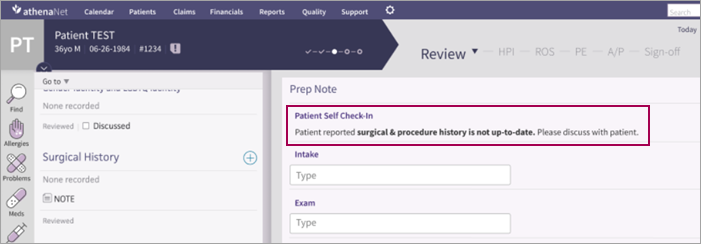
In this example, the patient indicated that the information shown during check-in is correct:

If a patient does not complete the surgical history review portion of enhanced self check-in, this status is not reflected in the intake, intake prep, exam prep, or exam stages. There is not currently a label that marks a patient's surgical history question as "incomplete."
Given this scenario, it is important to remind your patients to complete this part of self check-in, whether via secure messaging or another preferred method of patient communication.
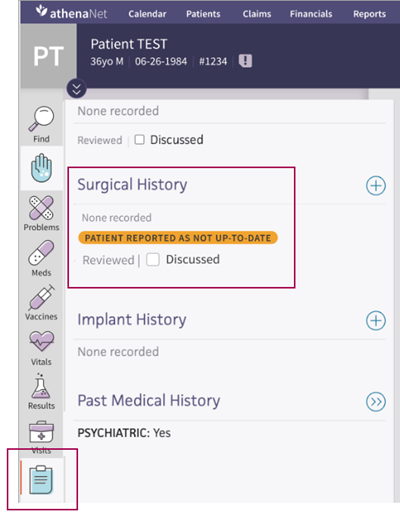
When a patient provides a response to the surgical history question, that response is now also recorded in the chart. You can view this information from the Surgical History section in the History tab.
Note that the functionality described in this section—including the patient reporting labels, the Discussed checkbox, the encounter summary update, and the removal of the patient reporting label—only work if the chart is opened during the exam. None of this functionality is available if the chart is opened during intake prep, the intake, or exam prep.
In this example, the patient indicated that the information shown during check-in is incorrect:
In this example, the patient indicated that the information shown during check-in is correct:
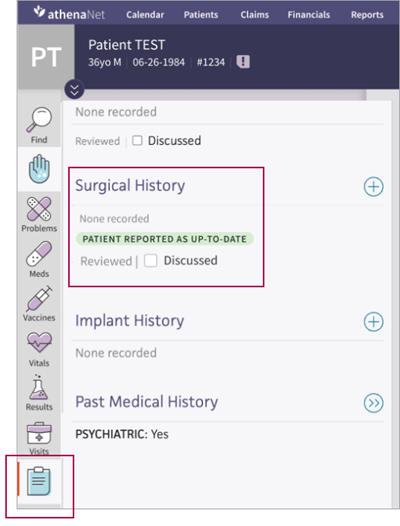
During the exam, the provider can check the Discussed box to indicate that the patient's response was acknowledged and that Surgical History has been discussed with the patient during the exam.
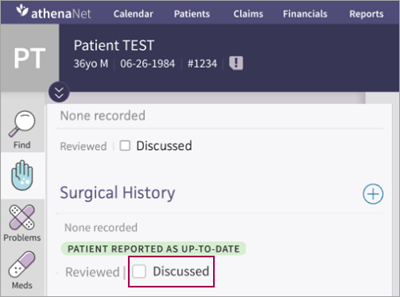
Important: This box is only available to providers during an the exam. We included this enhancement in the chart because if the information isn't up to date, then there should be a level of awareness to help any decision making regarding patient care.
By checking the Discussed box, the provider can remove the label—either "not up to date" or "up to date"—so as to acknowledge the patient's response. Checking this box also changes a note in the Full Encounter Summary: "Reviewed Surgical History" to "Discussed Surgical History."
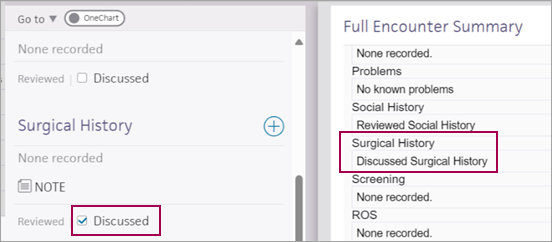
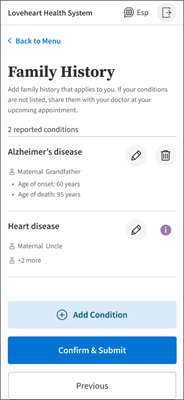
Family History allows patients to edit or add health information pertaining to their family history.
Important: If enhanced self check-in is unable to create an encounter due to how the provider is configured (for example, as a non-person provider, or the provider is configured such that encounters are not auto-created on check-in), then the Screening Questionnaires and Family History sections are not presented in the patient workflow.
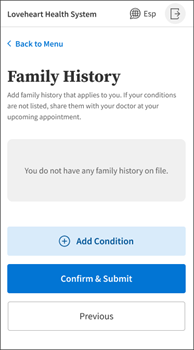
When you enable family history on the Enhanced Self Check-in Settings page, patients are shown the Family History section. Patients can add or edit family history information for later reconciliation in their chart by your staff .
|
This is what the patient sees if they don't have any family history information on file:
|
If there is family history information on file, it's shown when the patient begins the Family History section:
|
Notes:
-
Patients can not delete Family History information that is currently in their chart. The info icon next to these conditions lets the patient/user know, when they hover over it, that they need to speak to their provider to remove the condition from their chart.
-
Whether or not the patient has any family history on file, they can add conditions and the corresponding family information by clicking Add Condition.
-
Patients can select from an alphabetized list of common conditions or simply start typing a condition name in the search box.
-
After selecting a condition, the patient must add at least one family member to be recorded as part of their family history.
-
The relationship to the patient is required information. Patients can also supply the age of onset and the age of death.
-
Patients can add multiple family members to one condition. Before adding the condition to the family history, the patient can also view, edit, or delete the family member information. There is no limit on the number of family members that can be associated with a particular condition.
You can define specific questions to show patients from the Family History Clinicals admin page. You must configure conditions on this page in order for them to appear for patients and allow them to review and respond.
- On the Main Menu, click Settings
 > Clinicals.
 - In the left menu, under PRACTICE LINKS — History/Intake, click Family History. The Family History Clinicals admin page opens with a new "Show in Patient Self Check-In" column.
- When adding a new question, the default answer to "Show in Patient Self Check-in" is "Yes."
- When editing an existing question with a null value (neither Yes or No) in the Show in Patient Self Check-in column, the default answer to "Show in Patient Self Check-in" is also "Yes." Here is an example of a question with a null answer being edited (notice the highlighted selection defaults to "Yes").
Important notes:
-
If any question has a "No" value, it will not appear to patients during self check-in. Questions with null values are interpreted as "Yes" and will appear in self check-in.
-
If there are no questions configured to appear for patients, the Family History section will not be shown during self check-in.
The medical history section allows patients to edit or add health information pertaining to their past medical history.
When you enable medical history on the Enhanced Self Check-in Settings page, patients are shown the Past Medical History section where they can answer Yes or No for a variety of conditions:
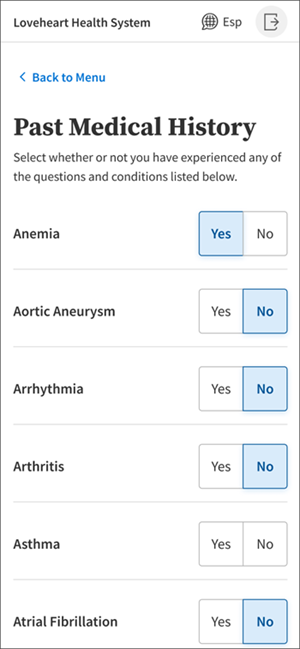
You can define specific questions to show patients from the Past Medical History Questions Clinicals admin page. You must configure conditions on this page in order for them to appear for patients and allow them to review and respond.
- On the Main Menu, click Settings
 > Clinicals.
 - In the left menu, under PRACTICE LINKS — History/Intake, click Past Medical History Questions. Locate the "Show in Patient Self Check-In" column.
- When adding a new question, the default answer to "Show in Patient Self Check-in" is "Yes."
- When editing an existing question with a null value (neither Yes or No) in the Show in Patient Self Check-in column, the default answer to "Show in Patient Self Check-in" is also "Yes."
Important notes:
-
If any question has a No" value, it will not appear to patients during self check-in. Questions with null values are interpreted as "Yes" and will appear in self check-in.
-
If there are no questions configured to appear for patients, the Medical History section will not be shown during self check-in.
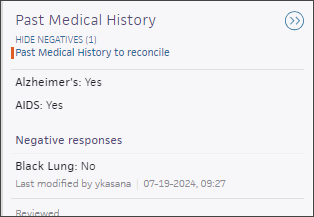
Patients' Past Medical History responses show up as a data reconciliation task in the Intake/Exam workflows in Clinicals.
After the patient is checked in, the patient responses given during Enhanced Self Check-in flow into Clinicals.
During the Intake or in the Exam, practice users can access the History tab to see the incoming responses:
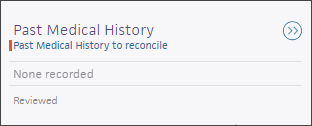
Clicking Past Medical History to reconcile opens data reconciliation a tool that allows you to compare the responses received during self check-in. The data reconciliationis shown here:
Tip: Click the image to see an expanded view.
The original answers saved in the patient chart are on the left. The new answers from self check-in are on the right.
By default, data reconciliation always shows the data from the most recently completed history from self check-in (you can also see answers from other dates). You can click each of the answers and leave notes if needed.
Tip: Click the image to see an expanded view.
Note: You can confirm whether you are seeing the latest history to reconcile. Go to the top of the workflow and click show documents to reconcile, which will show the latest incoming history responses.

Click Update Chart at the top to save these answers to the patient chart. A pop-up confirmation appears:
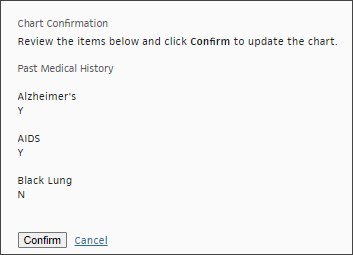
Click Confirm to update the patient chart.

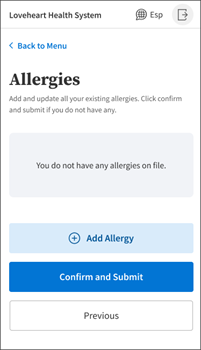
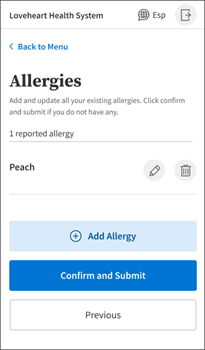
When you enable allergy history on the Enhanced Self Check-in Settings page, patients are shown the Allergies section.
|
This is what the patient sees if they don't have any allergy information on file:
|
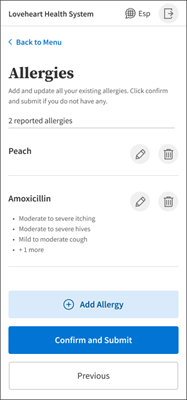
If there is family history information on file, it's shown when the patient begins the Allergies section:
|
At any time, the patient can click Confirm and Submit to affirm the information being displayed.
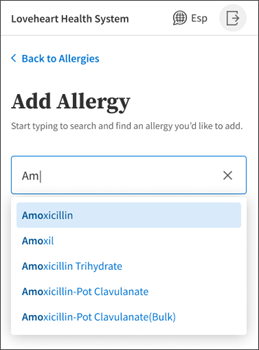
To add allergy information, patients click Add Allergy. Patients can search for allergies by name. As they type, a list of allergies opens from which they can select an allergy:
|
As they type, a list of allergies opens from which they can select an allergy:
|
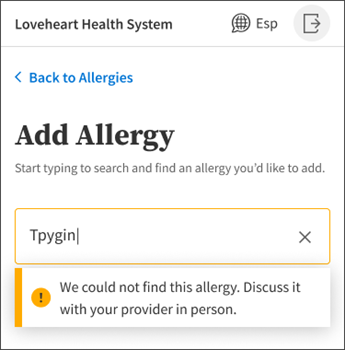
If patients type information for an allergy that does not exist (such as entering a misspelled term), they are instructed to talk with their provider:
|
After identifying and selecting an allergy, the patient is prompted to Add Reaction, a start date, and select a severity level from the drop-down:
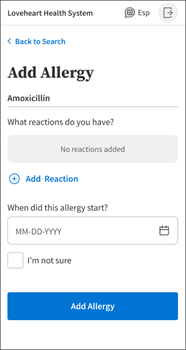
|
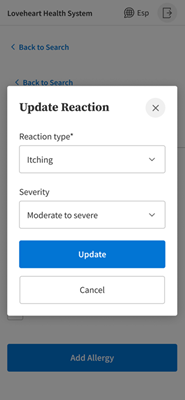
|
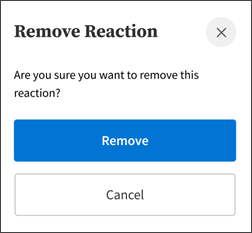
After clicking Update, the reaction information is added to the in-progress allergy. The patient can remove the reaction information by clicking the trash can icon.
Finally, the patient clicks Add Allergy. The new allergy information is added to the Allergies page:
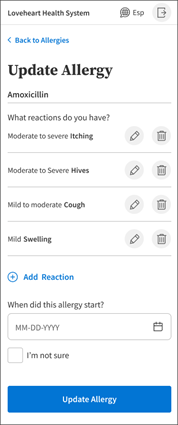
The patient can also update an existing allergy at any time by clicking the edit icon. In addition to editing the basic allergy information, the patient can also add multiple reactions to an existing allergy, as shown here:
Gynecological history is available so that your gynecological patients can see questions specific to your practice and respond with answers specific to their gynecological conditions. To make this available to your patients you must:
Important: Ensure that gynecological questions are configured on the Configure GYN History page (Settings > Clinicals and in the left navigation panel under History/Intake, select GYN History).
Patients are shown questions determined under Family Medicine > Fields to Show > Patients on the GYN History page.
To ensure questions are shown to patients during Enhanced Self Check-in from the Configure GYN History page:
-
Go to the Fields to Show: Patients column. Note that athenaOne automatically collapses specialties on the GYN History page.
-
Click the expand button (+) to see the full list of options.
-
Check the patient checkbox if you want that question to show for that particular specialty.
Notes:
-
Any new question is turned off by default for both the clinician and patient. Practice admins must check the clinician and patient checkboxes if they want the question to be displayed.
-
Any existing question is turned off by default for patients and the user needs to check the patient checkbox to display the question on the Enhanced Self Check-in side.
-
To display a question for patients in Enhanced Self Check-in, the question must be enabled for the clinician first. The configuration page allows you to only check the patient checkbox, but the question won't show unless the clinician checkbox is also checked.
Digital Patient Forms
Digital Patient Forms is a form builder tool that allows clients to create customizable, interactive forms for patient use. Forms can include various elements, such as static text boxes, acknowledgment and consent questions, and registration questions. These forms are designed to collect structured data and are linked to specific fields on registration pages.
To create a form, use the Add Form Elements option in the form builder. You must manually add content; forms are not automatically populated from existing paper forms.
If a form is created but not populated with questions or content, the patient will only see a signature field during self check-in. For example, if you build a form with an empty text box or a placeholder (such as "Please sign"), the patient only sees the signature prompt during self check-in. This is because content or questions were not added manually to the form. To ensure your desired content displays, you must manually create the form and add the relevant content.
Clinical Paper Forms are different from Digital Patient Forms. The former are often just images and cannot be interacted with or automatically converted.
Content from paper forms must be manually entered into Digital Patient Forms.
Note: Forms can only be sent on demand if the patient has an open encounter.
You must have athenaOne (Collector, Communicator, and Clinicals) enabled to access and use Digital Patient Forms.
After clicking Manage Digital Patient Forms from the Self Check-in Settings page, you are brought to the following landing page:
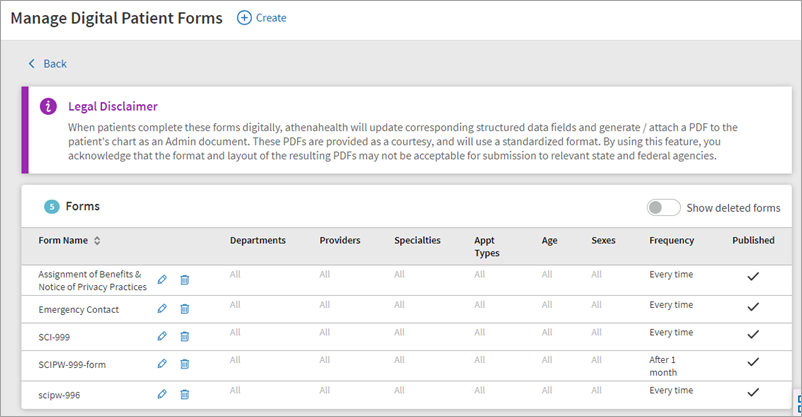
The view shown here reflects forms that have already been created. This landing page appears blank upon first use, assuming no forms have been created previously.
Tip
Forms that have already been created appear in alphabetical order based on the internal form name assigned. This offers some predictability in terms of where your forms appear.
This landing page includes several column headers, providing insight into how and where each form is applied. These columns include
-
Departments
-
Providers
-
Specialties
-
Appointment types
-
Age
-
Sex
-
Frequency
-
Published status (meaning if the form is available to patients in the check-in workflow)
Each form includes an edit and delete function:
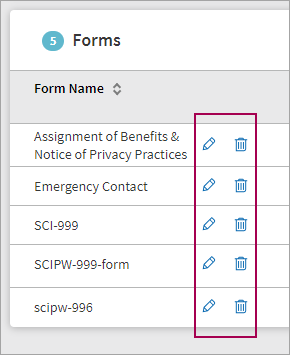
To create a new form, click Create at the top of the Manage Digital Patient Forms page.

You are brought to the Create Form page.
Blue borders denote required fields:
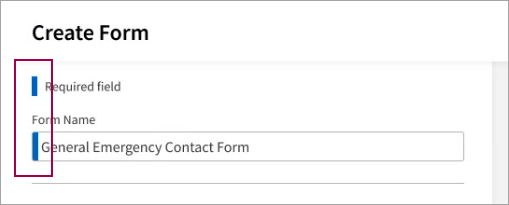
The following sections detail each part of the create form workflow.
Use this implementation setting: Digital Patient Forms - Guarantor.
If this setting is OFF, you cannot find or add guarantor fields to a Digital Patient Form. If this setting is ON, you are able to find or add guarantor fields to a Digital Patient Form.
Create a support case to request available field options. You can contact the CSC from athenaOne > Support > Success Community > Contact Client Support Center or by going to the Success Community and clicking Contact Client Support Center in the Support Cases section. For more information, see Contact athenahealth.
A number of options appear under the Add Form Elements menu:
-
Textbox
-
Acknowledgments & Consents
-
Registration questions
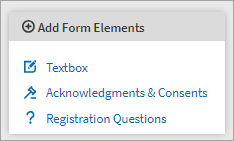
Each element is clickable and provides a preview prior to completion and/or publication of the form.
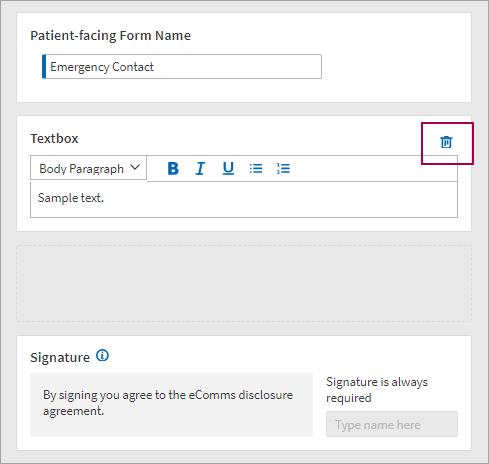
The textbox element appears below the bottom-most form element. This placement is true whenever you add a new form element.
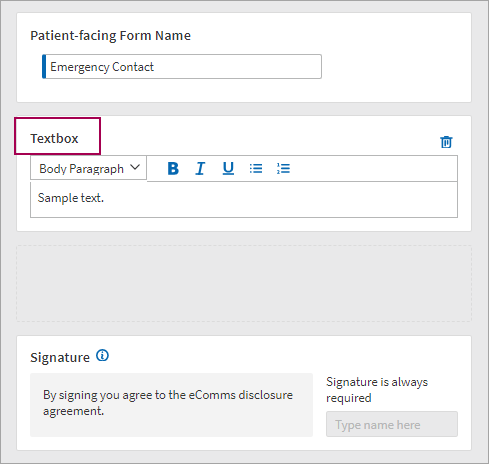
Use the trash icon to remove the text element:
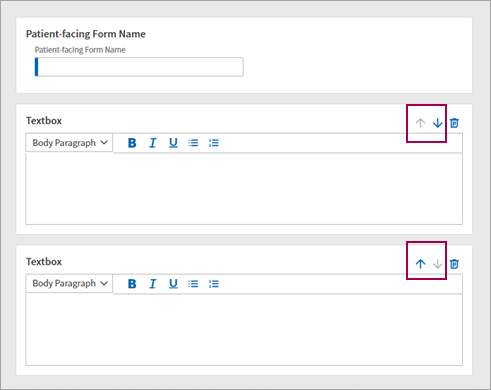
After adding more than one form element, you can use the up and down arrows to rearrange the order of the elements:
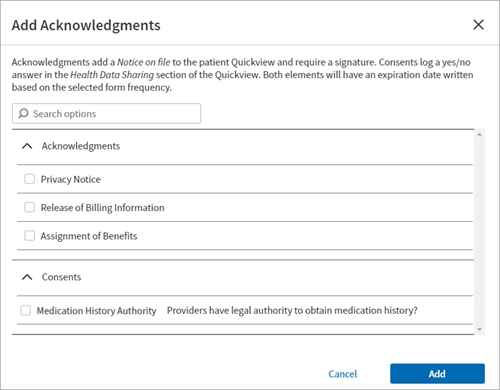
Acknowledgments & Consent
The acknowledgments and consents included in this element reflect the checkboxes (acknowledgments) and yes/no radio buttons (consents) found on the patient's Quickview and full registration page.
Consents include, for example, medication history authority (reflected by the radio buttons on the patient's Quickview) and any data/health sharing consents that have been set up for the practice. These data/health sharing consents are typically set up via interface. For example, practices in the state of New Jersey may have consents set up for the New Jersey Immunization Information System (NJIIS).
Consents have two patient-facing options: I consent and I do not consent.
You can select multiple acknowledgments and/or consents, then click Add to add them to the form preview.
Here is an example of an acknowledgment preview after it has been added:
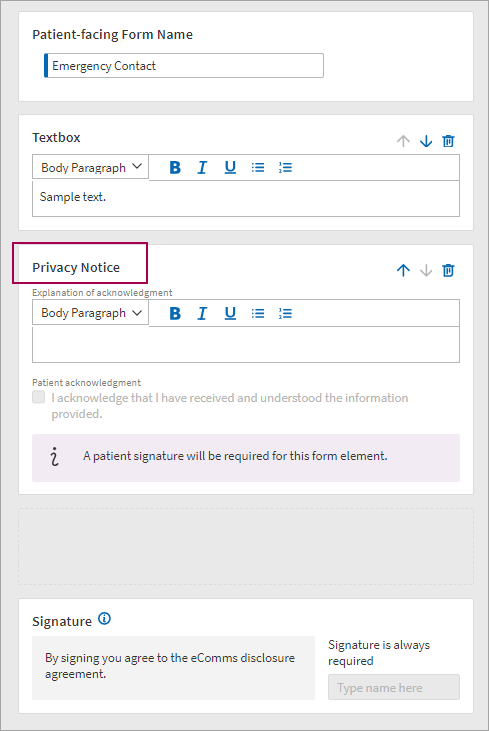
For acknowledgments, there is no option for the patient to decline.
Here is an example of a consent preview after it has been added:
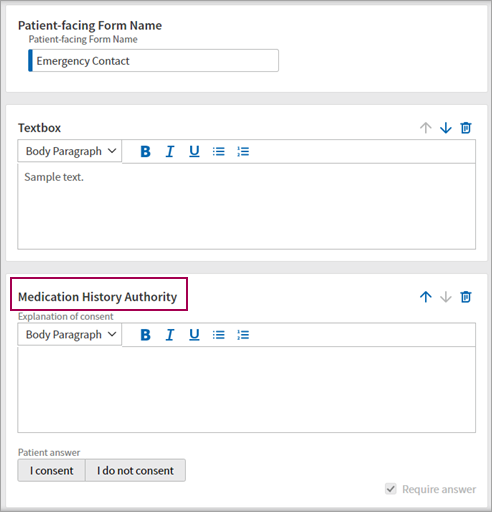
Registration questions
Registration questions are sourced from the patient Quickview and the full registration pages.
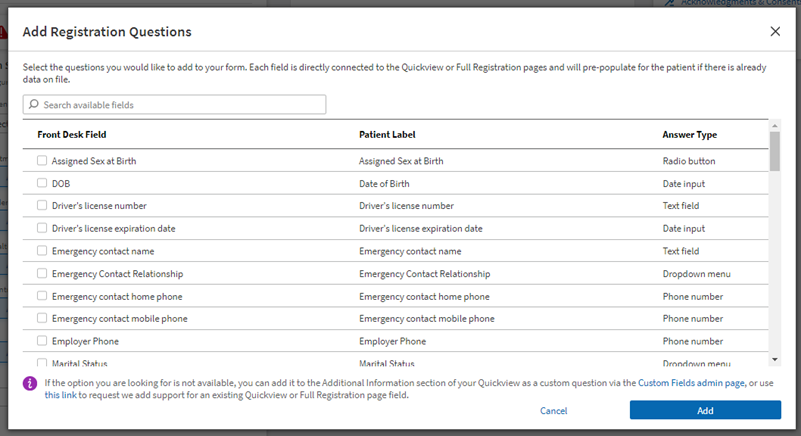
From the view shown above, you can search for available fields. You can also use the check boxes to select which questions to add prior to clicking the Add Questions button, which includes your selected question count in parentheses.
The column headings display the front desk name of a particular field, the patient-facing label, and the answer type. Answer type refers to the format in which the patient answers the question (via drop-down, entering a phone number, entering a date, and so on).
The following information appears at the bottom of this menu:
"If the option you are looking for is not available, you can add it to the Additional Information section of your Quickview via the Custom Fields admin page, or use this link to request we add support for an existing Quickview or Full Registration page field."
Any questions already created by your practice via the custom fields admin page will also appear in this list.
-
If a digital patient form is configured to include a custom field question and the custom field is deleted from the Custom Fields admin page, the question remains on the digital patient form (and is presented to patients) until the question is removed by practice staff. However, patient-submitted answers are not saved.
-
If a digital patient form is configured to include a custom field question and the custom field is modified on the Custom Fields admin page, the modifications are not applied to the Digital Patient Form until the question is removed from, and re-added to, the digital patient form by practice staff. In the meantime, answers submitted by patients are not saved.
-
If a digital patient form is configured to include a drop-down-based custom field question but no drop-down options are configured for the question, the question appears to patients as a free-text field, and any answers they submit are not be saved.
-
If you create a new custom field via the Custom Fields admin page in Practice Manager admin, it may take five to ten minutes for the field to show up in the digital patient form builder menus.
Here is an example of multiple registration questions after they have been added:
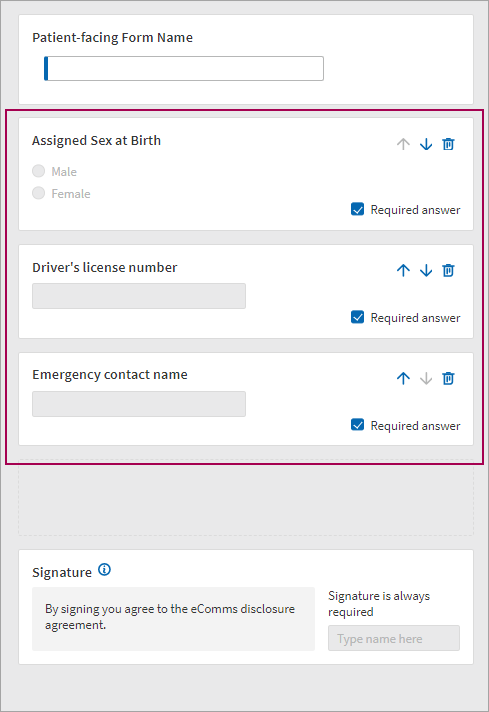
From here, you have the option to require an answer for each question. If an answer is required, the patient is not able to submit the form until a value is present in the patient-facing field.
The presence of a signature is driven by the Require a digital signature toggle under Form Settings:

However, if you add a consent or an acknowledgment field, this toggle automatically turns on and is locked.
Form Name is a required field near the top left of the Create Form page. Enter an internal-facing form name. This name appears on the Manage Digital Patient forms landing page:
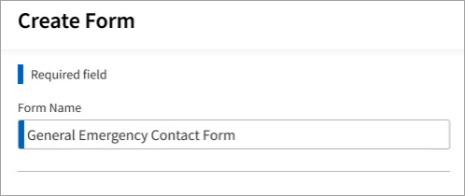
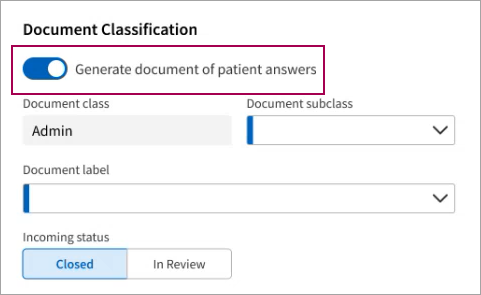
Under the Document Classification heading, you can toggle whether or not a PDF is generated when a form is completed. By default, this is toggled on (as shown in the image below).
The document class is set to ADMIN and is not configurable. However, the document subclass can be selected from a short list of options in the Document subclass drop-down.
You can also add a label to the form using the Document label drop-down.
You can set the incoming status of the form to either Closed or In Review. The default status is Closed, meaning the form is not assigned to any internal user.
If you select a status of In Review, the document is automatically assigned to either the department staff bucket or the provider staff bucket, depending on how your practice is configured.
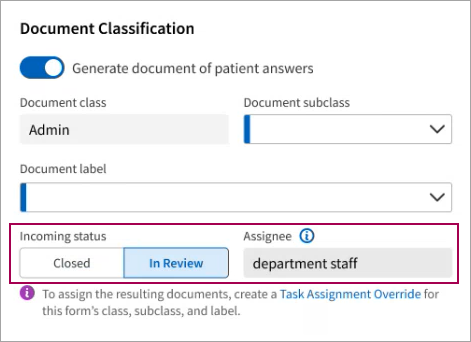
Note
You can use Task Assignment Overrides to override the default task assignment for a document classification in the Clinical Inbox.
In addition to the digital signature toggle, Form Settings includes
-
Departments selector
-
Providers selector
-
Specialties selector
-
Appointment types selector
-
Ages selector
-
Sexes selector
The frequency options are every time, once a week, once a month, once every six months, once a year and after 3 months. The default frequency value is "every time."
If the form includes at least one field with an expiration date, the selected frequency is compared against the expiration date of the completed field and a determination is made regarding whether or not to display the form to the patient.
For example, when the frequency is configured for once a year, when the form is signed, the expiration date is the day of signing plus 365 days.
How does the Frequency filter work?
The Frequency filter allows you to control how often a form appears in the Enhanced Self Check-in workflow when all of the other filter criteria are met.
The Frequency filter also determines the expiration date that is populated when a patient completes a form containing a question with an associated expiration date field. For example, Release of Billing Information or Assignment of Benefits.
The Frequency filter is bypassed if any of the following conditions are true:
-
The form contains an Acknowledgement question and the corresponding checkbox on the Quickview is unchecked.
-
The form contains an Acknowledgement question whose current value is expired.
-
The form contains a Consent question and the corresponding field on the Quickview does not equal "Yes".
The goal of this filter is to display forms during check-in based on specific insurance associations.
The filter can be set to scan for matches in one of two locations:
-
The primary insurance package as listed on the patient's Quickview
-
The primary insurance package as listed on the appointment requiring check in
The filter can be configured at three different levels:
-
Insurance Reporting Category
-
Insurance Product Type
-
Insurance Package
The Insurance Package options are informed by the choices you make in the Reporting Category and Insurance Product Type filters.
Given this filter logic, the best practice is to begin by making a Reporting Category and/or Insurance Product Type selection, and to select specific Insurance Packages only if necessary.
Important: If you make Insurance Package selections first without setting the previous two filter options, and then go back to make selections under Reporting Category and/or Insurance Product Type, your selections under Insurance Package are erased. This safeguard is in place to prevent filter conflicts.
This filter eliminates the need to manually ensure that forms remain visible in the event that new product types and/or packages are added for a given category.
For example, if you'd like a form to display for all insurance packages with the Insurance Reporting category of Aetna, you can select Aetna in the Reporting Category filter. If you then leave the Insurance Product Type and Insurance Package options set to All (rather than selecting specific items from each list), your form will always display for all insurance packages with that reporting category. And as athenahealth adds (or removes) packages with the "Aetna" reporting category, the filter automatically reflects these changes with no need to manually update your selections at a package level.
Dynamic variables are placeholders that can be included in digital patient forms. These placeholders pull values in from athenaOne when a form is rendered or generated.
Using dynamic variable can reduce the manual work your staff does to create and maintain multiple copies of a form. If two departments use the same form with different department names, that name difference can now be automatically updated within the same source form—a dynamic variable pulls in the appropriate name information without any staff intervention.
Dynamic variables can also be used to generate patient-facing information, pulling from the patient record in athenaOne and displaying that in the patient web form. Some patient-facing dynamic variables may include the primary insurance name, as well as name and address information.
You can insert a dynamic variable into any free-text field that contains formatting tools.
- Begin by typing a curly bracket—{—and then part of your desired variable name as shown here:
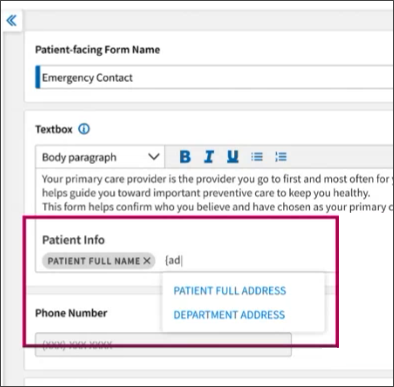
- As you type, a menu appears offering any dynamic variables that match your search terms. In the above example, "{ad}" pulls up both PATIENT FULL ADDRESS and DEPARTMENT ADDRESS.
- Click a search result to insert the dynamic variable into the field.
Tip: To delete dynamic variables you've already inserted, click the x next to the variable name.
When the patient views the form during self check-in, they'll see the information dictated by the dynamic variable.
Notes:
- If a dynamic variable is added to a form and there is no corresponding value in the system, the space where the variable would otherwise populate is left blank.
- When you click Print Blank Form to print a blank copy of a form that contains dynamic variables, blank spaces appear in place of the variables. These blank spaces are underlined so that it is apparent where the variable would appear on the blank form.
- The primary insurance dynamic variable pulls information from the patient's Quickview, not from the appointment information.
When using digital patient forms, you can customize the format and layout of the PDF that gets generated when a patient submits their responses.
When a patient completes a digital form, athenahealth can automatically generate a PDF and attach it to the patient's chart. This PDF serves as an artifact that reflects what the patient saw and how they responded.
Some digital form use cases require your practice to retain copies of the patient-completed forms in their original format for auditing and legal purposes. Using this feature, your staff can customize the format and layout of the resulting PDFs to satisfy these use cases.
To see a demo video, refer to this release note from Spring 2025.
To utilize custom PDF formatting instead of the standard PDF format, start by accessing digital patient forms from the Self Check-in Settings page.
- On the Main Menu, click Settings
 > Communicator.
 - In the left menu, under Practice Links — Self Check-in, click Self Check-in Settings.
- Under Forms & Signatures, click Manage Digital Patient Forms.
- Click Create at the top of the screen.
You are now in the create new form workflow. A toggle appears, as highlighted below in the default off position:
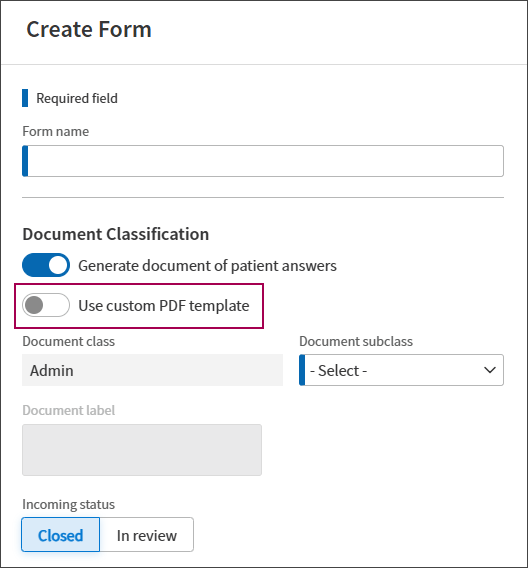
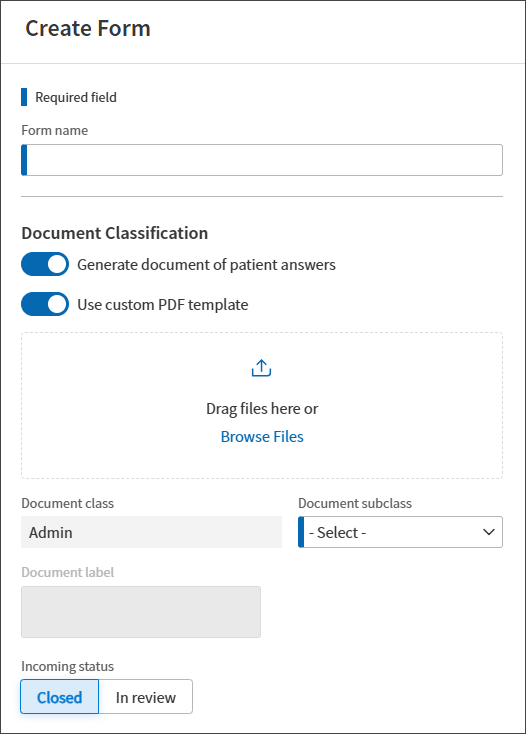
Toggle Use custom PDF template on, as shown here:
-
Drag a file where indicated or click Browse Files to open the file explorer.
-
athenaOne scans the file for any issues (such as viruses or security issues). If there are no issues with your selected file, the file then appears in the preview pane as shown here:
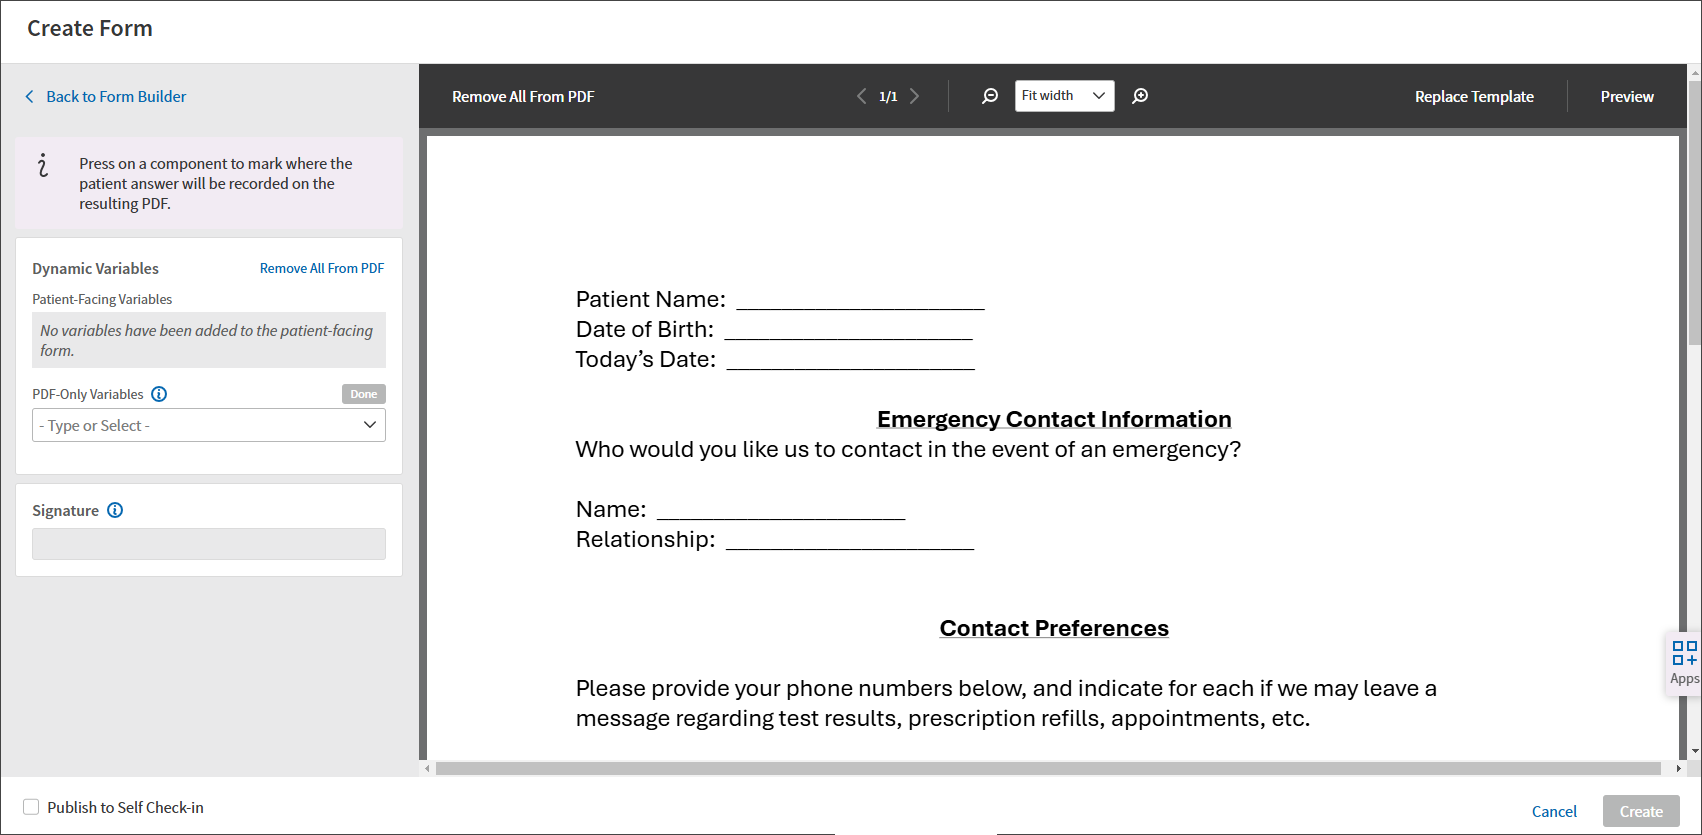
Tip: Hover over the image to expand.
Adding dynamic variables to a custom form
Dynamic variables are a set of placeholders that can be included in patient forms. These placeholders pull values in from athenaOne when a form is rendered or generated. Patients will not see the placeholders within a form, only the values pulled in by these placeholders.
When creating a custom PDF, you have two options when using dynamic variables:
-
Patient-facing variables. If any dynamic variables were added to the patient-facing form, then they will appear in the Patient-Facing Variables section for easy access.
-
PDF-only variables. Any dynamic variables that do not appear in the patient-facing form can be added to the custom PDF from here.
-
Use the PDF-Only Variables pull-down menu to view available variables. You can select multiple variables. You can also remove any selected variables by clicking the x next to the variable name.
-
After making your selections, click Done.
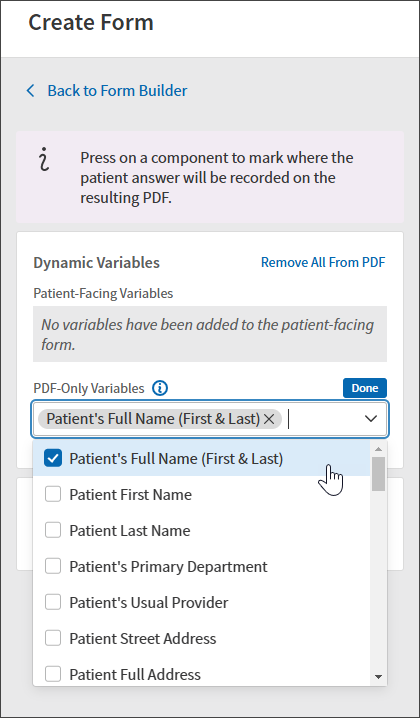
-
Your variable selections appear under the PDF-Only heading. You can add or remove selected variables at any time by clicking the edit icon highlighted here:
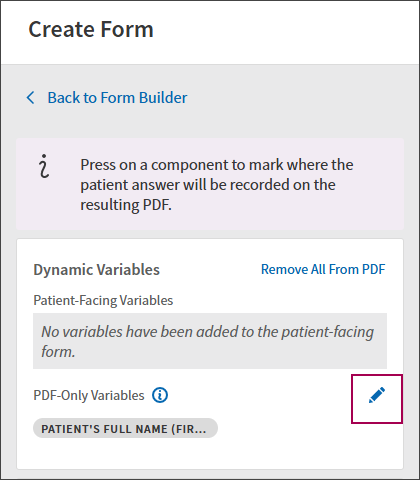
-
Click the variable name to add the corresponding value to your custom form. A box representing the variable populates in the top right-hand corner of the form.
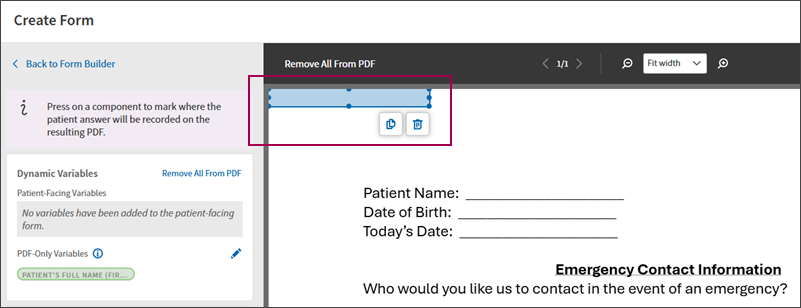
-
Drag the box to your desired location. You can also copy or delete the box using the highlighted icons. In the example below, the "Patient's Full Name" variable is placed on top of the patient name field in the custom form:
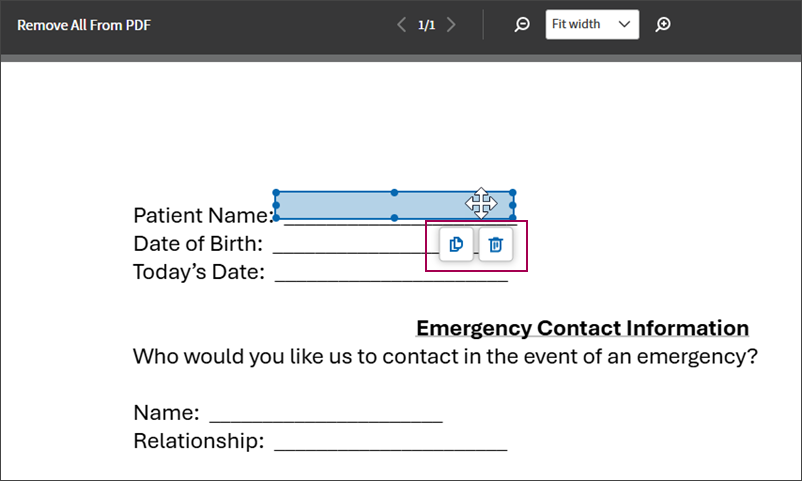
-
Preview the form to check the placement and corresponding value pulled in by the variable. Mock data will be used to illustrate how the form will appear when it gets generated with patient-submitted data.
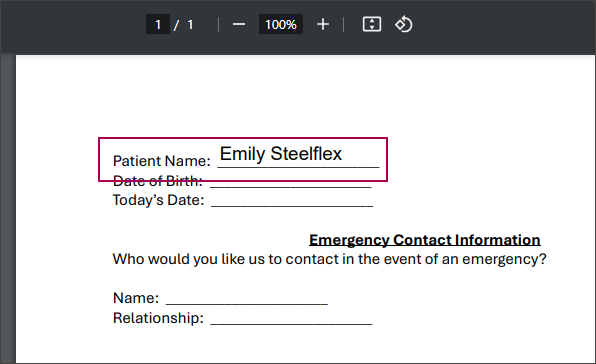
-
From the Form Builder page, begin typing a dynamic variable in a given field (for example, a textbox as shown on the bottom right). After selecting your variable, click Edit Answer Mappings.
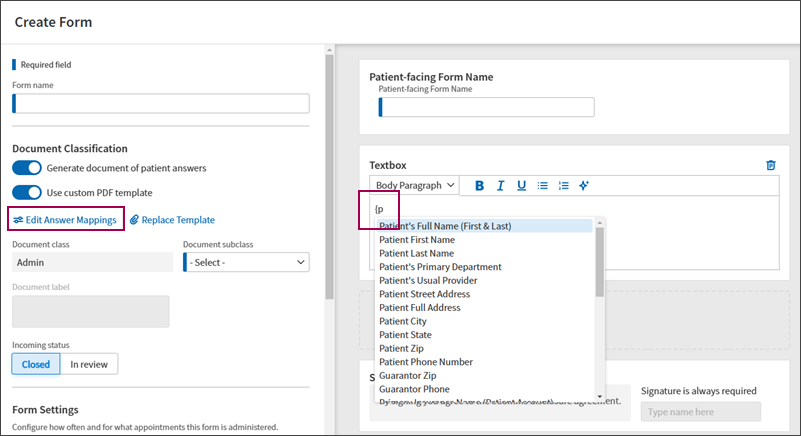
-
Click the patient-facing variable name to create a box on the form. You can then drag the variable anywhere within the form.
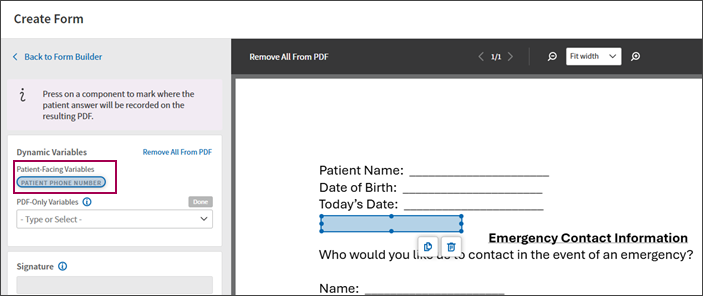
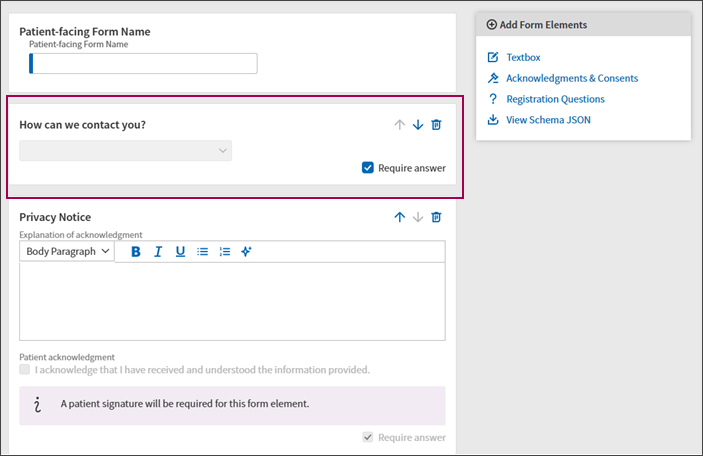
There may be a case where you want to map a patient-facing question to your PDF, and that question has multiple patient-facing answer options. For example, a patient may be asked the following question during check-in: "How can we contact you?"
The answer options associated with this question include:
-
Simple Voicemail
-
Detailed Voicemail
-
No Voicemail Please!
This feature allows you two options for this type of question:
-
Display the patient answer as text (for example, "Simple Voicemail" appears somewhere on your custom PDF).
-
Display the patient answer as a checkbox. This makes sense if your custom PDF includes the answer options, and you simply want to mark how the patient answered.
Here is the example contact question included on the Form Builder page:
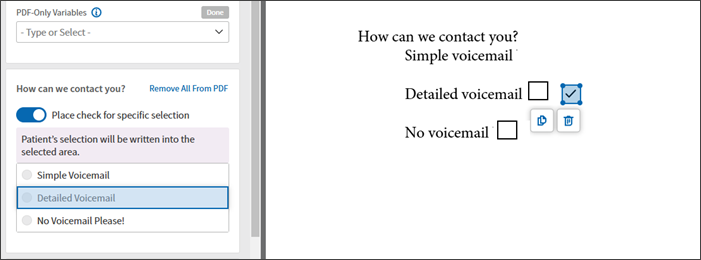
After clicking Edit Answer Mappings, the question is shown next to the custom PDF. There's an option to toggle Place check for specific selection on or off:
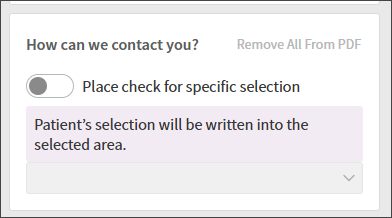
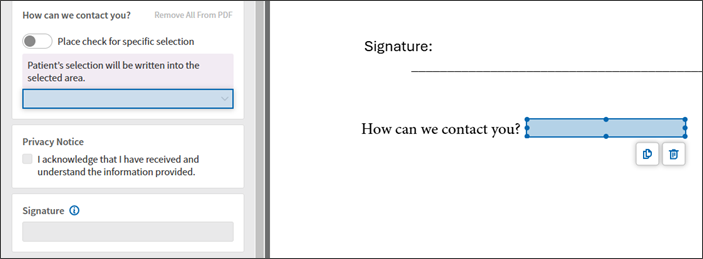
If you leave this option toggled off, you can place the patient answer somewhere in your custom PDF. In this case, the text version of the patient's answer will appear in the PDF (rather than a checkmark).
After toggling Place check for specific selection on, the patient's answer options are shown:
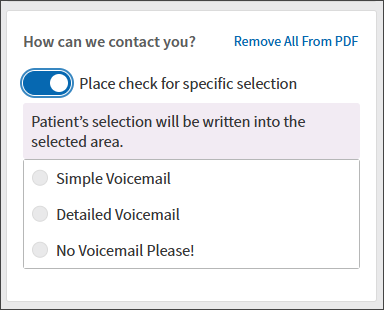
Click an option to generate a field in your PDF. Place this field next to the corresponding answer in your PDF:
You can complete your form with or without publishing it to self check-in. If you publish the form to self check-in, patients will see the form during the check-in workflow. If you do not publish the form (clicking Create without checking the Publish Form box), you can still access the form from the main Manage Digital Patient Forms landing page.
Additional helpful tools are highlighted below, including:
-
Remove all from PDF. Use this tool to remove all variables from your custom form.
-
Replace template. Use this tool to open your computer's file explorer. You can select another file to replace the current custom form. All fields previously replaced will remain as-is; this option simply replaces the PDF in the background of your placements and selections.
-
Preview. This preview shows what the final PDF file will look like. Use this option to check the placement of your fields, as well as the information they pull in from the completed patient self-check in and/or athenaOne.
Tip: Hover over the image to expand.
Click Cancel to discard any changes made while creating your new form. Create saves your changes, but the Publish Form box must be checked for the patient to be able to see the new form in the self check-in workflow.

When you save a new form, it appears on the forms list on the Manage Digital Patient Forms landing page.
On form completion, we'll generate a PDF that serves as a record of what the patient saw and how they responded. That PDF is stored in the Find tab in the patient's chart. For both drop-down and radio button fields, completed PDFs only display the answer provided by the patient, not the full array of options presented.
Note: PDF generation only occurs when the document generation toggle (located under Document Classifcation) is in the ON position.
If your practice features multiple locations (contexts), you can push out patient form configurations to member contexts using the Cross-Context Configuration Management tool.
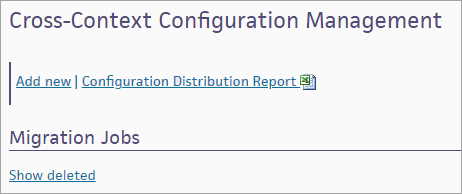
To access this page,
-
On the Main Menu, click Settings
 > Implementation.
 -
In the left menu, under Practice Links - Tablespace Data Transfer, click Cross-Context Configuration Management.
Tip: Alternatively, enter text in the search box.
Context-specific aspects of your forms, such as custom questions and department, provider, and appointment type filters, do not copy over. Configure these form aspects within the destination tablespace(s) after the copy process is complete and prior to form publication.
Note
In some cases, it may take up to four hours for form configurations to copy over and appear in the destination context.
To prevent this delay, it is best to avoid accessing the destination context immediately before, during, or after the copy operation completes.
When a patient completes a form, we will do the following:
-
Generate a PDF of the completed form and attach it to the chart as an ADMIN document (unless PDF generation is toggled off).
-
Update structured data fields with the patient-submitted responses. For example:
The patient fills out an emergency contact name field. After submitting the form, this information is also updated in the patient Quickview.
Is Enhanced Self Check-in compatible with client devices (for example, in-office iPads).
Yes. Jump to this article for more information.
Is Enhanced Self Check-in available in multiple languages?
Enhanced Self Check-in is currently available in English and Spanish only.
Can digital patient forms be created using HTML?
No, digital patient forms do not use HTML. Users have the ability to format their templates as desired using the template builder.
Is there be a preview option to preview the digital patient form?
No, not currently.
Can I configure certain questions based on age?
You can use the age filter at the form level to make sure a given form only appears for certain patient ages.
Can I create a custom screening questionnaire?
No, digital patient forms are for administrative purposes only.
Can digital patient forms be pushed to the Patient Portal?
The forms are only available via the Enhanced Self Check-In Workflow.
Can I add letterhead to the forms?
No, not currently. If this is an enhancement of interest, please add an idea to the Success Community.
Can you build drop-downs and/or radio buttons in digital patient forms?
We can add custom fields to digital patient forms with drop-downs but not radio buttons.
If the patient completes the digital patient form and then reschedules the appointment, is the data lost or does it apply to the new appointment?
After a digital patient form is submitted by the patient, it automatically saves in athenaOne.
Are digital patient forms logged in the "portal e-signature history" under Manage Privacy (as clinical paper forms were)?
Signed digital patient forms are not logged under the "portal e-signature history." Digital patient forms generate the PDF to the patient’s chart. The
Acknowledgment checkboxes on the Quickview and Managed Privacy do get checked off and associated effective and expiration dates are updated appropriately.
If a patient does not complete the entire digital patient form during self check-In, does the practice see the completed portion?
If the patient does not click Submit, the practice does not see the completed portion. If the patient clicks Submit and does not answer non-required questions, the practice sees the completed portion.
Is there an expiration date associated with the consent forms and, if so, is the practice prompted when the patient needs to re-sign?
The Frequency filter determines when forms need to be signed. For example, if a form is signed on August 1, 2024, with the Frequency filter set for one time per year, the expiration date is written automatically as August 1, 2025. Even if forms do not contain an expiration date, if the Frequency is defined, the system defaults to the timeline that was defined.
What happens when a patient completes a form?
The digital patient form generates a PDF and updates any structured data fields with the patient-submitted responses.
How do you know if you are enabled for enhanced self check-in?
If you are not sure whether you have Enhanced Self Check-in enabled, please submit a case to the CSC.
Is enhanced self check-in an out-of-office workflow only or can enhanced self check-in and the new digital forms function be used for in-office check-in?
Enhanced Self Check-in (ESCI) can be completed via both out-of-office and in-office points of entry. To use the in-office workflow, first ensure In-Office is enabled (via the Gear > Communicator > Self Check-in Settings admin page). Then, on the pre-check-in page, practice staff can choose to send a check-in link to the patient via text message any time within 6-hours of the appointment start time.
Will there be "standard forms" already created?
There are no standard forms at present, though we are exploring this as a potential future enhancement. All digital patient forms must be created by a client.
Where do we make custom acknowledgements?
Custom Acknowledgements can be created via Gear > Practice Manager Admin > Custom Fields, and choosing the field type "Privacy Checkbox."
If patient consents to medication authority will it auto select in the patient chart?
Yes.
Will the patient information automatically default on the forms, or would we have to annotate or manually put their information on the form?
Any existing values already on file will auto-populate into a form when it is displayed to a patient in the Enhanced Self Check-in workflow. This saves patients time by allowing them to just review for accuracy and make edits as necessary, rather than having to answer every question from scratch.
How is pre-visit sent to the patient? Via email and text?
If your practice has ReminderCall emails and text messages enabled, pre-visit check-in links will be included in ReminderCall confirmation emails, ReminderCall reminder emails, in a ReminderCall Check-in SMS (sent one day before the visit), and in the "Last Moment Reminder" message sent 4 hours before the appointment.
Can you make some questions mandatory?
Yes.
How do you remove previous forms so that they are not duplicated?
To unmap the older Clinical Paper Form version from Enhanced Self Check-in to prevent the patient from seeing redundant forms please follow this pathway: Gear> Clinical>Clinical Paper Forms> update> uncheck "Enable for Digital Signature" checkbox.
You can confirm if a patient completed self check-in from the patient chart. While in the check-in stage, you can view the following information under Self Check-in:
- If self check-in is complete, a note appears directly under Self Check-in.
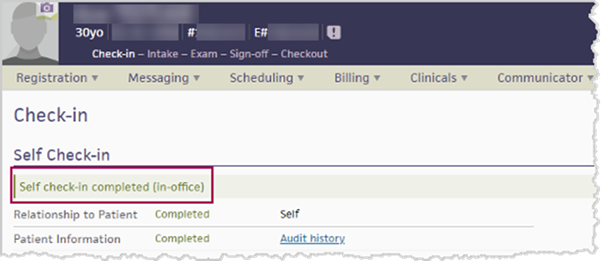
-
Relationship to Patient—Describes if the patient completed self check-in for themselves or for another person.
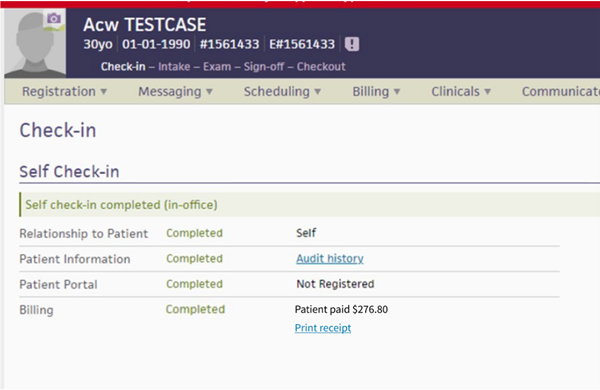
-
Consent Forms — Each form is designated as Signed or Not signed. Click print to print a form.

