 User Guide — Patient Portal
The Web-based Patient Portal gives patients secure and convenient access to their health information. Patients can use the Patient Portal to view, download, and transmit their health information, and send secure messages to their provider.
Note: For practices with athenaClinicals that do not use athenaCommunicator, athenahealth provides the Patient Information Center.
In athenaOne, your practice can see when a patient viewed, downloaded, or transmitted their health information using the Patient Communication Activity Report and the Patient Communication History page.
To assist a patient with the Patient Portal, you may need to know if the patient is new to your practice and has not yet registered. You may also need to know if the patient's provider allows appointment scheduling using the Patient Portal. You may need to provide the patient with the URL for your Patient Portal.
The following instructions help you walk patients through some of the more common tasks that they can perform on the Patient Portal.
Note: athenaOne assigns the "Prospective" status to a patient who first registers with your practice on the Patient Portal but has not yet checked in for an appointment. On the Manage Prospective Patients page, you can view and manage all patients who are in Prospective status.
To use the Patient Portal, patients must use a computer or mobile device with one of these supported browsers:
- Google Chrome
- Microsoft Edge (for Windows 7, Windows 8/8.1, Windows 10, and Windows 11)
- Mozilla Firefox
- Safari (for Apple devices only)
Patients who attempt to use an unsupported browser (such as Internet Explorer) to access the Patient Portal receive a message with links to download a supported browser. If patients ask you about these messages, please encourage them to upgrade to a supported browser using the links displayed in the alerts.
Note: To use the Log in to Portal as Patient option on the Quickview, practice staff must also use a supported browser (not Internet Explorer).
Important: To comply with the Children's Online Privacy Protection Act (COPPA), patients under the age of 13 cannot create self-registered Patient Portal accounts, and you cannot register or invite new Patient Portal users under the age of 13. For patients under 13 years old, we recommend that you set up a family access account for a parent or other caregiver to access the patient's health and billing information through the Patient Portal.
Patients and family members can register for the Patient Portal in several ways:
- Patient Portal email invitation
- Notification email, such as an appointment reminder or notice that a lab result has been published to the Patient Portal
- During an office visit (see To register a patient for the Patient Portal or Patient Information Center in the office)
Patients and family members are prompted to create an athenahealth account when they register for the Patient Portal.
Following are instructions for a patient or family member who is creating a Patient Portal account for the first time from an email invitation or an athenaCommunicator notification email.
- Click the Patient Portal link in the email.
In a Patient Portal invitation email, the link is Create My Account. In a lab result email, the link is View Results.
The Create your new password page appears.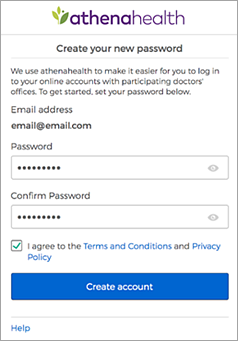
- Confirm your email address and enter your password twice. After you review the Terms and Conditions and the Privacy Policy, check the box and click Create account.
You are prompted to select a security option to protect your account. This one-time setup enables you to confirm your identity in the future if you forget your password. - Select a security option and then click the Setup button below that option.
- Text me (recommended) — Receive a verification code by text message.
- Call me — Receive a verification code by phone call.
Note: Select this option if you entered the number of a landline phone. - If you selected Text me or Call me:
- Enter your phone number and then click Send code (for text message) or Call (for phone call).
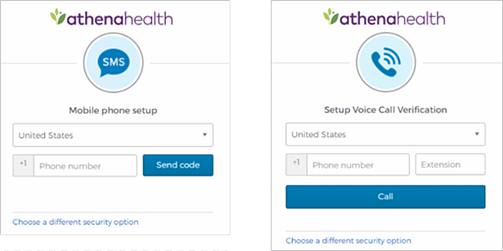
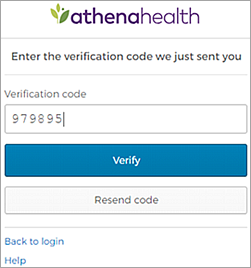
The verification code is sent to your phone. - Enter the verification code you received by text message or phone call, and then click Verify.
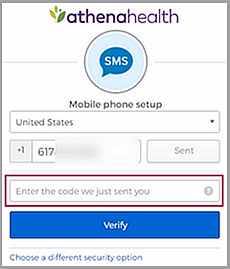
- If you entered a recovery phone number that differs from the phone number in your patient record, you must verify access to the phone number on file with your healthcare provider.
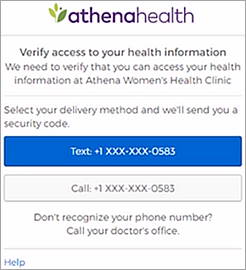
Note for practice users: If the user is the patient, the phone number of record is the phone number in the patient's Quickview. If the user is not the patient, the phone number is recorded on the Portal Accounts page in the entry for the patient.- Select Text or Call to receive a verification code at the phone number displayed in the message.
- Enter the verification code you received by text message or phone call, and then click Verify.
- If you initiated your Patient Portal registration from a lab result email or during the online check-in workflow, you may see the Choose your patient relationship page. This page asks whether you are the patient or another person (family member or guardian) who manages the patient's account.
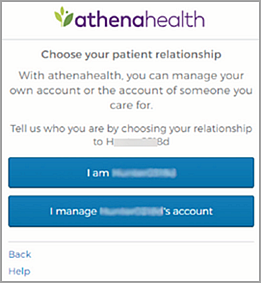
- Click I am <patient_name> or I manage <patient_name>'s account.
- If you click I manage <patient_name>'s account, you must enter your name, email address, and date of birth. This information is associated with your athenahealth account.
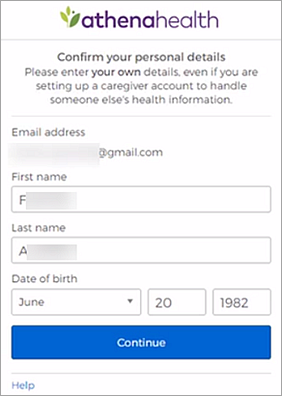
- Click Continue.
A confirmation page appears. - On the confirmation page, click Continue.
The home page of your Patient Portal appears.
Note: When you log on to the Patient Portal in the future, you will need to enter only your email address and password.
Note for practice users: If the patient or family member selects phone verification (text or phone call), the phone number entered here is managed independently from the patient phone of record found on the Quickview and Patient Registration pages.
This self-registration procedure applies to patients who fall into these categories:
- The patient record exists in athenaOne but the patient has not set up a Patient Portal account.
- The patient does not exist in athenaOne.
For patients to register online, ensure you have online Patient Portal registration enabled on the Patient Portal Settings page.
For patients to register at your practice (and create a Patient Portal or Patient Information Center account) from the Patient Portal, the Portal New Patient Creation Allowed feature must be enabled for your practice.
Important: To comply with the Children's Online Privacy Protection Act (COPPA), patients under the age of 13 cannot create self-registered Patient Portal accounts, and you cannot register or invite new Patient Portal users under the age of 13.
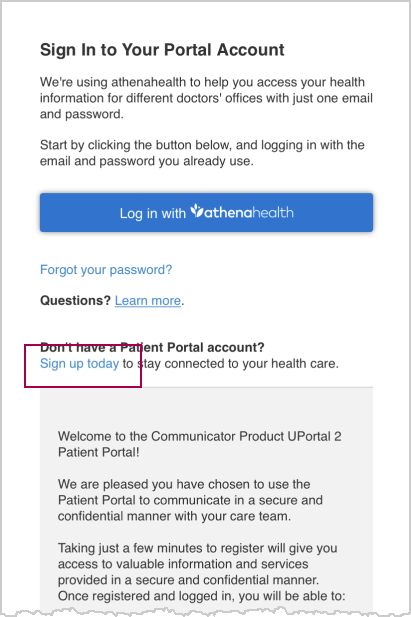
The patient accesses the Patient Portal sign up workflow from your practice-branded Patient Portal login page.
They click Sign up today to begin the registration process.
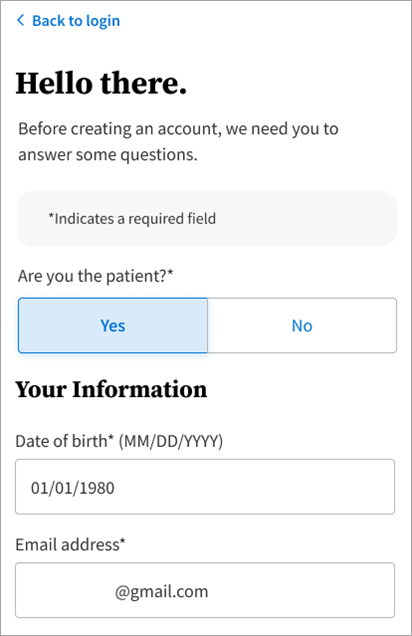
The patient indicates that they are signing up for themselves ("Are you the patient?"), as well as their date of birth and email address.
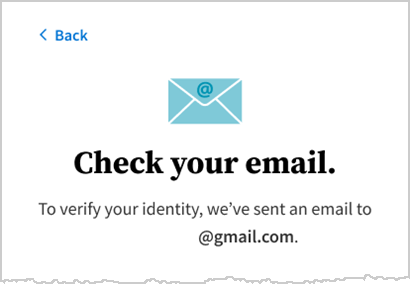
A verification email is sent to the patient's email address.
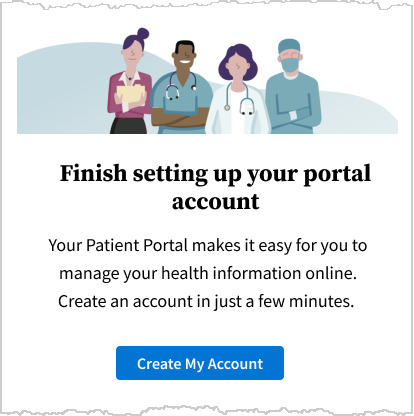
From this email, the patient clicks Create My Account.
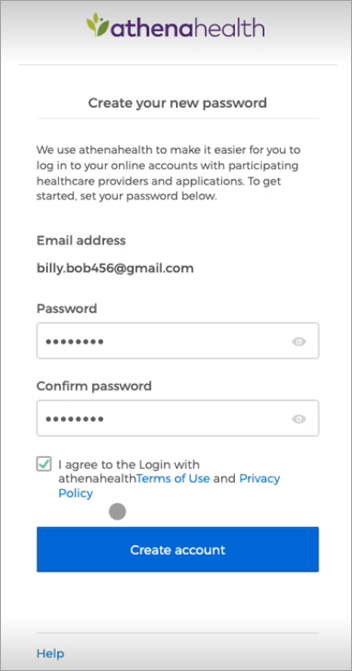
For these users, demographic information is not required. After they receive their verification email and click Create My Account, they are taken to the create your new password page.
The patient creates a password for their Patient Portal account.
Then, they choose a security option:
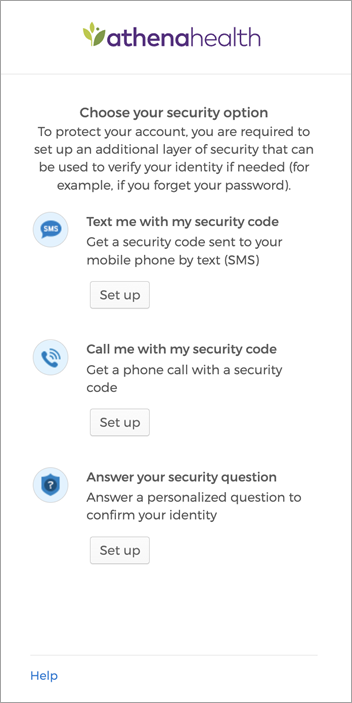
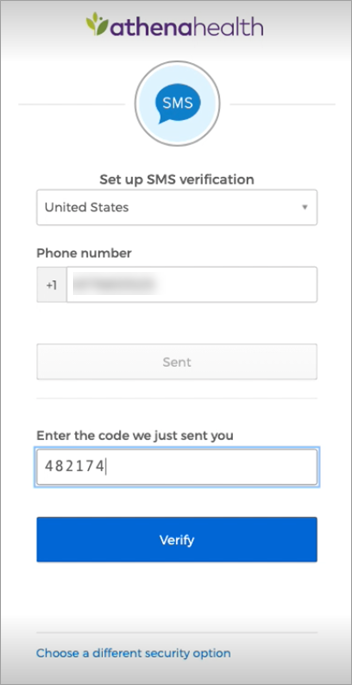
The example below shows the mobile phone security setup option. The patient receives a code via SMS and enters it on this page.
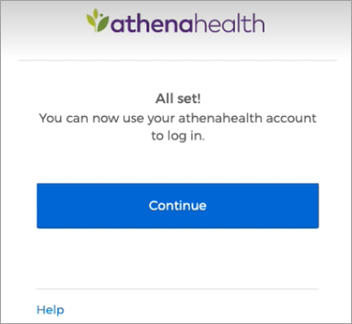
The registration process is complete. When the patient clicks Continue, they are taken to the Patient Portal.
The patient accesses the Patient Portal sign up workflow from your website. They click Sign up today to begin the registration process.
Important: You must enable the "Allow new patient registration" setting on the Portal Settings page to allow new patients to successfully register online.

The patient indicates that they are signing up for themselves ("Are you the patient?"), as well as their date of birth and email address.

A verification email is sent to the patient's email address.

From this email, the patient clicks Create My Account.

They enter the demographic information shown below:

Note: Gender identity is an optional field.
Next, the patient chooses a provider name. They can start typing in this field, which provides options via a drop-down menu:
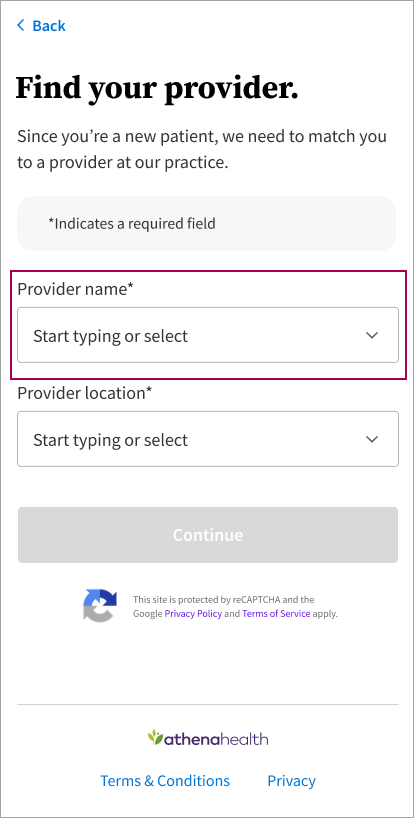
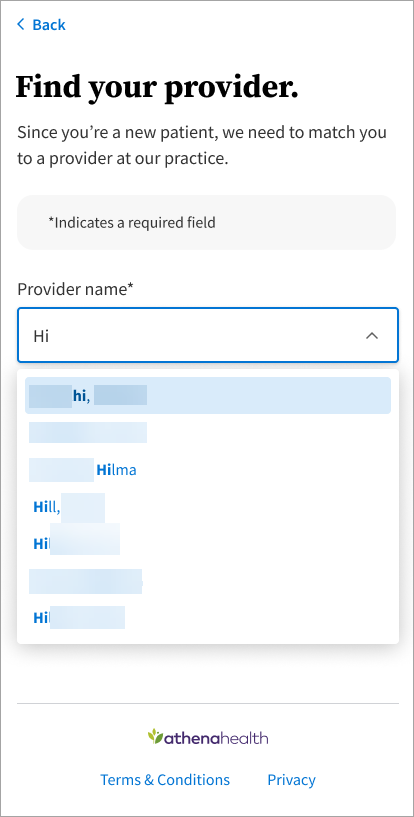
After selecting a provider name and location, the patient can continue the registration process.
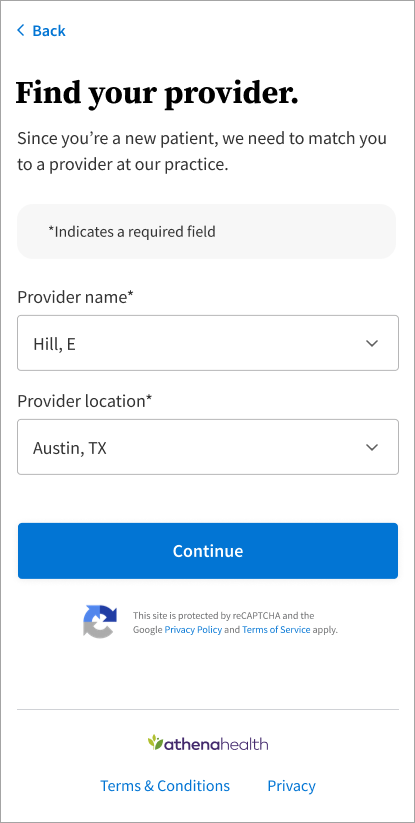
The patient creates a password for their Patient Portal account.

Then, they choose a security option.

The example below shows the mobile phone security setup option. The patient receives a code via SMS and enters it on this page.

The registration process is complete. When the patient clicks Continue, they are taken to the Patient Portal.

If your practice does not allow new patient registration online, they will see the followings screens:
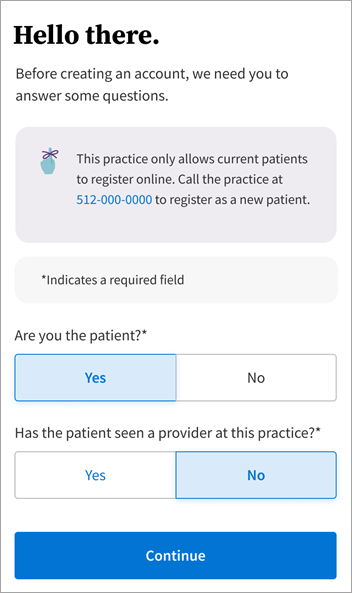
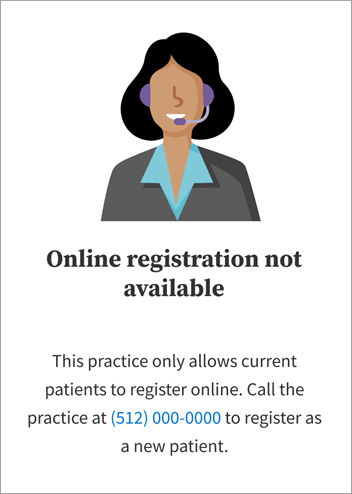
If a patient has an existing patient record and, during self registration, uses an email address or date of birth that differs from their current information on file, a new patient record is created for them. The new record is created because athenaOne is unable to match the patient's information with their existing patient record.
In this scenario, we advise using the Manage Prospective Patients page to review and merge the new record with the existing patient record in athenaOne as appropriate.
To access the Manage Prospective Patients page in athenaOne, from the Main Menu, click Patients. Under Patient Registration, click Manage Prospective Patients.
For practices with brands that have the "Allow new patient registration" setting enabled on the Portal Settings page, athenahealth automatically enables the "Prospective Patient Management Admin" setting to ensure the Manage Prospective Patients page is available to practice users.
If your practice is testing this online self-registration workflow, you may receive this error message when clicking Create my account from the identity validation email:
"No record found. This practice only allows current patients to register online. If you're already an existing patient, call the practice."
In the online self-registration workflow, the most likely reasons the system does not recognize an existing patient in athenaOne are as follows:
-
Wrong DOB entered
-
Wrong email address entered
-
Patient does not have an email address on their Quickview
-
Patient was created in athenaOne less than 30 minutes before initiating the portal registration workflow
-
Patient's DOB or email address were updated less than 30 minutes before initiating the portal registration workflow
There is a 30-minute latency period in the patient search function used in the online self-registration workflow, so if the patient was created, or the DOB or email were updated, just before testing, the system hasn't had enough time to refresh the changes. Please wait at least 30 minutes after making those changes before testing the online self-registration workflow.
A family member who is not a patient at your practice can create a Patient Portal (or Patient Information Center) account on behalf of a family member who is a patient at your practice. For example, a father can create a Patient Portal account for his minor child, so that he can access her health information.
Note: If your practice does not allow non-patients to create Patient Portal accounts, this feature is not available to your patients.
If the age of majority for your practice's Patient Portal is 18 years old, a family member can register to access their 19-year-old child's Patient Portal account, but the family member will have billing-only access (instead of the full access they would have if the child was 15 years old).
Instructions for patient's family member
- On the Patient Portal home page, click Sign up today.
- Who will use this account? — Click the Patient's family member option.
Enter information about the patient
- First name — Enter the patient's first name.
- Last name — Enter the patient's last name.
- Date of birth — Select the patient's date of birth.
- Gender — Select the patient's gender.
- Email — Enter the patient's email address.
- Phone — Enter the patient's phone number.
- Is this a mobile phone? — Select Yes or No.
- I'm not a robot — Check the box, enter the CAPTCHA information, and click Verify.
- Click Continue.
Verify your identity
- The Patient Portal will send a temporary passcode to the patient (not to you).
Note: By sending the temporary passcode to the patient, we inform the patient of your request to obtain access to his or her Patient Portal account. By giving you the temporary passcode, the patient consents to your receiving access. - Select how this passcode should be sent: email, call, or text message (these options depend on the patient contact information that is on file with the practice).
- Enter the email address or phone number and then click Send Code.
- Enter the temporary passcode that the patient received by email, phone call, or text, and then click Continue.
Enter your demographic information
- Relationship to patient — Select your relationship to the patient.
- First name — Enter your first name.
- Last name — Enter your last name.
- Email — Enter your email address.
- Date of birth — Select your date of birth.
- Phone — Enter your phone number.
- Is this a mobile phone number? — Select Yes or No.
- Click Continue.
Set your password
- Password — Enter a password that meets the criteria on the right. This password must be 8-20 characters long and must have at least one uppercase letter, one lowercase letter, and one number or symbol.
- Confirm password — Enter your password again.
- Remember this computer to save time resetting your password — If you're using your own computer or a computer that you trust, you can select this option to make it faster to reset your password if you ever need to. If you're using a public or shared computer, do not select this option.
- Click Terms and Conditions and Privacy Policy to read both documents, and then check the box to accept the Terms and Conditions and the Privacy Policy.
- Click Continue.
You are now logged in to your own Patient Portal account, with third-party access to your family member's account.
A family member who is a patient at your practice can request access to the Patient Portal (or Patient Information Center) account of another family member who is also a patient.
Note: If your practice does not allow non-patients to create Patient Portal accounts, this feature is not available to your patients.
If the age of majority for your practice's Patient Portal is 18 years old, a family member can access their 18-year-old child's Patient Portal account, but the family member will have billing-only access (instead of the full access they would have if the child was 15 years old).
Note: After a child reaches the age of majority, that child can grant full access to a family member.
Instructions for the patient
- Log on to your Patient Portal account.
- Click the arrow next to your name at the top of the Patient Portal and select Family access settings from the menu.
Note: Patients who do not have access to other patients' Patient Portal accounts do not see the Family access settings option.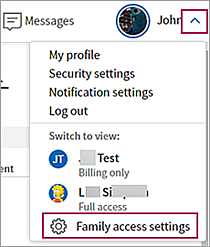
The My profile page appears with the Family Access tab displayed.
- Click Add Patient.
- Enter the information about your family member who is also a patient at the practice.
- First name — Enter the patient's first name.
- Last name — Enter the patient's last name.
- Email — Enter the patient's email address. If the patient does not have an email address, select the No Email option.
- Date of birth — Select the patient's date of birth.
- Phone — Enter the patient's phone number.
- Your relationship to patient — Select your relationship to the patient.
- Click Continue.
The Patient Portal sends a temporary passcode to the patient (not to you).
Note: By sending the temporary passcode to the patient, we inform the patient of your request to obtain access to his or her Patient Portal account. By giving you the temporary passcode, the patient consents to your receiving access. - Select how this passcode should be sent: email, call, or text message (these options depend on the patient contact information that is on file with the practice).
- Click Send Code.
- Enter the temporary passcode that the patient received by email, phone call, or text, and then click Continue.
You can now access your family member's information using your own Patient Portal account. The Family Access tab of the My profile page shows this access.
Patients who have a Patient Portal or Patient Information Center can provide access to family members.
- Log on to your Patient Portal or Patient Information Center account.
- Click the arrow next to your name at the top of the Patient Portal and select Family access settings from the menu.
Note: Patients who do not have access to other patients' Patient Portal accounts do not see the Family access settings option.
The My profile page appears with the Family Access tab displayed.
- Click Invite Family Member.
- Enter the information about your family member.
- First name — Enter the family member's first name.
- Last name — Enter the family member's last name.
- Relationship to you — Select the family member's relationship to you from the menu.
- Email — Enter the family member's email address.
- Access level — Select Full or Billing only.
A user with billing-only access can see only billing information, not health information, on the Patient Portal or Patient Information Center. - Date of birth — Select the family member's date of birth.
- Phone — Enter the family member's phone number.
- Is this a mobile phone — Select Yes or No.
- Click Invite.
Your family member receives an email invitation to access your Patient Portal or Patient Information Center.
If your practice uses Credit Card Plus, and the Patient Portal for your practice supports electronic payments, your patients can pay outstanding balances with a credit card on the Patient Portal.
- Patients can access detailed information about their claims.
- Patients can pay all claims at once or pay individual claims in full or in part.
Note: If your practice is not set up to accept partial payments from patients, contact the CSC from athenaOne > Support > Success Community > Contact Client Support Center to request this feature.
Before patients can make payments on the Patient Portal, your practice must be set up to use Credit Card Plus.
- Log in to your Patient Portal account with your email address and password.
- Click Billing & Payments on the left side of the page.
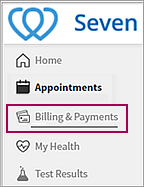
The Billing & Payments page appears. - Click Make a Payment.
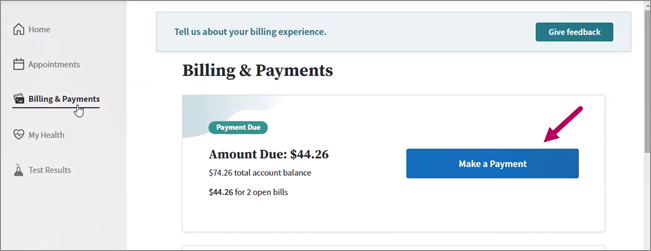
The Patient Portal transfers you to a secure payment server. - On the Make a Payment page, select your payment method.
- If you previously paid a charge on the Patient Portal and saved your card number for future payments, you can select that card for your payment.
- To enter a new card number, click Pay with a different card and enter the card information. Confirm or enter your billing address.
Note: Check the I'm not a robot box to verify that you are a person. - Click Review Payment.
- In the Review and Submit step, review your credit card information, your billing address, and the charges to pay.
- Click Submit Payment.
The Payment Confirmation page displays the details of your payment. You also receive a confirmation email. - Click Print receipt to print this page for your records.
- Click Back to Bill Pay to return to the Bill Pay page to make another payment or to review your account.
On the Payment History tab of the Patient Portal, your patients can see a complete history of credit card payments made to your practice for healthcare visits, with links to view each receipt. The Payment History page displays these credit card payments:
- Payments made online using the Patient Portal, the Online Statement-based Experience (formerly QuickPay Portal), and the Guest Payment service
- Credit card payments made during patient self check-in
- Credit card payments made at the front desk, over the phone, and sent in the mail
Patients and family members with access to the patient account on the Patient Portal can view the payment history, print the page, and print receipts of credit card payments.
Note: Patients who are also guarantors or authorized family members can see payments made for their own healthcare expenses when they log on to their Patient Portal account as themselves. If the guarantor or family member has access to a dependent's Patient Portal account, the guarantor or family member can log on to the patient's Patient Portal account to view the dependent's past payments.
- Log on to your Patient Portal account with your email address and password.
- Click Billing & Payments on the left side of the page.

The Billing & Payments page appears. - Scroll down to the Billing History section.
The first three payments are shown. - To view a statement from a past visit, click Statements from the Billing History menu.
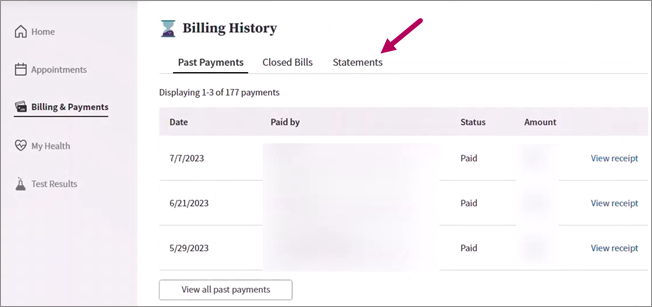
You can then click View PDF to view and print a PDF of the statement. - To display and print a receipt:
- Click View receipt for the selected payment.
A new window opens that displays the details about that single payment. - To print the receipt, click the print icon
 .
.
- Click View receipt for the selected payment.
Note: Patients can access the health history form only through the self check-in procedure. After patients complete self check-in, they cannot access the health history form again until they check in for their next appointment.
Patients can log on to the Patient Portal and check in for their appointments within 7 days of the appointment date.
Note: The number of days is set to 7 by default; however, you can open a case with the CSC to adjust this setting to 2-10 days.
Log on to the Patient Portal and find the appointment
- Log on to the Patient Portal.
Your upcoming appointment appears on your home page and on the Appointments page. - Click Manage appointment.
The Patient Information step appears.
Confirm or update demographic information and (optional) add pharmacies
- Confirm or update your contact and personal information.
- Would you like to receive text alerts? — This prompt appears only if you have not yet agreed to accept text message notifications from the practice. Select Yes to receive text messages from the practice.
- To add a pharmacy to your patient record:
- Scroll to the bottom of the page and click Add Pharmacy.
In the Select a Pharmacy window, search for and select the pharmacy. - Click Save.
Note: You can store up to five pharmacies in your patient record, but only one can be designated as your primary pharmacy. - Click Continue.
If you have an outstanding account balance, a copay, or both, the Billing step appears.
Pay your copay or outstanding balance
- Select the charges to pay.
Note: For outstanding balances, you can enter an amount smaller than the charge in the Payment box. - Select your payment method.
If you select Pay at the front desk or I have questions about my balance, you can pay your balance at the time of your appointment. - Click Continue.
- If you selected Pay with a credit card, a payment window appears.
- Enter your credit card information, check the I'm not a robot box, and click Review Payment.
- Verify your credit card information and then click Submit Payment.
A message confirms that your payment was received. - Click Continue.
If the practice has any consent forms for you to sign, the Consent and Privacy step appears.
Sign consent forms
- Review each form in the list and either sign it or click Sign at the front desk to continue to the next step.
To sign a form, enter your full name in the signature box at the bottom of the window and click Sign. - After you review all the forms, click Continue.
The Health History Form step appears.
Complete the health history form
- Review each section (Medications, Allergies, and so on) of your health history form.
- For each section, click Update to add, edit, or remove items, or click No Changes.
- When you finish reviewing the health history, click Complete.
A message thanks you for completing online check-in.
Send a secure message to the provider (optional)
- After you check in for the appointment, the final window displays a prompt to enter a question for your provider. (For more information, see Questions for providers created during pre-appointment self check-in.)
- Click Send a secure message.
A message box opens. - Enter your question (up to 500 characters) and then click Send.
Practice staff will not see the question until the time of your visit.
- Click Send a secure message.
From a ReminderCall email message, you can confirm your upcoming appointment and check in for the appointment.
Log on to the Patient Portal from the ReminderCall email
-
In the appointment reminder email, click Yes, I'll be there.
A new window indicates that your appointment is confirmed and prompts you to check in for the appointment online. - Confirm your email address, enter your Patient Portal password, and click Check In.
The Patient Information step appears.
Note: If you can't remember your password, click Forgot your password?
Confirm or update demographic information and (optional) add pharmacies
- Confirm or update your contact and personal information.
- To add a pharmacy to your patient record:
- Scroll to the bottom of the page and click Add Pharmacy.
In the Select a Pharmacy window, search for and select the pharmacy. - Click Save.
Note: You can store up to five pharmacies in your patient record, but only one can be designated as your primary pharmacy. - Click Continue.
If you have an outstanding account balance, a copay, or both, the Billing step appears.
Pay your copay or outstanding balance
- Select the charges to pay.
Note: For outstanding balances, you can enter an amount smaller than the charge in the Payment box. - Select your payment method.
If you select Pay at the front desk or I have questions about my balance, you can pay your balance at the time of your appointment. - Click Continue.
- If you selected Pay with a credit card, a payment window appears.
- Enter your credit card information, check the I'm not a robot box, and click Review Payment.
- Verify your credit card information and then click Submit Payment.
A message confirms that your payment was received. - Click Continue.
If the practice has any consent forms for you to sign, the Consent and Privacy step appears.
Sign consent forms
- Review each form on the page and either sign it or click Sign at the front desk to continue to the next step.
To sign a form, enter your full name in the signature box at the bottom of the window and click Sign. - After you review all the forms, click Continue.
The Health History Form step appears.
Complete the health history form
- Review each section (Medications, Allergies, and so on) of your health history form.
- For each section, click Update to add, edit, or remove items, or click No Changes.
- When you finish reviewing the health history, click Complete.
A message thanks you for completing online check-in.
Send a secure message to the provider (optional)
- After you check in for the appointment, the final window displays a prompt to enter a question for your provider. (For more information, see Questions for providers created during pre-appointment self check-in.)
- Click Send a secure message.
A message box opens. - Enter your question (up to 500 characters) and then click Send.
Practice staff will not see the question until the time of your visit.
- Click Send a secure message.
From a ReminderCall email message, you can confirm your upcoming appointment, check in for the appointment, and register for the Patient Portal.
Confirm the appointment from the ReminderCall email
-
In the appointment reminder email, click Yes, I'll be there.
A new window indicates that your appointment is confirmed and prompts you to check in for the appointment online. - To check in online, click Check In.
The Verify Identity step appears.
Verify your identity
- Select how you would like to receive your temporary passcode: Call or Text.
- Click Send Code.
- When you receive the
temporary passcode, enter it in the box, and then click Continue.
A window prompts you to indicate whether you are the patient or the patient's family member. - If you're checking in as the patient, click I'm [patient name].
- If you're a family member checking in on the patient's behalf, click I'm [patient name's] Family Member.
The Your Information window appears. - Select your relationship to the patient from the menu and enter your contact information.
- Click Continue.
The Patient Information step appears.
Confirm or update demographic information and (optional) add pharmacies
- Confirm or update your (or the patient's) contact and personal information.
- Would you like to receive text alerts? — This prompt appears only if you have not yet agreed to accept text message notifications from the practice. Select Yes to receive text messages from the practice.
- To add a pharmacy to the patient record:
- Scroll to the bottom of the page and click Add Pharmacy.
In the Select a Pharmacy window, search for and select the pharmacy. - Click Save.
Note: You can store up to five pharmacies in your patient record, but only one can be designated as your primary pharmacy. - Click Continue.
The Patient Portal registration step appears. You can still check in for the appointment even if you choose not to create a Patient Portal account.
Register for the Patient Portal (not required)
- If you do not want to create a Patient Portal account now, click the No Thanks button.
- To create a Patient Portal account:
- Verify your email in the Email address field.
- Enter the same password in the Password and Confirm password fields.
- Click Register Now.
A thank you message appears. - Click Continue.
A message asks you about signing up for electronic statements (e-statements). If you do not want to receive e-statements, click No thanks. - To receive e-statements, click Sign up, select the Receive e-Statements option, and then click Save.
If you have an outstanding account balance, a copay, or both, the Billing step appears.
Pay your copay or outstanding balance
- Select the charges to pay.
Note: For outstanding balances, you can enter an amount smaller than the charge in the Payment box. - Select your payment method.
If you select Pay at the front desk or I have questions about my balance, you can pay your balance at the time of your appointment. - Click Continue.
- If you selected Pay with a credit card, a payment window appears.
- Enter your credit card information, check the I'm not a robot box, and click Review Payment.
- Verify your credit card information and then click Submit Payment.
A message confirms that your payment was received. - Click Continue.
If the practice has any consent forms for you to sign, the Consent and Privacy step appears.
Sign consent forms
- Review each form on the page and either sign it or click Sign at the front desk to continue to the next step.
To sign a form, enter your full name in the signature box at the bottom of the window and click Sign. - After you review all the forms, click Continue.
The Health History Form step appears.
Complete the health history form
- Review each section (Medications, Allergies, and so on) of your health history form.
- For each section, click Update to add, edit, or remove items, or click No Changes.
- When you finish reviewing the health history, click Continue.
A message thanks you for completing online check-in. - After you check in for the appointment, the final window displays a prompt to enter a question for your provider. (For more information, see Questions for providers created during pre-appointment self check-in.)
- Click Send a secure message.
A message box opens. - Enter your question (up to 500 characters) and then click Send.
Practice staff will not see the question until the time of your visit.
- Click Send a secure message.
- If you registered for the Patient Portal, you can click the Go to Patient Portal button to display the Patient Portal home page.
Patients can securely attach documents and images to the messages they send to your practice from the Patient Portal. For example, a patient can send:
- PDF files — Multi-page medical form with a signature on each page
- PNG files — Photograph of a symptom (for example, a wound or rash) or a photograph of each page of a signed consent form
Note: If a patient sends a password-protected file, you see an error message and you can't display the attachment. Contact the patient and ask them to remove password protection and re-send the attachment.
Patients can attach up to 10 files (PDF, JPEG, JPG, or PNG) per message with a maximum file size of 10 MB each. Video files are not supported.
Important: Providers cannot send attachments to patients in a new message or in a response to an existing message. If the patient needs a form signed by the provider, such as return to work or return to school letters, see To send a provider-signed patient letter to the Patient Portal.
When a patient (or other portal user) sends a message from the Patient Portal, the message and any attachments appear in athenaOne as a patient case. Attachments become a historical part of the patient case. These patient cases are routed to the Clinical Inbox (Patient Cases column in the PORTAL row) and to the patient chart (Visits tab).
Important: You can view attachments from patients in athenaOne only on your desktop computer.
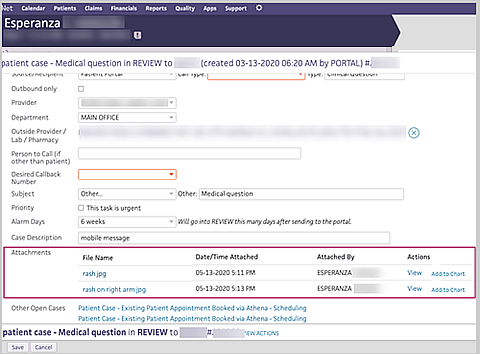
The Attachments section of the patient case lists the files that your patient attached to the message.
- File Name — Name that the patient gave the attached file
- Date/Time Attached — When the file was sent
- Attached By — Name of the Patient Portal user who attached the files
Note: If a patient sends a Patient Portal message without attachments, the following text appears in the Attachments section: No attachments have been added to this case.
You can act on patient cases for Patient Portal messages as follows:
- To reply to the message, see To reply to an open patient case.
Note: When you reply to a patient's message, you cannot add your own attachment to the patient case. If the patient needs a form signed by the provider, such as return to work or return to school letters, see To send a provider-signed patient letter to the Patient Portal. - To display an attachment, click the file name of the attachment or click View.
- To save an attachment to the patient chart, click Add to Chart.
Note: athenaOne does not check patient attachments for viruses. When you save an attachment sent by a patient, you can scan the file with your anti-virus software.
To save an attachment from a patient cases to the patient chart
You can save the attachments that patients send from the Patient Portal to the patient's chart in athenaOne.
Note: If a patient attaches more than one document to a message, you must add each attachment one at a time to the chart.
- In the Attachments section of the patient case, click Add to Chart.

The document appears in DATAENTRY status on the Process Document page.
Identify the document
- Department — This field defaults to the department that the Patient Portal message was sent to, but you can select another department from the menu.
- Patient — The patient whose chart you are adding the attachment to.
Classify the document
- Class — Select a document classification (for example, Clinical Document or Admin - Signed Forms & Letters).
Note: See Document Classifications for more information about document types and document processing. - Document Label — Click
 Select a document label to open the document label selector and select a document label.
 - If you cannot find an appropriate label after searching the full list of labels:
- Click the Document label not listed link at the bottom of the selector.
Note: To suggest additions to the global document label list, open a support case from athenaOne > Support > Success Community > Contact Client Support Center. - Internal Note — Enter a description of the document in this field.
Save the attachment to the chart
- Select the Data Entry Completed option.
- Click Save and Back to return to the patient case.
The Add to Chart link is replaced with the text "Added to Chart."
If you don't save the attachment on the Process Document page
- If you leave the Process Document page before you save the document, you can find the partially processed document in the Other documents section of the Find tab in the patient chart.
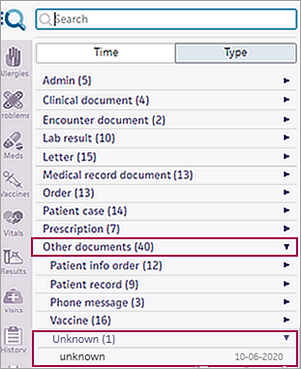
- Click Other documents to display them.
- Click Unknown.
- Click the document under Unknown to open it (the date that the document was added to the patient chart is shown).
- Complete the processing of the attachment document on the the Process Document page and save the document.
After you save an attachment from a patient case to the chart
After you save an attachment from a patient case to the patient chart, you can search for and display the attachment in the chart. If the attachment is a JPEG, JPG, or PNG image file, the file appears smaller than its actual size. To zoom the file display, click here.

The entire image is displayed in a new window (you do not need to scroll to see the whole image).
Important: Tell your patients not to send any credit card information in the messages they send from the Patient Portal. Credit card information includes images of credit cards and credit card data entered as text.
- On your desktop or laptop computer, log on to the Patient Portal.
The Patient Portal home page opens.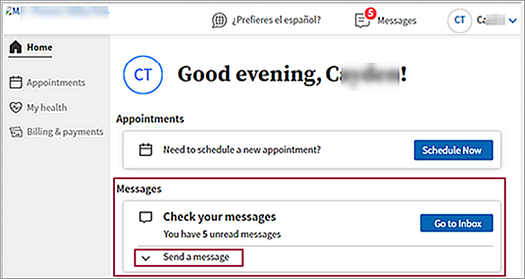
-
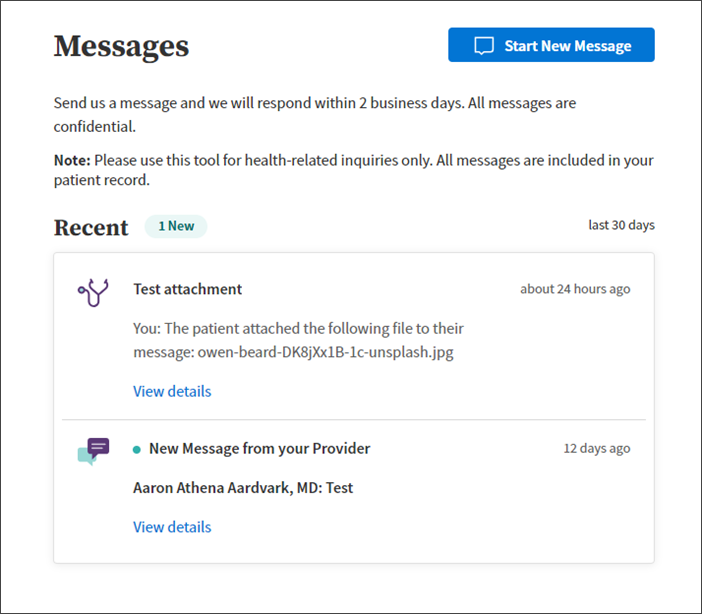
Patients can start a new message from two places:
-
Send a new message from the Patient Portal home page:

-
Start New Message from the Messages landing page:
-
-
Choose a message type. Note: The available message fields are determined by the message type. For example, if the patient chooses Prescriptions and Refills, the list of the medications auto-populates from the patient chart and into the message itself.
-
Choose a provider/care team and an office location.
-
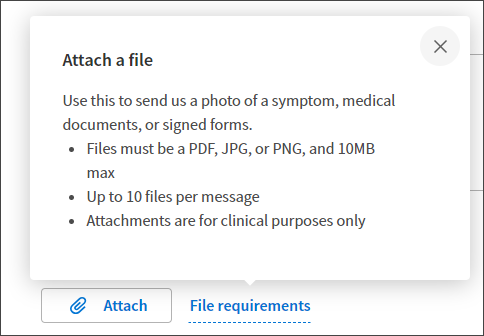
Attach a file (optional). Clicking File requirements provides some format guidance:
-
A message sent confirmation appears after sending.
-
Click Continue to go back to the Messages landing page, with an updated list of recent messages:
- Log on to the Patient Portal.
- Click My health on the left side of the page.
The My Health page is displayed. - Click the Medications tab to display your medications.
If additional information or instructions are available for a medication, click the Rx Info link below the name of the medication. - To request a medication refill, click Request refill.
The Compose Message page appears. - Enter the required information on the page and then click Send.
Patients can download and transmit their health records from the Patient Portal or the Patient Information Center in the form of a continuity of care document (CCD). A patient can send the health record using Direct Messaging, a secure, encrypted method for transmitting health information, or using regular email, which is not encrypted.
Note: To use Direct Messaging, the patient may need to phone the receiving provider to find out that provider's Direct email address (these addresses contain "@direct" in the address).
- Log on to the the Patient Portal or Patient Information Center.
- Click My health on the left side of the page.
-
On the My Health page, click the Health Records tab. The Health Records page appears.
Choose a time frame
- Specify the dates of service for the health information that you want to download or send.
- Custom date range — Specify the From date and the To date to retrieve health information from the dates of service in that time range.
- Single date — Specify the date for the information, for example, the date of your last physical exam.
- All time — Retrieve your entire health record.
Choose how you'd like to get your data
- By default, the Download tab is selected. To download your health record, click the Download button.
A .zip file containing your health record is downloaded to your computer. - To send your health record using email:
- Click the Email tab.
The tab displays a warning about sending sensitive information via unencrypted email.
Important: Make certain that the email address is correct! After you send the email, you cannot cancel or recover it. - Email — Enter the provider's email address in the field.
- Confirm email — Enter the provider's email address again in this field.
- Click the Send button.
The email recipient receives a one-time-use link to the health record. - To send your health record using Direct Messaging:
- Click the Direct Exchange tab.
- Direct Exchange Address — Enter the provider's Direct address in the field.
Note: If you do not know the provider's Direct address, contact the provider (these addresses contain "@direct" in the address). - Click the Send button.
If the receiving provider uses athenaClinicals, athenaOne classifies the health record as a clinical document (ClinicalDocument_CCDA) and routes it to the Clinical Inbox.
Vaccination information appears on the Patient Portal Health Summary page if the information is filled out in the patient chart. This information includes the following:
- Vaccine name
- Vaccine type
- Administered date
Note: Practice users cannot print the vaccination record when logged on to a patient's Patient Portal using the Log in to Portal as Patient option from the Quickview.
To print the vaccination record (patient instructions)
- Log on to the Patient Portal.
- Click My health on the left side of the page.
- Click the Health Summary tab.
- Click the Vaccinations section.
- To print the vaccination record, click the print icon.
A .pdf version of the vaccination record appears. - Print the .pdf file.
Some states require a provider signature at the bottom of the vaccination record. To meet the requirements of entities such as schools, camps, and other medical providers, you can request that athenahealth enable the "Usual Provider Signature in Portal My Health" setting for your practice. When this setting is enabled, athenaOne automatically adds the signature of the patient's usual provider to the bottom of the vaccination form when it is printed from the Patient Portal.
Note: If your state requires a "wet" signature, you can customize the setting to exclude the automated signature at the bottom of the form.
When patients submit their tobacco history on the Patient Portal or Patient Information Center, an alert appears next to the History tab in the patient chart. Use the data reconciliation process to integrate your patients' self-reported tobacco use with their chart.
- Log on to the Patient Portal or Patient Information Center.
- Click My health on the left side of the page.
- On the My Health page, click the Health Summary tab.
- Click Tobacco Use.
- Do you or have you ever smoked tobacco? — Select an option from the menu, for example, Former smoker.
- How much tobacco do you smoke? — Select an option from the menu, for example, 1 pack per week.
- How many years have you smoked tobacco? — If you are or were a smoker, enter the number of years you've smoked.
- Click Submit.
A confirmation message appears. - After you read the message, click OK.
-
Log in to the Patient Portal.
-
Click Manage Insurance from the Insurance section of Billing & Payments.
-
Click Add Insurance to add plan information.
-
Add insurance card images.
-
When you click eitherFront of Card or Back of Card, an instructional pop-up appears.
-
Either take a picture of the card or upload a compatible image file. A preview of the image appears after uploading. You can also toggle single picture mode on or off; the upload view adjusts depending on the status of the toggle.
If a patient or other user forgets his Patient Portal password, you can send an email with a password reset link.
- Display the patient's Quickview.
- Scroll down to the Contact Details & People with Portal Access section.
- Locate the name of the patient or the name of a Patient Portal user who is not the patient.
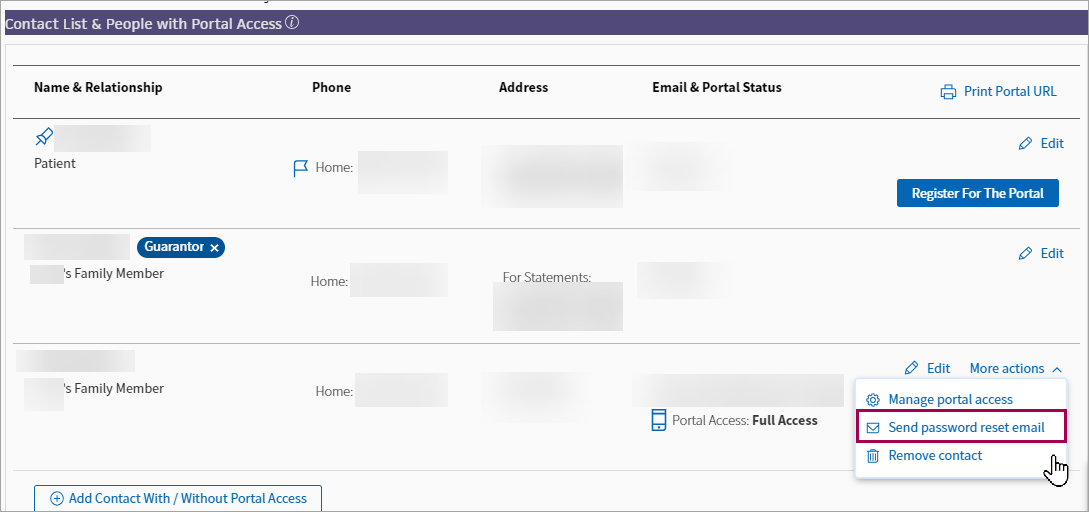
- Click More actions and then click Send password reset email.
When the patient or family member receives the email, that person resets the Patient Portal password as described in the following steps.
Following are instructions for a patient who needs to reset her athenahealth login password. If you sent the user a password reset email, the user opens the email and clicks Reset Password (see step 4).
- Display the Patient Portal login page.
- Click the Forgot your password? link.
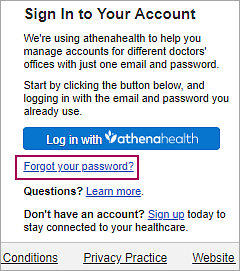
The Forgot Password page opens. - Enter the email address that you use to log on to the Patient Portal and click Email me.
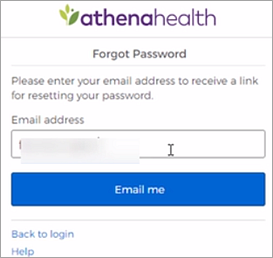
athenaOne sends the password reset email. - Open the email and click Reset Password.
The Create your new password page opens.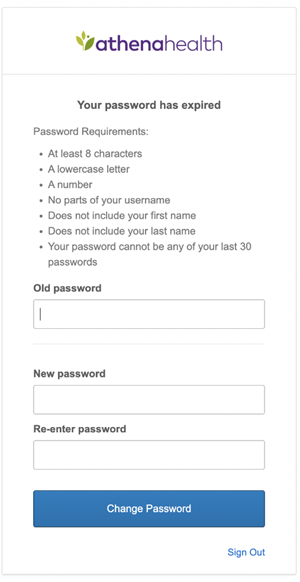
- Enter your new password twice and then click Save and continue to confirm it.
You are asked to verify your identity using the security option you created when you first set up your athenahealth login. - If you set up text messaging as your security option, the following message appears:
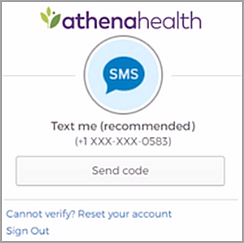
Note: If the phone number shown in the message is not correct — for example, if the phone was lost or discarded — click Cannot verify? Reset your account and see To reset your Patient Portal account. - Click Send code.
Note: If you do not receive the code within 5 minutes, make sure that the phone number shown in the message is correct. If you're using a mobile phone, try restarting the phone (make sure that you have cellular reception) and then click Send code again. - When you receive the security code on your phone, enter it in the space provided and then click Verify.
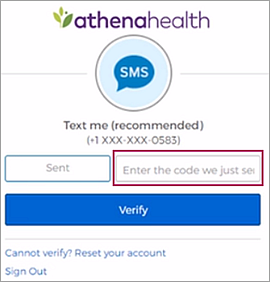
- After you verify your identity, the Patient Portal home page opens.
If a patient or other user cannot use the security option created to log on to the Patient Portal — for example, the user loses access to the recovery phone — that user must reset the Patient Portal account.
Note: The security option is not saved in athenaOne and is controlled exclusively by the patient or family member. Providers and other practice users are unable to change the security option because the user's athenahealth account may be linked to other providers and applications outside your organization.
You can provide the following instructions to Patient Portal users to help them with the account reset process. The Patient Portal user will re-create her athenahealth login profile and Patient Portal account.
Note: If you sent the user a password reset email, the user opens the email and clicks Reset Password (see step 3).
- Click the Forgot your password? link on the Patient Portal landing page.

The Forgot Password page opens. - Enter the email address associated with your Patient Portal account and click Email me.

athenaOne sends the password reset email. - Open the email and click Reset Password.
The Create your new password page opens.
- Enter your new password twice and then click Save and continue to confirm it.
You are asked to verify your identity using the security option you created when you first set up your athenahealth login.If you set up text messaging as your security option, the following message appears: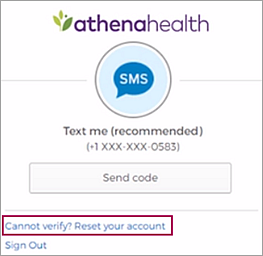
- If the phone number shown in the message is not correct — for example, if the phone was lost or discarded — click Cannot verify? Reset your account.
A warning message appears.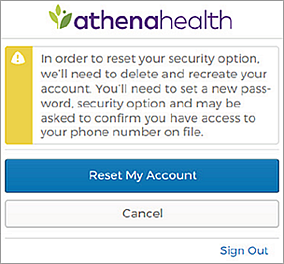
- To delete your existing account and create a new one, click Reset My Account.
Note: The account reset can take up to a minute to complete. You cannot click the Reset My Account button during this time.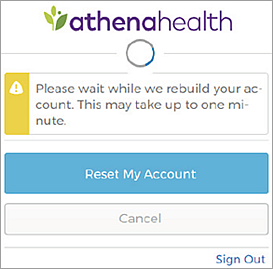
After your new Patient Portal account is created, the Create your new password page appears.
- Confirm your email address and enter your password twice. After you review the Terms and Conditions and the Privacy Policy, check the box and click Create account.
You are prompted to select a security option to protect your account. This one-time setup enables you to confirm your identity in the future if you forget your password. - Create your security option and finish creating your account, as described in To create a Patient Portal account from an email invitation or notification (begin at step 3).
Patients can access the Patient Portal using a mobile device compatible with iOS and Safari (iPhones, iPads, etc.) or using an Android device. The URL is the same one used for your practice's Patient Portal. Patients whose preferred language is Spanish can tap Esp in the upper right corner of the screen to display information on the Patient Portal in Spanish.
Note: The mobile version of the Patient Portal is not an app, but you can save the URL on the home screen of your smartphone.
The mobile version of the Patient Portal provides functionality similar to that of the desktop version:
- Login page
- Home page
- Terms and Conditions
- Privacy Policy
- Standard appointment functionality (listing of past and future appointments, cancelling and rescheduling of appointments)
- Inbox and message management
- Billing
- My Health (test results, medications, vaccinations, allergies, problems, and surgical procedures)
- Medication refills
- Communication with provider and practice
- Mobile feedback
When your patients open a Patient Portal invitation email on their smartphone, a mobile-friendly workflow makes it easy for them to complete the registration process on their smartphones.
For patient instructions, see To create a Patient Portal account from an email invitation or notification or To register for the Patient Portal in the office using a smartphone.
Patients can securely attach documents and images to the messages they send to your practice from the Patient Portal. For example, a patient can send:
- PDF files — Multi-page medical form with a signature on each page
- PNG files — Photograph of a symptom (for example, a wound or rash) or a photograph of each page of a signed consent form
Note: If a patient sends a password-protected file, you see an error message and you can't display the attachment. Contact the patient and ask them to remove password protection and re-send the attachment.
Patients can attach up to 10 files (PDF, JPEG, JPG, or PNG) per message with a maximum file size of 10 MB each. Video files are not supported.
Important: Providers cannot send attachments to patients in a new message or in a response to an existing message. If the patient needs a form signed by the provider, such as return to work or return to school letters, see To send a provider-signed patient letter to the Patient Portal.
When a patient (or other portal user) sends a message from the Patient Portal, the message and any attachments appear in athenaOne as a patient case. Attachments become a historical part of the patient case. These patient cases are routed to the Clinical Inbox (Patient Cases column in the PORTAL row) and to the patient chart (Visits tab).
Important: You can view attachments from patients in athenaOne only on your desktop computer.

The Attachments section of the patient case lists the files that your patient attached to the message.
- File Name — Name that the patient gave the attached file
- Date/Time Attached — When the file was sent
- Attached By — Name of the Patient Portal user who attached the files
Note: If a patient sends a Patient Portal message without attachments, the following text appears in the Attachments section: No attachments have been added to this case.
You can act on patient cases for Patient Portal messages as follows:
- To reply to the message, see To reply to an open patient case.
Note: When you reply to a patient's message, you cannot add your own attachment to the patient case. If the patient needs a form signed by the provider, such as return to work or return to school letters, see To send a provider-signed patient letter to the Patient Portal. - To display an attachment, click the file name of the attachment or click View.
- To save an attachment to the patient chart, click Add to Chart.
Note: athenaOne does not check patient attachments for viruses. When you save an attachment sent by a patient, you can scan the file with your anti-virus software.
To save an attachment from a patient cases to the patient chart
You can save the attachments that patients send from the Patient Portal to the patient's chart in athenaOne.
Note: If a patient attaches more than one document to a message, you must add each attachment one at a time to the chart.
- In the Attachments section of the patient case, click Add to Chart.

The document appears in DATAENTRY status on the Process Document page.
Identify the document
- Department — This field defaults to the department that the Patient Portal message was sent to, but you can select another department from the menu.
- Patient — The patient whose chart you are adding the attachment to.
Classify the document
- Class — Select a document classification (for example, Clinical Document or Admin - Signed Forms & Letters).
Note: See Document Classifications for more information about document types and document processing. - Document Label — Click
 Select a document label to open the document label selector and select a document label.
 - If you cannot find an appropriate label after searching the full list of labels:
- Click the Document label not listed link at the bottom of the selector.
Note: To suggest additions to the global document label list, open a support case from athenaOne > Support > Success Community > Contact Client Support Center. - Internal Note — Enter a description of the document in this field.
Save the attachment to the chart
- Select the Data Entry Completed option.
- Click Save and Back to return to the patient case.
The Add to Chart link is replaced with the text "Added to Chart."
If you don't save the attachment on the Process Document page
- If you leave the Process Document page before you save the document, you can find the partially processed document in the Other documents section of the Find tab in the patient chart.

- Click Other documents to display them.
- Click Unknown.
- Click the document under Unknown to open it (the date that the document was added to the patient chart is shown).
- Complete the processing of the attachment document on the the Process Document page and save the document.
After you save an attachment from a patient case to the chart
After you save an attachment from a patient case to the patient chart, you can search for and display the attachment in the chart. If the attachment is a JPEG, JPG, or PNG image file, the file appears smaller than its actual size. To zoom the file display, click here.

The entire image is displayed in a new window (you do not need to scroll to see the whole image).
Important: Tell your patients not to send any credit card information in the messages they send from the Patient Portal. Credit card information includes images of credit cards and credit card data entered as text.
- On your smartphone, log on to the Patient Portal.
- Tap Messages and then tap Compose Message.
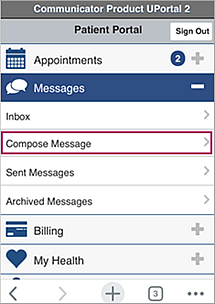
The Compose message page opens. - Provider — Select the provider to whom you are sending the message. The list includes providers that you've seen in the past.
Note: The Office staff option appears in the list only when the Provider-based message routing option is disabled on the Portal Settings page. - Location — Select the location for the provider you selected. The options in the Location list are the departments that the provider works in.
Note: This field is used to route the message to the appropriate Clinical Inbox. - Message type — Select the type of message from the list, for example Medical question or Appointments and scheduling.
Note: When you select certain message types, other fields appear. For example, if you select Prescriptions and refills, you are prompted to select a prescription. - Subject — Enter a brief summary of the message.
- Message — Enter a detailed message (up to 1000 characters).
- If you want to send the provider a file attachment:
- Tap Attach files.
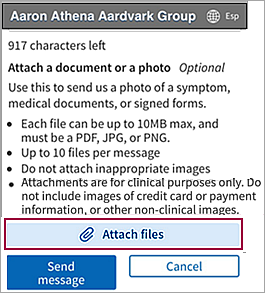
Note: You can attach files in the same way when you reply to a message from your provider. - Select the appropriate file from your browser or photo library.
Note: If you attach the wrong file, delete it before you send the message by clicking the X next to the file name. - To send more than one file, tap Attach files again. You can attach as many as 10 files.
Note: You must attach each file individually.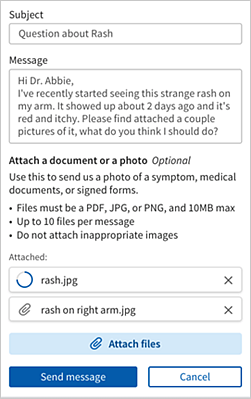
- Click Send message.
The message is routed to the appropriate provider's Clinical Inbox.
If your practice uses Credit Card Plus and the Patient Portal for your practice supports electronic payments, your patients can pay outstanding balances with a credit card on their smartphone.
- Patients can use their smartphones to pay all claims at once or pay individual claims in full or in part.
- Patients can access detailed information about their claims on their smartphones.
Note: To access the mobile Patient Portal, patients can use an iPhone or an Android device.
Before you can use this feature, you must set up online credit card payments and contact the CSC to make updates to your Patient Portal settings.
- On your smartphone, log in to your Patient Portal account with your email address and password.
- Display the Billing menu (tap Billing).
The Billing menu has two options: Bill Pay and Charge Details. - Tap Bill Pay.
Select Payment Amount appears. - Select the charges to pay. By default, all charges are selected. If you do not want to pay a selected charge at this time, clear the checkbox.
For more information about a charge, click View details. - To make a partial payment on a charge, change the amount in the text box.
- Tap Make a Payment.
Select Payment Method appears. - Enter your credit card information and billing address.
- I'm not a robot — Select this CAPTCHA option to verify that you are a person.
- Tap Continue.
Review & Submit appears. - Verify the payment details, credit card information, and billing address.
- Tap Submit.
After your payment is processed, a confirmation page appears (you also receive a confirmation email). - At the top of the screen, tap Home to return to the Patient Portal home page, or tap Sign Out. You can also tap full site to view complete payment details on the full Patient Portal.
- On your smartphone, log in to your Patient Portal account with your email address and password.
- Display the Billing menu (tap Billing).
The Billing menu has two options: Bill Pay and Charge Details. - Tap Charge Details.
Your balances appear. - Tap view detail next to a charge to see the services included in that charge.
Note: Patients can access the health history form only through the self check-in procedure. After patients complete self check-in, they cannot access the health history form again until they check in for their next appointment.
Patients can log on to the Patient Portal and check in for their appointments within 7 days of the appointment date.
Note: The number of days is set to 7 by default; however, you can open a case with the CSC to adjust this setting to 2-10 days.
Log on to the Patient Portal and find the appointment
- Log on to the Patient Portal on your mobile device.
- Tap Appointments.
- Tap Upcoming Appointments.
Check-in Available appears next to any appointment that is available for online check-in.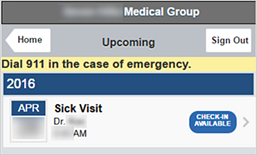
- Tap Check-in Available.
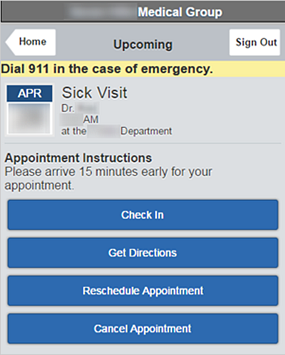
- Review the appointment information and tap Check In.
The Patient Information step appears.
Confirm or update demographic information
- Confirm or update your contact and personal information.
- To add a pharmacy to your patient record:
- Scroll down and tap Add Pharmacy.
In the Select a Pharmacy window, search for and select the pharmacy. - Tap Save.
Note: You can store up to five pharmacies in your patient record, but only one can be designated as your primary pharmacy. - Tap Continue.
If you have an outstanding account balance, a copay, or both, the Billing step appears.
Pay your copay or outstanding balance
- Select the charges to pay.
Note: For outstanding balances, you can enter an amount smaller than the charge in the Payment box. You can also select pay at your appointment. - Tap Continue.
- Select your payment method (credit card only).
You can select any credit card displayed on this page, or you can select Pay with a different card. - If you have no credit card on file with the practice, or if you selected Pay with a different card, a payment window appears. Enter your credit card information and check the I'm not a robot box.
- Tap Review Payment.
- Verify your payment information and tap Submit Payment.
A message confirms that your payment was received. - Tap Continue.
If the practice has any consent forms for you to sign, the Consent and Privacy step appears.
Sign consent forms
- Tap a form.
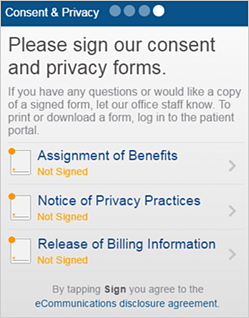
- Some forms (.html and .png) appear immediately.
- For other forms (.pdf), tap download. The form opens in your mobile device's default reader.
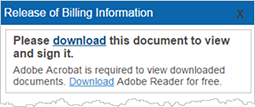
Note: You can tap Download to download Adobe Reader for free. - To sign the form, enter your full name in the signature box and tap Sign.

If you prefer to sign the form when you arrive at the practice, tap Sign at the front desk. - Review each form on your mobile device and either sign it or tap Sign at the front desk to continue to the next step.
- After you review all the forms, tap Continue.
The Health History Form step appears.
Complete the health history form
- Review each section (Medications, Allergies, and so on) of your health history form.
- For each section, tap Update to add, edit, or remove items, or click No Changes.
- If you tap No Changes in every health history section, this message appears:
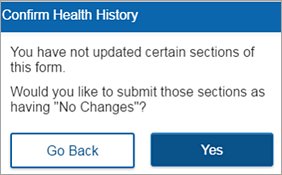
- To make changes, tap Go Back. Otherwise, tap Yes.
- When you finish reviewing the health history, tap Complete.
A message thanks you for completing online check-in. - After you check in for the appointment, the final window displays a prompt to enter a question for your provider. (For more information, see Questions for providers created during pre-appointment self check-in.)
- Tap Send a secure message.
A message box opens. - Enter your question (up to 500 characters) and then tap Send.
Practice staff will not see the question until the time of your visit.
- Tap Send a secure message.
From a ReminderCall email message, you can confirm your upcoming appointment and check in for the appointment.
Log on to the Patient Portal from the ReminderCall email
-
In the appointment reminder email, tap Confirm Appointment.
A new window indicates that your appointment is confirmed and prompts you to log on to the Patient Portal to check in for the appointment online. - Confirm your email address, enter your Patient Portal password, and tap Check In.
Note: If you can't remember your password, tap Forgot your password?
The Patient Information step appears.
Confirm or update demographic information
- Confirm or update your contact and personal information.
- To add a pharmacy to your patient record:
- Scroll down and tap Add Pharmacy.
In the Select a Pharmacy window, search for and select the pharmacy. - Tap Save.
Note: You can store up to five pharmacies in your patient record, but only one can be designated as your primary pharmacy. - Tap Continue.
If you have an outstanding account balance, a copay, or both, the Billing step appears.
Pay your copay or outstanding balance
- Select the charges to pay.
Note: For outstanding balances, you can enter an amount smaller than the charge in the Payment box. You can also select pay at your appointment. - Tap Continue.
- Select your payment method (credit card only).
You can select any credit card displayed on this page, or you can select Pay with a different card. - If you have no credit card on file with the practice, or if you selected Pay with a different card, a payment window appears. Enter your credit card information and check the I'm not a robot box.
- Tap Review Payment.
- Verify your payment information and tap Submit Payment.
A message confirms that your payment was received. - Tap Continue.
If the practice has any consent forms for you to sign, the Consent and Privacy step appears.
Sign consent forms
- Tap a form.

- Some forms (.html and .png) appear immediately.
- For other forms (.pdf), tap download. The form opens in your mobile device's default reader.

Note: You can tap Download to download Adobe Reader for free. - To sign the form, enter your full name in the signature box and tap Sign.

If you prefer to sign the form when you arrive at the practice, tap Sign at the front desk. - Review each form on your mobile device and either sign it or tap Sign at the front desk to continue to the next step.
- After you review all the forms, tap Continue.
The Health History Form step appears.
Complete the health history form
- Review each section (Medications, Allergies, and so on) of your health history form.
- For each section, tap Update to add, edit, or remove items, or click No Changes.
- If you tap No Changes in every health history section, this message appears:

- To make changes, tap Go Back. Otherwise, tap Yes.
- When you finish reviewing the health history, tap Complete.
A message thanks you for completing online check-in. - After you check in for the appointment, the final window displays a prompt to enter a question for your provider. (For more information, see Questions for providers created during pre-appointment self check-in.)
- Tap Send a secure message.
A message box opens. - Enter your question (up to 500 characters) and then tap Send.
Practice staff will not see the question until the time of your visit.
- Tap Send a secure message.
From a ReminderCall email message, you can confirm your upcoming appointment, check in for the appointment, and register for the Patient Portal.
Confirm the appointment from the ReminderCall email
-
In the appointment reminder email, tap Confirm Appointment.
A new window indicates that your appointment is confirmed and prompts you to check in for the appointment online.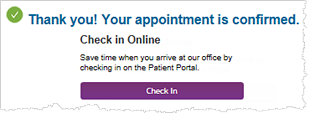
- To check in online, tap Check In.
The Verify Identity step appears.
Verify your identity
- Select how you would like to receive your temporary passcode: Call or Text.
- Tap Send Code.
- When you receive the
temporary passcode, enter it in the box, and then tap Continue.
A window prompts you to indicate whether you are the patient or the patient's family member. - If you're checking in as the patient, tap I'm [patient name].
- If you're a family member checking in on the patient's behalf, tap I'm [patient name's] Family Member.
The Your Information step appears. - Select your relationship to the patient from the menu and enter your contact information.
- Tap Continue.
The Patient Information step appears.
Confirm or update demographic information
- Confirm or update your (or the patient's) contact and personal information.
- To receive text message notifications from the practice, select the Yes, you may send me text alerts option. (This option appears only if you have not yet agreed to accept text message notifications from the practice.)
- Tap Continue.
The Patient Portal registration step appears. You can still check in for the appointment even if you choose not to create a Patient Portal account.
Register for the Patient Portal (not required)
- If you do not want to create a Patient Portal account now, tap No Thanks.
- To create a Patient Portal account:
- Verify your email in the Email address field.
- Enter the same password in the Password and Confirm password fields.
- Select I have read and agree to the Terms and Conditions and Privacy Policy (after reading the documents).
- Tap Sign Up Now.
A thank you message appears. - Tap Continue.
A message asks you about signing up for electronic statements (e-statements). If you do not want to receive e-statements, tap No thanks. - To receive e-statements, tap Sign up, select the Receive e-Statements option, and then tap Save.
If you have an outstanding account balance, a copay, or both, the Billing step appears.
Pay your copay or outstanding balance
- Select the charges to pay.
Note: For outstanding balances, you can enter an amount smaller than the charge in the Payment box. - Tap Continue.
- Select your payment method (credit card only).
You can select any credit card displayed on this page, or you can select Pay with a different card. - If you have no credit card on file with the practice, or if you selected Pay with a different card, a payment window appears. Enter your credit card information and check the I'm not a robot box.
- Tap Review Payment.
- Verify your payment information and tap Submit Payment.
A message confirms that your payment was received. - Tap Continue
If the practice has any consent forms for you to sign, the Consent and Privacy step appears.
Sign consent forms
- Tap a form.

- Some forms (.html and .png) appear immediately.
- For other forms (.pdf), tap download. The form opens in your mobile device's default reader.

Note: You can tap Download to download Adobe Reader for free. - To sign the form, enter your full name in the signature box and tap Sign.

If you prefer to sign the form when you arrive at the practice, tap Sign at the front desk. - Review each form on your mobile device and either sign it or tap Sign at the front desk to continue to the next step.
- After you review all the forms, tap Continue.
The Health History Form step appears.
Complete the health history form
- Review each section (Medications, Allergies, and so on) of your health history form.
- For each section, tap Update to add, edit, or remove items, or tap No Changes.
- If you tap No Changes in every health history section, this message appears:

- To make changes, tap Go Back. Otherwise, tap Yes.
- When you finish reviewing the health history, tap Complete.
A message thanks you for completing online check-in. - After you check in for the appointment, the final window displays a prompt to enter a question for your provider. (For more information, see Questions for providers created during pre-appointment self check-in.)
- Tap Send a secure message.
A message box opens. - Enter your question (up to 500 characters) and then tap Send.
Practice staff will not see the question until the time of your visit.
- Tap Send a secure message.
- If you registered for the Patient Portal, you can tap Go to Patient Portal to display the Patient Portal home page.
Using the Patient Portal, patients can:
- Update their personal information.
- View and manage their insurance information.
- Exchange secure messages with your office.
- Make appointments.
- View upcoming appointments and appointment ticklers.
- View past medications, past allergies, and past problems.
- Preview and download their health record.
- Transmit their health data from the Patient Portal to other providers.
- Fill out forms.
- Retrieve test results. The results appear on the Patient Portal in a document that the patient can view, download, or transmit. A result must be in closed status to appear in this document (a result in review status does not appear in the document that the patient can see on the Patient Portal).
- View account statements.
- Pay balances.
- Get directions to your practice.
For a list of all options available to patients on the Patient Portal, see Quick Reference — Patient Portal (What Patients See).
The MIPS and Promoting Interoperability (PI) quality programs require that patients are provided online access to their health information in a timely manner. When you click Done with Check-in, the Patient Portal invitation menu automatically prompts you to register the patient if the patient:
- Has not registered for the Patient Portal.
- Has not previously been given access to the Patient Portal.
If athenaOne prompts you to register a patient for the Patient Portal when you click Done with Check-in, you can either:
- Register the patient for the Patient Portal or Patient Information Center using one of the buttons on the Register Patient or Register Family Member page.
- Indicate that the patient declined to register by clicking the Indicate portal declined reason link in the Contact Details & People with Portal Access section. After you click Indicate portal declined reason, you must select a reason from the list. Reasons include "Does not have an email" and "Does not want a portal account."
The decline reason and date are displayed in the Contact Details & People with Portal Access section for 6 months, and athenaOne does not display the Patient Portal invitation menu for that patient when you click Done with Check-in. After 6 months, athenaOne displays the Patient Portal invitation menu again when you click Done with Check-in for this patient.
Note: To report on this data using the Report Builder, select the Patient Demographics report type and then select the Patient Portal Decline Date and Patient Portal Decline Reason display columns.
If a patient declines to register for the Patient Portal, you can satisfy the portal access measure as follows:
- Click Print Portal URL to print registration instructions from athenaOne and give them to the patient.
or
- Click Provided Registration Instructions to indicate that you gave the patient other instructions outside athenaOne (for example, a brochure that includes registration instructions).
When you use either of these options, athenaOne records your action, which counts towards satisfying the patient access measure for the provider.
There's a section under Billing & Payments: Insurance.
If the patient already has insurance information on file, they can view basic information right from this section:
-
The status of the insurance, including
- Submitted — The patient has submitted insurance information and it is waiting for review and approval by your staff.
- On File — The patient has submitted insurance information and it has been reviewed and approved by your staff.
- Removal Pending — The patient requested that insurance information be removed.
-
The insurance carrier name.
-
The member ID
This section adapts to the current status of the patient's insurance.
The Patient Portal always displays the two most recently-submitted insurance plans. Patients can have information on file for more than two plans, but the view in the Patient Portal is limited to two plans.
Test results appear on the Patient Portal in a document that the patient can view, download, and transmit. The document remains in SUBMITTED status until the patient retrieves the test results from the Patient Portal, after which the document is automatically set to CLOSED status.
Note: Analyte data from lab results appears on the Patient Portal only when the provider moves the document into SUBMITTED or CLOSED status, so that the provider has time to review the analyte data attached to labs before the information is made available to the patient. Analyte data that you enter manually in a patient chart or in a flowsheet appears on the Patient Portal when the data is saved.
To send a test result to the Patient Portal, you must process a result in REVIEW status.
- From the actions menu, select one of the following actions:
- Notify Patient - Normal
- Notify Patient - Abnormal
- Click the Send to portal delivery option in the menu (only one of these options appears):
- Send to portal - Email patient
- Send to portal - Text patient
- Send to portal - Call patient
Note: The delivery option that appears — email, text, or phone call — depends on patient and practice settings. For more information, see ResultsCall delivery options.
You can also send a test result to the Patient Portal without sending a ResultsCall notification by opening the test result document, clicking more actions, and then selecting the Publish to Portal (no notification) option. This action sets the document to CLOSED status.
Important: The Publish to Portal (no notification) option appears only for patients who have a Patient Portal account and for any patient who received a Patient Portal invitation — even if the patient did not subsequently register for the Patient Portal.
For more information about sending test results to patients using ResultsCall, see To send a ResultsCall notification to a patient from the Clinical Inbox.
athenaOne can automatically publish lab and imaging results directly to the Patient Portal, allowing patients to receive lab and imaging results as soon as they become available.
Note: This feature works only with results sent to the patient's ambulatory chart; results in hospital charts use a different infrastructure.
athenaOne can automatically publish lab and imaging results:
-
Received via interface (a connection between an external system and athenaOne)
-
From point-of-care tests
-
Received via Marketplace Partner APIs
-
Received via fax
The ability to automatically publish lab and imaging results received via interface to the Patient Portal was first introduced in 2021. If your organization is enabled to automatically publish lab and imaging results, lab and imaging results received via interface, from point-of-care tests, from Marketplace Partner APIs, and via fax are all included in the results published.
If your organization is not yet using the feature to automatically publish lab and imaging results to the Patient Portal, you must contact the CSC to enable the feature for you at the practice or department level.
To opt in, contact the CSC. On the Main Menu, click Support > Success Community > Contact Client Support Center.
You can automatically publish lab and imaging results received via interface to the Patient Portal when the following prerequisites are met, and the lab or imaging order and result document meet the described criteria.
Prerequisites
-
The Patient Portal is configured for your practice
-
The patient opted in to use the Patient Portal
-
The imaging center sends results via interface
-
Your organization is enabled to automatically publish lab and imaging results.
Criteria for the lab or imaging order
When you place the lab or imaging order, leave this box unchecked:

Important: Results are immediately published to the Patient Portal, per your practice/department configuration. To exclude specific results from auto publishing, you must check this box. You can manually publish results via standard workflows once results are available.
Note: Results for orders placed before your practice was enabled to automatically publish lab and imaging results are excluded automatically from auto-publishing. If the auto-publishing feature is turned off and enabled again at a later time, results for orders placed while the feature was turned off are excluded for auto-publishing.
Criteria for the result document
For a lab result received via interface to automatically publish to the Patient Portal, the following conditions must be met:
-
Result is tied to an order and not excluded for sharing prior to provider review
-
Document is in REVIEW or CLOSED status
-
Result has structured data (that is, it has one or more observations)
-
Result category matches the department setting value (NORMAL/ALL)
Note: You decide whether all lab results are automatically published to the Patient Portal or only lab results with a "normal" finding. You can choose a different option for each department, and you can choose not to enable this feature in some departments. If you choose to automatically publish only normal lab results to the Patient Portal, only results with an explicit department setting value of NORMAL are published. -
The status of the result is one of the following:
-
FINAL
-
COMPLETE
-
FINAL RESULT
-
SIGNED
-
SIGNED OFF
-
F
-
CORRECTED
-
AMENDED
-
For an imaging result received via interface to automatically publish to the Patient Portal, the following conditions must be met:
-
Result is tied to an order and not excluded for sharing prior to provider review
-
Document is in REVIEW or CLOSED status
-
The status of the result is one of the following:
-
FINAL
-
COMPLETE
-
CORRECTED
-
AMENDED
-
View the reason a lab or imaging result was not automatically published
When athenaOne tries to automatically publish a lab or imaging result sent by interface but cannot, you can view the reason in the Audit History.
In this example, the reason is that the document is not in an eligible status to be automatically published:
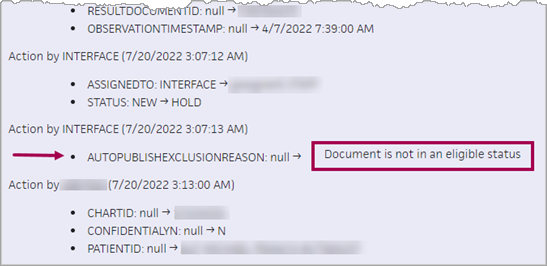
You can automatically publish lab and imaging results from point-of-care tests to the Patient Portal when the following prerequisites are met, and the lab or imaging order and result document meet the described criteria.
Prerequisites
-
The Patient Portal is configured for your practice.
-
The patient opted in to use the Patient Portal.
-
The point-of-care test lab or imaging order is placed.
-
Your organization is enabled to automatically publish lab and imaging results.
Criteria for the lab or imaging order
When you place the lab or imaging order, leave this box unchecked:

Important: Point-of-care test results and interpretations are immediately published to the Patient Portal, per your practice/department configuration. To exclude specific results from auto publishing, you must check this box. You can manually publish results via standard workflows once results are available.
Note: Results for orders placed before your practice was enabled to automatically publish lab and imaging results are excluded automatically from auto-publishing. If the auto-publishing feature is turned off and enabled again at a later time, results for orders placed while the feature was turned off are excluded for auto-publishing.
Criteria for the result document
For a lab result from a point-of-care test to automatically publish to the Patient Portal, the following conditions must be met:
-
Result is tied to an order and not excluded for sharing prior to provider review
-
Document is in CLOSED status
-
Result has structured data (that is, it has one or more observations)
-
Result category matches the department setting value (NORMAL/ALL)
Note: You decide whether all lab results are automatically published to the Patient Portal or only lab results with a "normal" finding. You can choose a different option for each department, and you can choose not to enable this feature in some departments. If you choose to automatically publish only normal lab results to the Patient Portal, only results with an explicit department setting value of NORMAL are published.
For an imaging result from a point-of-care test to automatically publish to the Patient Portal, the following conditions must be met:
-
Result is tied to an order and not excluded for sharing prior to provider review
-
Document is in CLOSED status
-
Result category matches the department setting value (ALL)
View the reason a lab or imaging result was not automatically published
When athenaOne tries to automatically publish a lab or imaging result from a point-of-care test but cannot, you can view the reason in the Audit History.
In this example, the reason is that the document is not in an eligible status to be automatically published:
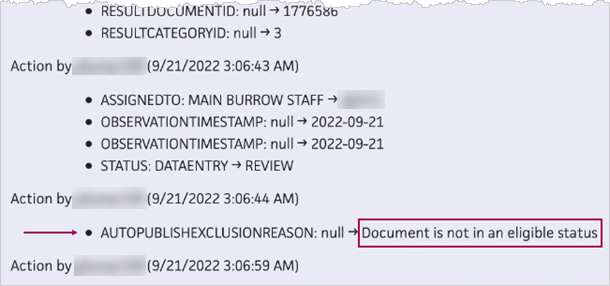
You can automatically publish lab and imaging results received via Marketplace Partner APIs when the following prerequisites are met, and the lab or imaging order and result document meet the described criteria.
Prerequisites
-
The Patient Portal is configured for your practice.
-
The patient opted in to use the Patient Portal.
-
The lab and imaging results are received via Marketplace Partner APIs.
-
Your organization is enabled to automatically publish lab and imaging results.
Criteria for the lab or imaging order
When you place the lab or imaging order, leave this box unchecked:

Important: Results are immediately published to the Patient Portal, per your practice/department configuration. To exclude specific results from auto publishing, you must check this box. You can manually publish results via standard workflows once results are available.
Note: Results for orders placed before your practice was enabled to automatically publish lab and imaging results are excluded automatically from auto-publishing. If the auto-publishing feature is turned off and enabled again at a later time, results for orders placed while the feature was turned off are excluded for auto-publishing.
Criteria for the result document
For a lab result received via a Marketplace Partner API to automatically publish to the Patient Portal, the following conditions must be met:
-
Result is tied to an order and not excluded for sharing prior to provider review
-
Document is in REVIEW or CLOSED status
-
Result has structured data (that is, it has one or more observations)
-
Result category matches the department setting value (NORMAL/ALL)
Note: You decide whether all lab results are automatically published to the Patient Portal or only lab results with a "normal" finding. You can choose a different option for each department, and you can choose not to enable this feature in some departments. If you choose to automatically publish only normal lab results to the Patient Portal, only results with an explicit department setting value of NORMAL are published. -
Result is in FINAL, COMPLETE, CORRECTED, or AMENDED status
For an imaging result received via a Marketplace Partner API to automatically publish to the Patient Portal, the following conditions must be met:
-
Result is tied to an order and not excluded for sharing prior to provider review
-
Document is in REVIEW or CLOSED status
-
Result category matches the department setting value (ALL)
View the reason a lab or imaging result was not automatically published
When athenaOne tries to automatically publish a lab or imaging result received via a Marketplace Partner API but cannot, you can view the reason in the Audit History.
In this example, the reason is that the document is not structured in an eligible state to be automatically published:
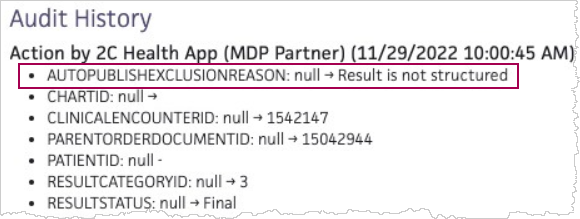
You can automatically publish lab and imaging results received via fax when the following prerequisites are met, and the lab or imaging order and result document meet the described criteria.
Prerequisites
-
The Patient Portal is configured for your practice.
-
The patient opted in to use the Patient Portal.
-
The lab and imaging results are sent via fax.
-
Your organization is enabled to automatically publish lab and imaging results.
Criteria for the lab or imaging order
When you place the lab or imaging order, leave this box unchecked:

Important: Results are immediately published to the Patient Portal, per your practice/department configuration. To exclude specific results from auto publishing, you must check this box. You can manually publish results via standard workflows once results are available.
Note: Results for orders placed before your practice was enabled to automatically publish lab and imaging results are excluded automatically from auto-publishing.If the auto-publishing feature is turned off and enabled again at a later time, results for orders placed while the feature was turned off are excluded for auto-publishing.
Criteria for the result document
For a lab result received via fax to automatically publish to the Patient Portal, the following conditions must be met:
-
Result is tied to an order and not excluded for sharing prior to provider review
-
Document is in CLOSED status
-
Result has structured data (that is, it has one or more observations)
-
Result category matches the department setting value (NORMAL/ALL)
Note: You decide whether all lab results are automatically published to the Patient Portal or only lab results with a "normal" finding. You can choose a different option for each department, and you can choose not to enable this feature in some departments. If you choose to automatically publish only normal lab results to the Patient Portal, only results with an explicit department setting value of NORMAL are published. -
The status of the result is one of the following:
-
FINAL
-
COMPLETE
-
FINAL RESULT
-
SIGNED
-
SIGNED OFF
-
F
-
CORRECTED
-
AMENDED
-
-
Result document is not marked CONFIDENTIAL
For an imaging result received via fax to automatically publish to the Patient Portal, the following conditions must be met:
-
Result is tied to an order and not excluded for sharing prior to provider review
-
Document is in CLOSED status
-
Result category matches the department setting value (ALL)
-
Result document is not marked CONFIDENTIAL
View the reason a lab or imaging result was not automatically published
When athenaOne tries to automatically publish a lab or imaging result received via fax but cannot, you can view the reason in the Audit History.
In this example, the reason is that the document is not in an eligible status to be automatically published:

If your practice uses athenaClinicals with the athenaCommunicator Patient Portal, you can display vitals graphs on the Patient Portal. Contact the CSC to enable vitals graphs for the Patient Portal.
Vitals graphs available on the My Health / Vitals page of the Patient Portal include:
- Weight
- BMI
- Blood pressure
- Cholesterol
- Diabetes A1C
- Coumadin INR
Analyte data from lab results appears on the Patient Portal only when the provider moves the result document into SUBMITTED or CLOSED status. In this way, the provider can review the analyte data attached to labs before the information is made available to the patient.
Analyte data that you enter manually in a patient chart or in a flowsheet appears on the Patient Portal when it is saved.
The athenahealth account for Patient Portal users creates a clear distinction between:
- Patient's or caregiver's athenahealth account (email and password).
- Patient's or caregiver's access to your organization's Patient Portal.
Note: Patient Portal users do not need to be patients at your practice.
The athenahealth account exists separate from your organization.
- A patient or caregiver can use the athenahealth account to log on to any Patient Portal powered by athenahealth, as well as to other applications.
Note: Patients and caregivers can manage their athenahealth account from the My profile page of any Patient Portal they use.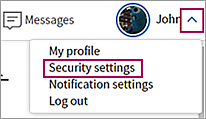
- Your organization manages a patient's access to your Patient Portal through the patient Quickview in athenaOne.
When you send a patient an email invitation to your Patient Portal, you grant permission for that patient to access your Patient Portal using their athenahealth account. If the patient or caregiver does not have an athenahealth account at that email address, they can create an athenahealth account using the invitation email you sent them.
When you delete a patient's Patient Portal account, you revoke that patient's access to your organization's Patient Portal; you are not deleting the patient's athenahealth account.
Patient Portal users can have different levels of access to patient records, as follows:
- Self — Patient Portal user is accessing her own patient record.
- Full access — Patient Portal user has full access to a patient record that is not his own. Full access is used in a family access scenario, such as when a mother has a Patient Portal account and accesses her child's patient record. (The Patient Portal user does not need to be a patient at your practice.)
- Billing-only access — Patient Portal user has billing-only access to a patient record that is not her own. A Patient Portal user with billing-only access can see only billing information, not health information. An example of this type of access is when a parent is the Patient Portal user with billing-only access to the patient record of a 20-year-old child.
Patient Portal users can access multiple records using the same login credentials (email address and password), for example, when a parent accesses her own patient record and the records of her children and elderly father.
Age of majority
The age of majority is governed by state law (in most states, the age of majority is 18). On the child's age of majority birthday, athenaOne automatically changes the access level for all family members who have full access to this patient record from full access to billing-only access. The practice or the patient can subsequently change the family member's access level or remove access at any time. If you are unsure of the age of majority in your state, check online. You can also contact the CSC to verify the age of majority in your state and control these settings.
When patients register for a Patient Portal account to access their own records, athenaOne identifies the Patient Portal user as a registered patient of the practice using the following matching logic.
- The following items entered on the Patient Portal registration page must match the corresponding items in athenaOne:
- First name
- Last name
- Date of birth
- Gender
- In addition, one of the following items must also match:
- Phone number, OR
- Email address
The best way to register patients for the Patient Portal is to register them in your office or to send them an email invitation. These methods are preferred because athenaOne knows who the patient is, who the provider is, and what department the patient is registered in; there's no need to ask the patient to enter any demographic information.
For example, when the patient receives an email invitation, opens it, and clicks Register Now:
- The first factor of authentication is the email itself.
- The second factor is the call or text message that the patient receives to confirm her identity.
Your practice has the patient's email address and phone number, and the patient's identity is confirmed when she responds to a message that the Patient Portal sends to the corresponding device.
When patients register for the Patient Portal on their own
When one of your patients searches the Internet for your practice, finds your website, and decides to register for the Patient Portal on their own (without an email invitation from your practice), no electronic link exists between the patient and your practice. The Patient Portal collects some initial information:
- Is this a patient or a patient's family member?
- Basic demographic information about the patient: first name, last name, gender, DOB, phone number, and email address.
The Patient Portal attempts to match this demographic information to existing patients at your practice by checking the first name, last name, gender, DOB, and either the phone number or email address. Even if this information matches one of your patients in athenaOne, the information constitutes only one factor of authentication, so the Patient Portal cannot tell the user whether it has confirmed that she is a patient at your practice.
Someone could fraudulently enter another person's first name, last name, gender, DOB, and phone number on the Patient Portal in an attempt to "phish" for PHI. The Patient Portal cannot reveal anything, including whether the named person is a patient at the practice, until there is a second factor of authentication, such as confirming the person's identity via phone or text message.
For this reason, the Patient Portal then asks the user to confirm his identity via phone or text message. After the user confirms his identity, the Patient Portal can safely indicate the user's next steps:
- If the user is an existing patient at your practice and enters the correct demographic information, the Patient Portal matches the user to a patient at your practice. This user sets a password and completes the Patient Portal registration without any issues.
- If the user is an existing patient at your practice but enters demographic information that does not match a patient record for your practice in athenaOne, a warning message instructs the user to call your office to resolve the problem. This user should not continue the Patient Portal registration process.
- If the user is a brand new patient, the demographic information she enters will not match any patient record for your practice in athenaOne. The Patient Portal prompts the user to select a provider and location, and then create a password. After the user does this, she is registered as a new patient at your practice, with the correct provider, department, and provider group; the user is also registered for the Patient Portal.
Note: New patients who register for your practice on the Patient Portal appear on the Manage Prospective Patients page.
If your practice configuration allows existing patients to register for Patient Portal accounts and does not allow family or guarantor access to those accounts, athenahealth can help you increase your patients' adoption of the Patient Portal: Every time you check in a patient who does not have a Patient Portal account, has an email address on file, and has not opted out of Patient Portal adoption emails, athenaOne automatically sends that patient a Patient Portal adoption email that encourages them to create an account.
You can use two Report Library reports, "Portal Adoption Rate — Sentinel Metrics Dashboard Report" and "Patients Not Registered for Portal," to understand how well your practice is encouraging patients to register for the Patient Portal. These reports are located on the Communicator tab of the Report Library.
Note: To use these reports, you must have permission to access the Report Library and the Report Builder.
The Portal Adoption Rate - Sentinel Metrics Dashboard Report includes the following information:
- Percentage and number of patients who accepted the Patient Portal Terms and Conditions within 30 days of their appointment.
For patients with multiple appointments in the same month, only the first appointment counts towards this metric. - Percentage and number of email addresses collected from patients over the last 30 days.
The Portal Adoption Rate - Sentinel Metrics Dashboard Report shows results for the 30 days prior to the date that you run the report. This report also helps you to understand the Portal adoption rate sentinel metric on the Sentinel Metrics Dashboard.
To run this report, you must have permission to access the Report Library and the Report Builder.
- Display the Report Library page: On the Main Menu, click Reports. Under General, click Report Library.
- Click the Communicator tab.
- Click run next to Portal Adoption Rate - Sentinel Metrics Dashboard Report.
The Choose Report: Format page appears. - Choose a format for the report.
- XML — The report results will be displayed on your screen. You can sort the results.
- Comma Delimited Text (CSV) — The report results will be downloaded to a file that can be viewed in Microsoft Excel.
- Custom — The report results will be downloaded to a file that can be viewed in a text editor.
- Select other options for the report.
- Show Totals — Display column totals (this option is selected by default).
- Deidentify Patient Data — Hide patient data to protect PHI, especially for any report that may be shared.
- Show Reporting Restricted Patients — Patients with a reporting restriction are excluded from the report results unless you select this option. (For more information, see Privacy Protection Notes.)
- Show in Small Print — This option appears if you select XML as the report format.
- Hide Line Numbers — This option appears if you select XML as the report format. Select this option if you do not want the line numbers to appear (line numbers appear by default).
- Show Filter Criteria — This option appears if you select Comma Delimited Text (CSV) or Custom as the report format. Select this option to display the filter criteria at the top of your report output.
- Hide Column Headings — This option appears if you select Comma Delimited Text (CSV) or Custom as the report format. Select this option to hide the column headings in your report output.
- Hide Report Name — This option appears if you select Comma Delimited Text (CSV) or Custom as the report format. Select this option to hide the report name in your report output.
- Click OK.
| Portal Adoption Rate report — Column Headings | |
|---|---|
| rndrng prvdr prvdr grp | Provider group for the rendering provider (this column appears only if your practice uses provider groups). |
| svc dept POS type |
Place of service. |
| svc dprtmnt |
Service department. |
| rndrng prvdr |
Rendering provider. |
| cnt portal accts |
Number of Patient Portal accounts created during the 30-day period before you ran the report. |
| cnt patients |
Number of Patient Portal users added during the 30-day period before you ran the report. |
| portal adoption rate |
Percentage of patients who had appointments during the 30-day period before you ran the report who subsequently signed up for the Patient Portal. |
| cnt email coll |
Total number of email addresses collected for each rendering provider in the service department. |
| email coll rate |
Percentage of email addresses collected for each rendering provider in the service department. |
Patients whose preferred language is Spanish can display the information on the Patient Portal in Spanish.
- Laptop computer — Click ¿Prefieres el español? at the top of any page.

- Mobile device — Tap Esp in the upper right corner of the screen on your mobile device.
If a patient chooses Spanish for the Patient Portal, the language defaults to Spanish the next time the patient visits any athenahealth Patient Portal.
To translate the Patient Portal back to English, a patient can click Prefer English? at the top of any page on a laptop, or tap Eng in the upper right corner of the screen on a mobile device.
Information that is translated into Spanish
All static text on each page of the Patient Portal is translated into Spanish, including the options on the left side of the screen and the tabs on the My health (Mi salud) and Billing (Facturación y pagos) pages.
The patient profile options and the tabs on the My profile page are also translated into Spanish.
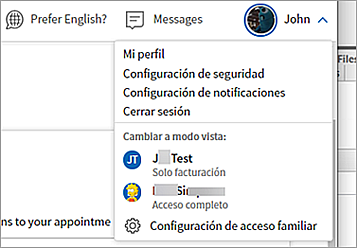
The options at the bottom of each Patient Portal page are also translated into Spanish.

When a patient clicks the FAQ (Preguntas Frecuentes) options, the text displayed is in Spanish.
Note: The Terms and Conditions, Privacy Practice, and Website Privacy text is not translated.
Information that is not translated into Spanish
The following information on the Patient Portal is not translated into Spanish:
- Content of secure messages
- Patient-specific clinical and claims data, such as medications, allergies, vaccines, patient care summaries, and appointments
- Practice-specific data, for example, the practice name, provider names, and department names and addresses
- Practice-specific content, for example, custom text that your organization added to the Sign In or Home page of the Patient Portal
Note: You can translate the custom text and request that the CSC update your Patient Portal to include the Spanish text. Both the English and Spanish text will appear on the Patient Portal.
To encourage patients to use the secure messaging feature on the Patient Portal and Patient Information Center, messaging prompts appear on the home page and throughout the My Health section.
When patients view their medical information on the My Health tabs of the Patient Portal or Patient Information Center, athenaOne prompts patients to send a message.
Secure messaging is required for MIPS Promoting Interoperability due to the Patient Electronic Access measure specification and certification requirements.
To enable prompts that ask patients whether they have questions after viewing data on the Patient Portal or Patient Information Center, patient messaging must be enabled. If you need additional help meeting the secure messaging measure, athenahealth can enable this feature for you.
Paperless statements (e-statements) are a simple and effective way to receive, manage, and keep records of your billing information online while reducing your environmental impact. Patients can opt in to electronic statements by updating their billing preferences on the Patient Portal.
athenaCommunicator sends an email to patients when they opt in to receiving electronic statements.
The Patient Portal provides information about the paperless statements service, as well as multiple opportunities to enroll in the service.
- Persistent prompts on the Home page and the Billing pages encourage patients to enroll in paperless statements.
- Paperless Statements Frequently Asked Questions (FAQ) page explains how the paperless statements work.
- Patients can view and change their paperless statement enrollment status on the Billing / Statements page.
Note: Credit Card Plus must be enabled for patients to make any payments from the Patient Portal.
The Partial E-payments feature allows patients to make partial payments on claims from the Patient Portal. You can contact the CSC to request that the Partial Payments feature be turned off.
Patients can select one or more claims in the Payment Amount section of the payment workflow and enter an amount to pay for each of those claims. This section also displays single claims, so patients can specify a payment amount.
Note: The Patient Portal does not display payment plan or card on file (Credit Card Plus) amounts, but patients can keep credit cards on file for future payment transactions and select which specific charges for medical services to pay.
Click here for more information on patient-initiated payment plans.
You can use the {{PORTALURL}} magic word on clinical paper forms.
This magic word displays your practice's Patient Portal URL (or the Patient Information Center URL, if your practice does not use the Patient Portal).
athenahealth recommends that you include your practice's URL on all patient-facing documents.
Your patients can send secure messages directly to their providers using the Patient Portal. The messages are routed to the Clinical Inbox (Patient Cases column and PORTAL row), or assigned to a row according to your practice's Task Assignment Overrides settings.
You can reply to messages sent by patients from the Patient Portal within the patient case (see To reply to an open patient case).
Patients can attach files to the messages they send from the Patient Portal. You can view and save these attachments in the patient case (see To view secure message attachments sent by patients from the Patient Portal).
Note: For more information, see Web Scheduling for Patients.
Before you enable Web scheduling for your patients, you should understand how rescheduling via the Patient Portal works with the appointment types used in your practice: generic or "open access" time slots, or slots used for specific appointment types.
- Template only appointment types — You cannot schedule a patient appointment using a Template Only appointment type. At scheduling time, you must select a valid appointment type from the Appointment Type list on the Schedule Appointment page. You can select any valid appointment type with the same duration as the template-only slot.
- Generic slot appointment types — Patients can reschedule appointments of any other type that is marked as Web Schedulable into generic slots.
Your practice should make sure that "Any" or "Open" appointment types have Generic? set to Yes. Normally, these appointment types should also have Template Only? set to Yes.
If your practice uses Generic and Template Only slots exclusively, Patient Portal rescheduling will be useful only if you enable rescheduling for the generic slots. Otherwise, no slots will be available for patients when they attempt to reschedule via the Patient Portal.
If you create few available appointment slots, patients may become frustrated by their inability to find an available slot for rescheduling. We encourage your practice to allow as many slots to be open as possible. You can always change the number of slots at a later time, if open slots become a problem (see the External Scheduling Rules page).
Note: Same-day rescheduling is not possible via the Patient Portal, but there are no other time restrictions for rescheduling an existing appointment via the Patient Portal. This means that a patient could reschedule an appointment without giving your practice adequate notice.
If you have scheduling questions specific to your practice, please consult the CSC prior to making changes.
On the Appointments page of the Patient Portal, a Reschedule link appears for appointments that are eligible for patient rescheduling. When a patient clicks the Reschedule link, a monthly calendar appears. The patient can click a day in the calendar to view the open slot times and book a slot. A confirmation message shows the new appointment date and time.
If your practice did not enable rescheduling and cancellation of appointments on the Patient Portal, patients see a message to contact the practice when they click the Reschedule or Cancel link for an appointment on the Patient Portal.
Note: The phone number of the patient's primary department appears in these messages, not the phone number of the department associated with the appointment.
When a patient reschedules an appointment with your practice on the Patient Portal, the new appointment appears on the Patient Portal for that patient and in athenaOne.
No. We match Patient Portal users to patient records based on first name, last name, date of birth, and either email OR phone number. If you invite patients via an email or if you register them using one of the in-office workflows, there is no risk of duplicate patients. Also, you can turn off "new patient registration" on your Patient Portal to not allow patients who have not been invited to sign up for the Patient Portal, eliminating the possibility of duplicate patient creation. The best way to avoid this problem is to send out Patient Portal email invitations when you click Save. This is a setting in athenaOne.
To minimize the risk of duplicate patients, you should register patients for the Patient Portal in the office or send them email invitations to bypass the entering of any demographic information.
On the Manage Prospective Patients page, you can see patients who first registered with your practice on the Patient Portal but have not yet checked in for an appointment (prospective patients). You can filter the list for possible duplicate patients, preview a merge, and decide whether to keep both patient records or merge the records.
If the people sharing an email address do not want to share access to their patient records, they must use separate email addresses for the Patient Portal. This way, each person logs on to the Patient Portal with a unique email address and password and has access to only his or her own clinical and financial information from the patient record.
To use the same email address for the Patient Portal, patients must choose one person to be the Patient Portal account owner and add the second person as a family member. The Patient Portal account owner has access to both patient records when logged on to the Patient Portal. For each patient to be the owner of a Patient Portal account, each patient must establish his or her own account using a unique email address.
Patients can request record restriction using the Record Restriction option within Patient Portal secure messaging. They are provided with the following information:
"A Record Restriction allows you to withhold your health information from one or more individuals or entities. To request a record restriction, include the name of the individual or entity in the message field below. Please note, we are not required to fulfill your request if it could affect your care."
After a patient sends a restriction request, a patient case is created. This patient case then enters the Clinical Inbox, within the Portal row. From there, your staff can take action to restrict the record access accordingly.
athenaOne allows both parents to register as family members to view the child's patient record. The practice can also restrict access using the Portal Accounts page (to display the Portal Accounts page, locate the name of the Patient Portal user in the Contact Details & People with Portal Access section of the patient's Quickview page, and then click Manage portal access in the More actions menu). If a divorced mother and father have different email addresses and are registered as family members, both parents can access the Patient Portal for their child using their own unique email address and password.
Yes. The patient can go to the My profile menu and click the Family access settings option for self-service management of the Patient Portal account.

If the patient is beyond the "Portal Age of Majority" (a setting that your practice can control by calling the CSC), the patient can change the access of any Patient Portal user to "billing-only" access.
Important: To comply with the Children's Online Privacy Protection Act (COPPA), patients under the age of 13 cannot create self-registered Patient Portal accounts, and you cannot register or invite new Patient Portal users under the age of 13.
Register the parent as a family member, that is, click Not the patient. This way, the parent has access to the child's patient record as a parent. If you enter the parent's email address in the Patient email field, the parent is essentially logging in *as* the child (instead of as the parent of the child). If the child is 13 or older, the child can also access his or her patient record; you can register the child for a Patient Portal account by clicking The patient.
If you notice that a patient is incorrectly registered — for example, if a family member's email address is entered in the Patient email field on the Quickview — you can delete the email address from the Patient email field and re-register the family member as a family member (click Not the patient). This way, the patient can register to see his own information on the Patient Portal at a later date.
The age of majority is governed by state law (in most states, the age of majority is 18). On the child's age of majority birthday, athenaOne automatically changes the access level for all family members who have full access to this patient record from full access to billing-only access. The practice or the patient can subsequently change the family member's access level or remove access at any time.
If you are unsure of the age of majority in your state, check online. You can also contact the CSC to verify the age of majority in your state and control these settings.
The following types of documents can be sent to a patient's Patient Portal.
- Patient Care Summaries (letter)
- Provider-signed letters for the patient
- Lab results
- Imaging/diagnostic results
- Patient cases
- Order reminders (called Health Reminders on the Patient Portal)
You can register patients and their family members for the Patient Portal or the Patient Information Center while the patient is in the office from the Quickview, Check-in, Checkout, and Patient Registration pages.
Note: The starting point for the registration workflow is slightly different on the Checkout and Patient Registration pages. The instructions on this page begin on the Quickview or Check-in page.
Note: Non-patient users, such as family members, can register for the Patient Portal without being at your practice. These non-patient users can then access the Patient Portal on behalf of patients. The most common use case for your patients would be a parent registering to gain access to their child's full Patient Portal account. Refer to this user guide for a full description of the non-patient Portal self-registration feature.
Important: To comply with the Children's Online Privacy Protection Act (COPPA), patients under the age of 13 cannot create self-registered Patient Portal accounts, and you cannot register or invite new Patient Portal users under the age of 13.
Practice users (including clinical providers) can register a patient or family member as follows:
- From a practice computer.
- From a kiosk (a desktop, laptop, or tablet computer set up for this task).
- Using the patient's smartphone (iPhone or Android device).
Note: The smartphone option is not available when registering a patient for the Patient Information Center. - By sending an invitation email to the patient's registered email address in athenaOne.
Practice users can register patients for the Patient Portal at any stage of the patient encounter. A dedicated practice user can also help patients register for the Patient Portal before check-in.
Important: Register your patients (or their family members) in the office to increase the likelihood that you will meet quality program measures.
E‑statement notifications, message notifications, and test result notifications are all sent to the patient via email. Patients will not know that they have a message waiting for them on the Patient Portal if they do not have an email account. The use of email helps ensure that the patient or family member receives proper notification from the practice.
Important: To comply with the Children's Online Privacy Protection Act (COPPA), patients under the age of 13 cannot create self-registered Patient Portal accounts, and you cannot register or invite new Patient Portal users under the age of 13.
Note: Non-patient users, such as family members, can register for the Patient Portal without being at your practice. These non-patient users can then access the Patient Portal on behalf of patients. The most common use case for your patients would be a parent registering to gain access to their child's full Patient Portal account. Refer to this user guide for a full description of the non-patient Portal self-registration feature.
You can use the Quick Registration functionality to allow patients and their family members to sign up for the Patient Portal from athenaOne.
Important: If a patient's family member is creating a Patient Portal account (for example, the parent of a young child), do not enter the family member's email address in the Portal email field for the patient. If the patient does not have an email address, select the No email option.
To start the Quick Registration process:
- On the Quickview or Check-in page, scroll down to the Contact List & People with Portal Access section and click
 Add Contact Person and Grant Portal Access.
The Add contact window opens. - Click The Patient or Not the Patient to indicate whether the Patient Portal account owner is the patient or another person (a family member or caregiver, for example). If the patient already has a Patient Portal account, these options do not appear; the new contact that you are creating is assumed to be "not the patient."
Note: If your practice does not use family access, the Not the Patient option does not appear. - You can click Pre-fill fields using the chart contact details to fill in fields — such as address and phone number fields — that exist already in the patient chart. This option is especially useful for parents and guardians of minor children.
- Contact person is the patient's — Specify the relationship of the new contact to the patient by selecting an option from the menu, for example, Mother, Spouse, Child, Grandparent, or Caretaker.
- Email — Enter the email address for the patient or contact. You must enter an email address to create a Patient Portal account.
- Legal first name — Enter the legal first name of the patient or contact.
- Legal last name — Enter the legal last name of the patient or contact.
- Contact type — Select Portal Access or NO portal Access.
- The following field appears when you select Portal Access:
Portal & messaging access level — Select Full Access or Billing Only.- Full Access — Patient Portal user has full access to a patient record that is not his own. Full access is used in a family access scenario, such as when a mother has a Patient Portal account and accesses her child's patient record. (The Patient Portal user does not need to be a patient at your practice.)
- Billing Only — Patient Portal user has billing-only access to a patient record that is not her own. A Patient Portal user with billing-only access can see only billing information, not health information. An example of this type of access is when a parent is the Patient Portal user with billing-only access to the patient record of a 20-year-old child.
- Mobile phone — Enter the mobile phone number of the patient or contact, or select the No mobile phone option.
- Home phone — If you entered a mobile phone number, this field defaults to Same as mobile, but you can enter a different home phone number in this field.
Note: If you selected the No mobile phone option in the Mobile phone field, you must enter a phone number in the Home phone field. - Work phone — You can enter a work phone number in this field, if you choose.
- Address line 1 — Enter the first line of the contact's address. If you need a second line, use the Address line 2 field.
- Zip — Enter the contact's 5-digit ZIP code. The ZIP code populates the City and State fields from the athenahealth ZIP code database. (If you find an error, please contact the CSC from athenaOne > Support > Success Community > Contact Client Support Center.)
- City — Enter the contact's city.
- State — Enter the contact's state.
Note: You can click the Verify address option below the State field to validate the address that you entered (you must first enter the address and either the ZIP code or the city and state). - After you enter all required contact information, click Save and Go To Portal Registration.
The Choose Portal Registration Method window opens. - Click Register With This Computer.
A message appears about your responsibility for verifying the patient's or family member's identity. - Click Continue.
- You are logged out of athenaOne, and the Create new password page appears.
- Allow the patient or family member to use the device that the practice user was using.
- The patient or family member confirms the email address and types in a Patient Portal password on the Create new password page. This password must be 8-20 characters long and must have at least one uppercase letter, one lowercase letter, and one number or symbol.
- The patient or family member checks the box to accept the Terms and Conditions and the Privacy Policy and then clicks Create account.
The Patient Portal home page appears. - When the patient or family member signs out of the Patient Portal, the athenaOne login page appears.
- You log back in to athenaOne and are returned to the Check-in workflow.
You can set up a computer (desktop, laptop, or tablet) in your office to allow patients and family members to register for the Patient Portal or Patient Information Center while the patient is at the practice. From the Quickview or Check-in page, practice staff generate temporary passwords, which they give to the patient or family member; the patient enters this password on the login page set up on the kiosk computer to register for the Patient Portal or Patient Information Center. (These temporary passwords are case sensitive.)
Note: Generate temporary passwords while the patient is in the office, not over the phone.
To enhance the security of the kiosk workflow, athenahealth provides you with a unique URL, which enables an automatic timeout of a Patient Portal or Patient Information Center login after 3 minutes. Also, a large Signout button is displayed on the kiosk screen so that your patients and their family members can easily sign out after they register for the Patient Portal or Patient Information Center and explore it.
To use the kiosk registration feature, you must set up a kiosk (desktop, laptop, or tablet computer) in your office and then call the CSC to enable this feature. After the CSC enables the feature for you:
- Open a Web browser, such as Chrome or Safari, on the kiosk device, and enter one of the following URLs:
- If your practice does not use the Communicator Brands feature, enter "https://CONTEXTID.portal.athenahealth.com/?section=kiosk", where CONTEXTID = your practice ID.
- If your practice uses the Communicator Brands feature, enter
"https://CONTEXTID-BRANDID.portal.athenahealth.com/?section=kiosk", where CONTEXTID = your practice ID and BRANDID = your brand ID.
Note: To find your brand ID, display the Communicator Brands page: On the Main Menu, click Settings >Communicator. In the left menu,under Practice Links — Communicator, click Brands.
- Bookmark this URL, and make it the home page of the browser on the device.
- Make sure that you turn the device on and open the browser every morning.
Important: When you start the kiosk registration process, advise patients that they must complete their registration and create a new password within 2 hours or the password will expire.
- On your computer (not the kiosk device) display the Quickview or Check-in page for the patient.
- On the Quickview or Check-in page, scroll down to the Contact Details & People with Portal Access section and click
 Add Contact Person and Grant Portal Access.
The Add contact window opens. - Click The Patient or Not the Patient to indicate whether the Patient Portal or PIC account owner is the patient or another person (a family member or caregiver, for example). If the patient already has a Patient Portal account, these options do not appear; the new contact that you are creating is assumed to be "not the patient."
Note: If your practice does not use family access, the Not the Patient option does not appear. - You can click Pre-fill fields using the chart contact details to fill in fields — such as address and phone number fields — that exist already in the patient chart. This option is especially useful for parents and guardians of minor children.
- After you enter all required contact information, click Save and Go To Portal Registration.
The Choose Portal Registration Method window opens. - Click Register With Kiosk.
athenaOne generates a temporary password on your computer screen. - Write down this password and give it to the patient or family member (this password is case sensitive).
Note: The temporary password that you generate for kiosk registration is valid for 2 hours.
- Go to the kiosk that's set up for Patient Portal or Patient Information Center registration.
- On the landing page, tap
 .
. - Enter your email address and the temporary password given to you by the practice staff and then tap Log In.
- On the Security update page, tap Continue.
The Choose your security option page appears.
Note: For detailed instructions about creating your account, see To create a new Patient Portal account from a notification email. The steps are summarized here. - Select your security option and then verify access to your patient record.
- Create a permanent Patient Portal or Patient Information Center password.
- Enter the temporary password in the Current password field.
- Enter your permanent password in the New password fields.
This password must be 8-20 characters long and must have at least one uppercase letter, one lowercase letter, and one number or symbol. - On the All set page, tap Continue.
The Patient Portal or Patient Information Center home page appears. You are now registered.
Important: To comply with the Children's Online Privacy Protection Act (COPPA), patients under the age of 13 cannot create self-registered Patient Portal accounts, and you cannot register or invite new Patient Portal users under the age of 13.
Patients and family members can sign up for the Patient Portal as part of the check-in process, as long as they have an email address and a smartphone (iPhone or Android device).
Note: This option is available only when registering for the Patient Portal; you cannot use a patient's smartphone to register for the Patient Information Center.
Important: When you start the mobile registration process, advise patients that they must complete their registration and create a new password within 6 hours or the temporary password will expire.
- On the Quickview or Check-in page, scroll down to the Contact Details & People with Portal Access section and click
 Add Contact Person and Grant Portal Access.
The Add contact window opens. - Click The Patient or Not the Patient to indicate whether the Patient Portal or PIC account owner is the patient or another person (a family member or caregiver, for example). If the patient already has a Patient Portal account, these options do not appear; the new contact that you are creating is assumed to be "not the patient."
Note: If your practice does not use family access, the Not the Patient option does not appear. - You can click Pre-fill fields using the chart contact details to fill in fields — such as address and phone number fields — that exist already in the patient chart. This option is especially useful for parents and guardians of minor children.
- After you enter all required contact information, click Save and Go To Portal Registration.
The Choose Portal Registration Method window opens. - Click Register With Smartphone.
After you click this button, athenaOne:- Sends a text message to the mobile phone number with a secure link to access the Patient Portal.
- Generates a temporary password on your computer.
- Write down the temporary password and give it to the patient or family member.
Note: The temporary password that you generate for smartphone registration is valid for 6 hours.
- When you receive the text message, open it and then tap the link to the Patient Portal in the text message.
- On the Patient Portal page, tap
 .
. - Enter your email address and the temporary password given to you by the practice staff and then tap Log In.
- On the Security update page, tap Continue.
The Choose your security option page appears.
Note: For detailed instructions about creating your Patient Portal account, see To create a new Patient Portal account from a notification email. The steps are summarized here. - Select your security option and then verify access to your patient record.
- Create a permanent Patient Portal password. Enter the temporary password in the Current password field and then enter your permanent password in the New password fields.
This password must be 8-20 characters long and must have at least one uppercase letter, one lowercase letter, and one number or symbol. - On the All set page, tap Continue.
The mobile Patient Portal home page appears. You are now registered for the Patient Portal.
During a patient encounter, you can send an email invitation for the Patient Portal or Patient Information Center on the Intake and Exam tabs.
- In the banner at the top of the Intake and Exam page, click Manage Portal Account.
The Register Patient or Register Family Member page appears. - Confirm or enter the email address, home phone number, and mobile phone number for the patient.
- Click Send Email Invitation.
The patient will receive an email containing the Patient Portal or Patient Information Center registration link at the email address given during registration.
You can send an email invitation for the Patient Portal or Patient Information Center at any time from the Quickview page.
- On the Quickview or Check-in page, scroll down to the Contact Details & People with Portal Access section and click
 Add Contact Person and Grant Portal Access.
The Add contact window opens. - Click The Patient or Not the Patient to indicate whether the Patient Portal or PIC account owner is the patient or another person (a family member or caregiver, for example). If the patient already has a Patient Portal account, these options do not appear; the new contact that you are creating is assumed to be "not the patient."
Note: If your practice does not use family access, the Not the Patient option does not appear. - You can click Pre-fill fields using the chart contact details to fill in fields — such as address and phone number fields — that exist already in the patient chart. This option is especially useful for parents and guardians of minor children.
- After you enter all required contact information, click Save and Go To Portal Registration.
The Choose Portal Registration Method window opens. - Click Send Email Invitation.
The patient or family member will receive an email containing the Patient Portal or Patient Information Center registration link at the email address given during registration.
Note: You must have the Communicator permission.
- Display the patient's Quickview page.
- On the Patient Actions Bar, click Communicator, and then click Log in to Portal as Patient.
A message alerts you that you are logging on to the Patient Portal as the patient. - Click OK.
A read-only view of the patient's Patient Portal page appears. Any changes you make will not be saved.
- Display the Providers
page: On the Main Menu, click Settings
 >Billing. In the left menu, under Practice Links — Providers, click Providers.
 - Scroll down to the Providers list and locate the provider that you want set up. The list is ordered first by ordering number, then alphabetically by last name.
- Click the edit
link for the provider.
The Edit Provider view appears. - Scroll down to the Patient Communication section.
- Patient Portal — Select the Display this provider in the Patient Portal option to display the provider's name on Patient Portal menus. If you do not select this option, patients cannot send messages or request appointments for this provider.
- Display name — Enter the name for the provider as it will appear in email messages to patients (Subject line, body, and signature of the email). This name is also used in the greeting of automated calls and on the Patient Portal, as well as on the billing statements sent to patients.
Note: For billing statements, the name you enter in this field overrides the value entered in the Billed name field. - You can select the Same as billed name option to use the provider name specified in the Billed name field.
- If you prefer not to display the provider's name, you can enter "Your Provider" in this field.
- SMS display name — Enter the shortened name for the provider as it will appear in automated text messages to patients (20-character maximum).
- You can select the Same as display name option to use the provider name specified in the Display name field.
- If you prefer not to display the provider's name, you can enter "Your Provider" in this field.
- Primary department — Select the provider's home department as it should appear on the Patient Portal.
- Click Save.
You can configure a patient-facing name for a department. This name appears in email messages to patients and on the billing statements sent to patients. This name is also used in the greeting of automated calls and on the Patient Portal.
- Display the Departments page: On the Main Menu, click Settings
 >Billing. In the left menu, under Practice Links — Departments, click Departments.
 - Locate the department that you want in the Departments list.
- Click the update link.
- Block in portal — Select N (No).
Patient Communication
- Display name — Enter the name for the department as it will appear in email messages to patients (Subject line, body, and signature of the email). This name is also used in the greeting of automated calls and on the Patient Portal, as well as on the billing statements sent to patients.
Note: For billing statements, the name you enter in this field overrides the value entered in the Billing name field. - SMS display name — Enter the shortened name for the department as it will appear in automated text messages to patients (20-character maximum).
- Display phone number — Enter the general contact phone number used in automated messages to patients. Patients can call this number to reach the office by phone.
- Click Save.
You can configure forms and documents for electronic signature on the Patient Portal.
Note: This procedure enables a form for e‑signature by patients. To fill out other fields in the form, patients must print the form and complete a paper copy.
- Display the Clinical Paper Forms page: On the Main Menu, click Settings
 > Clinicals. In the left menu,under Practice Links — Forms and Letters, click Clinical
Paper Forms.
For non-clinical forms, display the Forms and Documents page: On the Main Menu, click Settings >Billing. In the left menu, under Practice Links — Billing Slips and Forms, click Forms
and Documents.
- Click update next to an existing form.
- View on Patient Portal — Select this option. Additional fields appear.
Note: Only .html, .pdf, and .png documents can be viewed on the Patient Portal. - Patient Portal display name — Enter the name of the form as it should appear on the Patient Portal. This name should be easily understandable by patients.
- Assign appointment types to form — Select the appointment types to map to this form.
The appointment types that you select move to the Selected list on the right. - Enable digital signature — Select this option to enable patients to sign the form electronically on the Patient Portal.
The Signature applies to field appears.
Note: To display a form to the patient during in-office self check-in, you must select the Enable digital signature option (you may not need to select this option if your organization uses only pre-appointment self check-in). - Signature applies to — You can select the type of consent that the patient is giving with their electronic signature. Leave this field blank for forms or consents that the menu options do not apply to (for example, a surgery consent form).
- Click Save.
Patients can sign this form electronically on the Patient Portal. When patients submit these forms electronically to your practice via the Patient Portal, the forms automatically update the corresponding privacy form checkboxes in the Privacy section of the patient's Quickview page.
- The patient or designate logs on to the Patient Portal.
-
The patient or designate clicks My Health on the left side of the page.
-
The patient or designate clicks Forms and Documents.
- The patient or designate selects a form from the list.
- The patient or designate clicks the link to display the form.
The form appears.
The patient or designate reads the form, and completes the fields provided
- I have read and understand the above — Patient or designate checks the box.
- Name — Patient enters his or her full name, or the designate enters his or her own name, not the patient's name.
- Date — The date defaults to the current date.
- Patient's relationship to you — If the signer is not the patient, the signer selects the patient's relationship to the signer.
- Reason if patient is unable to sign — If the signer is not the patient, the signer enters the reason that the patient is unable to sign the form.
- The signer clicks Submit.
The form automatically updates the corresponding privacy form checkboxes on the patient's Quickview page in athenaOne.
- Display the patient's Privacy Information page: On the Quickview, click Manage Privacy (under the Privacy heading).
- Under the Health Data Sharing heading, click show portal e-signature history.
The audit history lists the forms that the patient has signed electronically on the Patient Portal, including the date that the form was signed, the name that was entered as the signature, and the relationship of the signer to the patient. - To view a form, click the linked form name.
The form is displayed in a new window, with options to scroll and print.
- Display the Patient Communication History page.
- Practices that use athenaCommunicator: On the Patient Actions Bar, click Communicator, and then click Patient Communication History.
- Practices that use athenaCollector and ReminderCall only: On the Patient Actions Bar, click Scheduling, and then click Automated Messaging History.
- Show services — All athenaCommunicator services in the list are selected by default.
- To select one service from the list, click the service.
- To select more than one service, click one service and then hold down the Ctrl key and click other services.
- Report types — Select Detailed to display a list of each action with date and time.
The results appear automatically. It may take a few moments to load the results.
The Summary view appears. This view displays a count of how many times each action was completed.
- Display the Privacy Information page: On the Quickview, click Manage Privacy (under the Privacy heading).
- Under the Communicator Privacy Status heading, select the Block Portal Access option to prevent the patient from having access to the Patient Portal.
- Click Save.
The patient's Quickview displays the message "This patient will not be able to access the Patient Portal."
When a patient is already registered for the Patient Portal in one brand, you can give that patient access to his health information on the Patient Portal for another brand. In the following example, Rick Smith already has a Patient Portal account at 6 Hills Medical Associates.
- Rick makes an appointment with a new provider at Blackstone Valley Medical Group, another brand in the same practice.
- When Rick checks in for this appointment, Janet Clark, a Blackstone Valley front desk staff member, sees on Rick's Quickview in the Contact Details & People with Portal Access section that he does not have a Patient Portal account at Blackstone Valley, so she clicks Add portal account.
- athenaOne informs Janet that Rick already has a Patient Portal account at another office and prompts her to give Rick access to his record at Blackstone Valley.
- Janet clicks Provide Access.
- Rick receives an email that prompts him to complete his registration for his Patient Portal account at Blackstone Valley Medical Group.
- Rick completes the steps to register for his Patient Portal account at Blackstone Valley. He can now use the same email address and password to log in to his Patient Portal at 6 Hills Medical Associates and at Blackstone Valley Medical Group.
Note: If a practice user at one brand changes the email address for a patient registered in more than one brand, athenaOne displays this alert: "This email address is linked to the patient's portal accounts in other offices. Editing the email will edit login credentials for all portal accounts."