Dunning Messages
This page allows you to view and edit dunning messages, which appear on patient statements for standard billing and for payment plan billing.
On the Main Menu, click Settings![]() >Billing. In the left menu, under Practice Links — Statement Admin, click Dunning
Messages
>Billing. In the left menu, under Practice Links — Statement Admin, click Dunning
Messages
The default dunning messages appear on the Dunning Messages page the first time you display this page. You can edit the default dunning messages if you choose.
Note: The simplified patient statements used with the Online Statement-based Experience (formerly QuickPay Portal) display the default dunning messages instead of any custom messages you create on the Dunning Messages page. For information about simplified and standard patient statements, see Patient Statement Samples.
- Display the Dunning Messages page: On the Main Menu, click Settings
 >Billing. In the left menu, under Practice Links — Statement Admin, click Dunning
Messages.
 - Enter the desired text for standard statement dunning messages in the text boxes under the heading
"Edit Dunning Messages" on the top half of the page.
Note: You can enter up to 80 characters for each dunning message. - Enter the desired text
for payment plan dunning messages in the text boxes under the heading
"Edit Payment Plan Dunning Messages" on the bottom half of the page.
Note: You can enter up to 80 characters for each dunning message. - Click Save.
Note: To see a history of all changes to a dunning message, click the Audit history link under the message.
- Display the Patient Account View
page: On the Patient Actions Bar, click Billing, and then click Patient Account View.
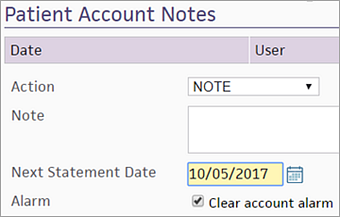
Note: You can also display the Patient Account View page from the Self-Pay Account Management Worklists page. Click run worklist to generate a worklist and then click a patient name in the Task Bar. - Scroll down to the Patient Account Notes section at the bottom of the page.
- Clear
account alarm — Select this option.

- Click Apply Action. The account alarm is cleared, and the patient is removed from the self-pay worklist.
Dunning levels are used to evaluate the delinquency of a patient account. Dunning levels are important in the setup of the Self-Pay feature because this architecture is used as the basis for patient account alarms and patient account alarm types. Your practice can define the dunning messages that are printed on patient statements using the Dunning Messages page.
Note: The simplified patient statements used with the Online Statement-based Experience (formerly QuickPay Portal) display the default dunning messages instead of any custom messages you create on the Dunning Messages page. For information about simplified and standard patient statements, see Patient Statement Samples.
Patients progress through dunning levels if they have a patient charge or payment plan charge that is not closed (neither paid nor adjusted). athenaOne provides two dunning level tracks: one for standard charges, and one for payment plan charges. Dunning levels are as follows:
- 0 indicates a patient in good standing with no active alarm
- 1-4 are used for standard patient charges
- 5-8 are used for payment plan charges
If a patient has a standard charge that is unpaid by the next statement cycle, that patient advances a level. If a patient has a payment plan charge, that patient advances a level only if he misses a scheduled minimum payment.
Patients who receive E-statements
If a patient has not paid his bill in full after receiving several E-statements, athenahealth sends both a paper statement and a final electronic statement. The paper statement is sent for the final non-payment plan statement (dunning level 3) or the final payment plan statement (dunning level 7). Patients continue to receive email notifications about new e-statements.
You can see which statements were sent electronically and on paper on the patient's Quickview: Under the Outstanding Balances heading, click Show patient statements. In the Method column, E-statement and Paper both appear, indicating that athenahealth sent both types of statements.
Number of statements sent before charges are sent to Collections
Your practice can specify how many statements must be sent to a patient before delinquent patient charges are sent to collections. The dunning level printed on a statement is the dunning level of the oldest charge as measured by the date of first billing. To change the default setting, contact the CSC from athenaOne > Support > Success Community > Contact Client Support Center.
Patients with Family statements
A patient and family may have both standard and payment plan charges that are billed on the same statement at the same time. Because a patient and family can have only one dunning level (and one patient account alarm), a hierarchy is used to evaluate dunning levels on individual charges. The account dunning level is always based on the most delinquent charge on the account. A missed payment plan is considered to be more delinquent than a missed standard payment. The hierarchy is as follows, beginning with "in good standing" to most severe: 0,1,5,2,6,3,7,4,8
Because only one account alarm is set, a patient or family appears only once on one worklist. The user following up on that account can access information about all delinquent charges from the Patient Account View page. For example, if a patient has standard charges in dunning level 2 and payment plan charges in dunning level 6, the account appears only in the worklist that is sorting for dunning level 6 because that level is more severe.