 User Guide — Lab and Imaging Workflow
athenaOne for Hospitals & Health Systems
Table of Contents
To register and check in a patient for outpatient lab or radiology services
Creating lab and imaging orders
To complete radiology orders in the Radiology Worklist
Managing user permissions for outpatient lab and radiology departments
Introduction
You can use the New Hospital Visit page to register and check in a patient for an outpatient radiology treatment.
The Radiology Orders list includes all radiology orders, regardless of your current department of login. Radiologists can use Radiology Orders list to complete orders for radiology patients.
By default, active orders are discontinued automatically after a patient is discharged. Upon request, you can prevent lab and radiology orders from automatically closing after a patient is discharged. This allows results that are received after the patient is discharged to be tied to the order placed during the stay.
Note: To access the Hospital Order Sets page, you must have the Inpatient Admin role.
To register and check in a patient for outpatient lab or radiology services
- On the Main Menu, click Patients. Under Patient Registration, click New Hospital Visit.
Locate the patient record
- Use the search fields provided to search for the patient record.
- If the patient record is found, click the patient name and then click New Hospital Visit.
- If the patent record is not found, click Create visit for a new patient, and then click New Hospital Visit.
Enter patient demographic information
- Under Patient Information, record as much information as you can. (Yellow indicates a required field.)
- Verify information in any pre-populated fields. Edit as needed.
- Primary care provider — Click Add provider and select the primary care provider from the patient's care team.
If the provider is not listed, click Add new provider to search for and add the provider name. - Language — Select the patient's language.
- Race — You can click the plus icon
 to add options to the Race menu.
Enter check-in details
- Click Next at the bottom of the page, or click Check-in Details at the left.
- Level of Care — Select Outpatient.
- Department — Select the Select the Outpatient lab or radiology department.
- Check-in date — Enter the check-in date.
Tip: Enter "t" in any date field to enter today's date. - Check-in time — The check-in time is populated automatically when the patient is checked in.
- Admission source — Select the facility or clinic that referred the patient.
- Admission type — Select Elective.
- Referring provider — Search for and select the referring provider.
- Chief complaint — Enter a brief description of the chief complaint.
- Attending provider — Verify the selected attending provider for this visit.
- Admitting provider — Verify the selected admitting provider for this visit.
- Operating provider — Select the operating provider, if relevant.
- Other Operating provider — Select an additional operation provider, if relevant.
Enter insurance information
- Click Next at the bottom of the page, or click Insurance at the left to display the Insurance fields.
- Complete as much insurance and billing information as possible.
- Click Next at the bottom of the page, or click Guarantor at the left to display the Guarantor fields.
Enter the guarantor's information
- Patient's relationship to guarantor — If the patient has no guarantor, select Self. Otherwise, select the patient's relationship to the guarantor.
- If the patient has a guarantor, record as much guarantor information as possible.
- Click Next at the bottom of the page, or click Payment at the left to display the payment fields.
Collect payment
- Card on File — If the patient has no credit care on file, or wants to use a different card, you can click Save a new card.
Note: Card on File is a feature that enables patients to authorize automatic charges that occur over the next year using a saved payment card. A default yearly limit is provided, but can be edited by the patient upon request. Patients will be notified 5 days prior to each individual charge. Patients can choose to cancel an individual charge upon notification, and can withdraw from the Card on File agreement upon request. - Current Visit — Enter the charge amount for the current visit.
- Click Next.
- Payment type — Select the payment method used to make the payment.
Additional fields and options may appear. - Collect the payment and record all payment details in the fields provided.
- Click Collect Payment.
- Click Receipt to print a copy of the receipt and present it to the patient.
- Click Next at the bottom of the page, or click Forms & Privacy at the left to display the Forms & Privacy fields.
Print the wristband, labels, and Patient Information sheet
- Labels/wristband — Click Print wristband.
Note: The Zebra HC100 wristband printer must be installed and configured. The wristband label includes a barcode with the patient's current visit ID. You can scan the barcode to quickly add item-related charges to a patient's bill at the point of care without manual entry.
- Labels/wristband — Click Print visit labels.
Note: The DYMO label printer must be enabled. Hospital visit labels include a barcode with the patient's current visit ID, the admission date, and level of care. You can scan the barcode to quickly add item-related charges to a patient's bill at the point of care without manual entry.
- Documents — Select Patient Information Sheet.
Note: The patient information sheet includes a barcode with the patient's current visit ID. You can scan the barcode to quickly add item-related charges to a patient's bill at the point of care without manual entry. - Click Print selected documents. The document preview appears
- Place your cursor at the top of the preview document. The function icons will appear. Click the printer icon.
Note: The patient information sheet includes a barcode with the patient's current visit ID. You can scan the barcode to quickly add item-related charges to a patient's bill at the point of care without manual entry.
Complete the registration and check in the patient
- Click Done with Registration.
- Click Check in Patient and review the check-in details
- Click Done with Check-in.
The patient appears in the Patient List with a status of Pre-Admission, and the visit number is added to the patient's Quickview, under Hospital Visits.
Creating lab and imaging orders
When you log in to an outpatient lab or radiology department and enter an order other than a lab or imaging order, no Referring Provider or ICD-10 Code fields appear.
Note: Orders can be entered by a nurse, but must be signed by a physician according to hospital and legal guidelines.
- Display the patient's Order Entry page: In the patient chart, click the arrow in the green workflow menu (at the upper right) and select Go to Orders. (The options available in the green workflow menu depend on your user role.).
- Click the plus icon next to Order Entry to display the search tool.
- Search for and select the type of imaging order you need.
- Click the new order form to expand the details.
- Ordering provider — Select the ordering provider, and then use the menu to the right to select how the order was given (verbal, phone, written, etc.)
- Referring provider — Click the drop-down menu and select the referring provider.
- Priority — select the priority for this order:
- STAT: urgency to administer order.
- now: intended to be given within the next 30 minutes.
- routine: based on routine for that frequency in the facility. For example: twice a day.
- schedule - start first order by specific time.
- Reason for exam — Enter the reason for the imaging exam.
- Frequency — Select from the available frequency options (for example, every other day).
- First task — Select the time for the first task.
- Diagnosis — Click the plus icon to search for and select the ICD-10 code.
- Note — Enter any relevant notes for the order. For example, you can provide additional information for the radiologist such as the diagnosis or reason for the order.
- Click the Sign Orders button.
Signing orders
Note: Orders can be entered by a nurse, but must be signed by a physician, according to hospital and legal guidelines.
- To sign all orders for this patient, scroll to the top of the page and check Select all.
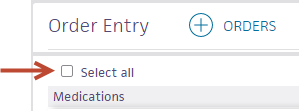
- To sign only selected orders, check the box for each order to sign.
- Click Sign Orders.
Once signed, the radiology order automatically appears on the Radiology Orders, where it is scheduled.
To complete radiology orders in the Radiology Worklist
Note: By default, radiology orders close automatically after a patient is discharged. There is an option to prevent this, so that radiology orders with results pending remain open in the RIS until athenaOne receives the results, or until you close the radiology order manually.
- Display the Radiology Orders page: On the Main Menu, click Clinicals. Under INPATIENT, click Radiology. The Radiology Orders list appears in the left pane.
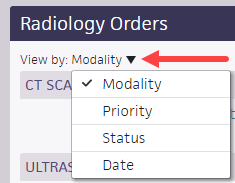
- You can click the View By arrow at the top of the Worklist to sort the orders.
- Click an order with a Pending status to display the order details in the right pane.
- Click Schedule at the upper right. This action indicates that the order is in process.
-
Schedule (or reschedule) the order using the process for the radiology order type. (The scheduling process is not directly integrated with the Radiology Orders list.)
- Review the order details and obtain the digital images.
- Click Close Order. The order status changes from Scheduled to Complete in the Radiology Orders list.
Result turnaround time varies with the technology used. After your PACS or RIS returns the imaging result to athenaOne, imaging results are added to the patient chart (either via interface or manually) and athenaOne performs charge capture for billing.
To print imaging results for a referring provider
- For orders from a referring provider, you can print the result from the patient chart using the chart export tool, or by using the expanded view of the order in the Results tab, and fax it the result to the referring provider.
athenaOne automatically closes the patient stay. No discharge is required.
Managing user permissions for outpatient lab and radiology departments
Your practice can limit order entry so each lab or radiology staff member can only add lab or imaging orders and not other types of orders, if this aligns with your hospital policies.
Important: You should add and manage lab and radiology orders only in an outpatient lab and radiology department.
Use the Patient List to find patients in your current department
To access the Patient List, click the athenaOne logo  in the top left corner of the Main Menu.
The Patient List includes patients admitted for services in the department you are logged in to. You can filter the list by ADMITTED, DISCHARGED, and ALL.
Use the Search tool to find patients, visits, and claims in any department
The search tool  is located in the Main Menu, at the upper right.
You can enter an ID number to search for visits and claims by ID number.
You can also search for patients by patient name, insurance number, custom ID, or guarantor. The search results include patients from all departments.