Preference Cards
athenaOne for Hospitals & Health Systems
Preference cards may be created for each procedure a provider performs. Preference cards are automatically associated with procedures at scheduling. Items on the preference card are added from available hospital inventory items.
On the Main Menu, click Settings![]() >Billing. In the left menu, under Practice Links — Inventory, click Preference Cards
>Billing. In the left menu, under Practice Links — Inventory, click Preference Cards
You must be logged in to a department that uses athenaOne for Hospitals & Health Systems, and the department must be configured for surgery.
See also: User Roles and Permissions.
Preference cards may be created for each procedure a provider performs. Preference cards are automatically associated with procedures at scheduling. Items on the preference card are added from available hospital inventory items.
- Display the Preference Cards page: On the Main Menu, click Settings
 >Billing. In the left menu, under Practice Links — Inventory, click Preference Cards.
 - Under Preference Cards, click Add New.
Additional fields appear.
Enter the preference card details
- Description — Enter a unique name for the preference card (required).
- Provider — Click the text box and select the provider in the drop-down list (required).
- Procedure — Click the text box, start to enter the name of the procedure and select it in the drop-down list (required).
- Position — Enter the patient's position for this procedure.
- Instructions — Enter any instructions from the surgeon (e.g., glove size, patient preparation).
- Click Save and Add Items.
Additional fields appear.
Add and specify item details
- Item — Enter the name or inventory number of the item to add.
- Open Quantity — Enter an open quantity. You are required to enter either an open quantity or hold quantity.
- Hold Quantity — Enter a hold quantity. You are required to enter either an open quantity or hold quantity.
- Notes — Enter any notes about this item.
- Click Save to save the preference card, or click Save and Add Another to add more items to the preference card.
You can add items from your hospital's inventory to a patient's preference card for the surgery. You can bill these items after the surgery is performed.
- Display the Preference Cards page: On the Main Menu, click Settings
 >Billing. In the left menu, under Practice Links — Inventory, click Preference Cards.
 - Under Preference Cards, click edit for the preference card to add an item to.
Additional fields appear. - Under Items, click Add New.
Additional fields appear.
Add and specify item details
- Item — Enter the name or inventory number of the item to add.
- Open Quantity — Enter an open quantity. You are required to enter either an open quantity or hold quantity.
- Hold Quantity — Enter a hold quantity. You are required to enter either an open quantity or hold quantity.
- Notes — Enter any notes about this item.
- Click Save to save the preference card, or click Save and Add Another to add more items to the preference card.
You can add or edit the preference card for a specific scheduled procedure. This feature is useful when a scheduled procedure requires unique instructions or supplies.
- Display the Operating Room Schedule page: On the Main Menu, click Calendar. Under APPOINTMENTS, click Operating Room Schedule.
- Click the scheduled surgery with the preference card to edit.
The surgical booking window appears.
- Click Edit.
The Edit Case page appears. - Preference card — Click EDIT.
The Case Preference Cards page appears.
Under the Procedure heading for the desired procedure
- Preference card — Click Edit.
Additional fields appear. You can complete the fields to add a new preference card, or edit an existing preference card for this procedure.
- Preference card — Enter a name for the preference card.
- Position — Enter the patient's position for the procedure.
- Instructions — Enter any instructions from the surgeon about this procedure, such as glove size, patient prep, etc.
- Click Save.
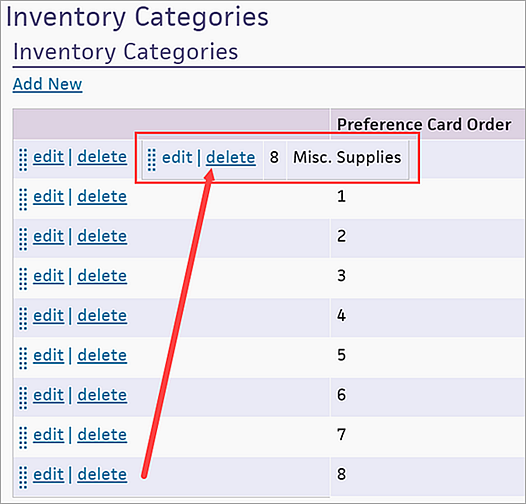
You can change the order of inventory categories on the surgery preference cards using the drag-and-drop method.
- Display the Inventory Categories page: On the Main Menu, click Settings
 >Billing. In the left menu, under Practice Links — Inventory, click Inventory Categories.
 - In the list of categories, click the vertical dots at the left, drag the item to the desired position in the list, and then drop the item to the right of the item name.

- Display the Operating Room Schedule page: On the Main Menu, click Calendar. Under APPOINTMENTS, click Operating Room Schedule.
- Click the PRINT icon
 at the top right.
The PRINT window appears. - Click the Preference Cards radio button.
Tip: You can click the Missing Preference Card orange arrow to view the missing preference cards for that procedure.
- Click Print.
- Display the Operating Room Schedule page: On the Main Menu, click Calendar. Under APPOINTMENTS, click Operating Room Schedule.
- Click the scheduled surgery with the preference card to edit.
The surgical booking window appears.
- Click the Preference Card print icon
 .
.