Repost Payment
This page enables you to void and repost payments on claims manually. athenaOne automatically opens the required payment batch — associating the payment batch with the original deposit batch — and automatically closes the payment batch after you void and repost a payment.
Note: Best practice is to contact athenahealth to correct an athenaOne posting. The procedures described on this page are intended for billing users who manage the voiding and reposting process themselves.
![]() Demo video — Move payments faster and more efficiently in athenaOne
Demo video — Move payments faster and more efficiently in athenaOne
On the Patient Actions Bar, click Billing, and then click Patient Activity. On the Patient Activity page, click Detail view at the top of the Patient Activity table. Locate the payment and click move.
 In the text box at the top right of your screen, enter the claim ID, select Claim ID from the search menu, and click the search icon. On the Claim
Edit page, scroll down to the Charges table and click move next to the payment transaction.
In the text box at the top right of your screen, enter the claim ID, select Claim ID from the search menu, and click the search icon. On the Claim
Edit page, scroll down to the Charges table and click move next to the payment transaction.
To edit claim information, you need both of these user permissions:
- Claim Edit Pages — This user permission provides view access to pages used to edit claims.
- Edit Claims — This user permission provides view access to pages used to edit claims and allows the user to add, edit, and delete information on a claim.
To change payers on a claim or to void claims, you also need the Void Charges and Transactions role.
Several user roles are associated with voiding transactions. These roles give your practice administrators more control over voiding permissions.
The Void Charges and Transactions role includes these permissions:
- Void Charges
- Void Collect Adjustments
- Void Own TOS Payments
- Void Transactions
- Onboarding Dashboard
- Live Benchmarks Access
- Messaging, user, and practice pages
- View Invoices
- EDIT SCHEDULES
- EDITBILLINGADMIN
- EDITDEMOGRAPHICS
- Research Menu
- Workflow Dashboard Access
The Void Transactions role includes these permissions:
- Void Collect Adjustments
- Void Own TOS Payments
- Void Transactions
- Onboarding Dashboard
- Live Benchmarks Access
- Messaging, user, and practice pages
- View Invoices
- EDIT SCHEDULES
- EDITBILLINGADMIN
- EDITDEMOGRAPHICS
- Research Menu
- Workflow Dashboard Access
The Void Transactions (excluding Collect Adjustments) role includes all permissions included in Void Transactions, excluding the permission to void collect adjustments, allowing you to designate certain users who can void transactions in general but not collect adjustments. The Void Transactions (excluding Collect Adjustments) role includes these permissions:
- Void Own TOS Payments
- Void Transactions
- Onboarding Dashboard
- Live Benchmarks Access
- Messaging, user, and practice pages
- View Invoices
- EDIT SCHEDULES
- EDITBILLINGADMIN
- EDITDEMOGRAPHICS
- Research Menu
- Workflow Dashboard Access
Important: athenaOne voids and reposts payments on a claim only when you repost all the payments and click Save. You can cancel the transaction at any time before clicking Save. When you click Cancel, athenaOne does not create the payment batch or post the transactions.
You can move a payment from one charge on a claim to a different charge on the same claim.
Note: For descriptions of each entry field on the Repost Payment page, see the Field Reference.
- From the Claim Edit or Patient Activity page, display the Move Payment window for the payment that you need to work on.
- In the text box at the top right of your screen, enter the claim ID, select Claim ID from the search menu, and click the search icon. On the Claim
Edit page, scroll down to the Charges table and click move next to the payment transaction.
On the Patient Actions Bar, click Billing, and then click Patient Activity. On the Patient Activity page, click Detail view at the top of the Patient Activity table. Locate the payment and click move.
- In the Move Payment window, select the Charges on the same claim option.
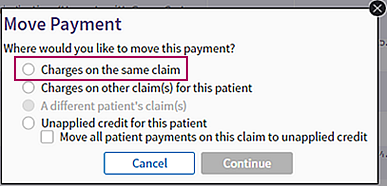
The Repost Payment page opens. - At the top of the Repost Payment page, read the instructions and the description of the transaction you are performing.
- Open Charges — Enter payment amounts on the relevant charges until the full Target Payment amount is reached.
Note: Click show all charges to expand the Open Charges section. - You can click the charge line to display the detailed posting fields.
Note: To display and hide the fields in the detailed view, click the charge line (+n #nnnnn: mm/dd/yyyy). - Make sure that the Status row indicates In Balance.
Important: You cannot click the Save button until the full target payment has been accounted for and the ledger is in balance. - Click Save.
The claim is updated, and all transactions occur within the specified payment batch. athenaOne automatically creates and closes the batch after a successful reposting.
You can move a payment applied to a charge on one claim to a different claim for the same patient.
Note: For descriptions of each entry field on the Repost Payment page, see the Field Reference.
- From the Claim Edit or Patient Activity page, display the Move Payment window for the payment that you need to work on.
- In the text box at the top right of your screen, enter the claim ID, select Claim ID from the search menu, and click the search icon. On the Claim
Edit page, scroll down to the Charges table and click move next to the payment transaction.
On the Patient Actions Bar, click Billing, and then click Patient Activity. On the Patient Activity page, click Detail view at the top of the Patient Activity table. Locate the payment and click move.
- In the Move Payment window, select the Charges on other claim(s) for this patient option.
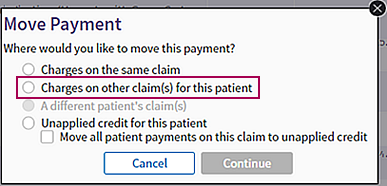
The Repost Payment page opens. - At the top of the Repost Payment page, read the instructions and the description of the transaction you are performing.
- Open Charges — Enter payment amounts on the relevant charges until the full Target Payment amount is reached.
Note: Click show all charges to expand the Open Charges section. - You can click the charge line to display the detailed posting fields.
Note: To display and hide the fields in the detailed view, click the charge line (+n #nnnnn: mm/dd/yyyy). - Make sure that the Status row indicates In Balance.
Important: You cannot click the Save button until the full target payment has been accounted for and the ledger is in balance. - Click Save.
The claim is updated, and all transactions occur within the specified payment batch. athenaOne automatically creates and closes the batch after a successful reposting.
You can move a payment from one patient claim to a claim for a different patient. You can select this option from the Move Payment window only when you are moving an insurance payment.
Note: For descriptions of each entry field on the Repost Payment page, see the Field Reference.
- From the Claim Edit or Patient Activity page, display the Move Payment window for the payment that you need to work on.
- In the text box at the top right of your screen, enter the claim ID, select Claim ID from the search menu, and click the search icon. On the Claim
Edit page, scroll down to the Charges table and click move next to the payment transaction.
On the Patient Actions Bar, click Billing, and then click Patient Activity. On the Patient Activity page, click Detail view at the top of the Patient Activity table. Locate the payment and click move.
- In the Move Payment window, select the A different patient's claim(s) option.
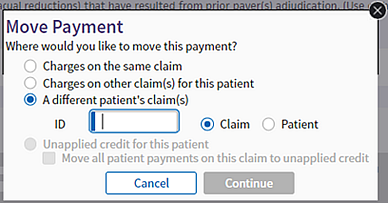
- Select the Claim or Patient option (the Claim option is selected by default) and enter the claim ID or the patient ID.
- When you select the Claim option and enter a valid claim ID, the Move Payment window displays the date of service, claim ID, patient name, and patient date of birth.
- When you select the Patient option and enter a valid patient ID, the Move Payment window displays the patient ID, patient name, and patient date of birth.
- Click Continue.
The Repost Payment page opens. - At the top of the Repost Payment page, read the instructions and the description of the transaction you are performing.
- Open Charges — Enter payment amounts on the relevant charges until the full Target Payment amount is reached.
Note: Click show all charges to expand the Open Charges section. - You can click the charge line to display the detailed posting fields.
Note: To display and hide the fields in the detailed view, click the charge line (+n #nnnnn: mm/dd/yyyy). - Make sure that the Status row indicates In Balance.
Important: You cannot click the Save button until the full target payment has been accounted for and the ledger is in balance. - Click Save.
The claim is updated, and all transactions occur within the specified payment batch. athenaOne automatically creates and closes the batch after a successful reposting.
You can move patient payments made on a claim to unapplied credit for this patient.
Note: You can move only patient payments to unapplied credit.
- From the Claim Edit or Patient Activity page, display the Move Payment window for the payment that you need to work on.
- In the text box at the top right of your screen, enter the claim ID, select Claim ID from the search menu, and click the search icon. On the Claim
Edit page, scroll down to the Charges table and click move next to the payment transaction.
On the Patient Actions Bar, click Billing, and then click Patient Activity. On the Patient Activity page, click Detail view at the top of the Patient Activity table. Locate the payment and click move.
- In the Move Payment window, select the Unapplied credit for this patient option.
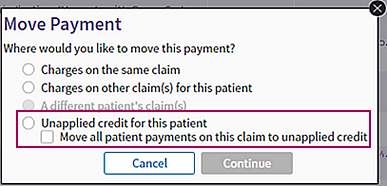
- If more than one patient payment was made on the claim, you can move all the payments to unapplied credit by selecting the Move all patient payments on this claim to unapplied credit option.
- Click Continue.
A confirmation message appears. (The message differs slightly, depending on whether you selected the Move all patient payments on this claim to unapplied credit option.) - Click OK.
The claim is updated, and all transactions occur within the specified payment batch. athenaOne automatically creates and closes the batch after a successful reposting.
You can void multiple patient transactions on a claim at once and move balances assigned to patient responsibility back to the insurance listed on the claim. When you select the Move responsibility from patient back to insurance option on the Move Payment window, you accomplish these actions:
- Move all patient payments on the claim to unapplied credit.
- Void all patient adjustments and transfers from the claim.
Note: The Move responsibility from patient back to insurance option on the Move Payment window applies only to patient transactions on a claim, not to insurance payments.
- Display the Claim Edit page: In the text box at the top right of your screen, enter the claim number, select Claim ID from the menu, and then click the search icon.
Note: This option does not appear on the Move Payment window when you access the Move Payment window from the Patient Activity page. - On the Claim
Edit page, scroll down to the Charges table and click move next to the transaction.
The Move Payment window appears. - In the Move Payment window, select the Move responsibility from patient back to insurance option.
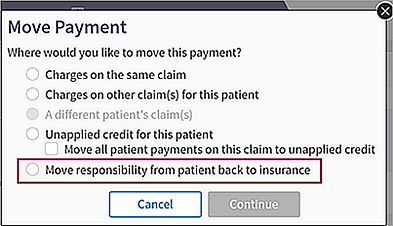
- Click Continue.
A confirmation message appears. - Click OK.
The claim is updated, and all transactions occur within the specified payment batch. athenaOne automatically creates and closes the batch after a successful reposting. - If some patient transactions cannot be voided, you see a message to that effect.
- In the message box, click OK.
The Claim Edit page appears. - Scroll down to the Charges table and select the Show voided transactions and full audit history option.
The Claim Edit page displays voided transactions as grayed out rows.
- In the message box, click OK.
After you repost a payment and click the Save button, you can display the Repost Payment page for the next patient or claim without leaving the page.
- On the Repost Payment page, scroll down to the Next (++) section below the charge lines.
- Enter values in one or more of these fields.
- ClaimID — Enter the claim ID of the next charge on the EOB.
- PatientID — If the EOB does not have the claim ID, you can enter the athenaOne patient ID.
- Service date — Enter the date of service associated with the claim.
If you need to repost payments for the same patient that you just posted to, you can use this field to display only the charges for the date of service that you specify in this field.
- Click Save to display the Repost Payment page for the next patient or claim.
As part of the athenaCollector service, athenahealth posts your claim remittance items for you. In general, we post per the EOB. On occasion, however, we have knowledge from the payer that posting per the EOB will lead to denials or inaccurate posting of transactions.
The claim note action POSTINGRULE lets you know that we have not posted per the EOB in specific instances, in order to post accurately. Certain kick codes are classified as POSTINGRULE type kick codes. When athenahealth applies these kick codes, the Action in the claim note is POSTINGRULE.
athenahealth has a 4- to 5-day minimum service commitment (MSC) for posting, during which time a batch created by athenahealth may remain in the "in process" status.
Note: Manual payment batches that you create are not included in the minimum service commitment (MSC).
- To maintain the integrity of the posting process, please do not manipulate transactions in a batch that the athenahealth posting team is actively working on.
Claims from an "in process" batch do not appear on your worklists and remain in a BILLED status until that batch is completed. - The links for moving and voiding transactions, as well as the ability to make changes to the posting of claims, become available when the posting team finishes work on the batch.
Patient statements are not generated until the batch is completed.
Voids
Please do not void payments or takebacks posted on claims by athenahealth. If you suspect that a claim is posted incorrectly, please contact us so that we can review the claim and correct it if needed.
If you post claims yourself
If you post claims yourself, no EOB image is associated with the posting actions that you take on the Claim Edit page.
If you have an EOB to post
If you have an EOB that you want to have posted, please send it to us using the Submit Remittance tab on the Manage Remittance page (recommended). You can also send a BYOLB Remittance Template, along with the paper remittance. Both methods ensure that the claims are posted with the associated EOB images.
By default, athenahealth uses the information returned with the patient payment stub to post payments to the claims billed on that statement.
- If the patient returns payment with the stub, pays the entire statement amount, and the outstanding amount for the claims billed on that statement has not changed in the interim, athenahealth posts the payment to those claims only.
- If the payment stub is not returned or if any of the above conditions are not met, athenahealth uses the advanced unapplied algorithms to post the payment.
If you do not want to use this feature, please contact the CSC.
The Repost Payment page includes the following sections (see the Field Reference for descriptions of the fields on this page).
Instructions and overview
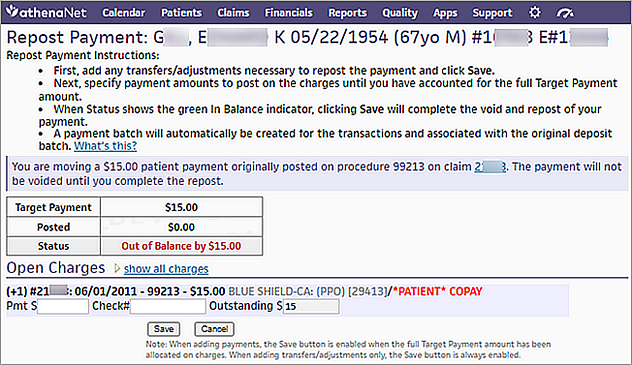
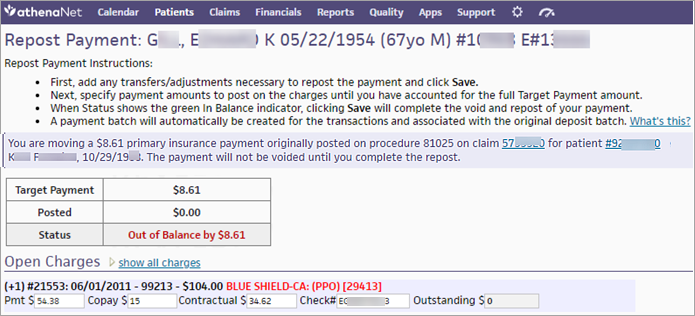
At the top of the Repost Payment page, read the instructions and the description of the activity you will accomplish on this page, for example, "You are moving a $15.00 patient payment originally posted on procedure 99213 on claim XXXXX. The payment will not be voided until you complete the repost."
The transaction status appears in a table and displays an up-to-date summary of the activity on this payment batch. You cannot save the reposting until the Status row says In Balance.
Charges section
The Charges section (Open Charges or All Charges) displays the show all charges or show open/overpaid charges link. When you click show all charges, you can use the displayed filter fields to locate charges for a specific claim only or for a specific date of service.

Each open patient charge item begins with a line that looks similar to these:
(+1) #52527: 01/03/2022 - 99213 - $175.00 BLUE SHIELD-CA: [PPO] [29413]
(+2) #52527: 01/03/2022 - 99213 - $15.00 BLUE SHIELD-CA: [PPO] [29413]/*PATIENT* COPAY
The red type indicates the responsible party (insurance package or patient).
Each item on the charge line provides the following information:
- (+n) — A shortcut to open and close the detailed view of a charge line. To use this shortcut, set NumLock on your keyboard. On your numeric keypad, type the plus sign (+) followed by a number to open or close the detailed view of the corresponding charge line item.
- #nnn — The claim ID number assigned by athenaOne.
- mm/dd/yyyy — The date of service for the charge.
- 99999 — The procedure code for the charge.
- $nnn.nn — The charge amount.
- Package name [99999] — The insurance package name and athenaOne-assigned insurance ID. For self-pay patients and for charges that have been transferred to the patient, the word *PATIENT* appears. When the charge is outstanding to the patient, the type of transfer also appears, for example, *PATIENT* COPAY.
When you place your cursor over a charge item, the item turns yellow. Click anywhere on the line to expand the charge item (click the line again to condense the item). When you expand the charge item, additional fields appear, along with a link to edit claim.
Next (++) section
Below the charge items is a navigation tool that allows you to find the next patient or claim. You can use the fields to enter the next patient's claim ID, patient ID, or the service date. When you click Save, the page reloads with the specified patient or claim.
You can use your numeric keypad to enter all information. The plus (+) key serves as the escape key; it precedes all command sequences.
You can view a list of generic athenaOne kick codes using the View Kick Reasons page.
| Keyboard Shortcuts | |
|---|---|
| +line number (for example, +2) |
Open or close the detailed view of the specified charge line. |
| +line number- (for example, +2-) |
Place the cursor in the Kick/Remit Code field of the specified charge line. |
| ++ |
Go to the next patient ID field. |
| +ENTER |
Save information and move on to the next patient. |
| Status summary table | |
|---|---|
| Target Payment |
The target amount that you will void and move. |
| Posted |
The total amount posted so far. |
| Status |
The amount that must still be posted to complete the transaction. You cannot save the reposting until the Status row says In Balance. |
| Open/All Charges — Charge Item Payment Entry Fields | |
|---|---|
| Pmt $ |
The amount of payment received. Payments are totaled against the batch target for reconciliation. This view assumes that a check has been received. |
| Copay $ |
The amount of the copay due from the patient. This field may already be populated based on the expected or collected copay for that charge. |
| Contractual $ |
The amount of the contractual adjustment (usually the charge amount minus the payer's allowable). If you enter an amount in the Copay $ field, the contractual amount is automatically calculated by athenaOne. |
| Check# |
The number of the check that accounts for the payment. |
| Outstanding $ |
The outstanding amount for this line item. athenaOne automatically calculates this field based on amounts entered in the other fields. After the row is complete, this amount should be $0. |
| Expanded Charge Item View | |
|---|---|
| Payment |
The payment method used for this payment amount (for example, CHECK or ACH), as shown on the Claim Edit page. |
| $ |
The dollar amount of the payment. |
| Check# |
The number of the check that accounts for the payment. |
| Copay Transfer |
The amount to transfer to the patient or secondary insurer for a copay. This information is filled in if an expected or actual copay was recorded. |
| Other Transfer |
Transfer types other than COPAY. If the Copay Transfer field is visible, leave this field blank. This field appears only for primary and secondary charges. A secondary transfer exists only if there is a secondary insurance.
This field allows practices to track deductible, coinsurance, and other transfers. When you select an option from the menu, athenaOne posts a TRANSFEROUT with the specified reason to the insurance, and a TRANSFERIN of equal and opposite amount with the specified reason to the patient or secondary insurance. |
| Contractual Adjustment |
Enter any contractual adjustment in this field. |
| Other Adjustment |
Select an option to create an adjustment of the specified type to the charge. You can select a standard adjustment code from the menu, or you can enter a custom adjustment code in the Custom Adj Code field (to the right). See the Custom Transaction Codes page for more information. |
| Kick/Remit Code |
Enter the kick code, or type a period in the field to access the Kick Code Lookup tool. If you enter a kick code, the claim is set to the status associated with the kick code (you can see the status in the Kick Code Lookup tool). |
| Patient Insurance |
Select the policy/payer associated with this payment.
If the payer does not appear in the list, you can select the Other (write in) option to display the Payor name field. Enter the name of the payer in the Payor name field. A new policy with an expiration date of today is created. |
| Outstanding $ |
The amount outstanding on the charge. This field is not set by the user; it is dynamically calculated as you add payments, transfers, and adjustments. |
| Next (++) | |
|---|---|
| ClaimID |
Enter the athenaOne-assigned claim ID of the next charge on the EOB. |
| PatientID |
If the EOB does not include the claim ID, you can search for the patient ID using this field. |
| Service date |
The date of service associated with the claim. If you need to repost payments for the same patient that you just posted to, you can use this field to display only the charges for the date of service that you specify in this field. |