Greetings
This page allows you to configure phone greetings for ReminderCall, ResultsCall, GroupCall, and Self-Pay reminder messages. The greeting is the first speech that your patients hear when they receive an automated phone call from your practice or organization. You can configure greetings at the practice, brand, department, and provider level.
Note: Before you edit greetings on the Greetings page, make sure that all brand and department names and phone numbers are configured on the Patient Communication Content Management page.
On the Main Menu, click Settings![]() >Communicator. In the left menu,under Practice Links — Greetings and Instructional Messages, click Greetings
>Communicator. In the left menu,under Practice Links — Greetings and Instructional Messages, click Greetings
Practices with athenaCollector but not athenaCommunicator:
On the Main Menu, click Settings![]() >Schedule. In the left menu,under Practice Links — Communicator, click Greetings
>Schedule. In the left menu,under Practice Links — Communicator, click Greetings
To view and edit this page, you must have the Patient Messaging: ReminderCall permission.
You must have the Patient Messaging: ReminderCall permission to see the Greetings page.
Text-to-speech (TTS) greetings are available the day after you create them. You can create a TTS greeting for permanent use.
- Display the Greetings page: On the Main Menu, click Settings
 >Communicator. In the left menu,under Practice Links — Greetings and Instructional Messages, click Greetings.
The Greetings page opens, with the practice-wide greeting displayed. - To create or edit the practice greeting, click Update.
- To create or edit the greeting for a provider, department, or brand:
- Click the provider, department, or brand on the left side of the page, or use the Filter by field to select a department or provider.
- If the provider, department, or brand already has a customized greeting, click Update to edit the greeting.
Note: If the provider, department, or brand is using the default greeting, the Update button does not appear. - Click the Use custom greeting option.
- If you are editing an existing custom greeting, the Editing Greetings menu is available.
- If you are creating a custom greeting for the first time, click the Create button. The Editing Greetings menu appears.
- Select the Text-to-speech option, if it is not already selected.
English Greeting
- Select the items to be included in the greeting.
- For a provider greeting, you must select Provider name; you can also select Department name, Department address, or both.
- For a department greeting, you must select Department name; you can also select Department address.
- Pronunciation — If the provider name, department name, department address, or practice name is unusual or difficult to pronounce, you can enter phonetic spellings in the Pronunciation fields. For example, for Dr. Petit, you can enter "Dr. Pet-ee" in the Pronunciation field under Provider name.
The Pronunciation fields accept letters and numbers, as well as periods, commas, apostrophes, quotation marks, and hyphens. The field also accepts Spanish characters, such as ñ. - Click Listen to play the complete TTS greeting.
Note: You must listen to the greeting before you can activate it. - When you're satisfied with the greeting, click Accept.
The new greeting appears on the right side of the page and is effective the next day. - To download the new greeting as a .wav file, click Download.
Note: These fields are automatically populated. The only field where you can manually enter text is the Pronunciation field (described below).
Spanish Greeting
- Enable Spanish — To create a greeting in Spanish, as well as in English, select this option.
- Select the items to be included in the greeting.
- For a provider greeting, you must select Provider name; you can also select Department name, Department address, or both.
- For a department greeting, you must select Department name; you can also select Department address.
- Pronunciation — If the provider name, department name, department address, or practice name is unusual or difficult to pronounce, you can enter phonetic spellings in the Pronunciation fields. For example, for Dr. Petit, you can enter "Dr. Pet-ee" in the Pronunciation field under Provider name.
The Pronunciation fields accept letters and numbers, as well as periods, commas, apostrophes, quotation marks, and hyphens. The field also accepts Spanish characters, such as ñ. - Click Listen to play the complete TTS greeting.
Note: You must listen to the greeting before you can activate it.
Note: These fields are automatically populated. The only field where you can manually enter text is the Pronunciation field (described below).
You can upload personalized English and Spanish greetings to the Greetings page in the form of a .wav file (maximum length of 15 seconds). The greeting is effective as soon as you upload it.
Note: The greeting that you upload is used in all athenaCommunicator phone calls, so it needs to be appropriate for all messages (appointment reminders, Self-Pay reminders, population health campaigns, and so on).
- Display the Greetings page: On the Main Menu, click Settings
 >Communicator. In the left menu,under Practice Links — Greetings and Instructional Messages, click Greetings.
The Greetings page opens, with the practice-wide greeting displayed. - To create or edit the greeting for a provider, department, or brand, click the provider, department, or brand on the left side of the page, or use the Filter by menu to select a department or provider.
Note: If you select more than one department or provider using the Filter by menu, the settings for the first selected department or provider appear on the right. - Select Use custom greeting (if that option is not selected).
- Click Update or Create (the Create button appears the first time that you create a custom greeting).
The Editing Greetings menu appears. - Select the Upload recording option.
English Greeting
- Click Choose File and locate the file to upload. The greeting must be a .wav file and be no longer than 15 seconds.
- Name — The name of the file you uploaded appears in this field, but you can edit the file name (maximum of 20 characters).
- Description — Enter a description of the greeting.
- Click Listen to review the uploaded greeting.
Note: You must listen to the greeting before you can activate it.
Spanish Greeting
- Enable Spanish — Select this option to upload a Spanish greeting.
- Click Choose File and locate the file to upload. The greeting must be a .wav file and be no longer than 15 seconds.
- Name — The name of the file you uploaded appears in this field, but you can edit the file name (maximum of 20 characters).
- Description — Enter a description of the greeting.
- Click Listen to review the uploaded greeting.
Note: You must listen to the greeting before you can activate it.
Enable the uploaded greeting
- Click Save.
The new greeting appears on the right side of the page and is effective immediately.
You may want to remove a department or provider from the Greetings page, for example, if a configured provider is a scheduling resource (such as "Echocardiogram") or a generic provider (such as "Nurse").
Note: You can restore a removed provider or department to the Greetings list (see "To restore a department or provider to the Greetings list").
- Display the Greetings page: On the Main Menu, click Settings
 >Communicator. In the left menu,under Practice Links — Greetings and Instructional Messages, click Greetings.
The Greetings page opens, with the practice-wide greeting displayed. - Click the provider or department name on the left side of the page or use the Filter by menu to select departments or providers.
Note: If you select more than one department or provider, the settings for the first selected department or provider appear on the right. - Select the Remove xxx from greetings list option at the top of the page.
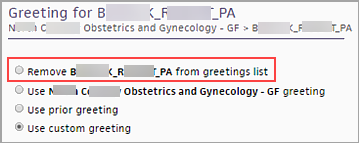
- Click Remove.
The provider or department no longer appears in the Greetings list.
If you removed a department or provider from the Greetings page, you can find the department or provider and restore it to the list.
Note: To remove a provider or department from the Greetings list, see "To remove a department or provider from the Greetings list."
- Display the Greetings page: On the Main Menu, click Settings
 >Communicator. In the left menu,under Practice Links — Greetings and Instructional Messages, click Greetings.
The Greetings page opens, with the practice-wide greeting displayed. - Filter by — Select one of these options from the menu:
- No Greetings: Department — Select this option to find all departments that are not shown in the list of departments on the Greetings page.
- No Greetings: Provider — Select this option to find all providers that are not shown in the list of providers on the Greetings page.
- Select the departments or providers in the filter list that you want to display again and click Restore to Greetings List.
The Filter by No Greetings list appears.
You can revert a greeting to a previously uploaded greeting.
Note: If no older greeting exists for the practice or for the selected brand, department, or provider, you cannot select the Use prior greeting option.
- Display the Greetings page: On the Main Menu, click Settings
 >Communicator. In the left menu,under Practice Links — Greetings and Instructional Messages, click Greetings.
The Greetings page opens, with the practice-wide greeting displayed. - To revert the greeting for a provider, department, or brand, click the provider, department, or brand name on the left side of the page or use the Filter by menu to select departments or providers.
Note: If you select more than one department or provider using the Filter by menu, the settings for the first selected department or provider appear on the right. - Select the Use prior greeting option at the top of the page.
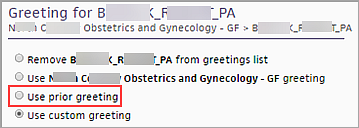
A list of older greetings appears. You can click the English and Spanish links to listen to any of these greetings. - Select the greeting that you want to use from the prior greeting list.
- Click Apply.
The greeting appears on the right side of the page and is effective immediately.
The audit history shows all changes made to the greetings for the practice, a brand, a department, or a provider.
- Display the Greetings page: On the Main Menu, click Settings
 >Communicator. In the left menu,under Practice Links — Greetings and Instructional Messages, click Greetings.
The Greetings page opens, with the practice-wide greeting displayed. - To display the audit history for the practice-level greeting:
- Click Audit history on the right side of the page.
Note: If no changes have been made to the greetings at the practice level, the Audit history link is not accessible. - Click the Close (X) icon when you finish viewing the audit history.
- To display the audit history for a brand-level greeting:
- Click the name of the brand on the left side of the page.
- Click Audit history on the right side of the page.
Note: If no changes have been made to the greetings at the brand level, the Audit history link is not accessible. - Click the Close (X) icon when you finish viewing the audit history.
- To display the audit history for a department or provider:
- Select the department or provider using the Filter by menu or by clicking the name of the department or provider on the left side of the page.
Note: If you use the Filter by menu to select multiple providers or departments, you see the Audit history link for the first department or provider that you selected. To see the Audit history link for another selected department or provider, click the name of the department or provider on the left side of the page. - Click Audit history on the right side of the page.
Note: If no changes have been made to the greetings for a department or provider, the Audit history link is not accessible. - Click the Close (X) icon when you finish viewing the audit history.
The greeting is the first speech that your patients hear when they receive an automated phone call from your practice or organization. The greetings configured on the Greetings page are used in ReminderCall, ResultsCall, GroupCall, and Self-Pay reminder phone messages. You can configure greetings at the practice, brand, department, and provider level.
The Greetings page uses the name and phone number information configured on the Patient Communication Content Management page as the starting point for the phone greetings. The patient-facing name and phone number are configured for the practice as a whole, for each brand, and for each department.
When you open the Greetings page, the practice-wide greeting appears on the right side of the page. The left side of the page displays the practice name, brand names (if you use the Communicator Brands feature), department names, and provider names.
- Department names appear under brand names (if you use brands).
- Provider names appear under department names (expand the department name to display the provider names).
Click a brand, department, or provider name on the left side of the page to display its phone greeting on the right side of the page.
For the practice, a brand, a department, or a provider, you see the current greeting, the username of the person who created it, and the date that the greeting was uploaded. Click Listen to hear the greeting, or click Download to download the greeting as a .wav file.
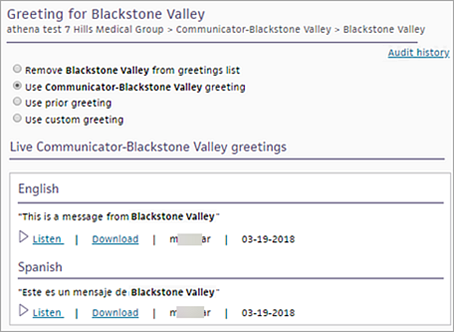
The Filter by menu on the left side of the page provides these filter options:
- Department — Use this option to select multiple departments. Select departments from the list and then click Filter to create the filtered list of departments on the left.
Note: If your practice uses Communicator Brands, click the plus sign next to the brand name to display the list of departments.
 - Provider — Use this option to select multiple providers. Select providers from the list and then click Filter to create the filtered list of providers on the left.
Note: If a selected provider works in more than one department, the provider name appears under each department on the left side of the page. - No Greetings: Department — Use this option to find all departments that are not shown in the list of departments on the Greetings page. Select the departments that you want to display and click Restore to Greetings List.
- No Greetings: Provider — Use this option to find all providers that are not shown in the list of providers on the Greetings page. Select the providers that you want to display and click Restore to Greetings List.
Note: If a selected provider works in more than one department, the provider name appears under each department on the left side of the page.
On the left side of the page, providers are listed under departments.
- If your practice uses the Provider Drop-downs feature — Providers are listed according to the mapping on the Provider Drop-Downs page.
- If your practice does not use the Provider Drop-downs feature — Providers are listed based on their scheduling history. For example, if a patient has been scheduled with Dr. Smith in the Rome office, Dr. Smith appears under the Rome office.
If a brand, department, or provider has a custom greeting, a star appears next to the brand, department, or provider name on the left side of the page.
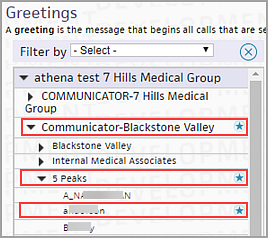
- For a brand, custom greetings are greetings that differ from the practice settings.
- For a department, custom greetings are greetings that differ from the practice (or brand) settings.
- For a provider, custom greetings are greetings that differ from the department settings.
Superusers in your practice can determine what permissions to grant to other users at your practice.
The Patient Messaging: ReminderCall permission gives read-only access to the ReminderCall Settings, GroupCall Settings, Greetings, Instructional Message Mapping, Instructional Messages, and ResultsCall Settings pages. You can combine the Patient Messaging: ReminderCall permission with the read-write permissions, for example,
- User Joe Smith has these permissions: Patient Messaging: ReminderCall and Communicator Admin: Greetings. Joe can edit the Greetings page and view (but not edit) the ReminderCall Settings, GroupCall Settings, Instructional Message Mapping, Instructional Messages, and ResultsCall Settings pages.
- User Alex Green has these permissions: Patient Messaging: ReminderCall, Communicator Admin: Instructional Messages, and Communicator Admin: Instructional Message Mapping. Alex can edit the Instructional Messages and Instructional Message Mapping pages, as well as the default practice-level instructional message (only) on the ReminderCall Settings page. Alex can also view (but not edit) the GroupCall Settings, Greetings, and ResultsCall Settings pages.
Note: If a user has one of the limited read/write permissions but does not have the Patient Messaging: ReminderCall permission, that user can edit the page specified by the read/write permission but cannot see the links to the other pages in the Task Bar. For example, if a user has the Communicator Admin: Instructional Message Mapping permission but not the Patient Messaging: ReminderCall permission, that user can edit the Instructional Message Mapping page and the ReminderCall Settings page (default practice-level instructional message only), but cannot see links to the Greetings, GroupCall Settings, Instructional Messages, or ResultsCall Settings pagesin the Task Bar.
Local roles
We recommend that large and enterprise organizations use local roles to simplify the management of user permissions in general. For the ReminderCall, ResultsCall, GroupCall, Greetings, and Instructional Messages settings pages, you can add one or more limited Communicator Admin permissions to a role. For example, if you want a user to edit settings for instructional messages only, you can remove the Communicator Admin permission and add the Communicator Admin: Instructional Messages permission to the local role for that user.
You can configure one standard greeting for the practice, each brand (if applicable), each department, and each provider. The standard greeting is used in ReminderCall, ResultsCall, GroupCall, and Self-Pay reminder phone messages.
- Set up your standard practice greeting. You can accept the default athenahealth greeting, or you can create a new practice greeting.
- Set up a custom greeting for each Communicator brand (if you use the Communicator Brands feature).
If you do not configure a custom greeting for a brand, the greeting configured for the practice is used for the brand. - Set up a custom greeting for each department.
If you do not configure a custom greeting for a department, the greeting configured for the practice (or the brand, if your practice uses brands) is used for the department. - Set up a custom greeting for each provider.
If you do not configure a custom greeting for a provider, the greeting configured for the department that includes the provider is used for the provider.
Note: If a provider is included in more than one department and the provider has no custom greeting, the greeting configured for each department that includes this provider is used.
If your practice was using athenaCommunicator before December 2014 and you have not set up standard greetings at the practice, brand, department, and provider levels, you are prompted to select a standard greeting. The prompt lists all legacy ReminderCall and GroupCall greetings (legacy greetings were created using remindercall.us).
Note: You can select only one legacy ReminderCall or GroupCall greeting as the standard greeting.
We strongly recommend that you consolidate your greetings and select a standard greeting for all the phone messages that athenaCommunicator sends on your behalf.
Note: If your organization has multiple legacy greetings and you want to change your greetings in any way, you must consolidate your greetings before you can create a new greeting.
- Display the Greetings page: On the Main Menu, click Settings
 >Communicator. In the left menu,under Practice Links — Greetings and Instructional Messages, click Greetings.
 - Select a brand, department, or provider.
If the brand, department, or provider is using a legacy (remindercall.us) greeting, you are prompted to select a standard greeting. The legacy greetings are listed below the prompt.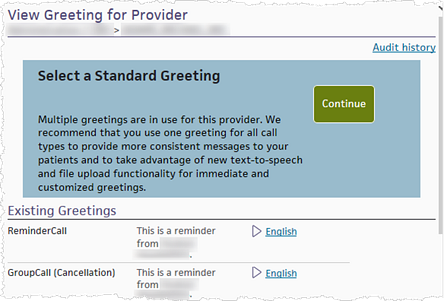
- Click Continue.
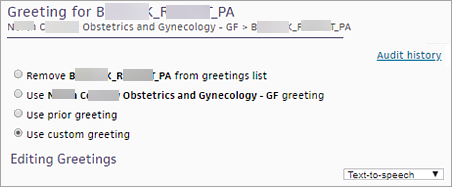
The Use custom greeting option is automatically selected. - To remove the brand, department, or provider from the Greetings page, select the first option, Remove xxx from greetings list.
- If you do not want to configure a custom greeting for the provider, department or brand, select the second option (for example, Use xxx department greeting).
- For a brand, select this option to use the greeting configured for the practice.
- For a department, select this option to use the greeting configured for the practice (or the brand, if you use Communicator Brands).
- For a provider, select this option to use the greeting configured for the department.
- To create a custom greeting, select an option from the Editing Greetings menu:
- Text-to-speech — Enter information that will be converted to an audio greeting (see "To create a text-to-speech (TTS) greeting").
- Upload recording — Upload your own recorded greeting (see "To upload your own recorded greeting").
- If you prefer to use an existing greeting:
- Select the Use prior greeting option at the top of the page.
The list of legacy ReminderCall and GroupCall greetings appears. - Select the prior greeting to use.
- Click English to review the greeting.
- Click Apply.
The greeting appears on the right side of the page and is effective immediately.