 Quick Reference — To create a patient case
To create, edit, and respond to patient cases, your practice must use the athenaClinicals service, and you must have the "Patient Case Management: Create/Edit Cases" user role or permission. The "Patient Case Management: Create/Edit Cases" user role or permission also enables you to delete newly created patient cases in DATAENTRY status.
When a patient calls the practice, you can document the call directly in athenaOne while the patient is on the phone and assign it to the appropriate person for resolution. You can access the patient's chart in athenaOne so that you can view and update the patient case in real time, while the patient is on the phone.
- In the patient chart, click the Menu icon
 at the upper right and select Create patient case.
A new patient case opens in DATAENTRY status.
Note: If you inadvertently create a patient case, select the Delete option and click Save. If you do not click Save before you close the patient case using the X icon at the top right of the document, the case is not deleted and appears in your inbox in DATAENTRY status.
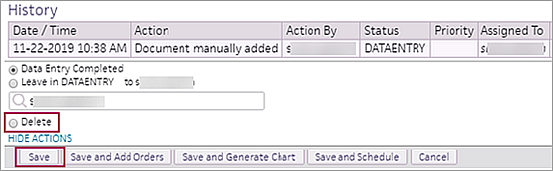
- Default Pharmacy — If the Search link appears, click it to set a default pharmacy for this patient. To change the default pharmacy, click the linked pharmacy name to display the pharmacy search tool.
- Source/Recipient — Select the source of the patient case (for example, Patient, Pharmacy, Lab, Specialist, PCP, or Patient Portal).
Note: Selecting Patient Portal from the Source/Recipient menu sends the patient case to the Patient Portal for this patient (the message appears on the Messages page of the Patient Portal). - Type — Select the type of call (Administrative, Clinical Question,
Medical Records, Medication, NewRx, Other, Patient No Show, Referral, Refill, Statement or Billing Question).
Note: The setting of the Type field is also used when a task assignment override routes a specific task type to a specific practice role. - Outbound only — Select this option to indicate that the patient case requires an outbound phone call, but not a response to an inbound call.
- Provider — Select the provider for whom the call is intended. From this menu, you can see each provider's billed name along with their username or practice role.
- Department — Select the department for which the call is intended.
- Outside Provider/Lab/Pharmacy — If the call is from an outside provider, lab, or pharmacy:
- Enter the name of the provider, lab, or pharmacy in the
field.
Note: When you enter three or more letters, matching selections appear. - Select the provider, lab, or pharmacy
from the list.
The address, phone number, and fax number for the outside provider appear in the field. - Person to Call (if other than patient) — Enter the name of the person to call about this case. This person can be a parent, guardian, or patient advocate, for example.
- Desired Callback Number — If the caller is the patient or caregiver, select a phone number from the menu. The options in the Desired Callback Number menu include the patient's home, work, and cell numbers, as well as the emergency contact phone number listed for the patient. If the number you need is not in the Desired Callback Number menu, select Other from the menu and enter the phone number in the Other field.
- Subject — Enter the subject of the case. This subject appears with the patient case task in the Clinical Inbox.
- Priority — Select This task is urgent if this case requires the urgent attention of the physician. When you select this option, a red bar appears to the left of the task in the list of patient cases in the Clinical Inbox.
- Alarm Days — If a message is sent to the Patient Portal, the Alarm Days field shows the default amount of time the patient has to read the message; after the alarm expires, the unread patient case is sent back to you for further action (such as calling the patient directly). You can select another value from the menu.
Note: To use message alarms, the athenaCommunicator Patient Portal must be enabled. - Case
Description — Enter a detailed description of the patient's
complaint or concern.
Note: To use a text macro in the Case Description field, type a period (".") followed by the beginning, or any part of, the shortcut name, then select the macro you need from the search results.
You can save the text that you enter in the Case Description field as a macro that you can reuse in the Case Description field of other patient cases.
Note: You can enter only plain text in text macros used in the Case Description field. HTML content — such as bold text, tables, and drop-down lists — is not supported. - Enter your text in the Case
Description field, then click the star
 icon to save the text as a text macro for later use.
The macro configuration fields appear.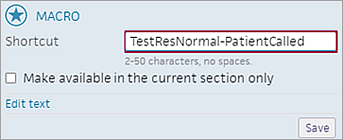
- Shortcut — Enter a name for the macro (2-50 characters with no spaces). This name will appear in the list of macros available for use.
- Make available in the current section only — Select this option to limit the macro's availability to the Case Description field in patient cases.
- Click Edit text to review and edit the full text.
- Click Save.
- If you do not need to add orders or generate a patient chart, click Save.
The patient case is assigned a case number. The case appears as an open task (in REVIEW status) in the provider's Clinical Inbox.
Note: A Save & Schedule button is also available for users who have Scheduling user permissions.
After you create a patient case, you can add orders for the patient immediately.
- Click Save
and Add Orders (at the bottom of the page).
A new order group tab opens. - Create the orders as you would from an encounter.
- Sign the orders.
After you create a patient case, you can provide the patient with an electronic medical record.
- Click Save and Generate Chart (at the bottom of the page).
athenaOne saves the patient case and opens a new chart export tab.
Under Chart Sections
- You can use the Date Range options to help you locate the documents that you need.
- To add documents from an entire category, click the category name and then click
the right-facing arrow, or double-click the category name.
Note: Each category name displays the number of available documents in that category in parentheses. If a category does not contain any documents, the category name is gray. - To add specific documents within a category, click the plus icon
 to expand the
category, click the specific document, and then click the right-facing arrow to move the
document to the Selected
Attachments box. You can also double-click the document name to add
it to the Selected Attachments box.
to expand the
category, click the specific document, and then click the right-facing arrow to move the
document to the Selected
Attachments box. You can also double-click the document name to add
it to the Selected Attachments box.
Note: When you hover over a document name in the Available Attachments or Selected Attachments box, a view document link appears. You can click this link to open the document in a new tab. - To select multiple categories or documents at once, hold down the Ctrl key and click each category or document that you want to add.
- Click Export Chart Sections.
The Record Release Information fields appear, along with a preview of the information to export.
Note: To change the selected chart sections, click the edit link to add and delete chart sections. - Click Save at the bottom of the page.