Order Group
You can create orders, RTOs, and letters for a patient outside an encounter using the "order group" workflow. This workflow is useful for reviewing a lab or image result, a physician consult, or a patient case. By default, unsigned orders are assigned to the provider in REVIEW status.
In the patient chart, click the Menu icon ![]() and select Create order group.
and select Create order group.
- In the patient chart, click the Menu icon
 .
. - Select Create order group.
- Search for and select the rendering provider.
The Order Group page appears. - Ordering Provider — Select the ordering provider.
- Supervising Provider — If you require a supervising provider when you create orders, select a supervising provider.
Note: If you previously assigned a supervising provider, that supervising provider is the default choice. - Click
 .
. - Select the order set or diagnoses and orders for this order.
- To record an onset date for a diagnosis, click the diagnosis to expand it and reveal the Onset field. Enter or select the onset date of the patient's symptoms.
- Enter the order details in the fields provided.
- For multiple orders, click each additional order to expand it and enter the order details.
- Click
 to add a follow-up RTO (appointment tickler) if needed.
 - Click
 to add a letter to the order, if needed.
 - Click the Sign Orders button.
The order group is added to the list of cases in the Visits section of the patient chart.
Required: The medication must have been previously prescribed, manually entered, or have a start date entered by a provider in your practice.
In the Exam stage of an in-person or telehealth visit, access the patient's Medications list.
Note: You can also accelerate a medication from Order Groups. To access,click the Menu icon in the upper right and select Order Groups.
To preview the information that will be copied into a new order prior to accelerating or to access supporting information, hover your mouse over the accelerator button
 in the upper right corner of a medication.
A window appears, detailing the information that will be added to the order. It also lists supporting information to help you determine whether a prescription refill is necessary.
Tip: Use order sets with preconfigured information to further accelerate medication ordering. See Order Sets and Manage My Order Sets for details.Click the accelerator arrow
 in the upper right to copy the medication details into a new order.
Note: Previewing information is available for any medication that can be copied, and remains available after acceleration.
Example of details
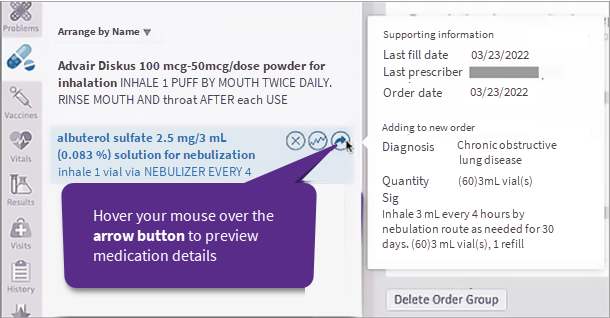
The preview shows these sections and all available details:
Supporting information
This section assists you in determining whether a prescription refill is needed.
- Last fill date
- Name of the Last prescriber
- Order date
Adding to new order
This section lets you review medication information before copying it into a new order. The details to be copied include:
- Diagnosis
- Quantity
- Sig
- Strength
- Base unit
- Route
- Refills
- DAW
- Note to pharmacy
- Note to patient
- Internal note
If a medication was manually entered or started and is not yet prescribed, it can still be accelerated into a new order. However, the term 'UNAVAILABLE' appears in some fields.
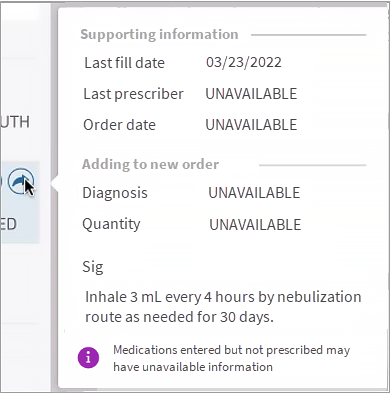
After the clinical provider accelerates the medication details into a new order, they will need to manually enter any missing data prior to signing. This information will be available within the medication the next time a member of clinical staff accelerates it.
The accelerator arrow ![]() in the upper right corner of a medication is active only if a clinical provider in your organization has previously prescribed a medication at least once, has manually entered the medication, or has entered a start date for the medication. Otherwise, the medication cannot be copied into a new order and the accelerator arrow is inactive
in the upper right corner of a medication is active only if a clinical provider in your organization has previously prescribed a medication at least once, has manually entered the medication, or has entered a start date for the medication. Otherwise, the medication cannot be copied into a new order and the accelerator arrow is inactive ![]() .
.
Solution
Create a new prescription for the medication. Once prescribed, you can use the accelerator feature for subsequent prescriptions.
Note: Beginning November 16-18, 2022, you cannot accelerate medications that have only fill histories because:
- Fill histories contain unstructured Sigs.
- They cannot be used to auto calculate quantity.
- They may differ from the original Sig and may include undesired inclusions or omissions from the pharmacy.
- They may include deprecated quantity units.
This change was in response to customer requests that we limit this feature to medications with at least one prescribing event, or that have been manually entered or started.
-
In the patient chart, click the Menu icon
 and select Create order group.
 - In the new order group, click
 .
.
Additional fields appear. - Provider — Select the desired provider for the follow-up appointment.
- Appointment — Select the type of follow-up appointment desired.
- Department — Select the department for the follow-up appointment.
- Alarm — If you want a reminder alarm for scheduling the follow-up appointment, select a time frame for scheduling the follow-up appointment.
- Note — Add a scheduling note about the follow-up appointment.
- Click outside the area to save.
-
In the patient chart, click the Menu icon
 and select Create order group.
 - In the new order group, click the plus icon next to Letters.
Additional fields appear.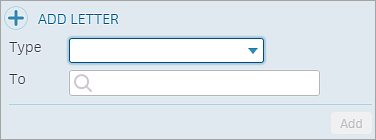
- Type — Select the type of letter or form.
- To — Select the recipients.
- Click Add.
As with lab and imaging orders, you can first search for a clinical provider for a consult/referral order and then select an order provided by the selected clinical provider.
- In the Exam stage of an encounter, locate the Assessment & Plan section.
Note: You can also create a consult/referral order from an order group. - Click the plus icon
 next to Diagnoses & Orders.
 - If a clinical provider (for a lab, imaging, or consult provider) is not already selected for the patient, click Search options.

Note: If a clinical provider is already selected for the patient but you want to select a different clinical provider, click the name of the facility or provider to change it.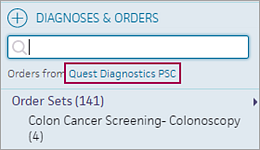
- In the Search Options window, scroll down to Consult Orders (or Referral Orders).
Note: To search the global consult compendium, do not select a consult provider before you click Global Orders List. - To select an order from a specific clinical provider, click Selected Provider.
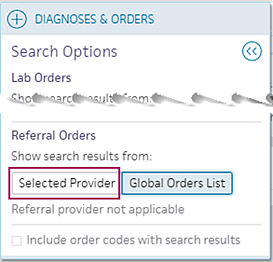
-
Click SEARCH to find a consult/referral provider.
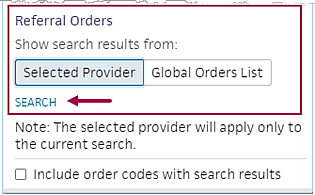
- Select a consult/referral provider.
The name appears under "Show search results from".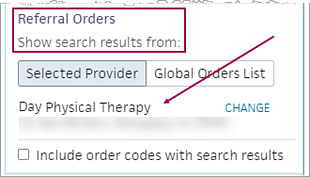
- To select a different provider, click CHANGE.
Note: athenaOne clears the selected provider and reverts the selected button to Global Orders List when you select a consult order in the DIAGNOSES & ORDERS list or when you navigate to a different encounter or patient. - Click the back icon
 .
.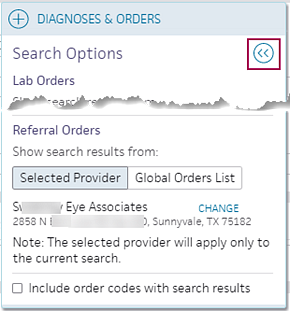
The consult/referral orders offered by the selected provider or receiving facility appear below the provider's name.
Note: To display the facility's electronic order codes, select the Include order codes with search results option. - Search for and select the consult/referral order for the selected clinical provider.
Note: The consult order appears with any receiver-specific order codes and customized AOE questions only when you submit the order by athenaFax or on paper. - To add chart attachments to the consult/referral order, click the add attachments icon
 and select the documents to attach to the order in the selection window.
For information about the documents you can attach to a consult/referral order, see Chart attachments for consult orders. The maximum number of attachments supported on an order is 200.
Facilities that receive consult orders from the athenahealth network of healthcare providers can:
- Customize the consults that providers can order, including the name of the consult order and any facility-specific order codes to associate with the order. (This feature applies only to orders that your facility offers.)
- Configure Ask at Order Entry (AOE) questions that appear and the order in which they appear.
Important: The consult order must be submitted to your facility by athenaFax or on paper.
To update your compendium of consult orders, create a support case from athenaOne > Support > Success Community > Contact Client Support Center and provide one of the following pieces of information about the clinical provider, or facility, that will receive referrals:
- Provider ID number
- Full name, address, phone, and fax number
With this information, athenahealth can identify where to load the compendium.
When you create a medication order, you may see the estimated price that the patient can expect to pay at the pharmacy. This price is based on the patient's insurance information and preferred pharmacy. (This feature is sometimes called real-time benefit check or RTBC.)
The estimated price displayed in athenaOne may differ from the actual price that the patient pays at the pharmacy, based on additional factors determined by the patient's insurance. The prescription price is returned from the pharmacy benefit manager (PBM) and the preferred pharmacy selected on the order.
Note: athenaOne displays prices from PBMs, including Humana, UnitedHealthGroup/OptumRx, Abarca, MedImpact, Navitus, CVS Caremark, DST Pharmacy Solutions, Express Scripts, Gemini Health, and Prime Therapeutics. athenahealth continues to add more vendors to increase price availability and market coverage.
You may also see the cash price (without insurance) and the price at an alternate pharmacy (the alternate pharmacy can be mail order). athenaOne displays these prices when they are available from the pharmacy benefit manager or vendor.
To see the price that a patient can expect to pay for a medication before sending the order to the pharmacy:
- In the Exam stage of an encounter, locate the Assessment & Plan section.
Note: You can also create an order from an order group or from the Orders and Results section of the Intake stage of an encounter. - Click the plus icon
 next to Diagnoses & Orders.
 - Search for and select the medication.
Note: Real-time prescription price estimates are available for structured medication orders only (all Sig and Quantity fields must be filled in).
- Click the order to open it and expand the details.
Estimated pricing information appears at the bottom of the order.
Note: You may see a notification that the medication you are prescribing requires a prior authorization. You can create an electronic prior authorization request after you sign the order (see Electronic Prior Authorization (ePA) for Prescriptions). - Price estimate — Review the prescription cost with the patient.
- If more alternatives appears below the price estimate, you can click the link to display alternatives to the prescribed medication. (If no information is available, two dashes (--) appear in the column.)

- Medication — Shows the medication on order in gray and alternative medications in blue.
- Insurance — Shows the price the patient would pay with insurance.
- Cash — Shows the price the patient would pay without insurance.
Note: athenaOne displays a cash price only if it is available from the vendor or pharmacy benefit manager. - Alt. Pharmacy — Shows the price the patient would pay at an alternate or mail order pharmacy. Hover the cursor over a price to see the name of the alternate pharmacy and the medication quantity.
Note: The Alt. Pharmacy price can be for the same quantity ordered or for a maintenance supply of 3x the ordered quantity. - To change the medication and pharmacy on the order, click the price in the Alt. Pharmacy column.
- After you and the patient agree on the medication and the price, complete the order and sign it.
- To create an electronic prior authorization request for the order, see Electronic Prior Authorization (ePA) for Prescriptions.
You can use the Authorization and Insurance Referrals section of an order to attach prior authorization and insurance information to the following order types:
- Consult
- Imaging
- Procedure
- Surgery
The Authorization and Insurance Referrals section appears when you create the order during an encounter (Intake stage and Exam A/P section) or as an order group. You can also add and edit this information in the document view of the order.
Note: If your organization uses the athenaOne® Authorization Management service, athenahealth completes the authorization (see Authorization Tracker). Therefore, you need to enter only the place of service and the date of service (for consult orders, you also enter the number of requested visits).
- In the Exam stage of an encounter, locate the Assessment & Plan section.
Note: You can also create an order from an order group or from the Orders and Results section of the Intake stage of an encounter. - Add a consult, imaging, procedure, or surgery order, then scroll down to the Authorization and Insurance Referrals section.
Note: The following figure shows a consult order.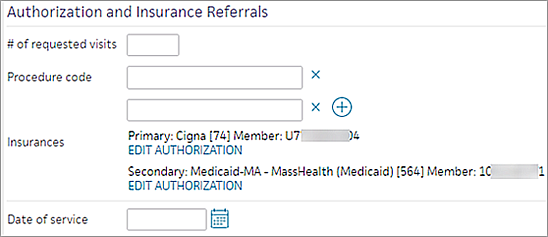
- Place of service — If you are creating a procedure or surgery order, select the type of facility where the procedure or surgery will be performed.
Note: If you use an order set that specifies the place of service, that POS appears in the field (you can edit the place of service). - # of requested visits — If you are creating a consult order, enter the number of visits that the patient should have with the provider.
Note: If you use an order set that specifies the number of visits, that number appears in the field (you can edit the number). - Procedure code — Enter the CPT codes for the consult, imaging, procedure, or surgery order. Start typing a keyword or code to view a list of matching codes and descriptions sorted by the code number. You can add as many CPT codes as needed.
athenaOne validates the CPT codes you enter. If a code is invalid, you receive a message. You must fix the error before you can sign or change the status of the order.
Insurance information
Note: If you completed the prior authorization, you can enter the information in the order now. If you have not yet completed the prior authorization, you can add the authorization information later in the document view of the order.
- Insurances — This field displays the patient's insurance policies as documented on the Quickview. To add authorization details for an insurance policy, click EDIT AUTHORIZATION.
Note: If you see the option to ADD ANOTHER INSURANCE, you can click it to select a different insurance policy for the patient. - Authorization is — Click Not required, Approved, or Denied.
- Authorization # — Enter the authorization number.
- Effective dates — Select the date range during which the authorization is valid.
- Additional information — You can enter any additional information about the order or the prior authorization if you choose.
Note: If you change the insurance policy after you enter authorization information for it, any information you entered in these fields is cleared.
- Select a date for the consult, imaging, procedure, or surgery order. The field name depends on the type of order:
- Date of service for a consult order
- Date of imaging for an imaging order
- Date of procedure for a procedure order
- Date of surgery for a surgery order
Important: You can copy prior authorization information from the order to the Quickview only once. If you change the authorization information after you select and save the Add auth to Quickview one time option, you must make the change on both the order and on the authorization in the Quickview.
- Open the order in document view.
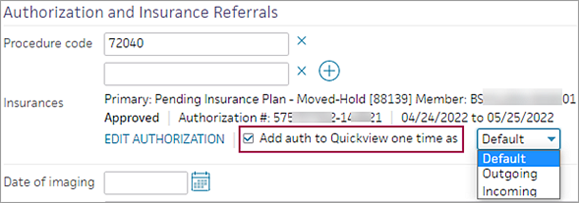
- Add auth to Quickview one time as — Select this option to copy the prior authorization information from this order to the Quickview, then specify the type of authorization to create from the order:
- Default — The authorization type depends on the provider. When the clinical provider is outside your practice, athenaOne creates an outgoing authorization. When the clinical provider is in your practice, athenaOne creates an incoming authorization.
- Outgoing — The authorization is always outgoing, regardless of which practice the clinical provider works in.
- Incoming — The authorization is always incoming, regardless of which practice the clinical provider works in.
- Save the order.
athenaOne creates an authorization on the patient's Quickview that contains the information you entered on the order. You can attach this authorization to upcoming appointments or claims. - You can see the newly created authorization in the patient's Quickview by clicking the view in quickview link in the document view.

Note: From the Quickview, you can click a link to the order.
Important: The provider's signature does not appear on the printed unsigned order, nor does the phrase "electronically signed by."
Your practice is responsible for submitting unsigned orders. Unsigned orders cannot be assigned to ATHENA, ATHENAFAX, or INTERFACE for submission.
- From the Clinical Inbox, display the unsigned order task that you want to print. Orders are found in the Orders/Rxs/Auths category.
Note: Only unsigned orders assigned to someone other than the encounter provider appear in the Clinical Inbox. - Click the print icon
 or the PRINT link at the top
right of the order task.
A print version of the order appears in a new window. - Select the printer and then click Print.
Note: By default, unsigned orders are assigned to the provider in REVIEW status. To route all unsigned orders or a particular set of unsigned orders to a specific user, create a task assignment override.
- Click Delete Order Group at the bottom of the order group form. A confirmation message appears.
- Click Delete.
In general, providers should avoid using order groups to document clinical care during rounds, or when visiting a series of patients in a facility, or an urgent care practice where providers see patients at a moment's notice.
- Billing for new orders outside the encounter is not part of the billing workflow, so your practice may lose revenue.
- Because you are working outside the appointment workflow, you cannot capture patient follow-up.
You can access order groups in the Visits section of the patient chart.