Manage Data Exports Page
This page allows you to request and track data exports from athenaOne, including CCDA, EHI, Appointments, Patient Demographics, EOBs, Transactions, clinical charts, and hospital inpatient Visit, Visit Charge, and Charge Detail exports. For CCDA exports, the exported document provides an in‑depth patient history for the period of time you specify. For CCDA and subset EHI exports, you can choose whether to include sensitive data in the exported file. You can track scheduled export jobs, as well as running and completed export jobs.
 How do I get to this page?
On the Main Menu, click Settings  > Clinicals. In the left menu,under Practice Links — Other, click Manage Data Exports
User access and permissions
To access this page, you must have the
- Manage Data Exports role or permission.
- Your practice will have the All Patients option enabled by an athenahealth personnel if you are terminating with athenahealth, or if your practice has providers or departments detaching.
- Please contact your CSM if you do not see the All Patients option enabled under the EHI, Appointments, Patient Demographics, Transactions, Visit, Visit Charge, or Charge Detail export type (click the Settings icon, under Clinicals, click Manage Data Export, and select the applicable export type).
To enable the 'all patients' option for EHI export types, you will need to ensure the Practice Setting "Bulk EHI export feature for practice users" is turned on. CSMs, are responsible for turning on this setting, when appropriate, by navigating in athenaOne to gear > Implementation > Practice Settings. If you are unable to edit the setting, please request the 'Edit CSM-Only Practice Settings' permission in athenista admin and ask your manager to approve it.
Step-by-step procedures
To export patient health information in CCDA format
Important: You can export health information in a CCDA document for a patient whose record is restricted or blocked (see Privacy Information). The provider remains responsible for protecting data under applicable federal and state privacy laws. For example, federal law requires a patient's consent for a substance use provider to disclose information to another provider; it is the provider's responsibility to obtain this consent.
You can export health information in a CCDA document for one or more patients now, or you can schedule the job for a later time or as a recurring job.
Note: You can create a CSV file that includes the patient IDs of the patients for whom you want to export information in CCDA format. The CSV file must have one column (only) with the column heading "PATIENTID"; this column should contain numeric data (patient IDs) only.
- Display the Manage Data Exports page: On the Main Menu, click Settings > Clinicals. In the left menu,under Practice Links — Other, click Manage Data Exports.
The New Export Job tab is displayed. - Select CCDA from the drop down to export CCDA. The default selected export type is CCDA.
- Patients — Specify the patients whose health information you want to export in a CCDA document.
- All Patients — Select this option to export the records of all patients.
- Patient ID List — Enter the patient IDs for which you want to export CCDA documents. To enter more than one patient ID, separate the IDs with a comma (1234,5678,9012).
Note: You can enter up to 120 patient IDs. - Upload CSV File — Click Choose File and select the local CSV file that contains the list of patient IDs for which you want to export records in CCDA format.
Note: The CSV file must have one column (only) with the column heading "PATIENTID"; this column should contain numeric data (patient IDs) only.
-
Select the appropriate CCDA standard for export. USCDI V3 is selected by default. You can select USCDI if you need to export CCDAs using that standard.
- Sensitive data — Select whether to include or exclude sensitive data in the CCDA export. This option helps apply privacy restrictions for third-party-facing and patient-facing exports according to applicable state regulations.
- Date range filter — You can specify a range of encounter dates to include in the exported CCDA document, or you can specify all patient records before a specific number of days, weeks, or months. Select one of these options:
- Include records between — Specify dates to include clinical data that occurred during this period of time in the exported CCDA file. You can also specify the beginning and end time of the encounters.
Note: If you do not specify either a start date or an end date, all clinical data for the patients are included in the CCDA file. - Include records for the prior — Enter the number of days, weeks, or months and select the time frame: Day(s), Week(s), or Month(s). Encounters that occurred before the specified number of days, weeks, or months are included in the exported CCDA file.
- Run this export — Specify when you want to create the exported CCDA files.
- Now — Run the report immediately.
Note: If you specified fewer than 120 patients in this export request and select the Now option, the export job begins now. However, if you specified more than 120 patients (or if you selected the All Patients option from the Patients field), the export will begin during non-business hours — that is, from 8 p.m. to 7 a.m. ET. - Once — Specify the date and time to export the files.
- Monthly — Specify the start date and end date to export the files, as well as the day of the month and the time that the report will be generated (hour and minutes). You can leave the end date blank.
- Save to location — For each report, athenaOne creates a .zip file that contains one .xml file per patient ID for ambulatory patients and two .xml files per patient ID for hospital patients. These files are saved on the athenaOne Practice Files page (On the Main Menu, click Settings >Practice Manager. In the left menu,under Practice Links — Miscellaneous, click Practice Files).
- Email when job is completed — You can enter an email address to notify the recipient when an export job is completed.
Note: Click Add Recipient to add additional email addresses.
 - Reason to schedule this export — You can select a reason for scheduling the export from the menu. This field helps athenahealth understand the use cases that cause practices to schedule exports.
Note: If you do not see a good option in the menu, select Other, then enter your reason in the Specify other reasons text box. - Description (optional) — You can enter a description of the CCDA export job (up to 200 characters are allowed).
- Click Submit. If you scheduled a one-time job or a recurring monthly job, the Scheduled Jobs tab appears with the new CCDA export request at the top of the list.
Note: If you chose to run the export now for fewer than 10 patients, do not leave the Manage Data Exports page until the export is completed. When the export is completed, you will receive an email notification indicating the location the exported files were added to.
To delete a CCDA file export job
If you schedule a CCDA export job for a future time or for a recurring monthly time on the Manage Data Exports page, you can delete it.
- Display the Manage Data Exports page: On the Main Menu, click Settings > Clinicals. In the left menu,under Practice Links — Other, click Manage Data Exports.
The New Export Job tab is displayed. - Click the Scheduled Jobs tab.
Scheduled and future export jobs are listed on this tab, organized by request ID.
Note: You can display the job IDs for a request by clicking the See historic/running jobs (n) link in the Jobs Created By This Request column (the Jobs Running/Done tab appears and displays a table of the jobs for the selected request ID). - If you have many export jobs on this tab, you can click Show filters to display the filter fields and filter the list by one or more options.
- Request ID — To display export jobs for a specific request only, enter the unique identifying number of the data export request.
- Job ID — To display a specific export job only, enter the unique identifying number of the data export job.
- Created Between — To display data export requests created during a specific time frame only, enter the start and end dates for the requests, or select a time frame from the menu.
- Status — To display export requests in a specific status only, select the status from the menu.
Note: To delete an export job, select one of these statuses: Scheduled, Waiting, In Progress, or Paused. - Click Filter.
The filtered list of export requests is displayed.
- To delete the export CCDA jobs:
- Click delete in the OPTIONS column on the far right of the table.
You are asked to confirm the deletion of the export jobs. - To delete the jobs for the selected request, click OK, Delete.
The jobs are deleted and the status of the request changes to Canceled.
Note: To back out of the delete operation, click No, Cancel.
- Click delete in the OPTIONS column on the far right of the table.
To download and display a CCDA data export file
After a CCDA data export job is completed, you can download and display the files using the Practice Files 2.0 page.
- Display the Practice Files 2.0 page: On the Main Menu, click Settings >Practice Manager. In the left menu,under Practice Links — Miscellaneousubl, click Practice Files 2.0.
- You can search for CCDA export files from the list of Practice files by filtering for CATEGORY = Data Archive and TYPE = CCDA. The filter function is available to the right of the search box on Practice Files 2.0 page.
- Click the download link. The .zip file contains:
- One .xml file per patient ID for ambulatory patients.
- Two .xml files per patient ID for hospital patients. One .xml file contains ambulatory information, and the other file contains hospital information.
- Unzip the file to extract each .xml file in it.
- Open the .xml file for a patient in a browser window to view the exported CCDA file for that patient.
For more information about the format of the .xml file, see Format of the downloaded CCDA file.
Features and workflows
Using the Manage Data Exports page, you can export CCDA and EHI information, clinical charts, Appointments, Patient Demographics, EOBs, Transactions, and hospital inpatient Visit, Visit Charge, and Charge Detail information. On this page, you can also track scheduled export jobs, as well as running and completed export jobs.
You can generate CCDA exports using the USCDI V3 standard. USCDI V3 exports provide updated CCDA content, including additional social determinants of health data.
For CCDA and subset EHI exports, you can choose whether to include sensitive data in the exported file. This functionality helps apply state-level privacy restrictions for third-party-facing and patient-facing exports. This option does not apply to bulk EHI exports or other export types.
Important: The Appointments, Patient Demographics, EOBs, and Transactions export types are available for all athenaOne for Ambulatory and athenaOne for Hospitals & Health Systems products. The Visit, Visit Charge, and Charge Detail export types apply only to athenaOne inpatients.
Note: Most CCDA export jobs are run on weekdays from 8 p.m. to 7 a.m. ET (outside of business hours) and on weekends. The exception to this rule is when you specify fewer than 120 patients in the export request and select the Now option; in this case, the export job begins now (even during business hours).
The Manage Data Exports page has these tabs:
- New Export Job tab — Request a data export job on this tab. You select the export type, patients, and any export-specific options.
- Scheduled Jobs tab — Locate scheduled export jobs on this tab. After you submit an export job on the New Export Job tab, the job appears on the Scheduled Jobs tab. If an export job is not in Completed or Canceled status, you can click delete to remove the job from the queue (the status of the job is changed to Canceled).
- Jobs Running/Done tab — See a more detailed history of the data export jobs. On the Scheduled Jobs tab, you can click the See historic/running jobs (n) link in the Jobs Created By This Request column to display the Jobs Running/Done tab (a table of the jobs for the selected request ID appears).
Format of the downloaded CCDA file
When you complete a data export using the Manage Data Exports page, you can retrieve the generated .zip files on the Practice Files 2.0 page.
- The file name begins with "CCDAs_".
- The file category (in the Category column on the Practice Files 2.0 page) is CCDA Archive.
The .zip file contains:
- One .xml file per patient ID for ambulatory patients
- Two .xml files per patient ID for hospital patients (one .xml file contains ambulatory information, the other file contains hospital information)
When you unzip the .zip file, you will be able to see a .xml file, which is a CCDA file for a given patient
For example, here is the .xml file name for an ambulatory patient named Sandra Smith:
Smith-Sandra-T_05241980_21_987654_AMB.xml
The human-readable view of the .xml file that includes exported CCDA information looks like this:
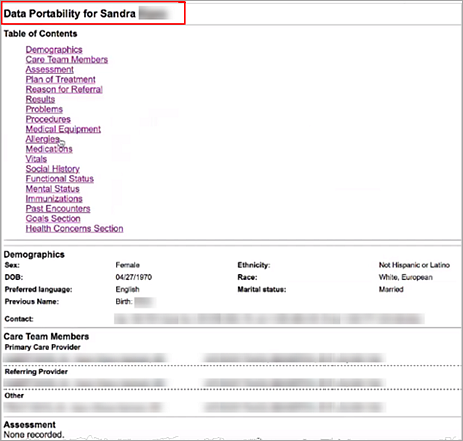
Sections included in a data portability CCDA document
CMS defines CCDA document templates for use in transmitting patient health information. When you export a patient's health information using the Manage Data Exports page, the CCDA data portability template is used to capture the patient information. (For more information, see CCDA templates used in athenaOne on the Summary of Care Record/Continuity of Care Document page.)
The CCDA data portability template includes the following sections:
- Advance Directives
- Allergies
- Assessment
- Care Team Members (Ambulatory Only)
- Family History
- Functional Status
- Goals
- Health Concerns
- Hospital Discharge Instructions (Hospital Only)
- Immunizations
- Medical Equipment
- Medical History
- Medications
- Mental Status
- Notes
- Past Encounters
- Patient Demographics
- Payers
- Plan of Treatment
- Problems
- Procedures
- Reason for Referral
- Results
- Social History
- Vitals
- Care Team
Field Reference
| New Export Job tab | |
| Patients |
Specify the patients whose health information you want to export in a CCDA document.
|
|---|---|
| CCDA standard for export |
Select the CCDA standard to use for the generated CCDA files. USCDI V3 is selected by default. Select USCDI only if you need to export CCDAs using that standard. |
| Sensitive data |
Select whether to include or exclude sensitive data in the CCDA export. This option helps apply privacy restrictions for third-party-facing and patient-facing exports according to applicable state regulations. |
| Date range filter |
You can specify a range of encounter dates to include in the exported CCDA document, or you can specify all patient records before a specific number of days, weeks, or months. Select one of these options:
|
| Run this report |
Specify when you want to create the exported CCDA files.
|
| Save to location |
For each report, athenaOne creates a .zip file that contains one .xml file per patient ID for ambulatory patients and two .xml files per patient ID for hospital patients. These files are saved on the athenaOne Practice Files page (On the Main Menu, click Settings |
| Email when job is completed | You can enter an email address to notify the recipient when an export job is completed. Note: Click Add Recipient to add additional email addresses. |
| Reason to schedule this export |
You can select a reason for scheduling the export from the menu. This field helps athenahealth understand the use cases that cause practices to schedule exports. Note: If you do not see a good option in the menu, select Other, then enter your reason in the Specify other reasons text box. |
| Description (optional) |
You can enter a description of the CCDA export job (up to 200 characters are allowed). |
| Scheduled Jobs tab — Filter fields | |
| Request ID | To display export jobs for a specific request only, enter the unique identifying number of the data export request. |
| Job ID |
To display a specific export job only, enter the unique identifying number of the data export job. Each data export request includes at least one job. You can display the job IDs for a request by clicking the See historic/running jobs (n) link in the Jobs Created By This Request column (the Jobs Running/Done tab appears and displays a table of the jobs for the selected request ID). |
| Created Between |
To display data export requests created during a specific time frame only, you can enter the start and end dates for the requests or you can select a time frame from the menu. |
| Status |
To display export requests in a specific status only, select the status from the menu.
|
| Scheduled Jobs tab — Column headings | |
| Request ID | Unique identifying number of the data export request. |
| Created On |
Date that the export job was created. |
| Description | Description entered when the export job was created or last modified. |
| Patient Record Info |
Specifies which records for the selected patients were scheduled for export.
|
| Scheduling Rule |
This field displays the schedule for the export, for example, "Once, 2021-08-21 at 11:45:00 am" or "Occurs every week on Monday effective 2021-07-12 until 2021-09-20." |
| Jobs Created By This Request |
Each data export request includes at least one job. To display the job IDs for a request, click the See historic/running jobs (n) link. The Jobs Running/Done tab appears and displays a table of the jobs for the selected request ID. |
| Next Job | If the export request specified a recurring export operation, this column displays the date that the next job is scheduled to run. |
| Status |
Status of the job, for example, Completed, In Progress, Scheduled, or Canceled. |
| OPTIONS |
Click the delete option to cancel any incomplete jobs in the export request. Note: The delete option is available only for requests that have one of these statuses: Scheduled, In Progress, Waiting, or Paused.
You are asked to confirm the deletion of the export jobs. If you click OK, Delete, the jobs are deleted and the status of the request changes to Canceled. |
| Jobs Running/Done tab — Filter fields | |
| Request ID |
To display export jobs for a specific request only, enter the unique identifying number of the data export request. Each data export request includes at least one job. |
| Job ID |
To display a specific export job only, enter the unique identifying number of the data export job. |
| Status |
To display export jobs in a specific status only, select the status from the menu.
|
| Jobs Running/Done tab — Column headings | |
| Job ID | Unique identifying number of the data export job. |
| Patients |
Specifies which patient records were selected when the export job was created.
|
| Description |
Description of the job that was entered when the request was created. |
| Progress | Number of records exported, for example "170 out of 200." |
| Status |
Status of the export job, for example, Completed, In Progress, Scheduled, or Canceled. |
| Request ID | Unique identifying number of the data export request. |
Step-by-step procedures
To export EHI

- Display the Manage Data Exports page: On the Main Menu, click Settings > Clinicals. In the left menu,under Practice Links — Other, click Manage Data Exports.
The New Export Job tab is displayed. - Export Type — Select EHI from the drop down to export EHI related information.
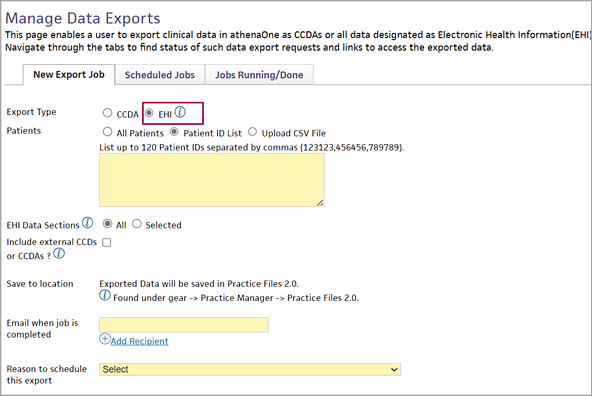
- All Patients — Select this option to create an export for all patients in the practice.
- Patient ID List — Manually add the Patient ID list that you want to export.
- Upload CSV File — Click Choose File and upload Patient IDs as a CSV file.
- Download template — Once the template is downloaded, you can add the patient ID and upload the same CSV file by selecting the Choose File button.

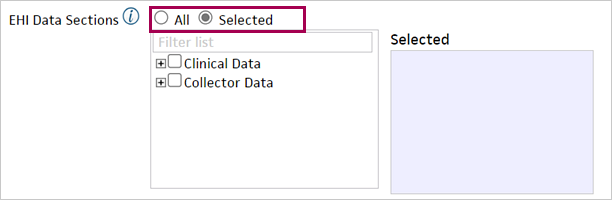
- EHI Data Sections — Select the required data sets (i.e., all, individual Clinicals, Collector data sections, or data classes) that you want to export.
- Selected — View specific data sections that are required in the selected window by clicking the Selected radio button in one or more of the available sections.
- Sensitive data — Select whether to include or exclude sensitive data in the subset EHI export. This option applies to subset EHI exports only and does not apply to bulk EHI exports.
- Filters to select specific patients — Select the appropriate EHI data that you want to export, using the Filters to select specific patients fields.
- Selected — View the selected EHI data filters in the selected window by clicking Selected in one or more of the available filters.
Note: The Filters to select specific patients fields are only available when you are selecting the All Patients field.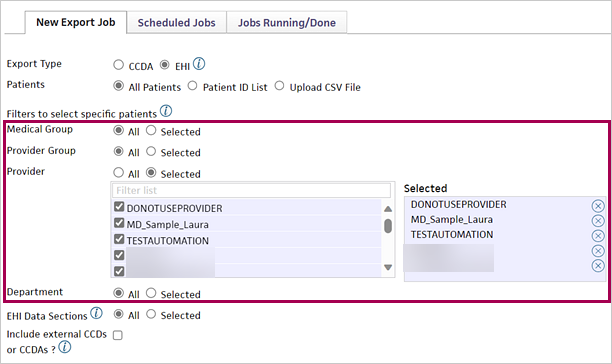
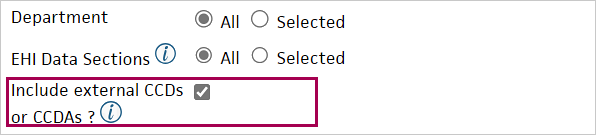
- Include external CCDs or CCDAs — Check the external CCDs or CCDAs according to your requirement. This option includes CCD or CCDA files that were once received from external system or generated by athenaOne and stored for future references or exports.
- Email when job is completed — You can enter an email address to notify the recipient when an export job is completed.
Note: ClickAdd Recipient to add additional email addresses. - Reason to schedule this export — You can select a reason for scheduling the export from the menu. This field helps athenahealth understand the use cases that cause practices to schedule exports.
Note: If you do not see a good option in the menu, select Other, then enter your reason in the Specify other reasons text box. - Description (optional) — You can enter a description of the EHI export job.
- Click Submit.
To export clinical charts
- Display the Manage Data Exports page: On the Main Menu, click Settings > Clinicals. In the left menu,under Practice Links — Other, click Manage Data Exports.
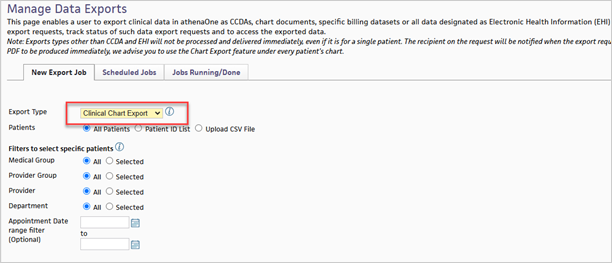
The New Export Job tab is displayed. - Export Type — Select Clinical Chart Export from the drop down to export clinical chart.
- All Patients — Create a clinical chart export for all patients in the practice.
- Patient ID List — Manually add the Patient ID list that you want to export.
- Upload CSV file — Upload Patient IDs as a CSV file.
- Download Template — Once the template is downloaded, you can add the patient ID and upload the same CSV file by selecting the Choose File button.
- Filters to select specific patients — Filters are defaulted to All.
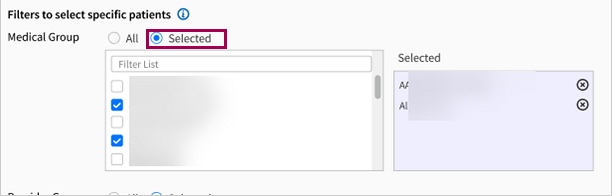
Select the appropriate patient data that you want to export, using the Filters to select specific patients fields.- Selected — View the selected patient data filters in the selected window by clicking Selected in one or more of the available filters.
Note:
The Filters to select specific patients fields are only available when you are selecting the All Patients field.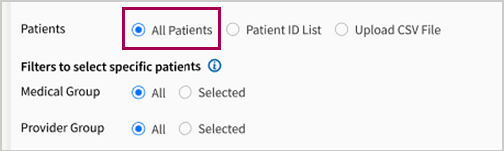
- Selected — View the selected patient data filters in the selected window by clicking Selected in one or more of the available filters.
- Appointment Date range filter (Optional) — Enter the start date and the end date to filter your appointment date results.
- Chart Data Filters — Filters are defaulted to All.
Select the appropriate clinical chart data that you want to export, using the Chart Section field.- Selected — View the selected clinical chart data filters in the selected window by clicking Selected in the available filter.
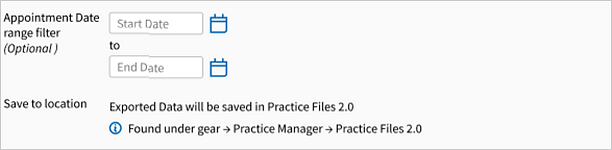
- Selected — View the selected clinical chart data filters in the selected window by clicking Selected in the available filter.
- Date range filter (Optional) — Enter the start date and the end date to filter your appointment date results.
- Export chart as — Select your desired clinical chart output format (PDF or HTML) to be exported.
- Save to location — The clinical chart exported based on your selection will be saved in Practice Files 2.0 page in athenaOne.
- Email when job is completed — Enter an email address of a recipient to be notified when a job is completed.
Note: Click Add Recipient to add additional email addresses.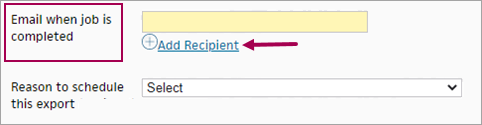
- Reason to schedule this export — Select a reason for scheduling the export from a list of options. This field helps athenahealth to understand the various use cases that cause practices to schedule exports.
Note: If you do not see an adequate option for your use case, select Other (please enter a description). Then enter your reason as text in the Specify other reasons text box.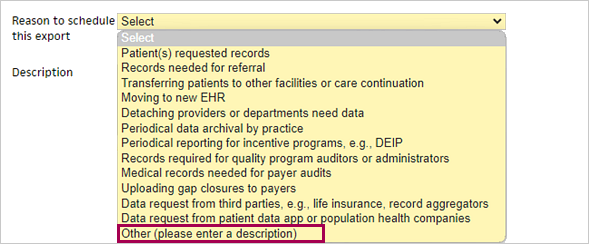
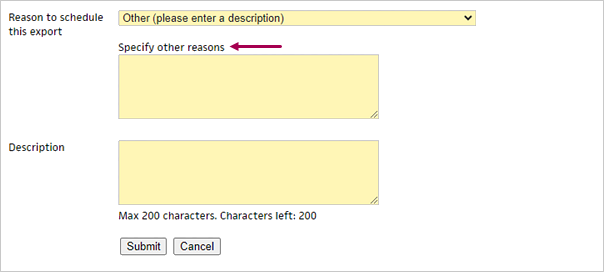
- Click Submit.
To export Appointments
- Display the Manage Data Exports page: On the Main Menu, click Settings > Clinicals. In the left menu,under Practice Links — Other, click Manage Data Exports.
The New Export Job tab is displayed. - Export Type — Select Appointments from the drop down to export appointments.
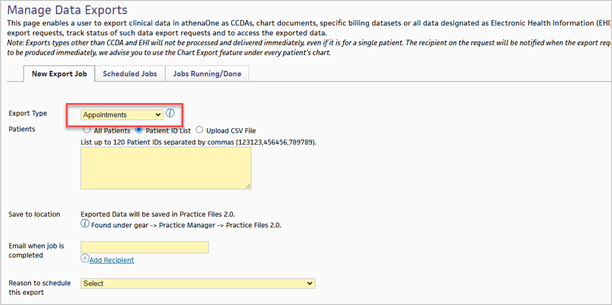
- Patients — Specify which patients to include in the export.
- All Patients — Create an Appointments export for all patients in the practice.
- Patient ID List — Manually add the Patient ID list that you want to export.
- Upload CSV File — Click Choose File and upload Patient IDs as a CSV file.
- Download Template — Once the template is downloaded, you can add the patient ID and upload the same CSV file by selecting the Choose File button.
- Save to location — The appointments export file will be saved on the Practice Files 2.0 page in athenaOne.
- Email when job is completed — Enter an email address of a recipient to be notified when a job is completed.
Note: ClickAdd Recipient to add additional email addresses. - Reason to schedule this export — Select a reason for scheduling the export from a list of options. This field helps athenahealth understand the various use cases that cause practices to schedule exports.
Note: If you do not see an adequate option for your use case, select Other (please enter a description). Then enter your reason as text in the Specify other reasons text box. - Click Submit.
To export Patient Demographics
- Display the Manage Data Exports page: On the Main Menu, click Settings > Clinicals. In the left menu,under Practice Links — Other, click Manage Data Exports.
The New Export Job tab is displayed. - Export Type — Select Patient Demographics from the drop down to export patient demographics.
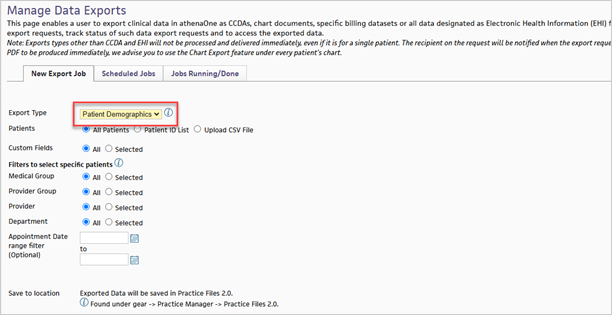
- Patients — Specify which patients to include in the export.
- All Patients — Create a Patient Demographics export for all patients in the practice.
- Patient ID List — Manually add the Patient ID list that you want to export.
- Upload CSV File — Click Choose File and upload Patient IDs as a CSV file.
- Download Template — Once the template is downloaded, you can add the patient ID and upload the same CSV file by selecting the Choose File button.
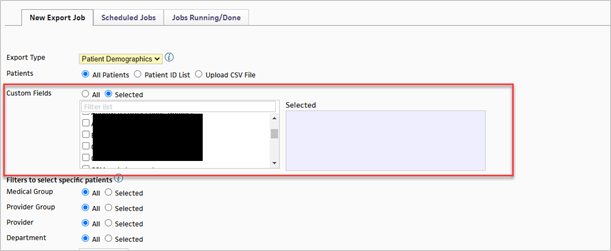
- Custom Fields — Select the custom fields you want to include in the export.
- Filters to select specific patients — Filters are defaulted to All.
- Selected — View the selected patient data filters in the selected window by clicking Selected in one or more of the available filters.
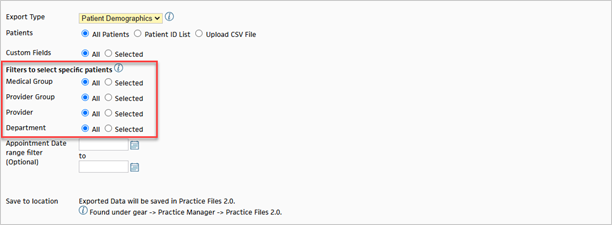
Note:
The Filters to select specific patients fields are only available when you select All Patients. - Selected — View the selected patient data filters in the selected window by clicking Selected in one or more of the available filters.
- Appointment Date range filter (Optional) — Enter the start date and the end date to filter your appointment date results.
- Save to location — The patient demographics export file will be saved on the Practice Files 2.0 page in athenaOne.
- Email when job is completed — Enter an email address of a recipient to be notified when a job is completed.
Note: ClickAdd Recipient to add additional email addresses. - Reason to schedule this export — Select a reason for scheduling the export from a list of options. This field helps athenahealth understand the various use cases that cause practices to schedule exports.
Note: If you do not see an adequate option for your use case, select Other (please enter a description). Then enter your reason as text in the Specify other reasons text box. - Click Submit.
To export EOBs
- Display the Manage Data Exports page: On the Main Menu, click Settings > Clinicals. In the left menu,under Practice Links — Other, click Manage Data Exports.
The New Export Job tab is displayed. - Export Type — Select EOBs from the drop down to export EOBs or remittances.
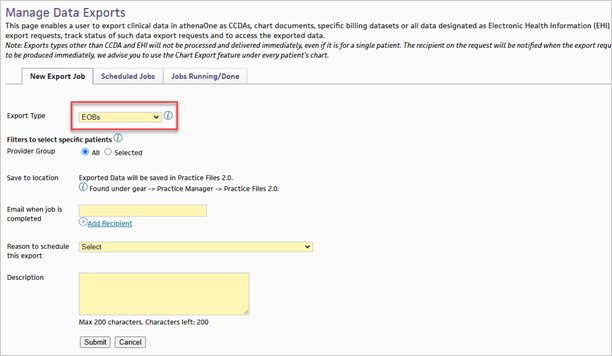
- Provider Groups — Specify which provider groups to include in the export.
- All — Export EOBs for all Provider Groups in your tablespace.
- Selected — Select specific Provider Groups to export EOBs.
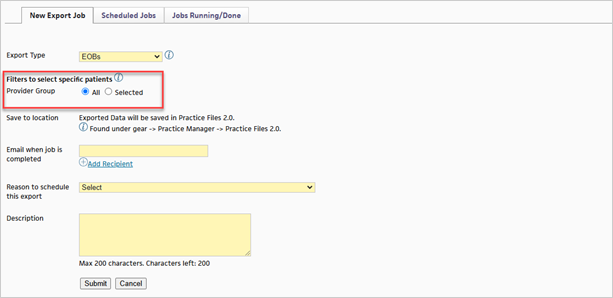
- Save to location — The EOB export file will be saved on the Practice Files 2.0 page in athenaOne.
- Email when job is completed — Enter an email address of a recipient to be notified when a job is completed.
Note: ClickAdd Recipient to add additional email addresses. - Reason to schedule this export — Select a reason for scheduling the export from a list of options. This field helps athenahealth understand the various use cases that cause practices to schedule exports.
Note: If you do not see an adequate option for your use case, select Other (please enter a description). Then enter your reason as text in the Specify other reasons text box. - Click Submit.
To export Transactions
- Display the Manage Data Exports page: On the Main Menu, click Settings > Clinicals. In the left menu,under Practice Links — Other, click Manage Data Exports.
The New Export Job tab is displayed. - Export Type — Select Transactions from the drop down to export a transactions report.
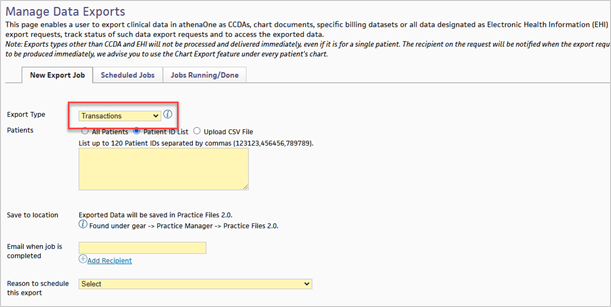
- All Patients — Create a Transactions report for all patients in the practice.
- Patient ID List — Manually add the Patient ID list that you want to export.
- Upload CSV file — Upload Patient IDs as a CSV file.
- Download Template — Once the template is downloaded, you can add the patient ID and upload the same CSV file by selecting the Choose File button.
- Filters to select specific patients — Filters are defaulted to All.
Note:
The Filters to select specific patients fields are only available when you are selecting the All Patients field.Select the appropriate patient filter that you want to export, using the Filters to select specific patients fields.
- Selected — View the selected patient data filters in the selected window by clicking Selected in one or more of the available filters.
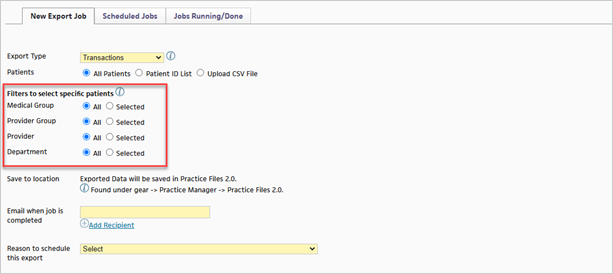
- Selected — View the selected patient data filters in the selected window by clicking Selected in one or more of the available filters.
- Save to location — The transactions report exported based on your selection will be saved in Practice Files 2.0 page in athenaOne.
- Email when job is completed — Enter an email address of a recipient to be notified when a job is completed.
Note: ClickAdd Recipient to add additional email addresses. - Reason to schedule this export — Select a reason for scheduling the export from a list of options. This field helps athenahealth to understand the various use cases that cause practices to schedule exports.
Note: If you do not see an adequate option for your use case, select Other (please enter a description). Then enter your reason as text in the Specify other reasons text box. - Click Submit.
To export Visit, Visit Charge, or Charge Detail
Important: The Visit, Visit Charge, and Charge Detail export types apply only to athenaOne inpatients.
- Display the Manage Data Exports page: On the Main Menu, click Settings > Clinicals. In the left menu,under Practice Links — Other, click Manage Data Exports.
The New Export Job tab is displayed. - Export Type — Select one of the following export types:
- Visit — Export visits.
- Visit Charge — Export visit charges.
- Charge Detail — Export charge details.
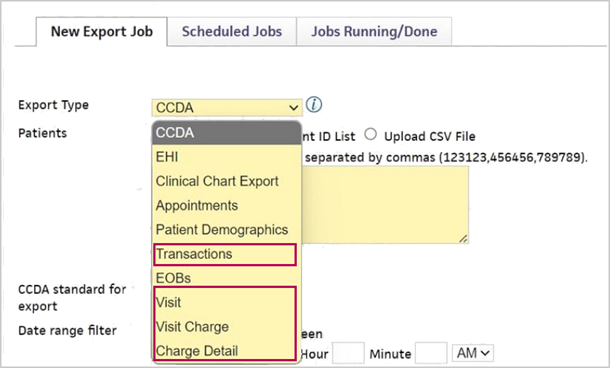
- Patients — Select the patients to include in the export.
- All Patients — Create the export for all patients in the practice.
- Patient ID List — Manually add the patient IDs that you want to export.
- Upload CSV file — Upload patient IDs as a CSV file.
- Download Template — After the template is downloaded, add the patient IDs and upload the same CSV file by selecting the Choose File button.
- Save to location — The exported data is saved on the Practice Files 2.0 page in athenaOne.
- Email when job is completed — Enter an email address of a recipient to be notified when the job is completed.
Note: ClickAdd Recipient to add additional email addresses. - Reason to schedule this export — Select a reason for scheduling the export from the list of options. This field helps athenahealth understand the use cases that cause practices to schedule exports.
Note: If you do not see an adequate option for your use case, select Other (please enter a description). Then enter your reason as text in the Specify other reasons text box. - Click Submit.
To track status of export requests
-
Select the Scheduled Jobs tab to track the status of your export request.
-
Use the below filters to view a specific request you created.
- Request ID
- Job ID
- Created Between
- Status
- Click Filter to view your results.
- Click Reset to reset your filters
- Click Hide Filters to hide the filter window.
- Click the See historic/running Jobs (X) on a specific export request to view the status of individual export jobs.
Note: You can see one or more export jobs on the Jobs Running/ Done tab depending on various factors, such as the number of chart sharing groups configured for your practice.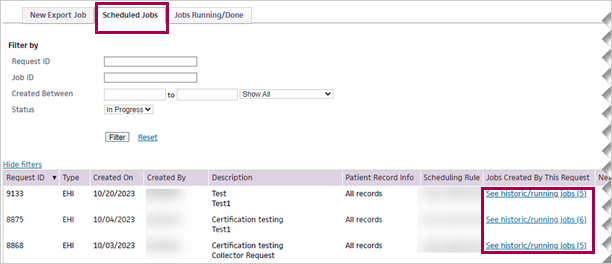
-
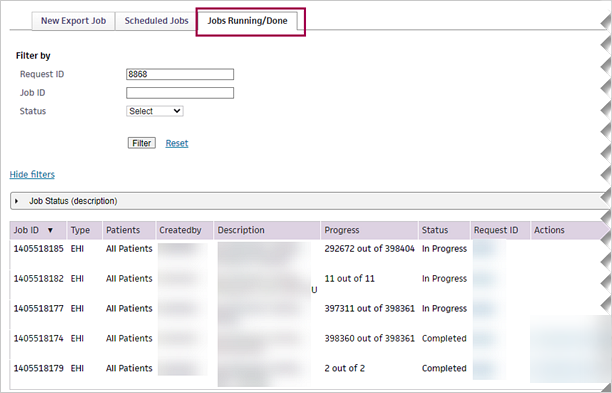
You can select the Jobs Running/Done tab directly to view and track the status of individual export jobs.
-
Use the below filters to view a specific export job you created:
- Request ID
- Job ID
- Status
- Click Filter to view your results.
- Click Reset to reset your filters.
- Select Hide filters to hide the filter window.
Field Reference
| New Export Job tab | |
| Export Type |
Select the type of data export to create.
|
|---|---|
| EHI |
Select EHI to export EHI.
|
| Appointments |
Select Appointments to export appointment information.
|
| Patient Demographics |
Select Patient Demographics to export patient demographic information.
|
| EOBs |
Select EOBs to export EOBs or remittances. The Patients section is not applicable to EOB exports. |
| EHI Data Sections |
Select the required data sets (i.e., all, individual Clinicals, Collector data sections, or data classes) that you want to export.
|
| Sensitive data |
Select whether to include or exclude sensitive data in the subset EHI export. This option applies to subset EHI exports only and does not apply to bulk EHI exports. |
| Custom Fields | For Patient Demographics exports, select the custom fields you want to include in the export. |
| Filters to select specific patients |
Select the appropriate patient data that you want to export, using the Filters to select specific patients fields. These fields are available for Patient Demographics exports when you select All Patients.
|
| Appointment Date range filter (Optional) | For Patient Demographics exports, enter the start date and end date to filter your appointment date results. |
| Include external CCDs or CCDAs | Check the external CCDs or CCDAs according to your requirement. This option includes CCD or CCDA files that were once received from external system or generated by athenaOne and stored for future references or exports. |
| Email when job is completed | You can enter an email address to notify the recipient when an export job is completed. Note: Click Add Recipient to add additional email addresses. |
| Reason to schedule this export |
You can select a reason for scheduling the export from the menu. This field helps athenahealth understand the use cases that cause practices to schedule exports. Note: If you do not see a good option in the menu, select Other, then enter your reason in the Specify other reasons text box. |
| Description (optional) |
You can enter a description of the export job. |
| Scheduled Jobs tab — Filter fields | |
| Request ID | To display export jobs for a specific request only, enter the unique identifying number of the data export request. |
| Job ID |
To display a specific export job only, enter the unique identifying number of the data export job. Each data export request includes at least one job. You can display the job IDs for a request by clicking the See historic/running jobs (n) link in the Jobs Created By This Request column (the Jobs Running/Done tab appears and displays a table of the jobs for the selected request ID). |
| Created Between |
To display data export requests created during a specific time frame only, you can enter the start and end dates for the requests or you can select a time frame from the menu. |
| Status |
To display export requests in a specific status only, select the status from the menu.
|
| Scheduled Jobs tab — Column headings | |
| Request ID | Unique identifying number of the data export request. |
| Type | Type of the export job. |
| Created By | Who created the export job. |
| Created On |
Date that the export job was created. |
| Description | Description entered when the export job was created or last modified. |
| Patient Record Info |
Specifies which records for the selected patients were scheduled for export.
|
| Scheduling Rule |
This field displays the schedule for the export, for example, "Once, 2021-08-21 at 11:45:00 am". |
| Jobs Created By This Request |
Each data export request includes at least one job. To display the job IDs for a request, click the See historic/running jobs (n) link. The Jobs Running/Done tab appears and displays a table of the jobs for the selected request ID. |
| Next Job | N/A for EHI export |
| Status |
Status of the job, for example, Completed, In Progress, Scheduled, or Canceled. |
| OPTIONS |
Click the delete option to cancel any incomplete jobs in the export request. Note: The delete option is available only for requests that have one of these statuses: Scheduled, In Progress, Waiting, or Paused.
You are asked to confirm the deletion of the export jobs. If you click OK, Delete, the jobs are deleted and the status of the request changes to Canceled. |
| Jobs Running/Done tab — Filter fields | |
| Request ID |
To display export jobs for a specific request only, enter the unique identifying number of the data export request. Each data export request includes at least one job. |
| Job ID |
To display a specific export job only, enter the unique identifying number of the data export job. |
| Status |
To display export jobs in a specific status only, select the status from the menu.
|
| Jobs Running/Done tab — Column headings | |
| Job ID | Unique identifying number of the data export job. |
| Type | Type of the data export Job. |
| Patients |
Specifies which patient records or provider groups were selected when the export job was created, depending on export type.
|
| Created by | Who created the data export job. |
| Description |
Description of the job that was entered when the request was created. |
| Progress | Number of records exported, for example "170 out of 200." |
| Status |
Status of the export job, for example, Completed, In Progress, Scheduled, or Canceled. |
| Request ID | Unique identifying number of the data export request. |
| Actions | Displays "Download from Practice Files 2.0" for export jobs which are completed. |