 User Guide — Clinical Provider Selector
athenaClinicals + athenaCoordinator
The clinical provider selector is used primarily to select the Send to receiving practice, provider, facility, lab, or pharmacy for a clinical order.
You can use the options in the clinical provider selector to:
- Add new provider — Click this link to add a new clinical provider.
New fields appear.
Fill out each field, and click Add.
Note: To see the Add new provider link, you must have the Clinicals Admin or Practice Set-Up: Referring Providers/ Numbers permission. - Use for all orders of this type for this encounter — Select this option to make athenaOne automatically select this clinical provider for all orders of this type.
The text that appears varies with the order type. - Set this lab as the patient's preferred lab — Select this option to assign all future lab orders to this clinical provider by default for this patient. If you already selected a lab, it appears on the Patient Labs tab of the selector, on the patient's Quickview, at the Check-in stage, and in the patient chart under Preferred Lab.
- Add to patient's list of pharmacies — Select this option to add the selected pharmacy to the patient's list of pharmacies. The Set as default pharmacy for this patient option appears.
- Set as default pharmacy for this patient — Select this option to assign future prescribed prescription and vaccine orders to this clinical provider by default for this patient.
- If pharmacies are already selected for this patient, they appear in the Patient Pharmacies tab to the right. The default pharmacy is the first one in the list. The Patient Pharmacies list also appears in the patient chart.
- The patient's default pharmacy also appears on the patient's Quickview and at the Check-in stage.
- Search — Enter the name of the provider and/or parts of the address or phone number to search for any clinical provider (not necessarily a local partner or athenaCoordinator partner).
- Patient Pharmacies — Select a pharmacy. The list of pharmacies appears only when you order a prescription for a medication or vaccine. It also appears on the Quickview and Check-in pages and in the patient chart.
- Patient Labs — Select a lab. The preferred patient lab appears only when you order a lab test. It also appears on the Quickview and Check-in pages, and in the patient chart.
- Display the Order Routes page: On the Main Menu, click Settings
 > Clinicals. In the left menu, under Practice Links — Order Configuration, click Order Routes.
 - To add an order route:
- Click Add new.
- Click Search next to the Clinical provider field.
- To edit an order route:
- Click edit next to the order route.
- Click the name of the existing receiver.
The clinical provider selector provides:
- List of clinical partners
- List of quickpicks
- Search box
- Patient pharmacies (when you order a prescription)
- Patient labs (when you order a lab)
- Patient imaging facility (when you order an image)
Clinical partners are receiving providers that participate in the athenaClinicals service.
The following icons appear next to the names of clinical partners.
-
 (olive branch) — This icon indicates a clinical provider that pays for order transmission services. For referrals, the taxonomy (specialty) of this provider matches the order you are creating.
 -
 (olive branch and plus sign) — This icon indicates a clinical provider that pays for order transmission services and provides additional services, such as insurance verification, preregistration, or precertification upon receiving an order. For referrals, the taxonomy of this provider matches the order you are creating.
For clinical partners, the following information appears:
- Clinical partner's name.
- Taxonomy, for referral orders.
- Distance from the patient's ZIP code to the clinical provider's ZIP code.
- Provider's full address, phone, and fax numbers.
- Direct Messaging address, if available.
- Services included, such as precertification.
- Website for athenaCoordinator Core receivers, if available.
Par indicates that this clinical provider is enrolled (participates) with the patient's insurance at a high level, but does not indicate that the provider will accept the patient's specific insurance package.
Note: This information is available only for providers using athenaCollector. If "Par" is not present, that provider may or may not accept the patient's insurance.
In a lab, medication, or imaging order, when the default provider is displayed in the Send to field, other preferred providers are displayed at the top of the list in the clinical provider selector, marked by the blue and white star icon.
When a non-default preferred provider is displayed in the Send to field for a lab, medication, or imaging order, the default preferred provider is displayed at the top of the selector list, marked by the blue and white star icon.
You can use the Clinical Provider Selection Widget (CPSW) for:
You can select a clinical provider for consult orders via the CPSW:
- Browse providers that accept the selected order type
- View providers in your practice’s local network(s)
- Find providers with a Direct address to help satisfy MIPS requirement.
Important: You can select a clinical provider for a consult order via the CPSW. However, we have not updated the clinical provider data in athenaOne's global clinical provider database. The CPSW makes it easier for you to select a provider for a consult order.
You must be logged in to a department that uses athenaClinicals, and you must have permission to access and update the patient chart to access this functionality.
To access Local Networks, your practice must have the local networks service turned on, and you must have the Coordinator Admin: Local Networks role to manage local network configurations.
For more information on Local Networks, see the following O-help topics:
You must have the one of the following roles to add new receivers in the Improved CPSW:
-
Clinicals Admin
-
Practice Set-Up: Referring Providers/ Numbers
The enhanced clinical provider selector offers robust receiver results to help you select the right receiver for your consult order.
When selecting a receiver for your consult order:
- Browse providers near the patient's zip code that accept the selected order type
- Easily view providers in your practice’s local network(s)
- Find providers with a Direct address to help satisfy MIPS requirements
- View all locations for a person provider at a glance
- View frequently used providers by order type and ordering provider
For consult orders — you can display the CPSW from several areas of athenaOne:
For consult orders, you can access the CPSW from the A/P section of the Exam stage navigation bar:
- Display the Add a receiver page: In the Exam stage of the patient encounter, click A/P in the Exam stage navigation bar.
- Click the add icon next to Diagnoses & Orders.
Note: You must select a specific consult order for the add receiver icon to appear. - Send to — Click the plus icon next to Receiver.
The Add a receiver page appears.
For consult orders, you can access the CPSW from the Order Group page.
To display the Order Group page: In the patient chart, click the Menu icon and select Create order group.
For consult orders, you can access the CPSW from the Hospital Discharge page.
Display the patient's Discharge tab: In the patient chart, click the arrow in the green workflow menu (at the upper right) and select Go to Discharge. (The options available in the green workflow menu depend on your user role.)
For more information on the hospital discharge workflow, see the see the following O-help topics:
For consult orders, you can access the CPSW from the Document view page.
Click the athenaOne logo at the upper left to display the Clinician view of the home page. The Clinical Inbox is in the left pane. Use the View by: menu to sort the documents by type. Click the document type to display a list of documents in that category. Click the document you need.
In the patient chart, click the Find tab at the top of the list of chart tabs to search for and select the document you need.
In the Assessment / Plan section, click an order to expand it, and then click VIEW MORE to display links to documents.
For more information on the Document View page, see Document View in O-help.
For consult orders, you can access the CPSW from the consolidated document view:
-
Display either the list view or the grid view of the Clinical Inbox.
-
Select Orders/Rxs/Auths results. Tasks with consolidated results appear with the number of results in parentheses and the results listed. Results are grouped based on the patient, originating encounter or order group, result type (lOrders or Rxs or Auths), status, and assigned user.
-
Click a consolidated consult order task, indicated by a numeral in parentheses before or after an order, to open the consolidated document view.
-
Click the linked clinical provider to display the CPSW.
The title of the document shows the number of results and, when known, the encounter or order group in which they originated. Below the title, you see the number of additional encounter results or orders without results.
You can access the existing options available from this entry point.
- Check the Use for all consult orders for this consolidated document view box.
- Click the Clear Selected Receiver link.
For consult orders, you can access the CPSW from the Order sets page:
- On the Main Menu,
- Click the Settings icon
- Under ADMIN, click Clinicals.
- In the Task Bar, under PRACTICE LINKS — Order Configuration, click Order Sets.
- You can filter the list of order sets using the filters at the top of the page.
- Locate the order set that you want to update in the list and click the update link.
- Scroll down to the Diagnoses and Orders Detail heading.
- Send To — Next to the Clinical Provider option, click the linked clinical provider to display the CPSW.
You can access the existing options available from this entry point.
- Check the Use for all consult orders for this consolidated document view box.
- Click the Clear Selected Receiver link.
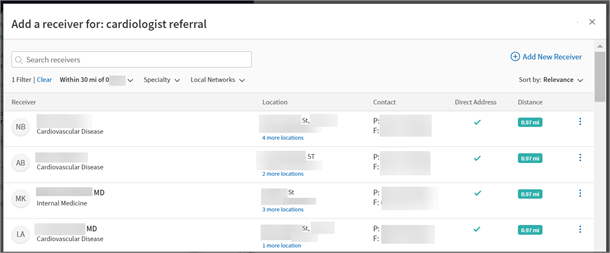
The Add a receiver page of the CPSW appears after you go through one of the previously described entry points:
- You first see a list of receivers within 30 miles of the patient’s zip code that accept the selected order type sorted by relevance.
- A receiver accepts the selected order type if it matches the primary specialty listed for them in athenaOne’s global clinical provider database.
For example, a cardiology referral consult order shows nearby receivers with a primary specialty of "Cardiovascular Disease", "Internal Medicine", or "Pediatric Cardiology". - If your practice has local networks enabled, sorting by relevance lists receivers by network tier and then distance. If you do not have local networks enabled, sorting by relevance is the same as sorting by distance to zip code.
- You can change the default distance radius based on your needs. Rural practices tend to expand the distance filter and urban practices tend to reduce the distance filter. Any changes to the distance filter persist. If you use a different computer, you need to reset your distance filter preference.
Filters allow you to refine the shown results. Default filters include:
- Local networks — This filter only appears if your practice has the Local Networks service turned on. See the User Access and Permissions section of this topic for information.
- The sorting order determines order of shown results. The default sorting order is by relevance.
- Within 30 miles from zip code — You can set a more applicable distance within the patient's or practice's zip code, or manually enter a valid US ZIP code. Available options include: 10 miles, 30 miles, 50 miles, 100 miles, or any distance. Any changes to the distance filter persist. If you use a different computer, you need to reset your distance filter preference.
-
See a message when the practice and patient ZIP codes are invalid or when a manually entered ZIP code is invalid.
-
Select a preference for the type of ZIP code. You can select Patient ZIP code or Practice ZIP code. athenaOne remembers your preferred ZIP code type.
Note: Hover over the info icon to reveal a message about the Default preference field, it says, "By default, results will be displayed based on your preferred selection". -
Switch between patient and practice ZIP code by clicking Switch to [Type of] ZIP code. Switching between ZIP code types via this link does not affect your preferred ZIP code type when the Add receiver window opens.
- Browse the pre-filtered results: you can apply your own filters, or search receivers.
- Click anywhere on the row to select a receiver and add them to the consult order.
Note: The row turns blue when you hover your cursor over it. - Click the more options icon or the [Number] more locations link in the Location column (if it appears) to display the Provider Details page.
Important: In the provider row:- A green outline indicates that this receiver is in the ordering providers local network. The name of the local network appears below the providers specialty.
- The initials in the icon indicate the receiver is a person.
- An image of multiple people (avatars) in the icon indicates the receiver is a non-person, group, or practice.
- A leaf icon next to the provider's circle icon indicates a coordinator core partner.
- An image of a stethoscope (avatar) in the icon indicates the receiver does not have a display name
Note: The Provider Details page provides a consolidated view for all clinical provider records related to a specific provider’s NPI number.
You can search and view a National Provider Identifier (NPI) for person providers in the browse and search results of the CPSW.
When you search a full ten digit NPI, and there is a match, the clinical provider selector displays it in bold.
If your organization uses local networks you can use the NPI to confirm the right clinical provider is selected.
You can filter the list of receivers by NPI number so that more receivers appear without duplication. For example, with the box unchecked you may see the provider appear twice because there are two locations for that provider.
Check the Group by NPI box to group results by NPI number.
Hover over the text "Group by NPI" to read a message about the check box. One of two messages appear, dependent on if you check or uncheck the box:
-
Checked Group by NPI box message says, "Uncheck to view all results by distance".
-
Unchecked Group by NPI box message says, " Check to group results by NPI".
Frequently used for [order type name] — If you’d like to easily and quickly select a provider that the ordering provider usually refers to for the order type, place your cursor in the search bar to reveal the Frequently used for [order type name] section.
The frequently used refer-to providers are sorted by local network participation (employed network, affiliate network, and then out of network), and then by distance from the zip code.
Important: The list of frequently used refer-to providers is unique to the ordering provider and the selected order type. If the ordering provider does not have any frequently used refer-to providers for the selected order type, a list of frequently used refer-to providers for the ordering provider's practice displays. If the practice does not have any frequently used refer-to providers, the list appears blank.
From here you can:
- Click into empty space of the provider's row to select the provider and close the CPSW.
Note: The row turns blue when you hover your cursor over it. - If applicable, click [Number] more locations to reveal the Provider Details page.
If you could not find the receiver you are looking for, you can create a new clinical provider and add it to your order.
Note: If you add a new clinical provider via the CPSW, the provider you added only accepts consult orders. See Suggest a Clinical Provider in O-help for more information on setting up a provider that accepts additional order types.
To add a new receiver
- When you’re displaying the Add a receiver page, click Add New Receiver to add a new receiving provider.
The Add New Receiver page appears - From the two tabs on the page, you can either:
- Add New Provider — Enter information in the required fields:
- First Name — This field is required.
- Last Name — This field is required.
- Display Name — This field is required. The display name appears on the providers record and be searchable.
- NPI — This field is optional.
- Specialty — This field is optional. The list of options displays the specialty that accepts the selected order type. Not all specialty options are available for selection.
Note:Order Type – This field is not displayed. The clinical provider created from this workflow will accept consult order types only.
- Add New Group — Enter information in the required fields:
- Display Name — This field is required.
- NPI — This field is optional.
- Specialty — This field is optional. The list of options displays the specialty that accepts the selected order type. Not all specialty options are available for selection.
Note:Order Type – This field is not displayed. The clinical provider created from this workflow will accept consult order types only.
- Add New Provider — Enter information in the required fields:
- Location — Enter the required location information:
- Address — This field is required.
- City — This field is required.
- State — This field is required.
- Zip — This field is required.
- Primary Phone — This field is required.
- Fax — This field is required.
- Direct Address — This field is optional.
- Click Add.
Note: The Add button is inaccessible until you fill all required fields. After you click Add, the group is added to our clinical provider records.
When adding a new receiver from either the consolidated document view or the Order Sets page, the following options appear at the bottom of the Add New Receiver page:
- Use for all consult orders for this order set. Checking this box ensures that the receiver being added applies to all consults orders in the order set.
- Clear selected receiver. After selecting an order and navigating to the Add New Receiver page, click this option to remove the previously added receiver from the order.
When you’re displaying the Add a receiver page, the Filters bar appears above the results section. In the Filters bar you can:
- See how many filter options are applied to the results.
- Click Clear to remove the filters that are applied to the results.
- Select filter options from the following headings:
When you’re displaying the Add a receiver page, the Filters bar appears above the results section. In the Filters bar you can:
- See how many filter options are applied to the results.
- Click Reset to remove the filters that are applied to the results.
-
Select filter options from the following headings:
| Option | Description |
| Within any distance of |
Select the distance from the patient’s zip code in miles or as any distance.
This heading displays the amount of miles from the patient that you selected. |
| Specialty | Select Any or a specific specialty. |
| Local Networks | If your practice has local networks configured, you can select specific network tiers and view the results. The values for this filter display the names of your practice’s self-defined network tiers. This filter only appears if your practice has the Local Networks service turned on. |
| Sort by |
Select either:
|
Note: When sorting by the Frequently Used option:
-
If your practice has enabled local networks: The frequently used refer-to providers from your local networks display by network priority. The remaining results are providers or facilities based on the proximity to the ZIP code.
-
If your practice has not enabled local networks: The frequently used refer-to providers appear first. The remaining results are providers or facilities based on the proximity to the ZIP code.
When you’re displaying the Add a receiver page, click Reset in the Filter options to remove the current filters.
You can better search for a receiver by:
- Display Name
- Address
- Phone number
- Fax number
- Specialty
If you don’t find who you are looking for, edit your search term.
You can view expanded information on the Provider Details page:
- When you’re displaying the Add a receiver page, click:
- The more options icon in any provider row to see the Provider Details page.
The [Number] more locations link (if it appears) in the provider row. This link only appears for providers with more than one location.
- The more options icon in any provider row to see the Provider Details page.
- The Provider Details page provides a consolidated view for all clinical provider records related to a specific provider’s NPI number.
You can access the Add New Location option from the Provider Details page to add a new location for an existing provider.
The provider’s main details are sourced from the existing clinical provider record and your instructed to complete the remaining fields. Main details include:
- Provider name,
- NPI number
- Specialty
You can select a clinical provider for imaging and lab orders via the CPSW:
- View receivers in your practice’s local network(s)
- View all locations for a receiver together
- Find receiver with a Direct address to help satisfy an optional MIPS measure
The CPSW has additional filters, display options, and robust results that make it easier to search and select the right receiver for imaging and lab orders.
Note: Utilizing this feature for imaging and lab orders aligns the CPSW experience for orders frequently sent to other facilities.
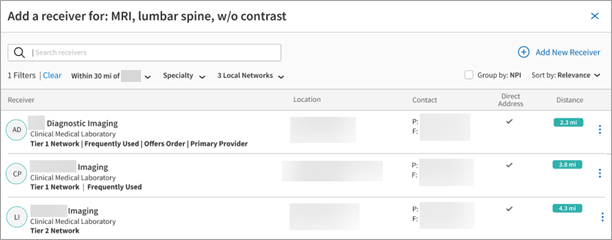
The enhanced clinical provider selector offers robust receiver results to help you select the right receiver for your imaging or lab order.
-
Clinical provider receiver name
-
Provider specialty (if applicable)
-
Local Network affiliation (if applicable)
-
Frequently Used by the ordering provider or department for the order type
-
Location with link to full list of locations if applicable
-
Phone and Fax numbers
-
Direct Address (full address available in receiver details )
-
Distance from either patient or practice zip code, or manually entered zip code
-
National Provider Identifier (NPI)
You must be logged in to a department that uses athenaClinicals, and you must have permission to access and update the patient chart to access this functionality.
To access Local Networks, your practice must have the local networks service turned on, and you must have the Coordinator Admin: Local Networks role to manage local network configurations.
For more information on Local Networks, see the following O-help topics:
You must have the one of the following roles to add new receivers in the Improved CPSW:
-
Clinicals Admin
-
Practice Set-Up: Referring Providers/ Numbers
Note: The CPSW is not available from the Quickview or Check-in pages.
You can quickly enter the clinical provider selector from various locations.
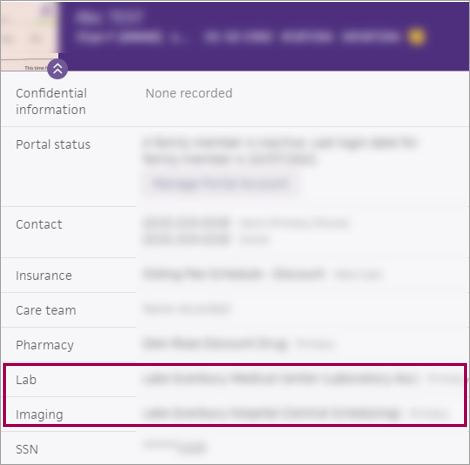
From the patient chart, you can view the preferred imaging and lab facility or open the clinical provider selector.
On the patient chart, click the downward arrow icon in the patient banner:
-
If a preference is set, see the preferred receivers in the Lab and Imaging fields.
-
If no preference is set, click the plus icon next to the Lab and Imaging fields to open the clinical provider selector.
Note: The enhanced clinical provider selector is not accessible from the "Preferred imaging facility" or "Preferred lab" fields on the Quickview and Check-in pages.
Frequently used receiver for preferred imaging and lab facilities
Frequently used refer-to providers appear when setting or viewing your preferred imaging or lab facility within the CPSW:
-
See the top four mostly frequently used refer-to providers appear at beginning of browse results of the clinical provider selector.
-
When the local networks feature is enabled, frequently used refer-to providers in your local network appear at the top of browse results.
To see frequently used refer-to providers to choose from:
-
View more icon in the patient banner (which expands patient demographic information) — You can quickly select either the ordering provider's or their department's frequently used refer-to providers when setting a patient's preferred imaging and lab facility. Click the plus icon to display the CPSW.
-
Diagnosis & Order cart — You can quickly select either the ordering provider's or their department's frequently used refer-to providers when setting an imaging or lab facility during the encounter and order group workflows. Click Search to display the CPSW.
When the CPSW for imaging and lab orders appears, the top four frequently used refer-to providers appear at the beginning of the browse results and they are labeled as Frequently Used.
You can update the Patient Preferred facility from:
-
The patient demographic information when you expand the View more icon in the patient banner.
-
The A/P section of the exam while selecting a receiver for an order in the Send to field.
When you click the View more icon in the patient banner to expand and review patient demographic information, you can set the Patient Preferred facility.
In the Imaging or Lab field, click the Plus icon, and the CPSW appears where you can click the facility you'd like to add to their Patient Preferred facility list.
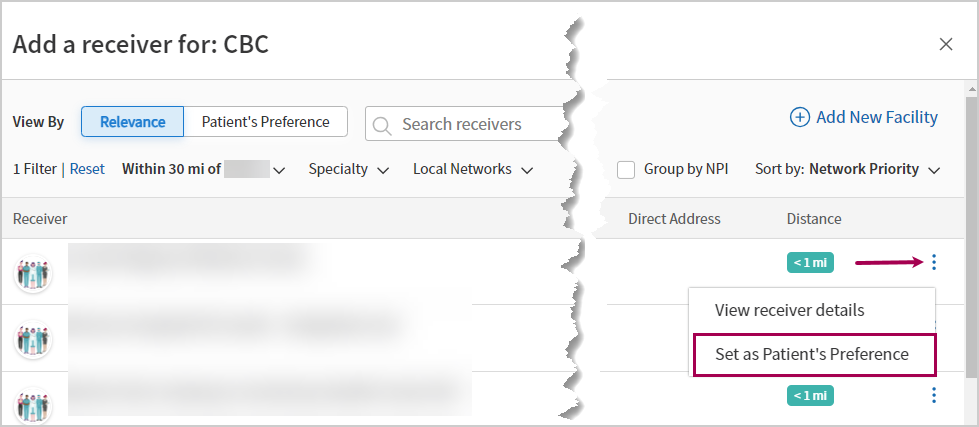
When you're in the CPSW (while choosing a facility for your prescribed order in the A/P section of the Exam), you can click the More options icon to:
-
Set as Patient Preference — Adds the facility to the Patient Preferred facility list and adds the label Patient's Preferred Facility while viewing the facility in the Relevance view.
- Remove from Patient Preference — Removes the facility from the Patient Preferred facility list.
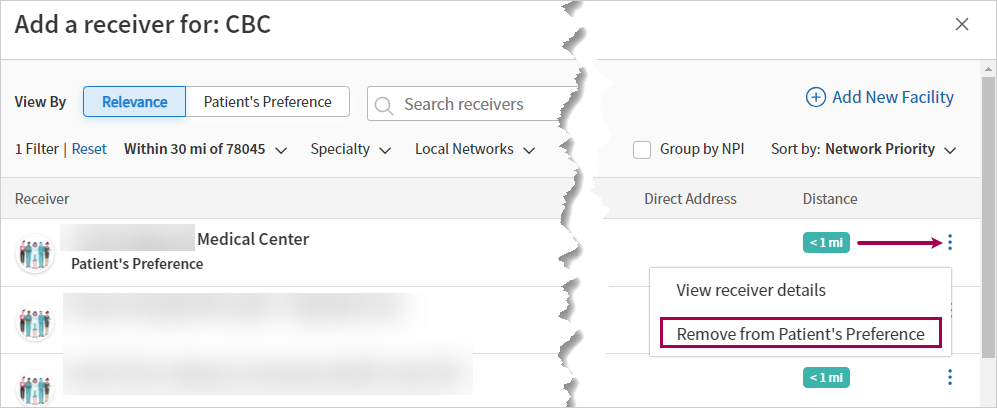
Once the facility is set as the patient's preferred facility, you can view the results by Patient Preferred. Only facilities set up as a patient's preferred facility appear in this view.
The facility set as the Patient's Preference always appears at the top of the list in the Relevance view.
Based on sorting options you've selected, the other patient preferred facilities may be further down in the table.
In the Patient Preferred view, you see all the preferred facilities together.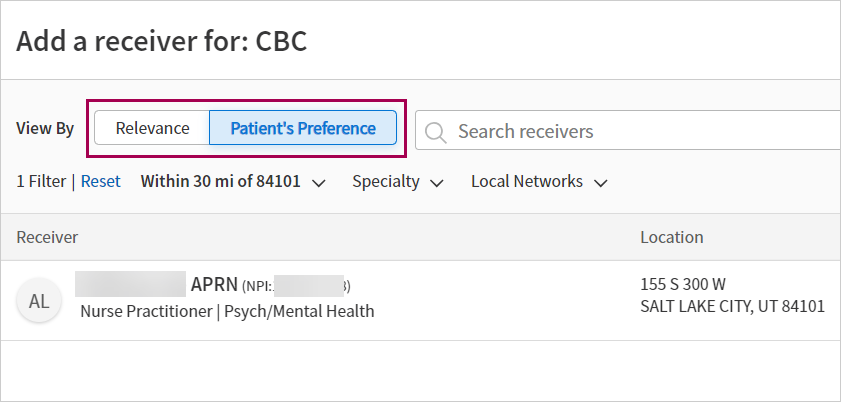
Note: In the Relevance view the facility labeled as Patient's Preferred Facility always appears at the top of the list.
-
From the A/P section of the Exam stage, click
 Diagnoses & Orders.
The Diagnoses & Orders menu appears. -
Click Search options.
The Search Options menu appears. -
Click Selected Facility in the:
-
Lab Orders section for a lab order
-
Imaging Orders section for an imaging order
-
Referral Orders section for a consult order
-
-
Click Search.
The clinical provider selector appears.
You can access the CPSW from the Order sets page:
- On the Main Menu,
- Click the Settings icon.
- Under ADMIN, click Clinicals.
- In the Task Bar, under PRACTICE LINKS — Order Configuration, click Order Sets.
- You can filter the list of order sets using the filters at the top of the page.
- Locate the order set that you want to update in the list and click the update link.
- Scroll down to the Diagnoses and Orders Detail heading.
- Send To — Next to the Clinical Provider option, click the linked clinical provider receiver to display the clinical provider selector.
The clinical provider selector appears.
- Click the Settings icon.
- Under ADMIN, click Clinicals.
- In the Task Bar, under PRACTICE LINKS — Order Configuration, click Order Routes.
The "Add a receiver" page of the clinical provider selector appears after you go through one of the previously described entry points:
- You first see a list of receivers within 30 miles of the patient’s zip code that accept the selected order type sorted by relevance.
-
A receiver accepts the selected order type if it matches the primary specialty listed for them in the athenaOne System’s global clinical provider database.
- If your practice has local networks enabled, sorting by relevance lists receivers by network tier and then distance. If you do not have local networks enabled, sorting by relevance is the same as sorting by distance to zip code.
- You can change the default distance radius based on your needs. Rural practices tend to expand the distance filter and urban practices tend to reduce the distance filter. Any changes to the distance filter persist. If you use a different computer, you need to reset your distance filter preference.
When you display the Add a receiver page, there are default filters and a default sort order:
- Filters allow you to refine the shown results. Default filters include:
- Local networks — This filter only appears if your practice has the Local Networks service turned on.
- The sorting order determines order of shown results. The default sorting order is by relevance.
- Within 30 miles from zip code — You can set a more applicable distance within the patient's or practice's zip code, or manually enter a valid US ZIP code. Available options include: 10 miles, 30 miles, 50 miles, 100 miles, or any distance. Any changes to the distance filter persist. If you use a different computer, you need to reset your distance filter preference.
- Local networks — This filter only appears if your practice has the Local Networks service turned on.
You can:
-
View a message when the practice and patient ZIP codes are invalid or when a manually entered ZIP code is invalid.
-
Select a preference for the type of ZIP code. You can select Patient ZIP code or Practice ZIP code. The athenaOne System remembers your preferred ZIP code type. Hover over the info icon to reveal a message about the Default preference field.
-
Switch between patient and practice ZIP code by clicking Switch to [Type of] ZIP code. Switching between ZIP code types via this link does not affect your preferred ZIP code type when the Add receiver window opens.
From here you can
- Browse the pre-filtered results: you can apply your own filters, or search receivers.
- Click anywhere on the row to select a receiver and add them to the consult order.
The row turns blue when you hover your cursor over it. -
Click the more options icon or the [Number] more locations link in the Location column (if it appears) to display the Receiver Details page.
Tip: In the receiver row:
-
A green outline indicates that this receiver is in the ordering providers local network. The name of the local network appears below the receivers specialty.
-
The initials in the icon indicate the receiver is a person.
-
An image of multiple people (avatars) in the icon indicates the receiver is a non-person, group, or practice.
-
A leaf icon next to the provider's circle icon indicates a coordinator core partner.
-
An image of a stethoscope (avatar) in the icon indicates the receiver does not have a display name
-
Note: The Receiver Details page provides a consolidated view for all clinical provider records related to a specific receiver’s NPI number.
You can search and view a National Provider Identifier (NPI) for person providers in the browse and search results of the CPSW.
When you search a full ten digit NPI, and there is a match, the clinical provider selector displays it in bold.
If your organization uses local networks you can use the NPI to confirm the right clinical provider is selected.
You can filter the list of receivers by NPI number so that more receivers appear without duplication. For example, with the box unchecked you may see the receiver appear twice because there are two locations for that receiver.
Check the Group by NPI box to group results by NPI number.
Tip: Hover over the text "Group by NPI" to read a message about the check box. One of two messages appear, dependent on if you check or uncheck the box.
Frequently used — If you’d like to easily and quickly select a receiver that the ordering provider usually refers to for the order type, you can view the top four results appear at the top of the table of receivers.
The frequently used refer-to providers are sorted by local network participation (employed network, affiliate network, and then out of network), and then by distance from the zip code.
Important: The list of frequently used refer-to providers is unique to the ordering provider and the selected order type. If the ordering provider does not have any frequently used refer-to providers for the selected order type, a list of frequently used refer-to providers for the ordering provider's practice displays. If the practice does not have any frequently used refer-to providers, then the table of receivers does not display the label "frequently used".
From here you can:
- Click into empty space of the receiver's row to select the receiver and close the clinical provider selector.
The row turns blue when you hover your cursor over it. - If applicable, click [Number] more locations to reveal the Receiver Details page.
The Receiver Details page appears.
If you could not find the receiver you are looking for, you can create a new receiver and add it to your order.
- When you’re displaying the Add a receiver page, click Add New Receiver to add a new receiver.
The Add New Receiver page appears. - Add New Group — Enter information in the required fields:
- Display Name — This field is required.
- NPI — This field is optional.
- Specialty — This field is optional. The list of options displays the specialty that accepts the selected order type. Not all specialty options are available for selection.
- Location — Enter the required location information:
- Address — This field is required.
- City — This field is required.
- State — This field is required.
- Zip — This field is required.
- Primary Phone — This field is required.
- Fax — This field is required.
- Direct Address — This field is optional.
- Click Add. The Add button is inaccessible until you fill all required fields. After you click Add, the group is added to our clinical provider records.
When you’re displaying the Add a receiver page, the Filters bar appears above the results section. In the Filters bar you can:
- See how many filter options are applied to the results.
- Click Clear to remove the filters that are applied to the results.
- Select filter options from the following headings:
When you’re displaying the Add a receiver page, the Filters bar appears above the results section. In the Filters bar you can:
- See how many filter options are applied to the results.
- Click Reset to remove the filters that are applied to the results.
-
Select filter options from the following headings:
| Option | Description |
| Within any distance of |
Select the distance from the patient’s zip code in miles or as any distance.
This heading displays the amount of miles from the patient that you selected. |
| Specialty | Select Any or a specific specialty. |
| Local Networks | If your practice has local networks configured, you can select specific network tiers and view the results. The values for this filter display the names of your practice’s self-defined network tiers. This filter only appears if your practice has the Local Networks service turned on. |
| Sort by |
Select either:
|
| Pharmacy Type |
The type of pharmacy. You can filter by:
|
Note: When sorting by the Frequently Used option:
-
If your practice has enabled local networks: The frequently used refer-to providers from your local networks display by network priority. The remaining results are providers or facilities based on the proximity to the ZIP code.
-
If your practice has not enabled local networks: The frequently used refer-to providers appear first. The remaining results are providers or facilities based on the proximity to the ZIP code.
When you’re displaying the Add a receiver page, click Reset in the Filter options to remove the current filters.
Note:
-
The Default Filtering by Pharmacy Type setting is on by default. If your practice does not want to filter the CPSW by Pharmacy Type by default, contact the CSC or your onboarding project team. On the Main Menu, click Support > Success Community > Contact Client Support Center.
-
This setting provides the following benefits:
-
Clearly categorizes the pharmacies as Retail or Mail-Order. This lets you select from the list faster because the results are better organized by default.
-
Shows the pharmacies at the top of the list. This saves time while selecting a receiver for these order types. For example, you may have previously seen physicians appear at the top of the list when selecting a pharmacy for a prescription.
-
You can better search for a receiver by:
- Display Name
- Address
- Phone number
- Fax number
- Specialty
If you don’t find who you are looking for, edit your search term.
You can view expanded information on the Receiver Details page:
- When you’re displaying the Add a receiver page, click:
- The more options icon
 in any receiver row to see the Receiver Details page.
 The [Number] more locations link (if it appears) in the receiver row. This link only appears for receivers with more than one location.
- The more options icon
- The Receiver Details page provides a consolidated view for all clinical provider records related to a specific receiver’s NPI number.
You can access the Add New Location option from the Receiver Details page to add a new location for an existing receiver.
The receiver’s main details are sourced from the existing clinical provider record and you're instructed to complete the remaining fields. Main details include:
- Provider name
- NPI number
- Specialty
You can select a clinical provider for procedure and surgery orders via the CPSW:
- View receivers in your practice’s local network(s)
- View all locations for a receiver together
- Find receiver with a Direct address to help satisfy an optional MIPS measure
The CPSW has additional filters, display options, and robust results that make it easier to search and select the right receiver for imaging and lab orders.
Note: Utilizing this feature for imaging and lab orders aligns the CPSW experience for orders frequently sent to other facilities.
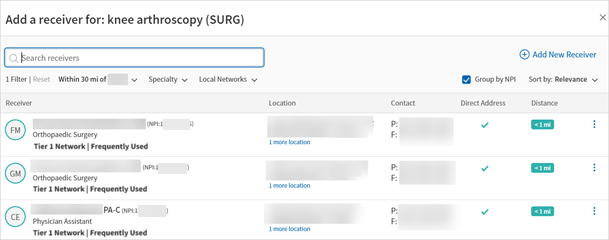
The enhanced clinical provider selector offers robust receiver results to help you select the right receiver for your procedure and surgery order.
-
Clinical provider receiver name
-
Provider specialty (if applicable)
-
Local Network affiliation (if applicable)
-
Frequently Used by the ordering provider or department for the order type
-
Location with link to full list of locations if applicable
-
Phone and Fax numbers
-
Direct Address (full address available in receiver details )
-
Distance from either patient or practice zip code, or manually entered zip code
-
National Provider Identifier (NPI)
You must be logged in to a department that uses athenaClinicals, and you must have permission to access and update the patient chart to access this functionality.
To access Local Networks, your practice must have the local networks service turned on, and you must have the Coordinator Admin: Local Networks role to manage local network configurations.
For more information on Local Networks, see the following O-help topics:
You must have the one of the following roles to add new receivers in the Improved CPSW:
-
Clinicals Admin
-
Practice Set-Up: Referring Providers/ Numbers
Note: The CPSW is not available from the Quickview or Check-in pages.
You can quickly enter the clinical provider selector from various locations.
You can access the clinical provider selection tool (CPSW) from the Document view page.
Click the athenaOne logo at the upper left to display the Clinician view of the home page. The Clinical Inbox is in the left pane. Use the View by: menu to sort the documents by type. Click the document type to display a list of documents in that category. Click the document you need.
In the patient chart, click the Find tab at the top of the list of chart tabs to search for and select the document you need.
In the Assessment / Plan section, click an order to expand it, and then click VIEW MORE to display links to documents.
For more information on the Document View page, see Document View in O-help.
You can access the CPSW from the Order sets page:
- On the Main Menu,
- Click the Settings icon.
- Under ADMIN, click Clinicals.
- In the Task Bar, under PRACTICE LINKS — Order Configuration, click Order Sets.
- You can filter the list of order sets using the filters at the top of the page.
- Locate the order set that you want to update in the list and click the update link.
- Scroll down to the Diagnoses and Orders Detail heading.
- Send To — Next to the Clinical Provider option, click the linked clinical provider receiver to display the clinical provider selector.
The clinical provider selector appears.
- Click the Settings icon.
- Under ADMIN, click Clinicals.
- In the Task Bar, under PRACTICE LINKS — Order Configuration, click Order Routes.
The "Add a receiver" page of the clinical provider selector appears after you go through one of the previously described entry points:
- You first see a list of receivers within 30 miles of the patient’s zip code that accept the selected order type sorted by relevance.
-
A receiver accepts the selected order type if it matches the primary specialty listed for them in the athenaOne System’s global clinical provider database.
- If your practice has local networks enabled, sorting by relevance lists receivers by network tier and then distance. If you do not have local networks enabled, sorting by relevance is the same as sorting by distance to zip code.
- You can change the default distance radius based on your needs. Rural practices tend to expand the distance filter and urban practices tend to reduce the distance filter. Any changes to the distance filter persist. If you use a different computer, you need to reset your distance filter preference.
When you display the Add a receiver page, there are default filters and a default sort order:
- Filters allow you to refine the shown results. Default filters include:
- Local networks — This filter only appears if your practice has the Local Networks service turned on.
- Sort by — The sorting order determines order of shown results. The default sorting order is by relevance.
- Within 30 miles from zip code — You can set a more applicable distance within the patient's or practice's zip code, or manually enter a valid US ZIP code. Available options include: 10 miles, 30 miles, 50 miles, 100 miles, or any distance. Any changes to the distance filter persist. If you use a different computer, you need to reset your distance filter preference.
- Local networks — This filter only appears if your practice has the Local Networks service turned on.
You can:
-
See a message when the practice and patient ZIP codes are invalid or when a manually entered ZIP code is invalid.
-
Select a preference for the type of ZIP code. You can select Patient ZIP code or Practice ZIP code. The athenaOne System remembers your preferred ZIP code type.
Hover over the info icon to reveal a message about the Default preference field. -
Switch between patient and practice ZIP code by clicking Switch to [Type of] ZIP code. Switching between ZIP code types via this link does not affect your preferred ZIP code type when the Add receiver window opens.
From here you can
- Browse the pre-filtered results: you can apply your own filters, or search receivers.
- Click anywhere on the row to select a receiver and add them to the consult order.
The row turns blue when you hover your cursor over it.Click the more options icon
or the [Number] more locations link in the Location column (if it appears) to display the Receiver Details page.
Tip: In the receiver row:
-
A green outline indicates that this receiver is in the ordering providers' local network. The name of the local network appears below the receiver's specialty.
-
The initials in the icon indicate the receiver is a person.
-
An image of multiple people (avatars) in the icon indicates the receiver is a non-person, group, or practice.
-
A leaf icon next to the provider's circle icon indicates a coordinator core partner.
-
An image of a stethoscope (avatar) in the icon indicates the receiver does not have a display name
Note: The Receiver Details page provides a consolidated view for all clinical provider records related to a specific receiver’s NPI number.
You can search and view a National Provider Identifier (NPI) for person providers in the browse and search results of the CPSW.
When you search a full ten digit NPI, and there is a match, the clinical provider selector displays it in bold.
If your organization uses local networks you can use the NPI to confirm the right clinical provider is selected.
You can filter the list of receivers by NPI number so that more receivers appear without duplication. For example, with the box unchecked you may see the receiver appear twice because there are two locations for that receiver.
Check the Group by NPI box to group results by NPI number.
Hover over the text "Group by NPI" to read a message about the check box. One of two messages appear, dependent on if you check or uncheck the box.
Note: You can select Frequently Used in the Sort by field.
Frequently Used — If you’d like to easily and quickly select a receiver that the ordering provider usually refers to for the order type, you can see the top four results appear at the top of the table of receivers.
The frequently used receivers are sorted by local network participation (employed network, affiliate network, and then out of network), and then by distance from the zip code.
Important: The list of frequently used receivers is unique to the ordering provider and the selected order type. If the ordering provider does not have any frequently used receivers for the selected order type, a list of frequently used receivers for the ordering provider's practice displays. If the practice does not have any frequently used receivers, then the table of receivers does not display the label "frequently used".
From here you can:
- Click into empty space of the receiver's row to select the receiver and close the clinical provider selector.
The row turns blue when you hover your cursor over it. - If applicable, click [Number] more locations to reveal the Receiver Details page. The Receiver Details page appears.
If you could not find the receiver you are looking for, you can create a new receiver and add it to your order.
- When you’re displaying the Add a receiver page, click Add New Receiver to add a new receiver.
The Add New Receiver page appears. - Add New Group — Enter information in the required fields:
- Display Name — Required.
- NPI — Optional.
- Specialty — Optional. The list of options displays the specialty that accepts the selected order type. Not all specialty options are available for selection.
- Location — Enter the required location information.
- Click Add.
The Add button is inaccessible until you fill all required fields. After you click Add, the group is added to our clinical provider records.
When you’re displaying the Add a receiver page, the Filters bar appears above the results section. In the Filters bar you can:
- See how many filter options are applied to the results.
- Click Reset to remove the filters that are applied to the results.
-
Select filter options from the following headings:
| Option | Description |
|---|---|
| Within any distance of |
Select the distance from the patient’s zip code in miles or as any distance.
This heading displays the amount of miles from the patient that you selected. |
| Specialty | Select Any or a specific specialty. |
| Local Networks | If your practice has local networks configured, you can select specific network tiers and view the results. The values for this filter display the names of your practice’s self-defined network tiers. This filter only appears if your practice has the Local Networks service turned on. |
| Sort by |
Select either:
|
Note: When sorting by the Frequently Used option:
-
If your practice has enabled local networks: The frequently used refer-to providers from your local networks display by network priority. The remaining results are providers or facilities based on the proximity to the ZIP code.
-
If your practice has not enabled local networks: The frequently used refer-to providers appear first. The remaining results are providers or facilities based on the proximity to the ZIP code.
When you’re displaying the Add a receiver page, click Reset in the Filter options to remove the current filters.
You can better search for a receiver by:
- Display Name
- Address
- Phone number
- Fax number
- Specialty
If you don’t find who you are looking for, edit your search term.
You can view expanded information on the Receiver Details page:
- When you’re displaying the Add a receiver page, click:
- The more options icon in any receiver row to see the Receiver Details page.
The [Number] more locations link (if it appears) in the receiver row. This link only appears for receivers with more than one location.
- The more options icon in any receiver row to see the Receiver Details page.
- The Receiver Details page provides a consolidated view for all clinical provider records related to a specific receiver’s NPI number.
You can access the Add New Location option from the Receiver Details page to add a new location for an existing receiver.
The receiver’s main details are sourced from the existing clinical provider record and you're instructed to complete the remaining fields. Main details include:
- Provider name
- NPI number
- Specialty
You can select a clinical provider for glasses and contact lenses orders via the CPSW:
- View receivers in your practice’s local network(s)
- View all locations for a receiver together
- Find receiver with a Direct address to help satisfy an optional MIPS measure
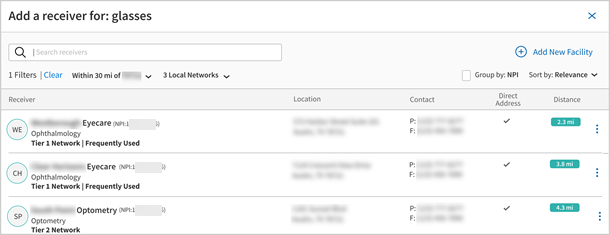
Clinical provider search results include:
-
Clinical provider receiver name
-
Provider specialty (if applicable)
-
Local Network affiliation (if applicable)
-
Frequently Used by the ordering provider or department for the order type
-
Location with link to full list of locations (if applicable)
-
Phone and Fax numbers
-
Direct Address (full address available in receiver details )
-
Distance from either patient or practice zip code, or manually entered zip code
-
National Provider Identifier (NPI)
You must be logged in to a department that uses athenaClinicals, and you must have permission to access and update the patient chart to access this functionality.
To access Local Networks, your practice must have the local networks service turned on, and you must have the "Coordinator Admin: Local Networks" role to manage local network configurations.
For more information on Local Networks, see the following O-help topics:
Note: The CPSW is not available from the Quickview or Check-in pages.
You can quickly enter the clinical provider selection widget from various locations.
Depending on the access point, the field where the clinical provider selection widget lives is labeled differently:
-
On a glasses or contact lenses order within an open encounter or order group— The CPSW appears when you click the plus icon in the Send to field. If no clinical provider is entered, click + Receiver. If a clinical provider is entered, click the receiver's name to view or update it.
-
In Document View and Consolidated Document View — The field is labeled Clinical Provider; you can click either Search or the clinical provider's name to open the CPSW.
-
When configuring an Order Set — The clinical provider selection field is Send to.
-
In Order Routes — The field is Clinical Provider.
The "Add a receiver" page of the clinical provider selection widget appears after you go through one of the previously described entry points. A receiver accepts the selected order type if it matches the primary specialty listed for them in the athenaOne System’s global clinical provider database.
-
The search will default to receivers within 30 miles of the patient’s zip code that accept the selected order type.
-
The default sort order is Relevance.
If your practice:
-
Has local networks enabled, sorting by relevance lists receivers by network tier and then distance.
-
Does not have local networks enabled, sorting by relevance is the same as sorting by distance to zip code.
When you’re displaying the Add a receiver page, the Filters bar appears above the results section. In the Filters bar you can:
- See how many filter options are applied to the results.
- Click Clear to remove the filters that are applied to the results.
-
Select filter options from the following headings:
| Option | Description |
| Within any distance of |
This heading displays the amount of miles from the patient's zip code. You can update your default preference to be distance from the practice's zip code. Quickly switch between the patient's and the practice's zip code or manually enter a valid US zip code. You can also set a more applicable search radius. Available options include: 10 miles, 30 miles, 50 miles, 100 miles, or any distance. Any changes to the distance filter persist. If you use a different computer, you need to reset your distance filter preference. |
| Local Networks |
If your practice has local networks configured, you can select specific network tiers and view the results. The values for this filter display the names of your practice’s self-defined network tiers. |
| Sort by |
Select either:
|
You can better search for a receiver by:
- Display Name
- Address
- Phone number
- Fax number
If you don’t find who you are looking for, edit your search term.
Frequently Used — If you’d like to easily and quickly select a receiver that the ordering provider usually refers to for the order type, you can see the top four results appear at the top of the table of receivers.
The frequently used receivers are sorted by local network participation (employed network, affiliate network, and then out of network), and then by distance from the zip code.
Important: The list of frequently used receivers is unique to the ordering provider and the selected order type. If the ordering provider does not have any frequently used receivers for the selected order type, a list of frequently used receivers for the ordering provider's practice displays. If the practice does not have any frequently used receivers, then the table of receivers does not display the label "frequently used".
From here you can:
- Click into empty space of the receiver's row to select the receiver and close the clinical provider selection widget.
The row turns blue when you hover your cursor over it. - If applicable, click [Number] more locations to reveal the Receiver Details page. The Receiver Details page appears.
-
Note: You can also set the sort order of the clinical provider selection widget to Frequently Used.
When filtering by distance, you can:
-
See a message when the practice and patient ZIP codes are invalid or when a manually entered ZIP code is invalid.
-
Select a preference for the type of ZIP code. You can select Patient ZIP code or Practice ZIP code. The athenaOne System remembers your preferred ZIP code type.
Hover over the info icon to reveal a message about the Default preference field, "By deafult, results will be displayed based on your preferred selection." -
Switch between patient and practice ZIP code by clicking Switch to [Type of] ZIP code. Switching between ZIP code types via this link does not affect your preferred ZIP code type when the Add receiver window opens.
When the clinical provider selection widget first appears, you can:
-
Browse the pre-filtered results: you can apply your own filters, or search receivers.
-
Click anywhere on the row to select a receiver and add them to the order.
The row turns blue when you hover your cursor over it.
Tip: In the receiver row:
-
A green outline indicates that this receiver is in the ordering providers' local network. The name of the local network appears below the receiver'sname.
-
The initials in the icon indicate the receiver is a person.
-
An image of multiple people (avatars) in the icon indicates the receiver is a non-person, group, or practice.
-
A leaf icon next to the provider's circle icon indicates a coordinator core partner.
-
An image of a stethoscope (avatar) in the icon indicates the receiver does not have a display name.
The Receiver Details page provides a consolidated view for all clinical provider records related to a specific receiver's NPI number.
Click the more options icon or the [Number] more locations link in the Location column (if it appears) to display the Receiver Details page.
The [Number] more locations link only appears for receivers with more than one location.
The receiver’s main details are sourced from the existing clinical provider record and you're instructed to complete the remaining fields. Main details include:
- Provider name
- NPI number
The Receiver Details page provides a consolidated view for all clinical provider records related to a specific receiver's NPI number. The [Number] more locations link (if it appears) in the receiver row. This link only appears for receivers with more than one location.
You can access the Add New Location option from the Receiver Details page to add a new location for an existing receiver.
You can search and view a National Provider Identifier (NPI) for person providers in the browse and search results of the CPSW.
When you search a full ten digit NPI, and there is a match, the clinical provider selection widget displays it in bold.
If your organization uses local networks you can use the NPI to confirm the right clinical provider is selected.
You can filter the list of receivers by NPI number so that more receivers appear without duplication. For example, with the box unchecked you may see the receiver appear twice because there are two locations for that receiver.
Check the Group by NPI box to group results by NPI number.
Hover over the text "Group by NPI" to read a message about the check box. One of two messages appear, dependent on if you check or uncheck the box.
When you hover over the:
-
Checked Group by NPI box, a message about what happens when you uncheck the box appears: "Uncheck to view all results by distance."
-
UncheckedGroup by NPI box, a message about what happens when you check the box appears: "Check to group results by NPI."
If you could not find the receiver you are looking for, you can create a new receiver and add it to your order.
- When you’re displaying the Add a receiver page, click Add New Receiver to add a new receiver.
The Add New Receiver page appears. - Add New Group — Enter information in the required fields:
- Display Name — Required.
- NPI — Optional.
- Specialty — Optional. The list of options displays the specialty that accepts the selected order type. Not all specialty options are available for selection.
- Location — Enter the required location information.
- Click Add.
The Add button is inaccessible until you fill all required fields. After you click Add, the group is added to our clinical provider records.
You can select a clinical provider for the following order types via the CPSW:
-
Prescription
-
Vaccine
-
Durable Medical Equipment (DME)
-
Prior authorizations

In the CPSW, you can:
-
Set the patient's preferred pharmacies.
-
Set the patient's primary pharmacy.
-
See receivers by Patient's Pharmacies.
- See receivers in your practice’s local network(s).
- Aligns the clinical provider selection widget experience for orders sent to other facilities.
Clinical provider search results include:
-
Clinical provider receiver name
-
Type — The type of pharmacy (Retail or Mail-Order)
-
Local Network affiliation (if applicable)
-
Frequently Used by the ordering provider or department for the order type
-
Location with link to full list of locations (if applicable)
-
Phone and Fax numbers
-
Direct Address (full address available in receiver details )
-
Distance from either patient or practice zip code, or manually entered zip code
-
National Provider Identifier (NPI)
You must be logged in to a department that uses athenaClinicals, and you must have permission to access and update the patient chart to access this functionality.
To access Local Networks, your practice must have the local networks service turned on, and you must have the "Coordinator Admin: Local Networks" role to manage local network configurations.
For more information on Local Networks, see the following O-help topics:
You can update the Patient Preferred pharmacy from:
-
The patient demographic information when you expand the View more icon in the patient banner.
-
The A/P section of the exam while selecting a receiver for an order in the Send to field.
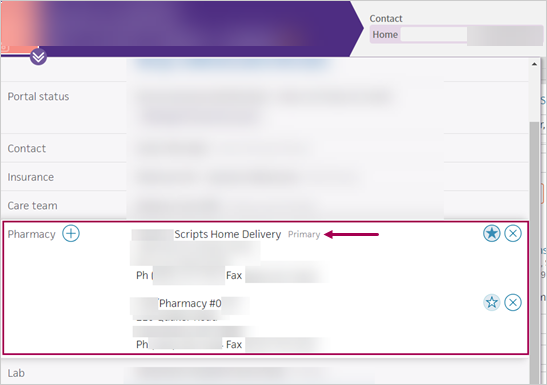
When you click the View more icon in the patient banner to expand and review patient demographic information, you can set the Patient Preferred pharmacy.
In the Pharmacy field, click the Plus icon, and the CPSW appears where you can click the receiver you'd like to add to the patient's Patient Preferred pharmacy list.
Click the Plus icon again to add additional receivers to the Patient Preferred pharmacy list.
The patient's primary pharmacy appears with the Primary label.
When there are two or more receivers in the Patient Preferred pharmacy list, you can click the:
-
Star icon to set the receiver as the Patient's Primary Pharmacy.
-
X icon to remove the receiver from the Patient Preferred pharmacy list.
Note: You can also set the patient's preferred receivers in the clinical provider selection widget for imaging and lab orders.
When you're in the CPSW (while choosing a receiver for your pharmacy order in the A/P section of the Exam), you can click the More options icon to:
-
Set as Patient's Primary — Makes the receiver the Patient's Primary Pharmacy.
-
Add to Patient Preferred — Adds the receiver to the Patient Preferred pharmacy list and adds the label Patient's Pharmacy while viewing the receiver in the Relevance view.
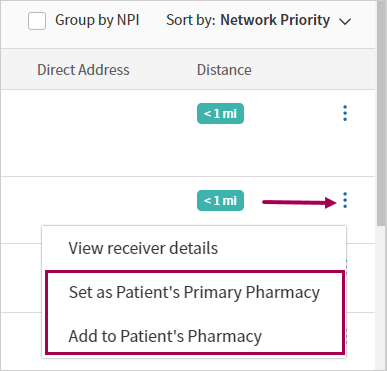
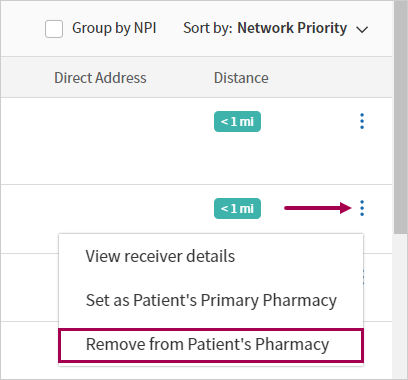
- Remove from Patient's Preferred Pharmacy — Removes the receiver from the Patient Preferred pharmacy list.
Once the receivers are set as the patient's preferred pharmacies, you can view the results by Patient Preferred. Only receivers set up as a patient's preferred pharmacy appear in this view. The receiver set as the Patient's Primary Pharmacy always appears at the top of the list in the Relevance view. Based on sorting options you've selected, the other patient preferred receivers may be further down in the table.
In the Patient Preferred view, you see all the preferred receivers together.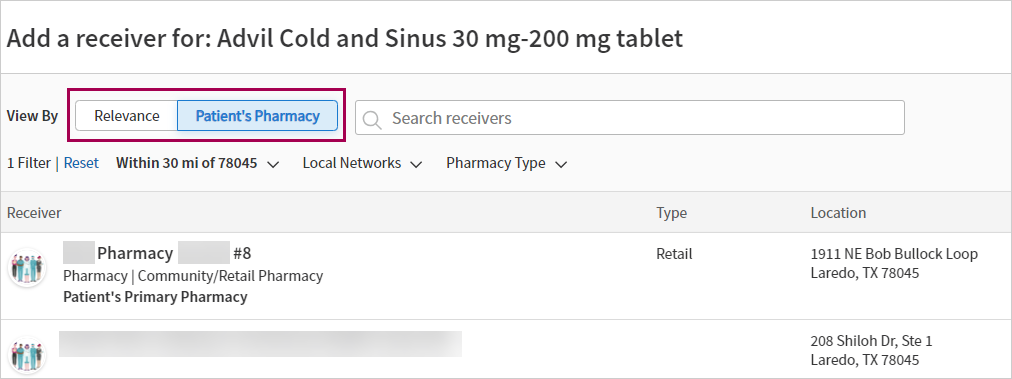
Note: In the Relevance view the receiver labeled as Patient's Primary Pharmacy always appears at the top of the list.
Note: The CPSW is not available from the Quickview or Check-in pages.
You can quickly enter the clinical provider selection widget from various locations.
Depending on the access point, the field where the clinical provider selection widget lives is labeled differently:
-
On a prescription, vaccine, and DME order within an open encounter or order group— The CPSW appears when you click plus icon in the Send to field. If no clinical provider is entered, click + Receiver. If a clinical provider is entered, click the receiver's name to view or update it.
-
In Document View and Consolidated Document View — The field is labeled Clinical Provider; you can click either Search or the clinical provider's name to open the CPSW.
-
When configuring an Order Set — The clinical provider selection field is Send to.
-
In Order Routes — The field is Clinical Provider.
The "Add a receiver" page of the clinical provider selection widget appears after you go through one of the previously described entry points. A receiver accepts the selected order type if it matches the primary specialty listed for them in the athenaOne System’s global clinical provider database.
-
The search will default to receivers within 30 miles of the patient’s zip code that accept the selected order type.
-
The default sort order is Relevance.
If your practice:
-
Has local networks enabled, sorting by relevance lists receivers by network tier and then distance.
-
Does not have local networks enabled, sorting by relevance is the same as sorting by distance to zip code.
Note: Direct addresses and NPI numbers only display if they are available for a receiver.
When you’re displaying the Add a receiver page, the Filters bar appears above the results section. In the Filters bar you can:
- See how many filter options are applied to the results.
- Click Clear to remove the filters that are applied to the results.
-
Select filter options from the following headings:
| Option | Description |
|---|---|
| Within any distance of |
This heading displays the amount of miles from the patient's zip code. You can update your default preference to be distance from the practice's zip code. Quickly switch between the patient's and the practice's zip code or manually enter a valid US zip code.
You can also set a more applicable search radius. Available options include: 10 miles, 30 miles, 50 miles, 100 miles, or any distance. Any changes to the distance filter persist. If you use a different computer, you need to reset your distance filter preference. |
| Local Networks |
If your practice has local networks configured, you can select specific network tiers and view the results. The values for this filter display the names of your practice’s self-defined network tiers.
This filter only appears if your practice has the Local Networks service turned on. |
| Pharmacy Type |
The type of pharmacy. You can filter by:
|
| Sort by |
Select either:
|
Note:
-
The Default Filtering by Pharmacy Type setting is on by default. If your practice does not want to filter the CPSW by Pharmacy Type by default, contact the CSC or your onboarding project team. On the Main Menu, click Support > Success Community > Contact Client Support Center.
-
This setting provides the following benefits:
-
Clearly categorizes the pharmacies as Retail or Mail-Order. This lets you select from the list faster because the results are better organized by default.
-
Shows the pharmacies at the top of the list. This saves time while selecting a receiver for these order types. For example, you may have previously seen physicians appear at the top of the list when selecting a pharmacy for a prescription.
-
The View By options let you see the receiver results by either:
-
Relevance — This is the default option.
-
Patient Preferred — Controlled by the patient's preferred pharmacies. Click the more options icon of any receiver to set them as a preferred receiver. Once set as Patient Preferred, you can set the receiver as the primary receiver or remove it from the preferred list.
Note: The Patient's Primary Pharmacy label appears in both views. The receiver set as the Patient's Primary Pharmacy appears at the top of the list.
In the Relevance view, the Patient's Pharmacy label appears on any receivers set to appear in the Patient Preferred view.
Changes made to a patient's preferred provider may take up to one hour to reflect in the clinical provider selection widget. Updates made within the clinical provider selection widget to a patient's preferred provider appear immediately.
The View By options also appear on lab and imaging orders.
You can better search for a receiver by:
- Display Name
- Address
- Phone number
- Fax number
If you don’t find who you are looking for, edit your search term.
Frequently Used — If you’d like to easily and quickly select a receiver that the ordering provider usually refers to for the order type, you can view the top four results appear at the top of the table of receivers.
The frequently used receivers are sorted by local network participation (employed network, affiliate network, and then out of network), and then by distance from the zip code.
Important: The list of frequently used receivers is unique to the ordering provider and the selected order type. If the ordering provider does not have any frequently used receivers for the selected order type, a list of frequently used receivers for the ordering provider's practice displays. If the practice does not have any frequently used receivers, then the table of receivers does not display the label "frequently used".
From here you can:
- Click into empty space of the receiver's row to select the receiver and close the clinical provider selection widget.
The row turns blue when you hover your cursor over it. - If applicable, click [Number] more locations to reveal the Receiver Details page.
The Receiver Details page appears.
Note: You can also set the sort order of the clinical provider selection widget to Frequently Used.
When filtering by distance, you can:
-
See a message when the practice and patient ZIP codes are invalid or when a manually entered ZIP code is invalid.
-
Select a preference for the type of ZIP code. You can select Patient ZIP code or Practice ZIP code. The athenaOne System remembers your preferred ZIP code type. Hover over the info icon to reveal a message about the Default preference field, "By default, results will be displayed based on your preferred selection."
-
Switch between patient and practice ZIP code by clicking Switch to [Type of] ZIP code. Switching between ZIP code types via this link does not affect your preferred ZIP code type when the Add receiver window opens.
You can filter by the type of pharmacy. Options include:
-
Retail
-
Mail-Order
This filter speeds up your selection decisions because you won't need to rely solely on searching the terms "Retail" or "Mail-order" to see those results.
When the clinical provider selection widget first appears, you can:
-
Browse the pre-filtered results: you can apply your own filters, or search receivers.
-
Click anywhere on the row to select a receiver and add them to the order.
The row turns blue when you hover your cursor over it.
Tip: In the receiver row:
-
A green outline indicates that this receiver is in the ordering providers' local network. The name of the local network appears below the receiver's name.
-
The initials in the icon indicate the receiver is a person.
-
An image of multiple people (avatars) in the icon indicates the receiver is a non-person, group, or practice.
-
A leaf icon next to the provider's circle icon indicates a coordinator core partner.
-
An image of a stethoscope (avatar) in the icon indicates the receiver does not have a display name.
The Receiver Details page provides a consolidated view for all clinical provider records related to a specific receiver's NPI number.
Click the more options icon  or the [Number] more locations link in the Location column (if it appears) to display the Receiver Details page.
The [Number] more locations link only appears for receivers with more than one location.
The receiver’s main details are sourced from the existing clinical provider record and you're instructed to complete the remaining fields. Main details include:
- Provider name
- NPI number
The Receiver Details page provides a consolidated view for all clinical provider records related to a specific receiver's NPI number. The [Number] more locations link (if it appears) in the receiver row. This link only appears for receivers with more than one location.
You can access the Add New Location option from the Receiver Details page to add a new location for an existing receiver.
You can search and view a National Provider Identifier (NPI) for person providers in the browse and search results of the CPSW.
When you search a full ten digit NPI, and there is a match, the clinical provider selection widget displays it in bold.
If your organization uses local networks you can use the NPI to confirm the right clinical provider is selected.
You can filter the list of receivers by NPI number so that more receivers appear without duplication. For example, with the box unchecked you may see the receiver appear twice because there are two locations for that receiver.
Check the Group by NPI box to group results by NPI number.
Hover over the text Group by NPI to read a message about the check box. One of two messages appear, dependent on if you check or uncheck the box.
When you hover over the
-
CheckedGroup by NPI box, a message about what happens when you uncheck the box appears: "Uncheck to view all results by distance."
-
Unchecked Group by NPI box, a message about what happens when you check the box appears: "Check to group results by NPI."
If you could not find the receiver you are looking for, you can create a new receiver and add it to your order.
- When you’re displaying the Add a receiver page, click Add New Receiver to add a new receiver.
The Add New Receiver page appears. - Add New Group — Enter information in the required fields:
- Display Name — Required.
- NPI — Optional.
- Specialty — Optional. The list of options displays the specialty that accepts the selected order type. Not all specialty options are available for selection.
- Location — Enter the required location information.
- Click Add.
The Add button is inaccessible until you fill all required fields. After you click Add, the group is added to our clinical provider records.
Note: Other orders appear with an asterisk ( * ) in the header of the clinical provider selection widget.
The CPSW is available to help you search and select the right receiver for the order type group: Other.
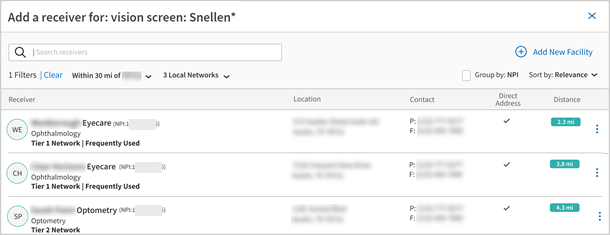
You can select a clinical provider for other orders via the CPSW:
- View receivers in your practice’s local network(s)
- View all locations for a receiver together
- Find receivers with a Direct address to help satisfy an optional MIPS measure
Clinical provider search results include:
-
Clinical provider receiver name
-
Provider specialty (if applicable)
-
Local Network affiliation (if applicable)
-
Frequently Used by the ordering provider or department for the order type
-
Location with link to full list of locations (if applicable)
-
Phone and Fax numbers
-
Direct Address (full address available in receiver details )
-
Distance from either patient or practice zip code, or manually entered zip code
-
National Provider Identifier (NPI)
You must be logged in to a department that uses athenaClinicals, and you must have permission to access and update the patient chart to access this functionality.
To access Local Networks, your practice must have the local networks service turned on, and you must have the "Coordinator Admin: Local Networks" role to manage local network configurations.
For more information on Local Networks, see the following O-help topics:
Note: The CPSW is not available from the Quickview or Check-in pages.
You can quickly access the clinical provider selection widget from various locations.
Depending on the access point, the field where the clinical provider selection widget appears is labeled differently:
-
On an other glasses or contact lenses order type within an open encounter or order group — The CPSW appears when you click plus icon in the Send to field. If no clinical provider is entered, click + Receiver. If a clinical provider is entered, click the receiver's name to view or update it.
-
In Document View and Consolidated Document View — The field is labeled Clinical Provider; you can click either Search or the clinical provider's name to open the CPSW.
-
When configuring an Order Set — The clinical provider selection field is Send to.
-
In Order Routes — The field is Clinical Provider.
The "Add a receiver" page of the clinical provider selection widget appears after you go through one of the previously described entry points. A receiver accepts the selected order type if it matches the primary specialty listed for them in the athenaOne System’s global clinical provider database.
-
The search will default to receivers within 30 miles of the patient’s zip code that accept the selected order type.
-
The default sort order is Relevance.
If your practice:
-
Has local networks enabled, sorting by relevance lists receivers by network tier and then distance.
-
Does not have local networks enabled, sorting by relevance is the same as sorting by distance to zip code.
When you’re displaying the Add a receiver page, the Filters bar appears above the results section. In the Filters bar you can:
- See how many filter options are applied to the results.
- Click Clear to remove the filters that are applied to the results.
-
Select filter options from the following headings:
| Option | Description |
|---|---|
| Within any distance of |
This heading displays the amount of miles from the patient's zip code. You can update your default preference to be distance from the practice's zip code.
Quickly switch between the patient's and the practice's zip code or manually enter a valid US zip code.
You can also set a more applicable search radius. Available options include: 10 miles, 30 miles, 50 miles, 100 miles, or any distance. Any changes to the distance filter persist. If you use a different computer, you need to reset your distance filter preference. |
| Local Networks |
If your practice has local networks configured, you can select specific network tiers and view the results. The values for this filter display the names of your practice’s self-defined network tiers.
This filter only appears if your practice has the Local Networks service turned on. |
| Sort by |
Select either:
|
You can better search for a receiver by:
- Display Name
- Address
- Phone number
- Fax number
If you don’t find who you are looking for, edit your search term.
Frequently Used — If you’d like to easily and quickly select a receiver that the ordering provider usually refers to for the order type, you can view the top four results appear at the top of the table of receivers.
The frequently used receivers are sorted by local network participation (employed network, affiliate network, and then out of network), and then by distance from the zip code.
Important: The list of frequently used receivers is unique to the ordering provider and the selected order type. If the ordering provider does not have any frequently used receivers for the selected order type, a list of frequently used receivers for the ordering provider's practice displays. If the practice does not have any frequently used receivers, then the table of receivers does not display the label "frequently used".
From here you can:
- Click into empty space of the receiver's row to select the receiver and close the clinical provider selection widget.
The row turns blue when you hover your cursor over it. - If applicable, click [Number] more locations to reveal the Receiver Details page.
The Receiver Details page appears.
Note: You can also set the sort order of the clinical provider selection widget to Frequently Used.
When filtering by distance, you can:
-
See a message when the practice and patient ZIP codes are invalid or when a manually entered ZIP code is invalid.
-
Select a preference for the type of ZIP code. You can select Patient ZIP code or Practice ZIP code. The athenaOne System remembers your preferred ZIP code type.
Hover over the info icon to reveal a message about the Default preference field, "By default, results will be displayed based on your preferred selection." -
Switch between patient and practice ZIP code by clicking Switch to [Type of] ZIP code. Switching between ZIP code types via this link does not affect your preferred ZIP code type when the Add receiver window opens.
When the clinical provider selection widget first appears, you can:
-
Browse the pre-filtered results: you can apply your own filters, or search receivers.
-
Click anywhere on the row to select a receiver and add them to the order.
The row turns blue when you hover your cursor over it.
Tip: In the receiver row:
-
A green outline indicates that this receiver is in the ordering providers' local network. The name of the local network appears below the receiver's name.
-
The initials in the icon indicate the receiver is a person.
-
An image of multiple people (avatars) in the icon indicates the receiver is a non-person, group, or practice.
-
A leaf icon next to the provider's circle icon indicates a coordinator core partner.
-
An image of a stethoscope (avatar) in the icon indicates the receiver does not have a display name.
The Receiver Details page provides a consolidated view for all clinical provider records related to a specific receiver's NPI number.
Click the more options icon or the [Number] more locations link in the Location column (if it appears) to display the Receiver Details page.
The [Number] more locations link only appears for receivers with more than one location.
The receiver’s main details are sourced from the existing clinical provider record and you're instructed to complete the remaining fields. Main details include:
- Provider name
- NPI number
The Receiver Details page provides a consolidated view for all clinical provider records related to a specific receiver's NPI number. The [Number] more locations link (if it appears) in the receiver row. This link only appears for receivers with more than one location.
You can access the Add New Location option from the Receiver Details page to add a new location for an existing receiver.
You can search and view a National Provider Identifier (NPI) for person providers in the browse and search results of the CPSW.
When you search a full ten digit NPI, and there is a match, the clinical provider selection widget displays it in bold.
If your organization uses local networks you can use the NPI to confirm the right clinical provider is selected.
You can filter the list of receivers by NPI number so that more receivers appear without duplication. For example, with the box unchecked you may see the receiver appear twice because there are two locations for that receiver.
Check the Group by NPI box to group results by NPI number.
Hover over the text "Group by NPI" to read a message about the check box. One of two messages appear, dependent on if you check or uncheck the box.
When you hover over the:
-
CheckedGroup by NPI box, a message about what happens when you uncheck the box appears: "Uncheck to view all results by distance."
-
UncheckedGroup by NPI box, a message about what happens when you check the box appears: "Check to group results by NPI."
If you could not find the receiver you are looking for, you can create a new receiver and add it to your order.
- When you’re displaying the Add a receiver page, click Add New Receiver to add a new receiver.
The Add New Receiver page appears. - Add New Group — Enter information in the required fields:
- Display Name — Required.
- NPI — Optional.
- Specialty — Optional. The list of options displays the specialty that accepts the selected order type. Not all specialty options are available for selection.
- Location — Enter the required location information.
- Click Add.
The Add button is inaccessible until you fill all required fields. After you click Add, the group is added to our clinical provider records.
Best practice: Enrolling in the interface is the best way to transmit orders to Labcorp. If you are not enrolled, reach out to your CSM.
.
Important: Labcorp no longer accepts faxes for orders.
The Coordinator partner, Labcorp, is partnering with athenahealth to manage Labcorp clinical providers. Labcorp is now responsible for the creation of new clinical providers and updating of existing clinical providers as needed.
This helps to ensure that the orders you send to Labcorp go to the Labcorp's centralized order system when sending orders from athenaOne.
-
Patients can visit the Labcorp testing facility locations of their choosing.
-
Practice users are prevented from creating or editing new Labcorp clinical providers from the:
-
Clinical Provider Selection Widget (CPSW)
-
Suggest a Clinical Provider
-
Labcorp now owns the creation process and any updates to Labcorp clinical providers in athenaOne. This means you can no longer create or edit a Labcorp clinical provider using the Clinical Provider Selection Widget (CPSW) or the Suggest a Clinical Provider admin page.
The image below is an example of the CPSW preventing the a practice user from creating a new provider.
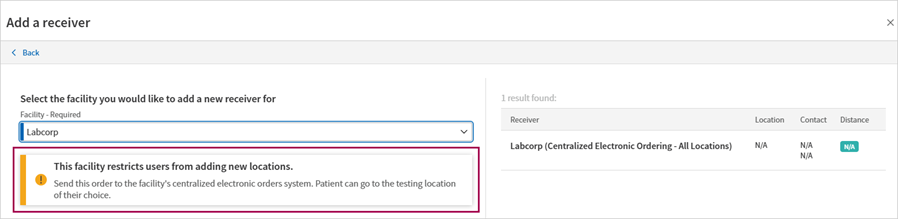
Previously, it was possible to have a Labcorp clinical provider with a fax number and not an interface. However, because Labcorp does not accept faxes, orders sent via fax were not received by Labcorp, which had the potential to delay patient care.
Now, all Labcorp clinical providers are linked and share an interface. athenaOne routes all orders to this interface. All Labcorp facilities will have access to these orders, so the patient can go to any Labcorp facility they choose.
If you can't find a Labcorp facility or are not sure which to select, you can select the "parent" Labcorp clinical provider or any other Labcorp entry.
Note: The "parent" Labcorp clinical provider = "Labcorp (Centralized Electronic Ordering - All Locations)"
Important:
-
This single and designated clinical provider record will be treated as the "parent" Labcorp clinical provider.
-
All other labcorp clinical provider records will be "child" clinical providers and be linked to the "parent" clinical provider record. Either the parent or the child Labcorp clinical provider can be selected for the order.
-
The patient can go to any Labcorp facility and their order will be available.
This feature helps:
-
Ensure Labcorp orders are available at any Labcorp facility, allowing for patient flexibility, and limiting delays in patient care due to unreceived orders.
-
Save time by eliminating the need for practice users to suggest updates to new or existing Labcorp clinical providers.
To add or suggest edits to a clinical provider other than Labcorp via add new receivers in the CPSW or Suggest a Clinical Provider, you must have one of the following roles:
-
Clinicals Admin
-
Practice Set-Up: Referring Providers/Numbers
We're making this change to limit delays in patient care when sending orders to Labcorp.
To properly display nearby results in the CPSW, and to inform the ordering provider of nearby options to consider, athenaOne requires all facility-locations to be their own unique clinical provider.
However, Labcorp needs all orders to go to a single interface regardless of the physical location of the facility that the patient goes to.
When you attempt to add or update a Labcorp clinical provider in Suggest a Clinical Provider a message informing you that you cannot complete this action appears and you're prevented from submitting the change.
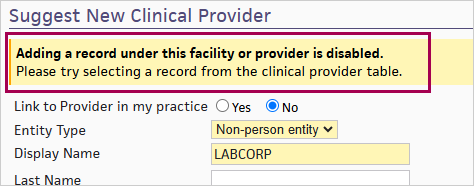
Now when you attempt to add a new facility in the CPSW, you'll see Labcorp in the list of options.

After you click Labcorp, a message appears to inform you that creating new Labcorp clinical providers is now restricted.
Once you complete order entry and are back on the Assessment & Plan (A/P) section of the Exam stage, a message appears in the Send to field. Under the Labcorp clinical provider, the message informs you that a "patient can go the location of their choice".
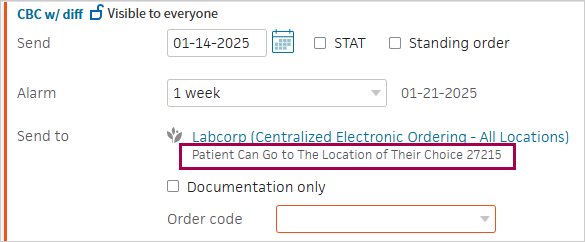
No, contact information does not appear in the Location, Phone, Fax, or Distance fields. These fields now show as N/A.
Select the parent Labcorp facility displayed in the Add new facility workflow. On the order any Labcorp facility can be selected because the order will route via the Labcorp interface and be available at all locations.
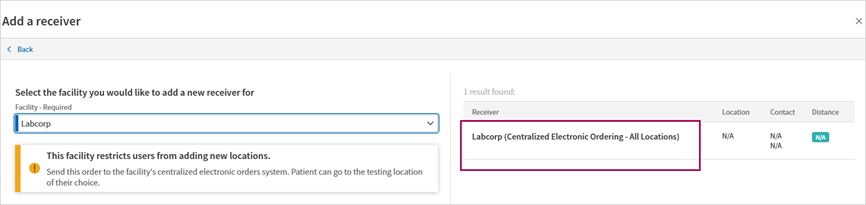
The Patient can then choose to visit the Labcorp facility that is most convenient for them.
No, you can send orders to your usual Labcorp facilities. This change only impacts the ability to create new Labcorp clinical provider or edit existing ones.
No, you must select the parent Labcorp facility.
Yes, you can use your usual workflow to create or edit other (meaning non-Labcorp) clinical providers as needed.
When you create a non-Labcorp clinical provider, click the Other option while completing your usual Add New Facility or Suggest a Clinical Provider workflow.
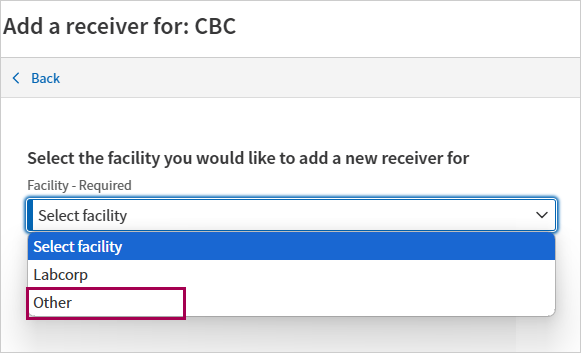
For more information see:
-
Suggest a Clinical Provider — See the To Suggest a Clinical Provider sub-section
-
User Guide — Clinical Provider Selector — See the Improved clinical provider selector for imaging and lab orders, then see Add New Receiver sub-section
This feature applies to:
-
Practices with Local Networks enabled
-
The CPSW
You can choose to have the clinical provider selector default to displaying receivers within your local network.
-
You can choose to filter provider results in the clinical provider selector to only show providers in your local network(s) by default.
-
With this setting enabled, when selecting a receiver for an imaging or lab order, your practice users are presented with a list of nearby providers in your local network that accept the selected order.
-
If no providers are available in your local network for the selected order, your practice users must clear the local network filter to view non-local network providers.
-
The local network filter is automatically set any time you open clinical provider selector when the setting is enabled.
Before you can use this feature, you must set clinical provider selector to have the Local Networks filter on by default on the Local Networks page.
To access Local Networks, your practice must have the local networks service turned on. To enable it for your organization, contact your CSM or your onboarding project team. On the Main Menu, click Support > Success Community > Contact Client Support Center.
You must be logged in to a department that uses athenaClinicals, and you must have permission to access and update the patient chart to access this functionality.
To access Local Networks, your practice must have the local networks service turned on, and you must have the Coordinator Admin: Local Networks role to manage local network configurations.
For more information on Local Networks, see the following O-help topics:
You must have the one of the following roles to add new receivers in the Improved CPSW:
-
Clinicals Admin
-
Practice Set-Up: Referring Providers/ Numbers
Your practice can manage this setting on the Local Networks page:
-
On the Main Menu, click the Settings icon
 .
. -
Under ADMIN, click Coordinator.
-
In the Task Bar, under PRACTICE LINKS — Relationships, click Local Networks.
To set the default experience, in the Manage CPSW Settings section, set the Filter by Local Network option to On and click Save.
With the setting on, when you open the CPSW, all the Local Networks under the Local Networks filter will be checked by default. You’ll only see providers that are part of a local network and accept the order type. Filters can be adjusted to expand or reduce the results.
There are two ways that you can find providers outside of a local network even if your default experience shows local networks upon opening the clinical provider selector:
-
Uncheck the local networks under the Local Networks filter.
-
Type in the search bar ( the Search receivers field). Regardless of whether Local Networks are selected as a filter, this searches outside the local networks and returns all results. Local network receivers are toward the top of the list with your frequently used refer-to providers.
Regardless of the filters you selected the last time you used the CPSW, the default to limit results to your Local Networks will be reapplied every time you open the selection widget.
If no providers are available in your local network for the selected order, your user must clear the local network filter to view non-local network providers.